Need to add SSL to WordPress so your site shows the secure HTTPS padlock?
Most WordPress hosts now include a free SSL certificate with every plan. All you need to do is activate it in your hosting dashboard and force WordPress to load over HTTPS. In this guide, I’ll walk you through each step, including how to use the free Really Simple SSL plugin and how to fix “Not Secure” warnings in Chrome.
In This Guide:
- What Is an SSL Certificate in WordPress?
- How Do SSL Certificates Work?
- Why Every WordPress Site Needs SSL in 2025
- How to Choose the Right SSL Certificate for WordPress
- How Much Does an SSL Certificate Cost?
- How to Get a Free SSL Certificate
- How to Add SSL to WordPress Automatically (Plugin Method)
- How to Add SSL to WordPress Manually (Advanced)
- Fixing Common SSL Issues (Mixed Content Errors)
- FAQs About Adding SSL to WordPress
What Is an SSL Certificate in WordPress?
SSL is short for Secure Sockets Layer. It’s a website security protocol that keeps information transferred between your browser and the website you’re visiting.
We all transfer information when we browse websites, and more often than not, when using eCommerce websites, it’s sensitive information like credit card details or login credentials that we share.
Using the normal HTTP protocol makes this information vulnerable to potential hackers because it isn’t a secure connection. This is where an SSL, otherwise known as HTTPS, steps in.
Your website needs an SSL certificate issued by a recognized certificate issuing authority.
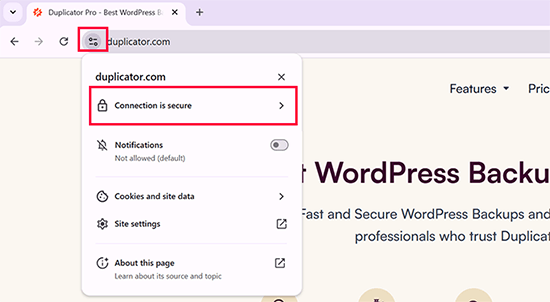
Then your certificate is verified and displayed in your browser’s site address bar with a padlock icon. You’ll notice the URL changes from HTTP to the HTTPS version, which we’ll explain more about later.
If you’re wondering exactly how an SSL works, we’ll cover that next.
How Do SSL Certificates Work?
SSL certificates protect your information by encrypting it when it’s transferred between your browser and the website you’re visiting.
When you visit an SSL-certified website, your browser first confirms if the website’s SSL certificate is valid. Then, if it all checks out, it uses that website’s public key to encrypt your information.
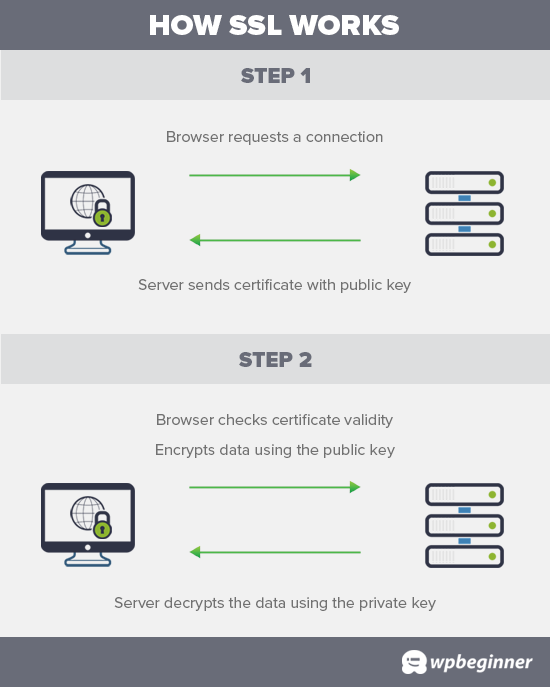
Encryption is the process of turning the information into code so it’s scrambled and anyone without authorized access can’t read it.
The information is then sent to the website you’re visiting, where it’s decrypted, or unscrambled, using the public key and a secret private key.
That said, do you really need an SSL certificate for your WordPress site? Let’s find out.
Why Every WordPress Site Needs SSL in 2025
It’s recommended that all websites use SSL/HTTPS — Google now treats secure connections as a web standard.
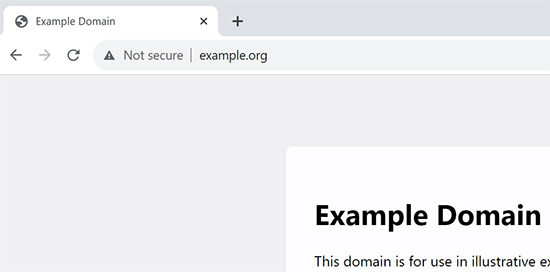
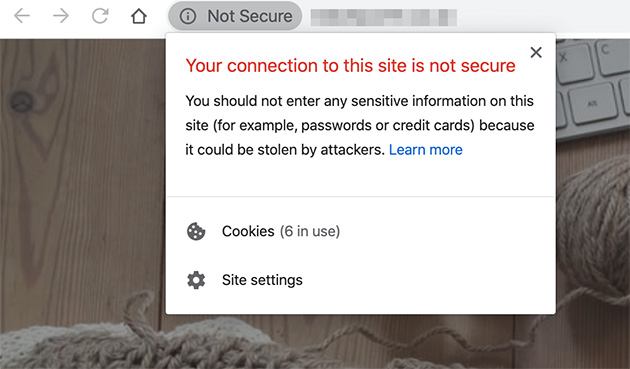
As of 2025, over 95% of all Chrome traffic loads over HTTPS, according to Google’s HTTPS Transparency Report. If your site doesn’t use HTTPS, Chrome may show a “Not Secure” warning to visitors, which can hurt their trust and reduce engagement.
SSL certificates are especially important if you collect the following types of user information:
- Credit card details
- Payment information
- Login credentials
In these cases, a verified SSL certificate helps protect your user’s data. Plus, many payment services require HTTPS before allowing you to accept payments.
Lastly, not using SSL means your site may continue showing “Not Secure” flags in Chrome, which can hurt your brand reputation and deter visitors.
This lack of trust can hurt your brand and discourage potential customers, which indirectly impacts SEO by reducing user engagement and conversions.
How to Choose the Right SSL Certificate for WordPress
After deciding that you need an SSL certificate, you’ll need to decide what type of SSL is best for your WordPress website. Here is an overview of what works for different types of websites:
- Domain Validated SSL – This is best for informational websites like blogs and personal sites.
- Organization Validated (OV) or Extended Validated SSL – This is a good solution for eCommerce sites, paid memberships, subscriptions, and charity, or if your visitors will need to log in with email ids and passwords.
- Multi-domain SSL – Use this type of SSL if your WordPress site has multiple domain names, for example, mysite.com, mysite.net, and mysite.ca.
- Wildcard SSL certificate – This is best for sites with subdomains like “blog.example.com,” or “mail.example.com,” etc.
- Multidomain Wildcard SSL – Use this type of SSL if your website has both subdomains and multi-domains.
So how much will a WordPress SSL certificate cost you? We’ll explore that question next.
How Much Does an SSL Certificate Cost?
How much SSLs cost can vary between certificate authorities. Their pricing could be anywhere from $50 to $200 a year. Some providers go as far as offering add-on services alongside their SSLs which could also affect the final cost.
If you’re looking to pay for an SSL certificate, give Domain.com a try. They’re one of the largest domain name registration services and they offer great deals on SSL certificates.
Their simple SSL certificate plans start at only $35.99 per year. And, to top it off, you’ll get a $10,000 warranty alongside a TrustLogo® Site Seal.
What if you can’t afford to buy a WordPress SSL certificate? No need to worry. Next, we’ll explore how to get one for free.
How to Get a Free SSL Certificate
You might not want to use an SSL for your website because of the cost. But not doing so can leave your website vulnerable to information theft.
Luckily Let’s Encrypt SSL, a non-profit company, decided to fix this problem. They created a free certificate authority to make it easier for small websites to get a free type of SSL certificate.
Let’s face it, the internet would be a much safer place if all websites used an SSL.
Because of the success of the project, major companies like WordPress, Facebook, and Google offered their support.
With the big companies on board, another challenge is making it easy for beginners to install SSL certificates. It’s a pretty complicated process that requires knowledge of coding and how web server systems work.
Thankfully as more and more people used Let’s Encrypt, the best WordPress hosting companies started offering it with their web hosting plans. This saves you the hassle of installing your SSL certificate on your own.
The following WordPress hosting companies all offer a free SSL certificate with their hosting plans:
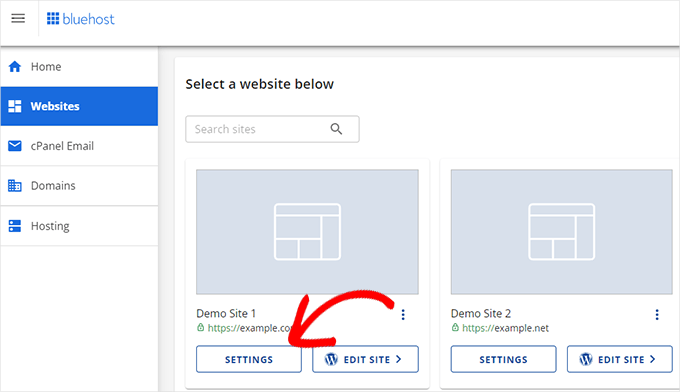
To use BlueHost as an example, you’ll need to visit the Websites section in your Bluehost dashboard and click the Settings button below your site.
From here, switch to the Security tab and turn on the free SSL certificate for your website. In most cases, Bluehost will automatically enable this option for you.
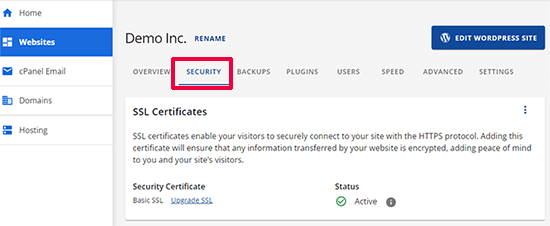
If your hosting company isn’t BlueHost, the process for turning your SSL certificate on may look different. You can ask your hosting provider to turn it on for you if you’re struggling to find it in your hosting admin area or Cpanel.
If your web host doesn’t offer an SSL certificate, you can buy one from SSL authorities like Comodo, GeoTrust, GlobalSign, and RapidSSL or for free from Lets Encrypt.
Now let’s look at getting your WordPress site ready to use HTTPS with your new SSL certificate.
How to Add SSL to WordPress Automatically (Plugin Method)
With your SSL certificate enabled with your hosting provider, you’ll need to set up WordPress so that it uses HTTPS instead of HTTP with all of your URLs.
The easiest way to do this is to add the Really Simple SSL plugin to your WordPress admin. It’s one of the best WordPress plugins for the job, and like the title, it’s super easy to use. For more details on installing WordPress plugins, check out this step-by-step guide.
After activating. the plugin, you can look at the plugin settings from your WordPress dashboard. It will check to see if your SSL certificate is enabled. Then it will turn on the HTTP to HTTPS redirect to force HTTPS across your URLs.
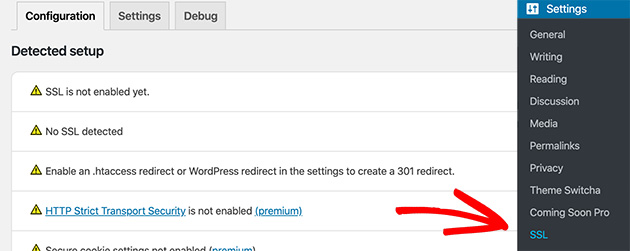
To ensure your site is fully secure, you need to be certain your site URLs are loading using HTTPS. Really Simple SSL does this for you automatically by fixing the URLs when the pages load.
Even if there’s a single HTTP URL, browsers will treat it as insecure. To fix it, you’ll need to use the inspect tool in your browser to find and replace the old URLs with the secure HTTPS protocol.
How to Add SSL to WordPress Manually (Advanced)
The method for adding SSL to your WordPress site above is the easiest solution. However, you may wish to manually move your site from HTTP to HTTPS.
Doing that will involve editing your WordPress files, so only follow this method if you’re confident with copying and pasting code snippets.
First, go to the Settings » General page from your WordPress dashboard. Then update your WordPress and site URL address fields by changing HTTP to HTTPS.
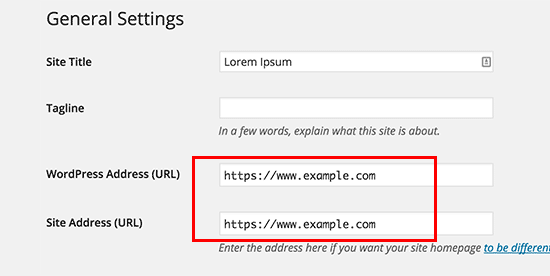
After saving your settings, WordPress will log you out, and you’ll need to log in again.
The next step is to set up redirects from HTTP to HTTPS by adding the following code to your WordPress .htaccess file:
<IfModule mod_rewrite.c>
RewriteEngine On
RewriteCond %{HTTPS} off
RewriteRule ^(.*)$ https://%{HTTP_HOST}%{REQUEST_URI} [L,R=301]
</IfModule>
If your website is on nginx servers, you’ll need to add the following code to redirect from HTTP to HTTPS in your configuration file:
server {
listen 80;
server_name example.com www.example.com;
return 301 https://example.com$request_uri;
}
Ensure you replace “example.com” with your domain.
By following these steps, you will avoid the WordPress HTTPS not working error because WordPress will now load your entire website using HTTPS.
To force SSL and HTTPS on your WordPress admin or login pages, you’ll have to configure SSL in your wp-config.php file. To do that, add the following code above the “That’s all, stop editing!”:
define('FORCE_SSL_ADMIN', true);
This code allows WordPress to force SSL and HTTPS in the WordPress admin area.
Fixing Common SSL Issues (Mixed Content Errors)
After adding the code to your website, it’s ready to use SSL / HTTPS, yet you may still notice some mixed content errors.
Errors like this are from sources like images, scripts, or stylesheets that are still loading using the insecure HTTP protocol in their URLs. As a result, you won’t be able to see a secure padlock icon in your site’s address bar.
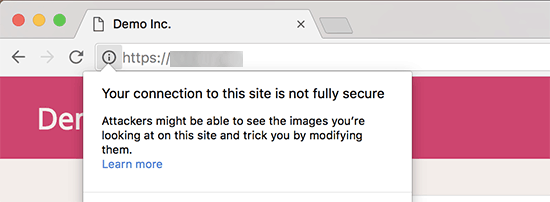
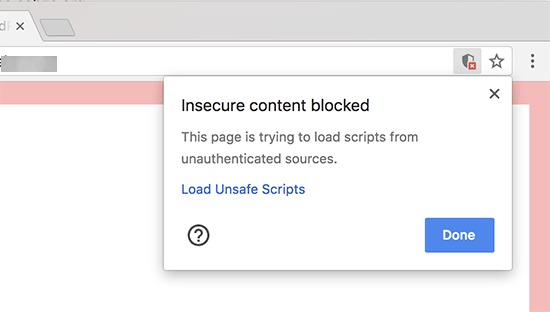
Some modern browsers will block unsafe scripts and resources. You may see a padlock icon, but it will show a notification about it in your address bar.
To learn which content uses the insecure protocol, you can use your browser’s Inspect tool. You should see the mixed content error as a warning in the console with details for each item.
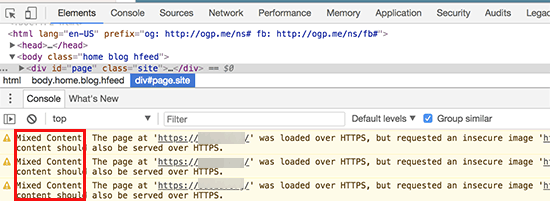
Most of the URLs are likely to be images, iframes, and image galleries. Yet some may be scripts and stylesheets from your WordPress plugins and themes.
You can follow this guide to fix mixed content issues in WordPress.
FAQs About Adding SSL to WordPress
.htaccess or NGINX config file. This method is best if you’re comfortable editing WordPress files.By now, you’ve seen how easy it is to add SSL to WordPress and secure your entire site with HTTPS. Whether you used your host’s free SSL option or installed one manually, your visitors will now see the secure padlock icon and trust your website more.
Don’t forget to check for mixed content warnings and test your site with SSL Labs to make sure everything is working properly. Once your site is fully secure, you’ll enjoy a safer user experience and fewer “Not Secure” warnings in search and browsers.
If you found this guide helpful, you might also like our tutorials on setting up a business email address and building a landing page in WordPress.
Thanks for reading! We’d love to hear your thoughts, so please feel free to join the conversation on YouTube, X and Facebook for more helpful advice and content to grow your business.

