The fastest way to put WordPress in maintenance mode is with SeedProd. In just a few clicks, you can show visitors a professional “we’ll be back soon” page, protect your SEO with the right status code, and even collect leads while you work on your site.
In this guide, I’ll show you how to set up maintenance mode in WordPress step by step. You’ll see the different methods available, when to use them, and why SeedProd is the best option for beginners and small business owners who want a custom, branded page without touching code.
How to Put WordPress Maintenance Mode: The Short Answer
- Install SeedProd: Download and activate the SeedProd plugin.
- Select a Template: Choose a maintenance mode page layout.
- Customize the Page: Add your logo and “coming soon” message.
- Put WordPress in Maintenance Mode: Go to the dashboard and toggle the switch to “Active.”
- What Is WordPress Maintenance Mode?
- When to Use WordPress Maintenance Mode
- Methods for Enabling Maintenance Mode in WordPress
- Why Choose SeedProd for Maintenance Mode?
- How to Put WordPress in Maintenance Mode with SeedProd
- How to Turn Off WordPress Maintenance Mode
- Tips for a Professional Maintenance Page
- Troubleshooting Maintenance Mode
- FAQs About WordPress Maintenance Mode
What Is WordPress Maintenance Mode?
WordPress maintenance mode is a status that shows visitors a temporary page while an administrator works on the site, preventing them from seeing a broken or incomplete version.
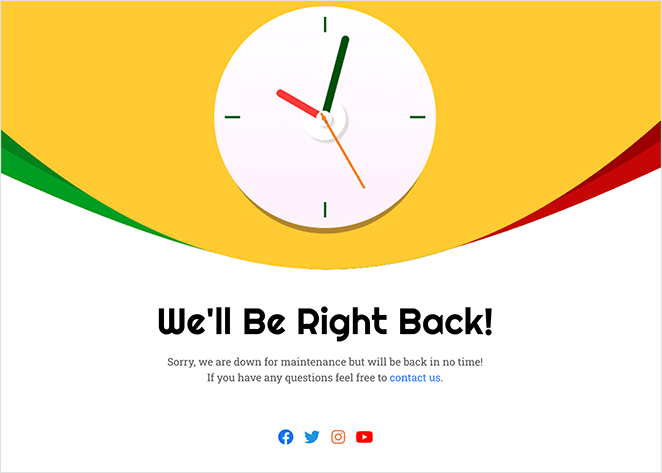
Technically, WordPress creates a temporary .maintenance file and sends a 503 “service unavailable” status code to search engines, which tells them the downtime is planned and won’t hurt your SEO. This is different from a “coming soon” page, which is used for brand new websites that haven’t launched yet.
When to Use WordPress Maintenance Mode
WordPress maintenance mode should be used during significant site updates that could otherwise appear broken or unpredictable to visitors.
Common situations include:
- Testing new features on a live site
- Redesigning or changing your WordPress theme
- Fixing bugs or updating plugins
- Running security patches or performance upgrades
- Migrating your site to a new host
In all of these cases, showing a maintenance page keeps visitors informed and reassured, instead of leaving them confused by errors.
Methods for Enabling Maintenance Mode in WordPress
The easiest way to enable maintenance mode is with a WordPress maintenance mode plugin. If you want more control, you can also turn it on manually with code or server settings. Here are the main methods you can use:
| Method | Best For | Technical Difficulty |
|---|---|---|
| Use a Plugin (Recommended) | Beginners | Low |
| Add a Code Snippet (WPCode) | Developers | Medium |
| Edit the .htaccess File | Advanced Users | High |
| Upload a .maintenance File | Advanced Users | High |
| Use Your Hosting Panel | All Users | Low |
While manual methods exist, I do not recommend them for beginners. Editing the .htaccess file or manually uploading a .maintenance file involves modifying server code. A single syntax error here can cause the ‘White Screen of Death,’ locking you out of your own site.
Why Choose SeedProd for Maintenance Mode?

Based on my experience testing more than a dozen maintenance mode tools, I always recommend SeedProd for its reliability, speed, and ease of use. It’s a full drag-and-drop website builder with one-click maintenance mode and professional templates, so you can publish a branded page in minutes without touching code.
Here’s a quick look at what makes SeedProd stand out:
| Feature | Benefit for Users |
|---|---|
| Custom Templates | Pick from dozens of ready-made designs that look great on any device. |
| Lead Capture Tools | Add email opt-ins, countdowns, and social links to stay connected while your site is offline. |
| Access Controls | Let admins or approved users bypass maintenance mode using a link, role, or IP address. |
| SEO-Friendly Setup | Automatically sends a 503 status code so Google knows your downtime is temporary. |
| Theme Compatibility | Works smoothly with any WordPress theme and plugin, no extra setup needed. |
These features make SeedProd the easiest way to keep your site professional, secure, and SEO-safe while you make updates.
How to Put WordPress in Maintenance Mode with SeedProd
SeedProd is always my first choice for putting WordPress in maintenance mode because it’s fast, easy, and code-free.
Here’s how to do it from start to finish. You can watch the video tutorial below to see how to put WordPress in maintenance mode, or continue reading for the text instructions.
Step 1: Install and Activate SeedProd
First, you’ll need to install and activate SeedProd.
After you buy the plugin and download it, go to your WordPress dashboard, click Plugins » Add New » Upload Plugin and upload the SeedProd Pro zip file.
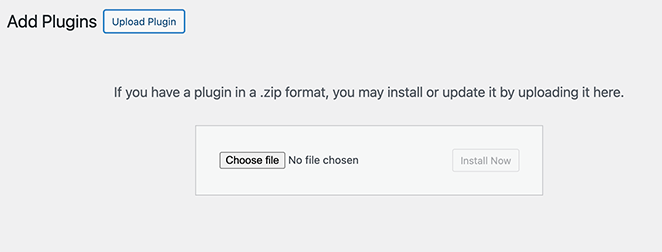
If you’re using the free version, simply head to Plugins » Add New and search for SeedProd.
Click “Install Now” and then “Activate.”
Don’t forget to enter your license key under SeedProd » Settings to get all the pro features and updates.

Step 2: Create Maintenance Mode Page
Next, go to SeedProd » Pages in your WordPress menu and find the Maintenance Mode section. Here, click “Set Up a Maintenance Mode Page.”
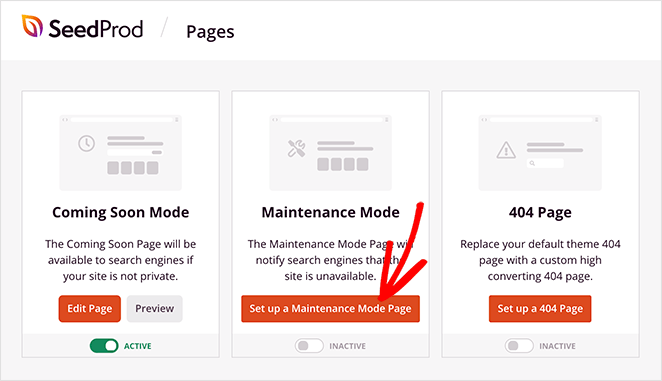
This is where SeedProd Pro really shines. You’ll see dozens of professional templates designed specifically for maintenance pages.
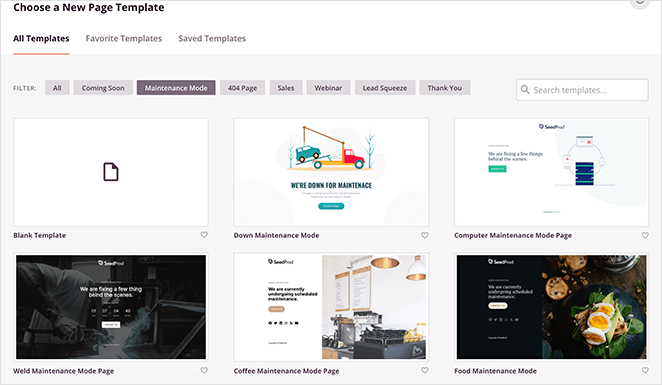
I usually pick one that matches my site’s style, but you can also start with a blank template if you prefer.
Hover your mouse over any maintenance mode page template you prefer and click the checkmark icon to launch it in the drag-and-drop page builder.
Step 3: Customize Your Page Design
This is where I take full advantage of SeedProd Pro’s features to create a WordPress maintenance mode page that actually works for my business. You can customize everything using the drag-and-drop editor.
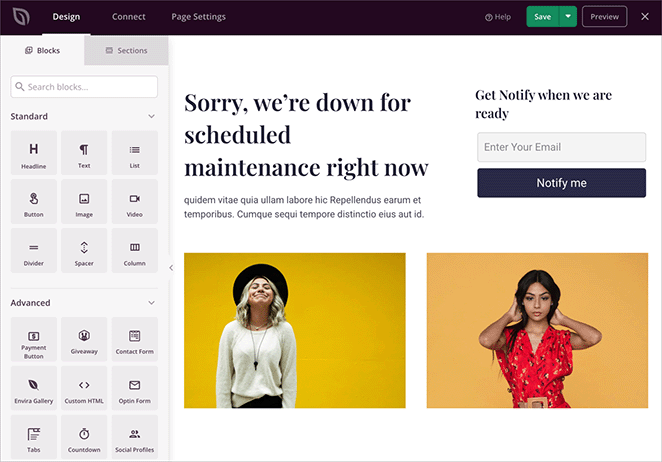
Here’s what I usually include when customizing my WordPress maintenance mode page:
- A countdown timer showing when the site will be back
- An email signup form to capture leads while the site is down
- Social profile buttons to keep visitors connected
- My logo and brand colors using the style settings
- A contact form, so people can still reach me
- Custom images and videos to make the page more engaging
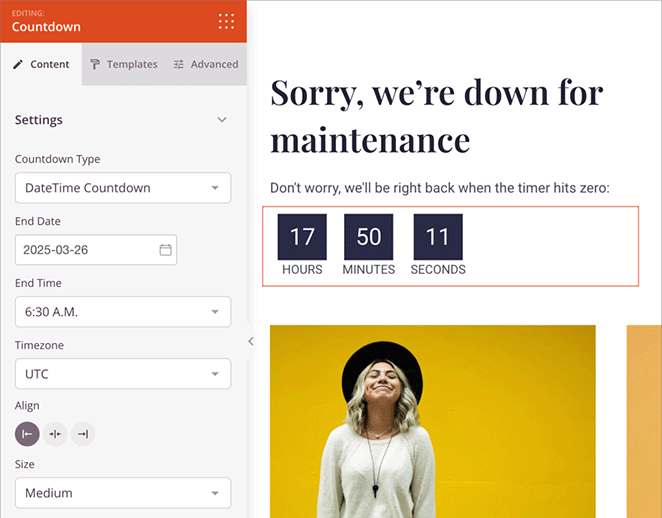
The best part is, you can see how your changes look in real-time. Just click any element to edit it, or drag in new blocks from the left sidebar.
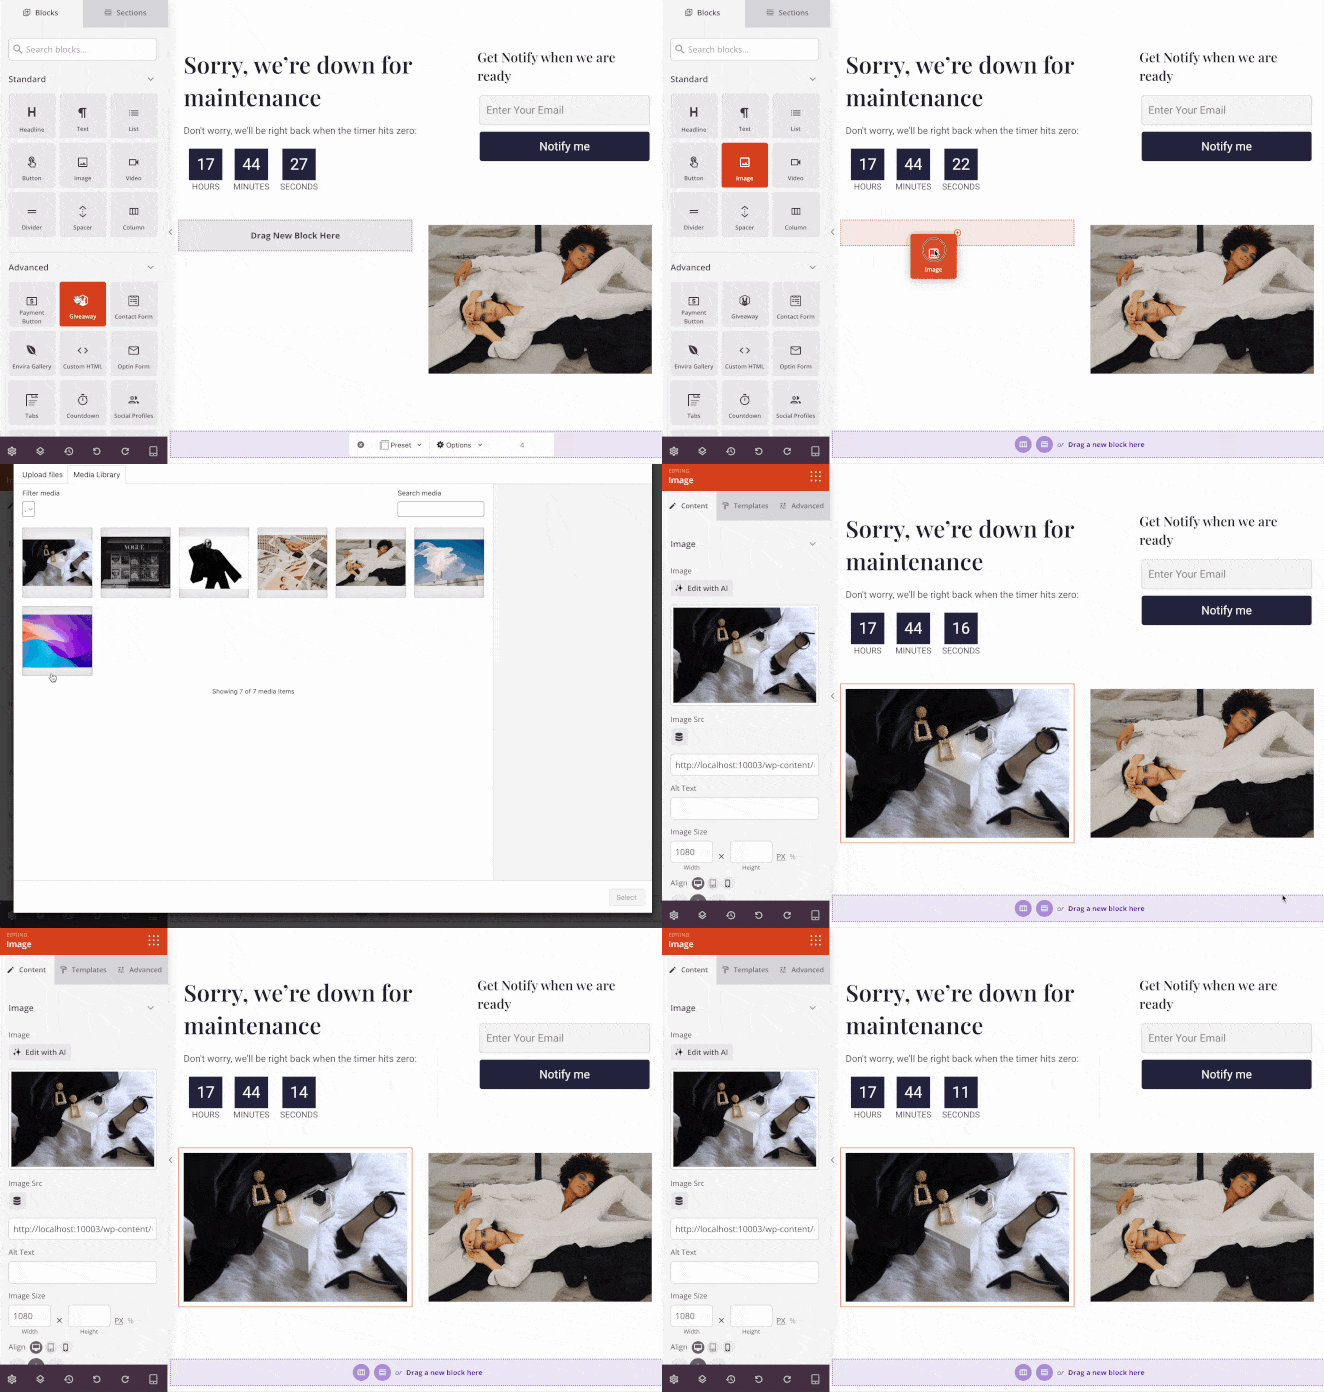
I often use the Advanced blocks like the email opt-in forms, which connect directly to my email marketing service.
Step 4: Configure Page Settings
Before activating maintenance mode, I always check the access settings. Click Page Settings at the top of the editor, then Access Controls.
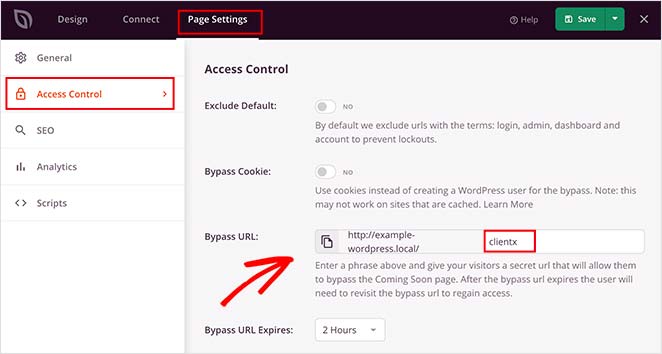
This lets you choose who can still see your regular site while maintenance mode is on. I usually:
- Keep access open for administrators and editors
- Allow specific user roles to bypass maintenance mode
- Exclude important pages like login or contact forms
- Create a special bypass link for team members who need access without logging in
Step 5: Publish and Activate Maintenance Mode
Once everything is set up, click “Save” to store your changes. Then go back to SeedProd » Pages and find the Maintenance Mode section. Here you can toggle the switch to enable maintenance mode. You can always come back and disable it later with one click.
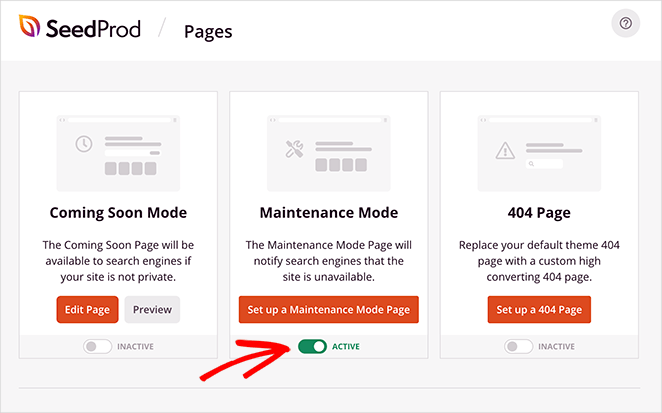
To see how your page looks to visitors, open your site in an incognito browser window or check it on your phone. Since you’re logged in as an admin, you’ll still see your regular site when browsing normally. This lets you keep working while maintenance mode is on.
However, visitors who are not logged in to your website will see your maintenance page. For example, this is what my website visitors see when Maintenance mode is active.

This is how to show a maintenance page in WordPress without touching code. Just drag, drop, and turn it on.
How to Turn Off WordPress Maintenance Mode
Once your updates are finished, turning off maintenance mode in WordPress is simple. Just follow these steps to make your site visible to visitors again:
- Go to SeedProd » Pages in your WordPress dashboard.
- Find the Maintenance Mode section.
- Toggle the switch to Inactive to disable maintenance mode.
- Open your website in a private or incognito browser to confirm it’s live again.
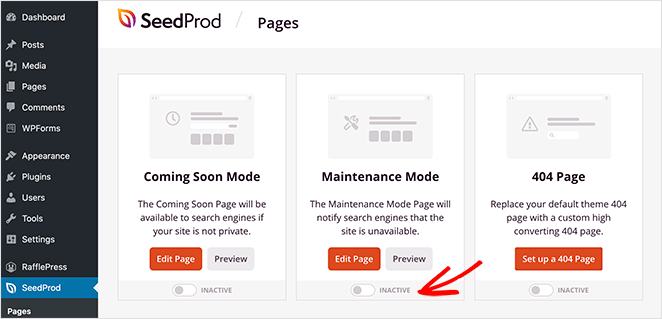
If your site still shows the maintenance page, clear your browser cache, plugin cache, or any CDN cache you’re using. That usually fixes it right away.
Tips for a Professional Maintenance Page
A professional maintenance page does more than just say “we’ll be back soon.” Based on my experience, it should actively keep visitors informed and protect your brand. Here are the direct tips I follow for an effective page.
- Provide a Clear ETA: Inform visitors when your site will be back to manage expectations. I find that a specific timeframe or a countdown timer builds the most trust.
- Maintain Your Branding: Use your logo, brand colors, and fonts. This reassures visitors they are in the right place and that the downtime is a professional, planned event.
- Capture Leads: Add an email signup form to your page. This turns downtime into a valuable opportunity to grow your newsletter by letting visitors subscribe for updates.
- Link to Active Channels: Direct visitors to your social media profiles. This gives them a way to get real-time updates and stay connected with your brand while the site is down.
- Ensure SEO Safety: Confirm your page sends a 503 “service unavailable” status code. This is a critical step that tells search engines the downtime is temporary, which protects your rankings.
These elements transform a simple maintenance notice into a professional tool for communication, lead generation, and brand trust.
Troubleshooting Maintenance Mode
Over the years, I’ve run into a few common issues with WordPress maintenance mode. Here’s how I usually troubleshoot them quickly and safely:
- If your site is stuck in maintenance mode: This usually happens when an update is interrupted. To fix it, you need to delete the
.maintenancefile from your site’s root directory. You can do this using an FTP client or the File Manager in your hosting control panel. Once the file is gone, clear your browser and plugin caches. - To avoid failed updates: Never refresh or close your browser while WordPress is updating plugins, themes, or core files.
- When updating multiple plugins: Run them one at a time to prevent version conflicts or timeouts.
- Before making edits: Always back up your site before touching functions.php or .htaccess files.
- To minimize downtime: Schedule maintenance during low-traffic hours and check your analytics afterward to ensure everything runs smoothly.
These quick fixes have saved me countless hours of troubleshooting. If you’re still stuck, check out my detailed guide on how to fix WordPress stuck in maintenance mode.
With a little preparation, you can keep maintenance downtime short, prevent errors, and make sure your visitors return when your site’s ready.
FAQs About WordPress Maintenance Mode
.maintenance file.Putting WordPress in maintenance mode is the best way to protect your visitors and your SEO while you update your site. You can do it manually with code or files, but the fastest and safest method is using a plugin.
If you want a professional page with zero hassle, SeedProd is the top choice. In minutes, you can launch a branded maintenance page. Now you know exactly how to put WordPress in maintenance mode quickly and safely.
Related Articles:
- Coming Soon vs Maintenance Mode: Learn The Difference
- How to Create a Modern WordPress Under Construction Page
- How to Put WooCommerce in Maintenance Mode
- Best Coming Soon Page Examples
Thanks for reading! We’d love to hear your thoughts, so please feel free to join the conversation on YouTube, X and Facebook for more helpful advice and content to grow your business.





the most importen thing is: it must simply work! and dont waste time of users which such a simply thing like a maintenance site. Its not possible to change the big background picture. the preview links doesn`t work. very very sad. bon voyage :)
Hi Marcel, we’re sorry to hear that you’re having trouble with your maintenance page. We can assure you that changing your background image and previewing your design is possible with SeedProd. However, with the manual code method, that won’t be possible. Please check out our maintenance mode documentation, or if you need more help, do feel free to submit a support ticket.
Hello! I have followed the instructions (I think! LOL) and my wordpress dashboard has the orange “maintenance mode active” info at the top, BUT anyone who checks my website, says they don’t see the nice Maint Mode page…. they only see the construction debris on my website ;) Not sure what to check next? Thank you!
Hi Debbie, when I clicked on the link you shared, I could see your coming soon page, which indicates that it’s working. If you need any more help, please contact our support team here https://www.seedprod.com/contact/
Hi there, Loving your product, however I’m on the free version, and can only see the maintenance page on mobile view… I do not wish for others to view the website in desktop as I haven’t even launched it yet! Anyway this can be taken down and/or also replaced with a maintenance page? Thanks!
Hi Truly Camies, thank you for your question. If you reach out to our support team here we can answer this for you in more detail.