I’ve tried just about every way to put a WordPress site in maintenance mode. That includes free plugins, drag-and-drop builders, and even adding code by hand. Whether I’m working on a full redesign or fixing a plugin issue, I always want the site to look professional while it’s offline.
If you need to hide your site while you make updates, this guide will help. I’ll explain what maintenance mode is, why it matters for visitors and SEO, and how to choose the right method for your site.
You’ll see how I use SeedProd for quick, no-code setup. I’ll also compare other free plugin options and show you how to enable maintenance mode using WPCode. Plus, I’ve included tips for what to put on your maintenance page, how to control who sees it, and how to fix common issues if something goes wrong.
This works whether you’re running a personal blog or a busy business site. It’s the easiest way to keep things looking good while you make changes behind the scenes.
Quick Summary: Here’s what you’ll learn in this guide:
- What Does Maintenance Mode Do in WordPress?
- What Are the Best WordPress Maintenance Mode Plugins?
- How to Put WordPress in Maintenance Mode Using SeedProd (No Code)
- Instalar el plugin SeedProd
- Create a Custom Maintenance Page
- What Should You Include on a WordPress Maintenance Page?
- Customize the Design
- Control Who Sees the Page
- Activate Maintenance Mode
- Enable Maintenance Mode Without a Plugin (WPCode)
- Common WordPress Maintenance Mode Problems (And How to Fix Them)
- Protect Your Site with Maintenance Mode
What Does Maintenance Mode Do in WordPress?
Maintenance mode lets you hide your site from visitors while you work on it. It shows a message instead of a broken page, which helps protect your brand and SEO while you make updates.
When Should You Put WordPress in Maintenance Mode?
Most WordPress updates are pretty quick. You can add new posts, update plugins, or even change your theme without showing visitors a maintenance page. I do these kinds of updates all the time without putting my sites in maintenance mode.
But sometimes, you need to work on bigger changes that take more time. Here’s when I always use maintenance mode:
- When doing a full site redesign
- Making major changes to my online store
- Testing new WordPress plugins that affect how my site works
- Moving to a new WordPress hosting provider
- Setting up complex features like membership systems
- Making changes to important forms or checkout pages
He aquí por qué:
If visitors try to use your site while you’re making these changes, they might see broken pages or get error messages. Even worse, you could lose important data like new orders or form submissions during the update.
The best way to handle big changes is to use a staging site. It’s like a private copy of your website where you can test changes safely.
I use staging sites on all my important projects. Good hosting companies like Bluehost and SiteGround include staging features with their plans.
But if you don’t have a staging site, maintenance mode is your next best option. Instead of showing broken pages or error messages, visitors will see a clean, professional message explaining your website is under maintenance.
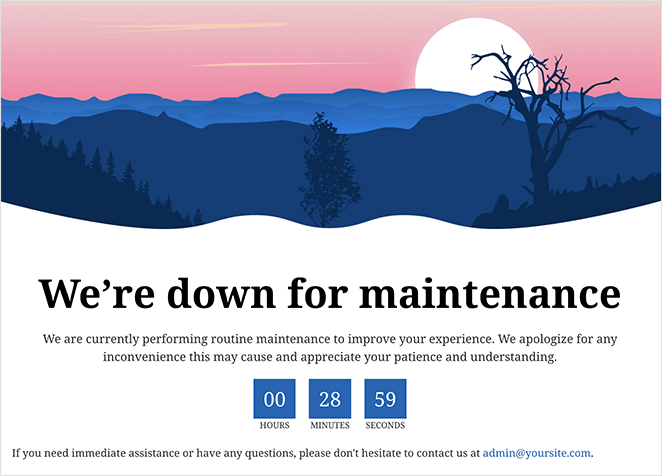
You can even use this chance to point them to your social media profiles or get them to join your email list while they wait.
What Are the Best WordPress Maintenance Mode Plugins?
I’ve tested a lot of maintenance mode plugins over the years. Some are simple and free, while others offer more control over design and visitor access. Here’s a quick comparison of the most popular options:
| Plugin | Lo mejor para | Free? | Características principales |
|---|---|---|---|
| SeedProd | Full design control | ✅ | Drag-and-drop builder, email opt-in, countdown, access control |
| Modo de mantenimiento WP | Simple sites | ✅ | Basic templates, GDPR options, contact forms |
| CMP by WP Maintenance | Custom design fans | ✅ | More templates, video backgrounds, SEO settings |
If you just need something quick and free, WP Maintenance Mode and CMP both get the job done. But I always go with SeedProd because it gives me full control over how my maintenance page looks and works. I can match my branding, grow my email list, and even let certain users bypass the maintenance screen, all without touching a line of code.
How to Put WordPress in Maintenance Mode Using SeedProd (No Code)
After trying many plugins over the years, I always come back to SeedProd. It’s actually a complete WordPress website builder that lets you design any type of page with drag-and-drop.

After trying many plugins over the years, I always come back to SeedProd. It’s actually a complete WordPress website builder that lets you design any type of page with drag-and-drop.
SeedProd is more than just a page builder — it’s a powerful maintenance mode plugin for WordPress that makes it easy to show a custom message while your site is down.
But what I really love is how easy it makes setting up maintenance mode. You can create and customize a professional maintenance page in just a few clicks, no coding needed.
I use SeedProd Pro on all my sites and recommend it to my clients because it gives you everything you need: pre-made templates, email capture forms, countdown timers, and complete control over how your maintenance page looks.
That said, you can use the free version of SeedProd to build a complete maintenance page quickly and easily.
Here’s my step-by-step process for setting up maintenance mode with SeedProd:
Step 1: Install SeedProd to Enable Maintenance Mode in WordPress
First, you’ll need to install and activate SeedProd.
After you buy the plugin and download it, go to your WordPress dashboard, click Plugins » Add New » Upload Plugin and upload the SeedProd Pro zip file.
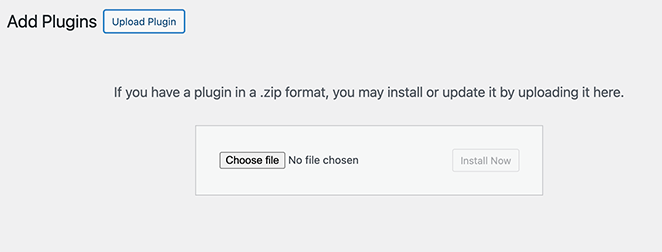
Click “Install Now” and then “Activate.” Don’t forget to enter your license key under SeedProd » Settings to get all the pro features and updates.

Step 2: Create a Custom Maintenance Page in WordPress
Next, go to SeedProd » Pages in your WordPress menu and find the Maintenance Mode section. Here, click “Set Up a Maintenance Mode Page.”
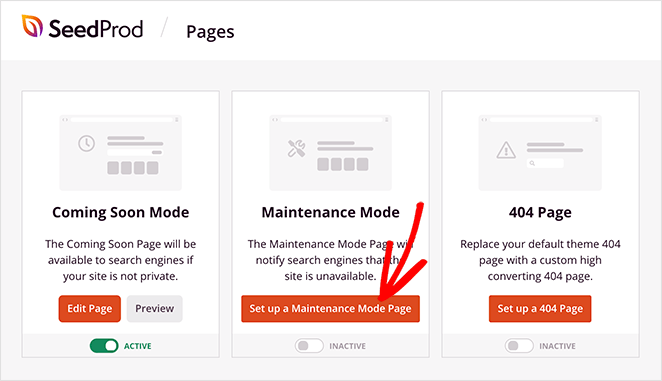
This is where SeedProd Pro really shines. You’ll see dozens of professional templates designed specifically for maintenance pages.
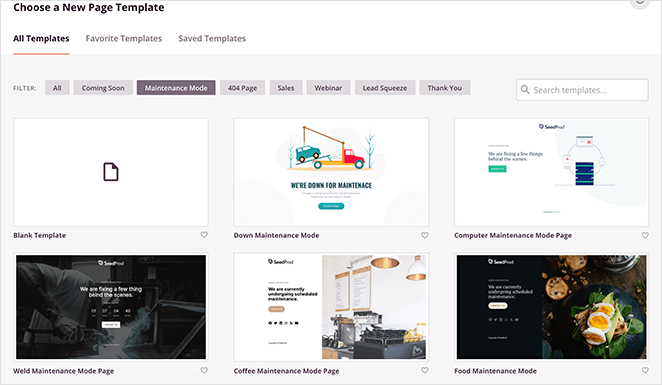
I usually pick one that matches my site’s style, but you can also start with a blank template if you prefer.
Hover your mouse over any maintenance mode page template you prefer and click the checkmark icon to launch it in the drag-and-drop page builder.
What Should You Include on a WordPress Maintenance Page?
Your maintenance page doesn’t have to be fancy, but it should still give visitors a clear and helpful experience. Here’s what I usually include when setting one up:
- A short message letting people know you’re working on updates
- An email signup form so visitors can join your newsletter or get notified when you’re back
- A countdown timer if you know when the site will be live again
- Social media links so people can stay in touch
- Basic contact info or even a quick FAQ if needed
These small details go a long way in keeping your visitors informed, connected, and even excited about what’s coming next.
Step 3: Customize Your WordPress Maintenance Page Design
This is where I take full advantage of SeedProd Pro’s features to create a WordPress maintenance mode page that actually works for my business. You can customize everything using the drag-and-drop editor.
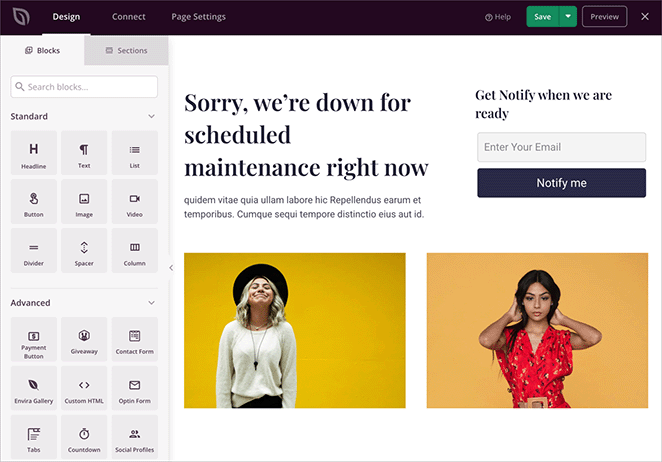
Here’s what I typically add:
- A countdown timer showing when the site will be back
- An email signup form to capture leads while the site is down
- Social profile buttons to keep visitors connected
- My logo and brand colors using the style settings
- A contact form, so people can still reach me
- Custom images and videos to make the page more engaging
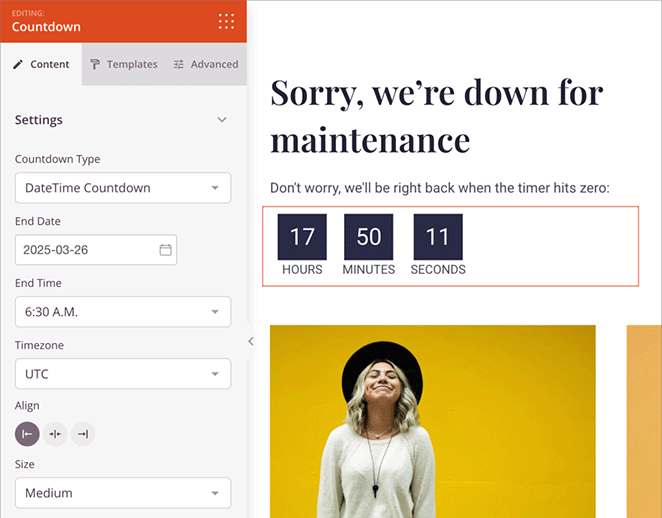
The best part is, you can see how your changes look in real-time. Just click any element to edit it, or drag in new blocks from the left sidebar.
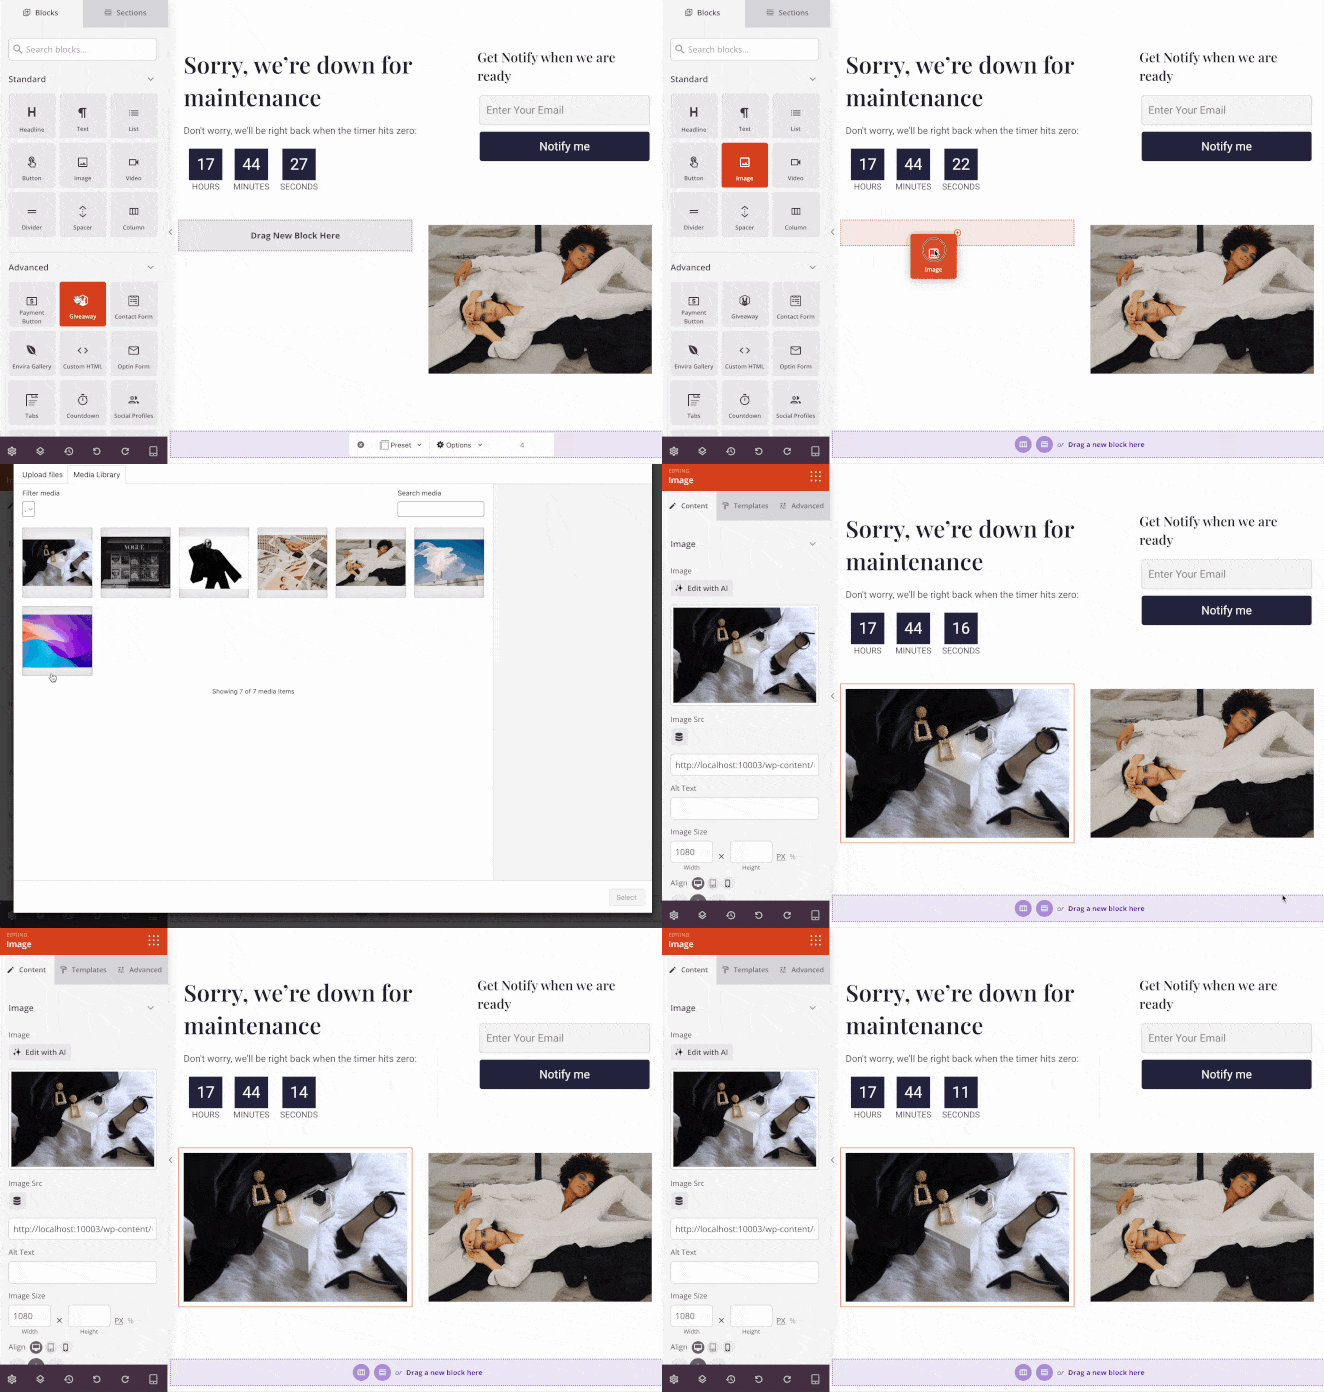
I often use the Advanced blocks like the email opt-in forms, which connect directly to my email marketing service.
Step 4: Control Who Sees the Maintenance Page
Before activating maintenance mode, I always check the access settings. Click Page Settings at the top of the editor, then Access Controls.
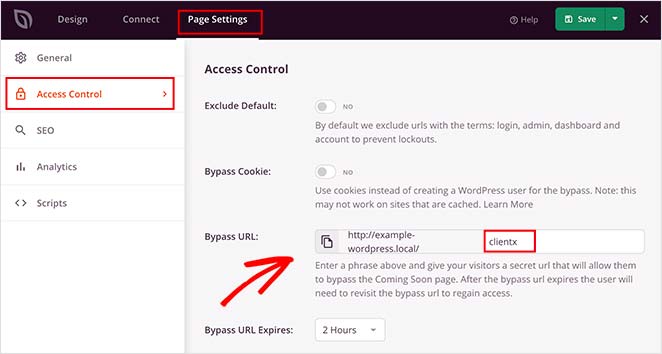
This lets you choose who can still see your regular site while maintenance mode is on. I usually:
- Keep access open for administrators and editors
- Allow specific user roles to bypass maintenance mode
- Exclude important pages like login or contact forms
- Set up bypass cookies for team members who need access
Step 5: Activate Maintenance Mode in WordPress
Once everything is set up, click “Save” to store your changes. Then go back to SeedProd » Pages and find the Maintenance Mode section. Here you can toggle the switch to enable maintenance mode. You can always come back and disable it later with one click.
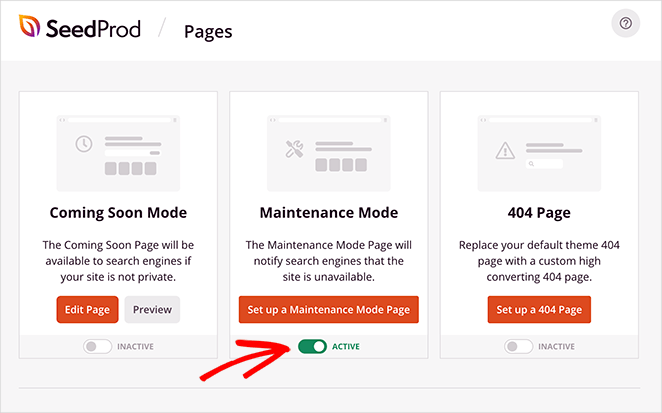
To see how your page looks to visitors, open your site in an incognito browser window or check it on your phone. Since you’re logged in as an admin, you’ll still see your regular site when browsing normally. This lets you keep working while maintenance mode is on.
However, visitors who are not logged in to your website will see your maintenance page. For example, this is what my website visitors see when Maintenance mode is active.

This is how to show a maintenance page in WordPress without touching code. Just drag, drop, and turn it on.
💡 Quick Comparison: WordPress Maintenance Mode Options
Not sure which method is right for you? Here’s how they compare:
| Método | Lo mejor para | Pros | Contras |
|---|---|---|---|
| SeedProd | Beginners who want full control | Drag-and-drop builder, templates, email forms, access controls | Requires plugin |
| WPCode | Users who want simple code control | Lightweight, works with any theme | No visual editing |
| Customizer / Site Editor | Small CSS changes or classic themes | Built-in, no extra plugin needed | Not supported by all themes |
| functions.php | Developers or advanced users | Total control | Risky, no live preview, lost on theme update |
How to Enable Maintenance Mode Without a Plugin (WPCode Method)
If you don’t want to use a page builder, WPCode is a great way to temporarily disable your WordPress site with a simple snippet. It’s a beginner-friendly way to enable maintenance mode in WordPress without writing or editing any code manually.
Here’s how to set it up:
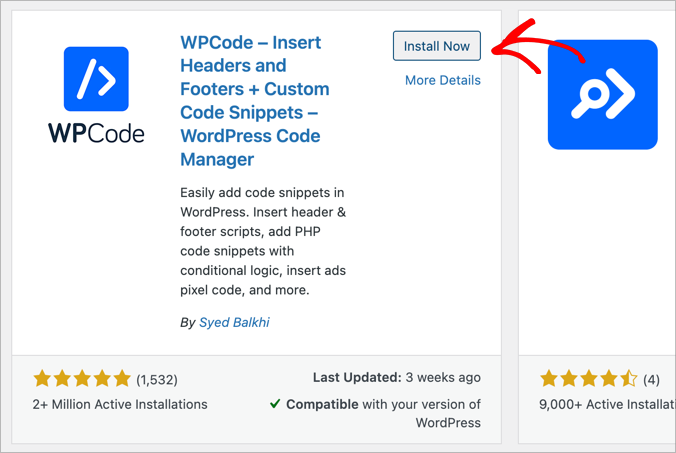
First, install and activate the free WPCode plugin. Go to Plugins » Add New, search for “WPCode”, and click “Install Now” followed by “Activate”.
After activation, go to Code Snippets » Library in your WordPress dashboard. Then, search for “Maintenance Mode” in the snippets library.
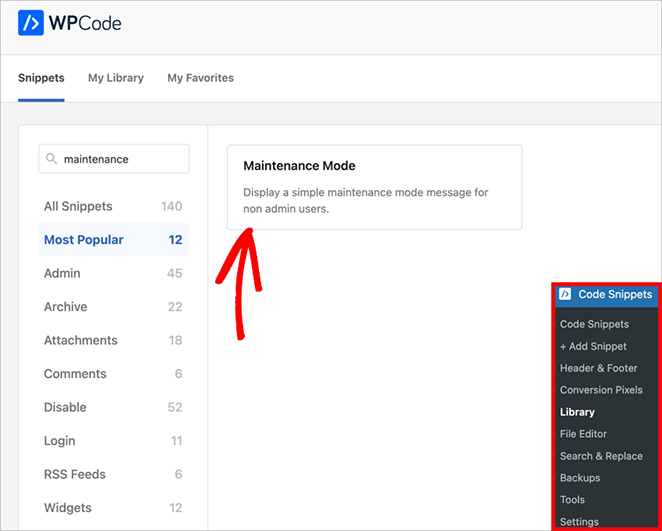
When you find the maintenance mode snippet, hover your mouse over it and click the “Use snippet” button. WPCode will automatically add the code for you.
You can customize the maintenance message to make it more personal. Once you’re happy with the message, toggle the switch from “Inactive” to “Active” and click the “Update” button at the top of the page.
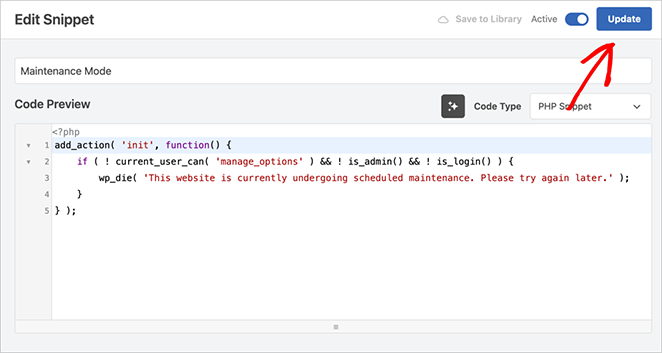
That’s it. Visitors will now see your maintenance message, while you can still access your site as an admin.

This setup gives you full control over your WPCode maintenance mode message while keeping the rest of your site safe.
Common WordPress Maintenance Mode Problems
Maintenance mode is usually simple to set up, but sometimes things don’t go as planned. I’ve run into a few of these myself, especially when juggling updates on client sites. Here are some common issues and how to fix them fast.
If this happens, refer to my detailed guide on how to fix WordPress stuck in maintenance mode.
To fix it, connect to your site via FTP or your hosting file manager. Look in your root directory and delete the .maintenance file. Once that file is gone, your site should load normally again.
Clear your WordPress cache (especially if you’re using a caching plugin)
Check your browser cache or view your site in incognito mode
Make sure you saved and exited the plugin correctly
This often happens after a plugin or theme update. If needed, clear your CDN cache (like Cloudflare) to refresh your live site.
In SeedProd, go to Page Settings » Access Control
Add roles like Editor or Administrator to the “bypass” list
You can also set a bypass cookie for specific users
Once that’s set, refresh the page or open it in a new browser to confirm it’s working.
Clear your plugin cache and browser cache
Make sure you clicked “Save” after editing the page
If using a page builder, confirm you’re editing the correct version
Sometimes changes take a few minutes to show, especially on CDN-enabled sites.
Use a different browser or incognito window to access the login page
If needed, log in through your hosting dashboard or file manager
You can also disable the plugin temporarily by renaming its folder via FTP
This will turn off maintenance mode and let you back in so you can fix the settings.
Protect Your Site with Maintenance Mode
Putting your WordPress site in maintenance mode doesn’t have to be complicated. Whether you choose SeedProd for its powerful features or WPCode for a simpler solution, the key is to keep your visitors informed while you work on your site.
Just remember to test your maintenance page in an incognito window, let visitors know when you’ll be back, and turn off maintenance mode once you’re finished. Your visitors will appreciate knowing what’s happening instead of finding a broken site.
Related Articles:
- Coming Soon vs Modo de mantenimiento: Conozca la diferencia
- Cómo crear una moderna página de WordPress en construcción
- Cómo poner WooCommerce en modo mantenimiento
- Best Coming Soon Page Examples
Gracias por leernos. Nos encantaría conocer tu opinión, así que no dudes en dejarnos un comentario con tus preguntas y comentarios.
También puede seguirnos en YouTube, X (antes Twitter) y Facebook para obtener más contenidos útiles para hacer crecer su negocio.





lo mas importante es: ¡que funcione! y no hacer perder el tiempo a los usuarios con una cosa tan simple como un sitio de mantenimiento. No es posible cambiar la imagen de fondo grande. los enlaces de vista previa no funcionan. muy muy triste. bon voyage :)
Hola Marcel, sentimos que tengas problemas con tu página de mantenimiento. Podemos asegurarte que cambiar tu imagen de fondo y previsualizar tu diseño es posible con SeedProd. Sin embargo, con el método de código manual, eso no será posible. Por favor, consulte nuestra documentación del modo de mantenimiento, o si necesita más ayuda, no dude en enviar un ticket de soporte.
¡Hola! He seguido las instrucciones (creo! LOL) y mi tablero de wordpress tiene el naranja "modo de mantenimiento activo" información en la parte superior, PERO cualquiera que compruebe mi sitio web, dice que no ven el modo de mantenimiento agradable page.... sólo ven los escombros de la construcción en mi sitio web ;) ¿No estoy seguro de qué comprobar a continuación? Gracias.
Hola Debbie, cuando hice clic en el enlace que compartiste, pude ver tu página de Próximamente, lo que indica que está funcionando. Si necesitas más ayuda, ponte en contacto con nuestro equipo de asistencia aquí https://www.seedprod.com/contact/
Hola, me encanta vuestro producto, pero estoy en la versión gratuita y sólo puedo ver la página de mantenimiento en la vista móvil... No quiero que otros vean el sitio web en el escritorio, ya que aún no lo he lanzado. ¿Hay alguna forma de quitarla y/o sustituirla por una página de mantenimiento? Gracias.
Hola Truly Camies, gracias por su pregunta. Si te pones en contacto con nuestro equipo de asistencia, podremos responderte con más detalle.