

TL;DR : Comment configurer le mode maintenance de WooCommerce
Masquez votre boutique pendant les mises à jour sans mettre tout votre site hors ligne. Voici la procédure :
- Installer SeedProd : Téléchargez et activez le plugin Pro sur votre site WordPress.
- Choisir un modèle : Sélectionnez un modèle de page de maintenance dans la bibliothèque de SeedProd et personnalisez-le avec votre marque, un compte à rebours et vos coordonnées.
- Définir les contrôles d’accès : Utilisez les contrôles d’accès de SeedProd pour masquer uniquement vos pages WooCommerce (/shop, /cart, /checkout) tout en gardant votre page d’accueil et votre blog en ligne.
- Activer et vérifier : Publiez votre page de maintenance, activez le mode maintenance dans SeedProd » Pages, puis testez-le dans une fenêtre de navigation privée.
Les propriétaires de boutiques qui mettent à jour des plugins ou refont leur processus de paiement sur un site en ligne découvrent souvent la dure réalité : les clients rencontrent des messages d’erreur en plein achat et les ventes s’arrêtent net.
C'est pourquoi un mode maintenance approprié est non négociable pour toute boutique WooCommerce sérieuse. Il vous permet de travailler sur vos pages de boutique en coulisses en toute confiance.
Contrairement aux plugins qui mettent tout votre site hors ligne, les contrôles d’accès de SeedProd vous permettent de cibler uniquement vos pages de boutique, de panier et de paiement, et vous le faites en quelques minutes sans toucher au code.
Dans ce guide, je vais vous expliquer les étapes exactes que j'utilise pour mettre une boutique WooCommerce en mode maintenance de la bonne manière.
- Qu'est-ce que le mode maintenance WooCommerce ?
- Quand utiliser le mode maintenance de WooCommerce ?
- Comment mettre WooCommerce en mode maintenance (étape par étape)
- Étape 1. Installer un plugin de mode maintenance WooCommerce
- Étape 2. Concevoir votre page de maintenance WooCommerce
- Étape 3. Masquer les pages de la boutique WooCommerce pendant que vous travaillez
- Étape 4. Activer le mode maintenance WooCommerce
- Vérifiez que votre page de maintenance fonctionne
- Bonus : Collectez des prospects avec une page "Bientôt disponible"
- Foire aux questions (FAQ)
Qu'est-ce que le mode maintenance WooCommerce ?
Le mode maintenance de WooCommerce est une fonctionnalité WordPress qui masque temporairement votre boutique aux visiteurs pendant que vous effectuez des mises à jour en coulisses.
Il empêche les clients de voir des erreurs et maintient l’aspect professionnel de votre site. Une page de maintenance appropriée renvoie un statut HTTP 503 Service Unavailable, qui indique à Google que l’indisponibilité est temporaire afin que votre classement reste intact.
Quand utiliser le mode maintenance de WooCommerce ?
Le mode maintenance est utile chaque fois que votre boutique risque de paraître cassée ou confuse pour les acheteurs.

Voici des situations courantes et la meilleure façon de les gérer :
| Situation | Meilleur mode | Temps nécessaire | Ce que les acheteurs voient | Analytique |
|---|---|---|---|---|
| Installation de mises à jour ou de plugins | Maintenance complète 503 | 15-30 minutes | Message « Nous serons bientôt de retour » | Peu ou pas de perte de données |
| Ajout de produits en masse | Page Bientôt disponible (pas de 503) | Quelques heures | Compte à rebours ou avis de lancement | Le trafic est toujours suivi |
| Modification du design ou du thème | 503 avec message personnalisé | Plusieurs heures ou une journée | « Améliorations du site en cours » | Les visites peuvent diminuer |
| Correction de problèmes de sécurité urgents | 503 immédiat | Aussi court que possible | Courte note « En maintenance » | Courte interruption des données |
| Test de nouvelles fonctionnalités | Utiliser un site de staging (pas d'interruption) | N/A | N/A | Aucun impact |
Utiliser le bon mode maintient les clients informés, protège votre SEO et vous aide à éviter les ventes perdues.
Comment informer les clients avant de passer hors ligne
Avant de publier votre page de maintenance, informez vos clients.
- Envoyez un e-mail à votre liste au moins 24 heures avant le début de la maintenance, en indiquant la fenêtre de temps d’indisponibilité prévue
- Publiez sur vos réseaux sociaux afin que vos abonnés sachent que la boutique WooCommerce sera temporairement hors ligne
- Ajoutez un compte à rebours à votre page de maintenance afin que les visiteurs sachent exactement quand vous serez de retour
- Envoyez un e-mail « nous sommes de retour » une fois votre boutique de nouveau en ligne pour ramener les clients
Faut-il utiliser un code ou un plugin pour le mode maintenance WooCommerce ?
Avant de configurer le mode maintenance WooCommerce, décidez si vous préférez la rapidité et la sécurité d'un plugin ou le contrôle manuel de l'ajout de code.
Utilisation d'un plugin (Idéal pour la plupart des utilisateurs)

Un plugin comme SeedProd est le moyen le plus simple d’activer le mode maintenance de WooCommerce. Vous n’avez pas à toucher au code, et vous pouvez concevoir une page personnalisée avec votre logo, vos couleurs de marque et même un formulaire d’inscription par e-mail. C’est aussi plus sûr car vous ne risquez pas de casser votre site en modifiant les fichiers du thème.
Utilisation de code (Pour utilisateurs avancés)
Si vous êtes à l'aise avec PHP, vous pouvez ajouter un petit extrait de code au fichier functions.php de votre thème. Cela affichera un message basique « Maintenance » aux visiteurs.
Note : Modifier directement les fichiers de votre thème peut causer des erreurs si vous faites une faute. Sauvegardez toujours votre site avant d'ajouter du code, et rappelez-vous que vous n'aurez pas les options de conception comme avec un plugin.
Pour les mises à jour importantes, un nouveau thème, une mise à niveau majeure de WooCommerce ou des modifications de code personnalisées, un site de staging est une option plus sûre que le mode maintenance. Vous effectuez et testez les modifications sur une copie de votre site avant de toucher à la boutique en ligne, ce qui signifie aucune interruption pour vos clients.
Comment mettre WooCommerce en mode maintenance (étape par étape)
Voici exactement comment mettre WooCommerce en mode maintenance à l'aide de SeedProd, sans code ni conflits de plugins.
Étape 1. Installer un plugin de mode maintenance WooCommerce
Tout d'abord, vous devrez installer et configurer SeedProd sur votre site WordPress. SeedProd est un constructeur de sites web par glisser-déposer pour WordPress. Vous pouvez l'utiliser pour créer des pages de maintenance, des pages "bientôt disponible" et des thèmes de site complets sans code.
- Télécharger SeedProd Pro : Visitez le site Web SeedProd et choisissez un plan Pro. Pour suivre ce tutoriel et masquer des pages WooCommerce spécifiques à l'aide des contrôles d'accès, vous aurez besoin de la version Pro.
- Connectez-vous à votre administration WordPress dans un navigateur normal pour confirmer que vous pouvez toujours accéder au tableau de bord et travailler pendant que les visiteurs voient la page hors ligne.
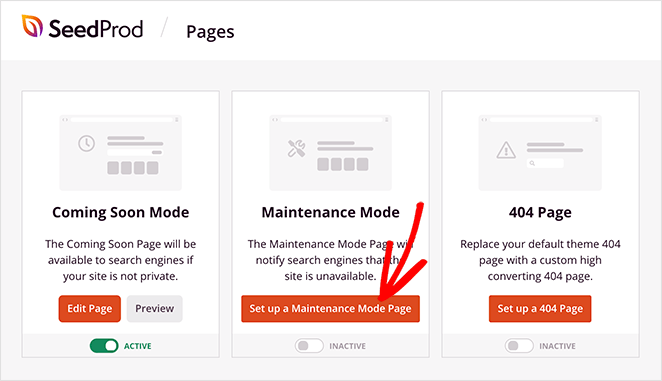
- Activer SeedProd : Après l'installation, cliquez sur le bouton "Activer".
- Commencer la création : Vous verrez un nouveau menu "SeedProd" dans votre tableau de bord WordPress. Cliquez dessus, puis cliquez sur le bouton "Configurer une page de mode maintenance". Vous êtes maintenant prêt à créer votre page de maintenance personnalisée.
Étape 2. Concevoir votre page de maintenance WooCommerce
Une bonne page de maintenance WooCommerce fait plus que dire "Nous serons bientôt de retour". C'est une occasion de rassurer les clients, de renforcer la confiance et même de collecter des prospects. Avec le constructeur par glisser-déposer de SeedProd, vous pouvez créer un design soigné en quelques minutes.
Choisir un modèle de mode maintenance (ou commencer à partir de zéro)
SeedProd comprend une bibliothèque de modèles conçus par des professionnels, vous n'avez donc pas besoin de commencer à partir de zéro. Choisissez-en un qui correspond à votre marque, puis personnalisez-le.
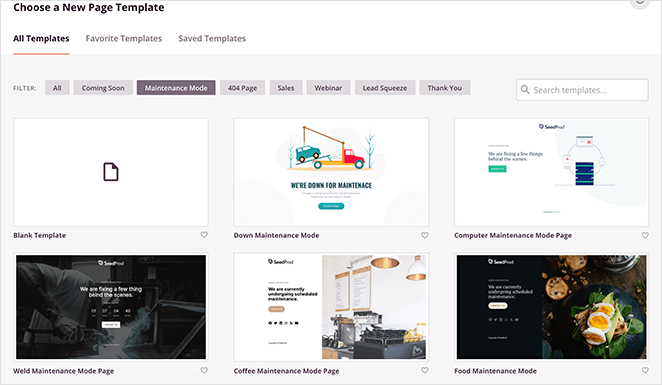
Si vous préférez un contrôle total, choisissez un modèle vierge et concevez-le à partir de zéro. Survolez simplement le modèle que vous aimez et cliquez sur la coche pour l'utiliser.
Personnaliser votre page de mode maintenance
Le constructeur visuel rend l'édition simple. Glissez et déposez du texte, des images, des vidéos, des comptes à rebours ou des formulaires directement sur votre mise en page, sans codage nécessaire.
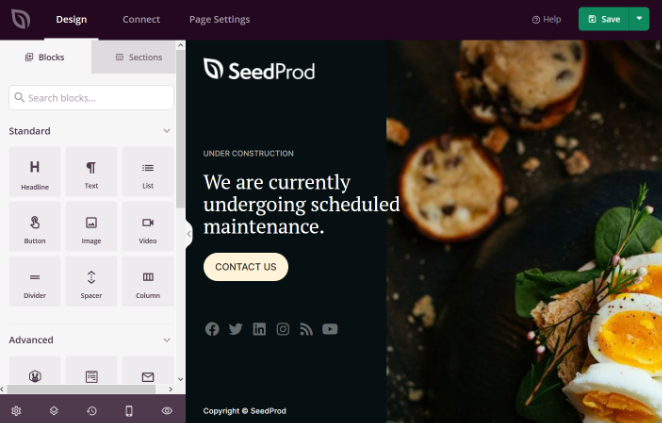
Par exemple, vous pouvez ajouter un compte à rebours pour indiquer quand votre magasin rouvrira. Cliquez sur le bloc pour le styliser, définir la date et l'heure, et le personnaliser pour qu'il corresponde à votre page.
Vous pouvez également ajouter des sections prédéfinies comme des FAQ, des fonctionnalités ou des appels à l'action. Essayez d'inclure un code de réduction ou un formulaire d'inscription pour faire revenir les visiteurs une fois votre magasin rouvert.
Que mettre sur votre page de maintenance WooCommerce
J'ai appris qu'une page générique « En construction » frustre souvent les visiteurs. Pour satisfaire les acheteurs et maintenir les ventes potentielles au chaud, j'utilise une stratégie de mise en page spécifique.
Voici les trois éléments non négociables que je mets sur chaque page de maintenance :
- Un calendrier concret : J'utilise toujours le bloc Compte à rebours. Il rassure les clients sur le fait que le site n'est pas cassé pour toujours, juste temporairement hors ligne.
- Une option « Prévenez-moi » : Vous ne voulez pas perdre ce trafic. Je place un formulaire d'inscription bien en évidence afin de pouvoir envoyer par e-mail aux acheteurs intéressés dès que le catalogue sera de nouveau en ligne.
- Informations de contact d'urgence : Si un client attend une commande, il a besoin d'un moyen de vous joindre. J'ajoute généralement un simple bloc Profils sociaux ou un lien d'e-mail de support en bas.
Une fois que votre page a l'apparence souhaitée, cliquez sur « Enregistrer » en haut à droite du constructeur.
Étape 3. Masquer les pages de la boutique WooCommerce pendant que vous travaillez
Par défaut, SeedProd masque l'ensemble de votre site Web. Cependant, vous voudrez probablement garder votre blog et votre page d'accueil en ligne pendant que vous travaillez sur vos produits.
Pour ce faire, nous utiliserons les contrôles d'accès pour masquer uniquement des pages WooCommerce spécifiques, en gardant votre page d'accueil et votre blog en ligne pour les visiteurs réguliers pendant que votre boutique WooCommerce est hors ligne.
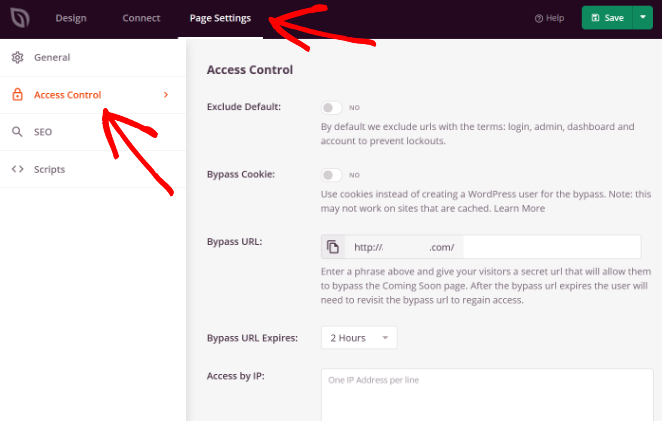
- Ouvrir les contrôles d'accès : Dans le constructeur SeedProd, allez à Paramètres de la page » Contrôles d'accès.
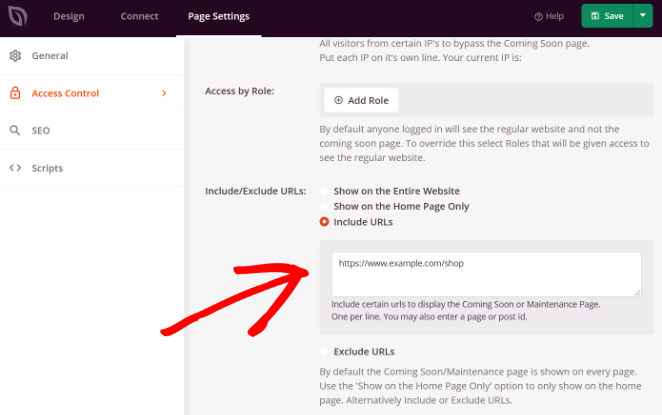
- Inclure les URL : Sélectionnez l'option « Inclure les URL ». Cela indique à SeedProd d'afficher votre page de maintenance uniquement sur les liens spécifiques que vous listez ici.
- Ajouter des pages WooCommerce : Collez les URL que vous souhaitez masquer. Assurez-vous de remplacer « example.com » par le nom de domaine réel de votre site.
- https://yourdomain.com/shop
- https://yourdomain.com/cart
- https://yourdomain.com/checkout
- https://yourdomain.com/my-account
Astuce Pro : Si vous souhaitez que les clients existants accèdent à leurs téléchargements ou à leur historique de commandes, supprimez le lien « mon-compte » de cette liste.
- Protéger les pages produits : Pour masquer toutes les listes de produits, utilisez des URL génériques afin que chaque page de produit ou de catégorie reste masquée :
- https://yourdomain.com/product/*
- https://yourdomain.com/product-category/*
- https://yourdomain.com/product-tag/*
Étape 4. Activer le mode maintenance WooCommerce
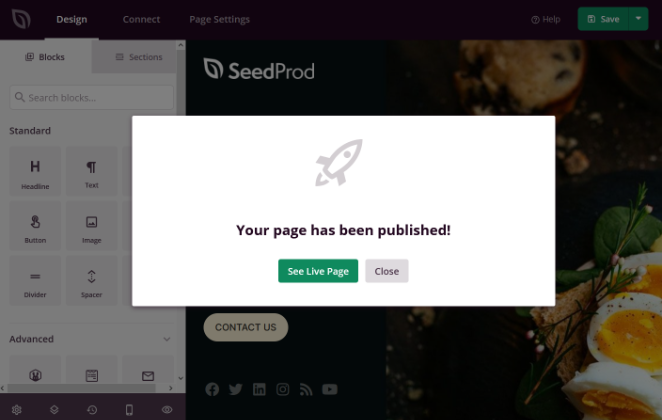
- Publier : Cliquez sur la flèche déroulante à côté du bouton « Enregistrer » dans le constructeur SeedProd et sélectionnez « Publier ».
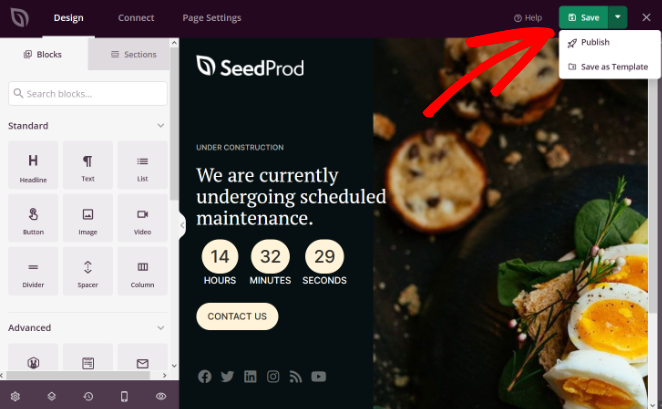
- Aperçu : Une fois votre page publiée, cliquez sur « Voir la page en direct » pour vous assurer que tout s'affiche correctement.
- Activer le mode maintenance : Dans votre tableau de bord WordPress, allez à SeedProd » Pages. Sous « Mode maintenance », basculez l'interrupteur de « Inactif » à « Actif ».
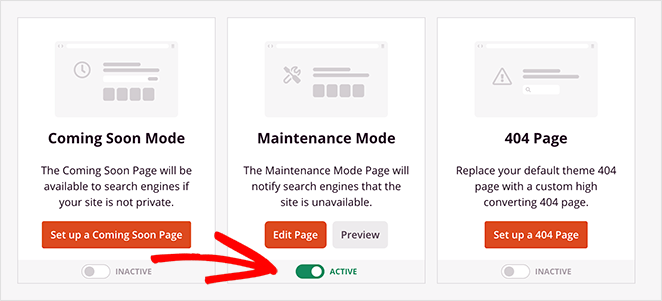
Votre boutique WooCommerce est maintenant en mode maintenance. Les visiteurs verront votre page de maintenance WooCommerce personnalisée pendant que vous effectuez des mises à jour en toute sécurité en arrière-plan.
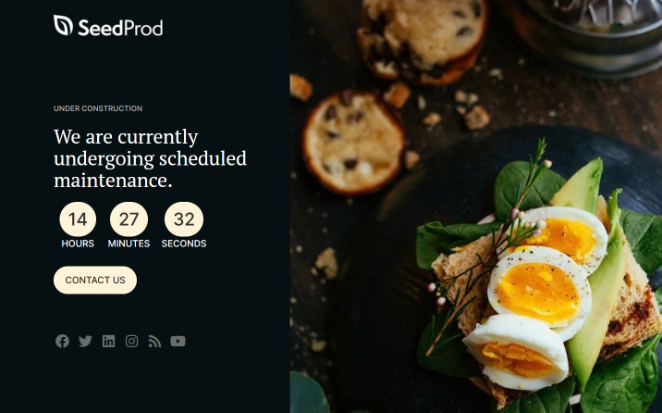
Voici un exemple de ce à quoi pourrait ressembler votre page de maintenance WooCommerce lorsqu'elle est en ligne :
Vérifiez que votre page de maintenance fonctionne
Avant de commencer à apporter des modifications, prenez 60 secondes pour confirmer que votre page de maintenance s'affiche bien aux visiteurs. J'ai vu des propriétaires de boutiques sauter cette étape et passer des heures à travailler sur une boutique qui était encore entièrement visible par les clients.
- Ouvrez une fenêtre de navigateur incognito ou privée et accédez à votre URL /shop. Vous devriez voir votre page de maintenance, pas vos produits.
- Visitez votre page d'accueil et votre blog dans la même fenêtre incognito. Ceux-ci devraient se charger normalement car ils ne sont pas dans votre liste "Inclure les URL".
- Connectez-vous à votre administration WordPress dans un navigateur normal pour confirmer que vous pouvez toujours accéder au tableau de bord et travailler pendant que les visiteurs voient la page hors ligne.
Désactiver le mode maintenance
Lorsque vos mises à jour sont terminées, retournez à SeedProd » Pages et basculez le « Mode maintenance » de « Inactif » à « Actif ».

Votre boutique WooCommerce est maintenant de retour en ligne et prête pour les acheteurs.
Bonus : Collectez des prospects avec une page "Bientôt disponible"
Si vous souhaitez collecter des prospects pendant que votre boutique est hors ligne, le mode "Bientôt disponible" de SeedProd vous permet d'ajouter un formulaire d'inscription à la liste d'attente. Découvrez comment concevoir une page de destination pour liste d'attente avec SeedProd.
Foire aux questions (FAQ)
Le mode maintenance va-t-il casser les webhooks ou les appels API de WooCommerce ?
Cela peut. Un bloc 503 complet peut arrêter les webhooks, les passerelles de paiement ou les intégrations tierces.
Si vous avez besoin que ceux-ci soient actifs pendant les mises à jour, utilisez une page "Bientôt disponible" au lieu d'un mode maintenance strict. Cela maintient votre site accessible sans déclencher le statut 503 qui peut interrompre les connexions API.
Cloudflare ou mon CDN vont-ils mettre en cache la page de maintenance ?
Oui, et c'est une étape importante à vérifier. Les CDN et les navigateurs peuvent mettre en cache votre page temporaire.
Si vous ne videz pas votre cache après avoir désactivé le mode maintenance, les visiteurs pourraient toujours voir l'ancienne page de maintenance au lieu de votre boutique en ligne. Videz toujours votre cache CDN et de site web une fois que vous avez terminé.
Combien de temps ma boutique peut-elle rester en mode maintenance sans nuire au référencement ?
Comme ce guide vous montre comment masquer uniquement vos pages de magasin, le risque global est faible. Pour les pages masquées, idéalement, maintenez le temps d'arrêt en dessous de 24 heures.
Des interruptions plus longues peuvent amener Google à traiter le statut 503 comme une erreur permanente. Si vous avez besoin d'un temps d'arrêt prolongé, envisagez plutôt de passer à une page "Bientôt disponible", qui n'envoie pas de signal 503.
Dois-je utiliser 503 ou noindex pour le mode maintenance de WooCommerce ?
Utilisez un statut 503 Service Unavailable avec un en-tête Retry-After. Cela indique aux moteurs de recherche que le temps d'arrêt est temporaire et qu'ils devraient revenir plus tard.
Évitez noindex, car cela peut entraîner la suppression de vos pages de magasin des résultats de recherche. L'approche 503 préserve votre classement tant que le temps d'arrêt reste court.
Dois-je mettre WooCommerce en mode maintenance pour les mises à jour de plugins ?
Cela dépend de la taille de la mise à jour. Pour les mises à jour mineures de plugins sur un site stable, le mode maintenance est facultatif mais recommandé par mesure de précaution.
Pour les mises à jour majeures de la version WooCommerce ou les changements susceptibles de provoquer des conflits de plugins, activez toujours le mode maintenance en premier. Cela empêche les clients de voir des erreurs si quelque chose se casse en cours de mise à jour.
Vos mises à jour sont terminées et vos clients reviennent à un magasin fonctionnel. C'est ce à quoi ressemble une bonne gestion. Commencez avec SeedProd pour configurer le mode maintenance WooCommerce en quelques minutes.
Pour plus d'astuces pratiques sur WooCommerce, consultez ces guides utiles :
- Meilleurs plugins d'affiliation WooCommerce pour maximiser vos ventes
- Meilleurs plugins WooCommerce pour faire décoller vos ventes
- Comment personnaliser votre page de paiement WooCommerce
- Meilleurs plugins SEO WooCommerce pour de meilleurs classements
- Comment créer une page de remerciement WooCommerce personnalisée
- Comment accélérer votre boutique WooCommerce (10 astuces faciles)
Merci de votre lecture ! Nous serions ravis d’entendre vos réflexions, alors n’hésitez pas à participer à la conversation sur YouTube, X et Facebook pour plus de conseils et de contenu utiles pour développer votre entreprise.


