

Kurz gesagt: Einrichtung des WooCommerce-Wartungsmodus
Verstecken Sie Ihren Shop während Updates, ohne Ihre gesamte Website offline zu nehmen. Hier ist der Vorgang:
- SeedProd installieren: Laden Sie das Pro-Plugin herunter und aktivieren Sie es auf Ihrer WordPress-Website.
- Vorlage auswählen: Wählen Sie eine Wartungsseite-Vorlage aus der SeedProd-Bibliothek aus und passen Sie sie mit Ihrem Branding, einem Countdown-Timer und Kontaktinformationen an.
- Zugriffskontrollen festlegen: Verwenden Sie die Zugriffskontrollen von SeedProd, um nur Ihre WooCommerce-Seiten (/shop, /cart, /checkout) auszublenden, während Ihre Homepage und Ihr Blog online bleiben.
- Aktivieren und überprüfen: Veröffentlichen Sie Ihre Wartungsseite, schalten Sie den Wartungsmodus in SeedProd » Seiten auf Aktiv, und testen Sie ihn dann in einem Inkognito-Fenster.
Shop-Betreiber, die Plugins aktualisieren oder ihren Checkout-Ablauf auf einer Live-Website überarbeiten, stellen oft auf die harte Tour fest: Käufer stoßen mitten im Kauf auf Fehlermeldungen und die Verkäufe brechen ab.
Deshalb ist ein ordnungsgemäßer Wartungsmodus für jeden ernsthaften WooCommerce-Shop unerlässlich. Er ermöglicht es Ihnen, im Hintergrund mit absoluter Sicherheit an Ihren Shop-Seiten zu arbeiten.
Im Gegensatz zu Plugins, die Ihre gesamte Website offline nehmen, können Sie mit den Zugriffskontrollen von SeedProd nur Ihre Shop-, Warenkorb- und Checkout-Seiten gezielt ansprechen, und das in wenigen Minuten, ohne Code anfassen zu müssen.
In diesem Leitfaden führe ich Sie durch die genauen Schritte, die ich verwende, um einen WooCommerce-Shop richtig in den Wartungsmodus zu versetzen.
- Was ist der WooCommerce-Wartungsmodus?
- Wann sollten Sie den WooCommerce-Wartungsmodus verwenden?
- So versetzen Sie WooCommerce in den Wartungsmodus (Schritt für Schritt)
- Schritt 1. Installieren Sie ein WooCommerce-Wartungsmodus-Plugin
- Schritt 2. Gestalten Sie Ihre WooCommerce-Wartungsseite
- Schritt 3. Blenden Sie WooCommerce-Shop-Seiten aus, während Sie arbeiten
- Schritt 4. WooCommerce-Wartungsmodus aktivieren
- Überprüfen Sie, ob Ihre Wartungsseite funktioniert
- Bonus: Leads mit einer „Coming Soon“-Seite erfassen
- Häufig gestellte Fragen (FAQ)
Was ist der WooCommerce-Wartungsmodus?
Der WooCommerce-Wartungsmodus ist eine WordPress-Funktion, die Ihren Shop vorübergehend für Besucher verbirgt, während Sie im Hintergrund Updates durchführen.
Er verhindert, dass Käufer Fehler sehen, und sorgt dafür, dass Ihre Website professionell aussieht. Eine ordnungsgemäße Wartungsseite gibt einen HTTP 503 Service Unavailable Status zurück, der Google mitteilt, dass die Ausfallzeit vorübergehend ist, sodass Ihre Rankings erhalten bleiben.
Wann sollten Sie den WooCommerce-Wartungsmodus verwenden?
Der Wartungsmodus ist immer dann nützlich, wenn Ihr Shop für Käufer defekt oder verwirrend aussehen könnte.

Hier sind gängige Situationen und die beste Vorgehensweise:
| Situation | Bester Modus | Benötigte Zeit | Was Käufer sehen | Analysen |
|---|---|---|---|---|
| Updates oder Plugins installieren | Vollständige 503-Wartung | 15-30 Minuten | Nachricht „Wir sind bald zurück“ | Wenig bis keine Daten verloren |
| Produkte in großen Mengen hinzufügen | Bald-Seite (kein 503) | Ein paar Stunden | Countdown oder Startbenachrichtigung | Traffic wird weiterhin verfolgt |
| Design oder Thema ändern | 503 mit gebrandeter Nachricht | Mehrere Stunden oder ein Tag | „Website-Verbesserungen laufen“ | Besuche können zurückgehen |
| Dringende Sicherheitsprobleme beheben | Sofortige 503 | So kurz wie möglich | Kurzer „Wartung“-Hinweis | Kurze Lücke in den Daten |
| Neue Funktionen testen | Staging-Website verwenden (keine Ausfallzeit) | N/A | N/A | Keine Auswirkungen |
Die richtige Methode zu verwenden, hält Kunden informiert, schützt Ihr SEO und hilft Ihnen, verlorene Verkäufe zu vermeiden.
So informieren Sie Kunden, bevor Sie offline gehen
Bevor Sie Ihre Wartungsseite live schalten, informieren Sie Ihre Kunden.
- Senden Sie Ihrer Liste mindestens 24 Stunden vor Beginn der Wartungsarbeiten eine E-Mail mit dem erwarteten Ausfallzeitfenster
- Posten Sie in Ihren sozialen Kanälen, damit Follower wissen, dass der WooCommerce-Shop vorübergehend offline sein wird
- Fügen Sie Ihrer Wartungsseite einen Countdown-Timer hinzu, damit Besucher genau wissen, wann Sie zurück sind
- Senden Sie eine „Wir sind zurück“-E-Mail, sobald Ihr Shop wieder live ist, um Käufer zurückzugewinnen
Sollten Sie Code oder ein Plugin für den WooCommerce-Wartungsmodus verwenden?
Bevor Sie den WooCommerce-Wartungsmodus einrichten, entscheiden Sie, ob Sie die Geschwindigkeit und Sicherheit eines Plugins oder die manuelle Kontrolle durch Hinzufügen von Code wünschen.
Verwendung eines Plugins (am besten für die meisten Benutzer)

Ein Plugin wie SeedProd ist der einfachste Weg, den WooCommerce-Wartungsmodus zu aktivieren. Sie müssen keinen Code anfassen und können eine benutzerdefinierte Seite mit Ihrem Logo, Ihren Markenfarben und sogar einem E-Mail-Opt-in-Formular gestalten. Es ist auch sicherer, da Sie nicht riskieren, Ihre Website durch Bearbeiten von Theme-Dateien zu beschädigen.
Verwendung von Code (für fortgeschrittene Benutzer)
Wenn Sie mit PHP vertraut sind, können Sie einen kleinen Code-Schnipsel zur Datei functions.php Ihres Themes hinzufügen. Dies zeigt den Besuchern eine einfache „Wartung“-Nachricht an.
Hinweis: Das direkte Bearbeiten Ihrer Theme-Dateien kann zu Fehlern führen, wenn Sie einen Fehler machen. Sichern Sie immer Ihre Website, bevor Sie Code hinzufügen, und denken Sie daran, dass Sie mit einem Plugin nicht die gleichen Designoptionen erhalten.
Bei großen Updates, einem neuen Theme, einem wichtigen WooCommerce-Versionssprung oder benutzerdefinierten Codeänderungen ist eine Staging-Site eine sicherere Option als der Wartungsmodus. Sie nehmen Änderungen an einer Kopie Ihrer Website vor und testen diese, bevor Sie den Live-Shop anfassen. Das bedeutet keinerlei Ausfallzeiten für Ihre Kunden.
So versetzen Sie WooCommerce in den Wartungsmodus (Schritt für Schritt)
Hier erfahren Sie genau, wie Sie WooCommerce mit SeedProd ohne Code oder Plugin-Konflikte in den Wartungsmodus versetzen.
Schritt 1. Installieren Sie ein WooCommerce-Wartungsmodus-Plugin
Zuerst müssen Sie SeedProd auf Ihrer WordPress-Website zum Laufen bringen. SeedProd ist ein Drag-and-Drop-Website-Builder für WordPress. Sie können damit Wartungsseiten, "Demnächst verfügbar"-Seiten und vollständige Website-Themes ohne Code erstellen.
- SeedProd Pro herunterladen: Besuchen Sie die SeedProd-Website und wählen Sie einen Pro-Plan. Um dieser Anleitung zu folgen und bestimmte WooCommerce-Seiten mithilfe von Zugriffskontrollen auszublenden, benötigen Sie die Pro-Version.
- Plugin installieren: Nachdem Sie SeedProd heruntergeladen haben, gehen Sie zu Ihrem WordPress-Dashboard, navigieren Sie zu Plugins » Neues Plugin hinzufügen und laden Sie die Plugin-Datei hoch.
- SeedProd aktivieren: Klicken Sie nach der Installation auf die Schaltfläche "Aktivieren".
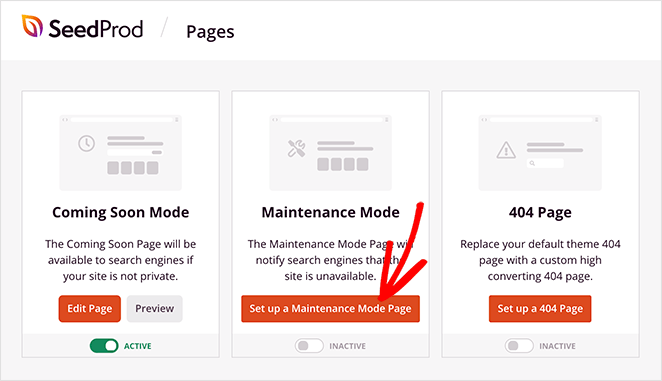
- Mit dem Erstellen beginnen: Sie sehen ein neues Menü "SeedProd" in Ihrem WordPress-Dashboard. Klicken Sie darauf und dann auf die Schaltfläche "Wartungsmodus-Seite einrichten". Sie sind nun bereit, Ihre benutzerdefinierte Wartungsseite zu erstellen.
Schritt 2. Gestalten Sie Ihre WooCommerce-Wartungsseite
Eine gute WooCommerce-Wartungsseite tut mehr, als nur "Wir sind bald zurück" zu sagen. Sie ist eine Gelegenheit, Kunden zu beruhigen, Vertrauen aufzubauen und sogar Leads zu sammeln. Mit dem Drag-and-Drop-Builder von SeedProd können Sie in wenigen Minuten ein poliertes Design erstellen.
Wählen Sie eine Wartungsmodus-Vorlage (oder beginnen Sie bei Null)
SeedProd enthält eine Bibliothek professionell gestalteter Vorlagen, sodass Sie nicht bei Null anfangen müssen. Wählen Sie eine, die zu Ihrer Marke passt, und machen Sie sie dann zu Ihrer eigenen.
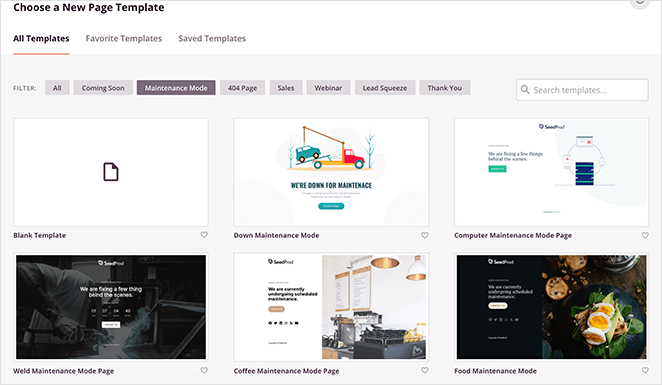
Wenn Sie die volle Kontrolle bevorzugen, wählen Sie eine leere Vorlage und gestalten Sie sie von Grund auf neu. Fahren Sie einfach mit der Maus über die Vorlage, die Ihnen gefällt, und klicken Sie auf das Häkchen, um sie zu verwenden.
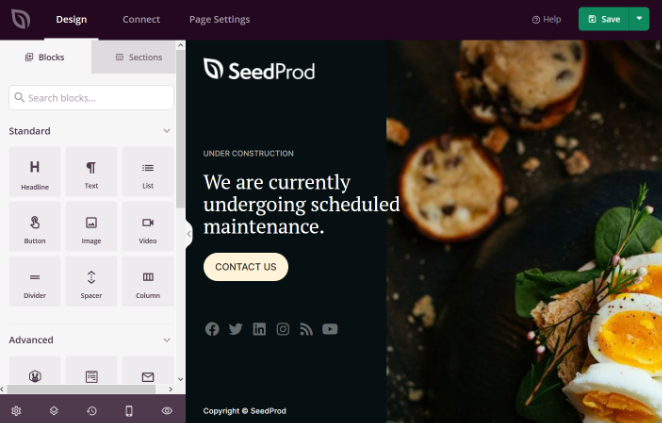
Passen Sie Ihre Wartungsmodus-Seite an
Der visuelle Builder macht die Bearbeitung einfach. Ziehen und legen Sie Text, Bilder, Videos, Countdown-Timer oder Formulare direkt auf Ihr Layout, ganz ohne Code.
Sie können zum Beispiel einen Countdown-Timer hinzufügen, um anzuzeigen, wann Ihr Geschäft wiedereröffnet wird. Klicken Sie auf den Block, um ihn zu gestalten, Datum und Uhrzeit festzulegen und ihn an Ihre Seite anzupassen.
Sie können auch vorgefertigte Abschnitte wie FAQs, Funktionen oder Handlungsaufforderungen hinzufügen. Versuchen Sie, einen Rabattcode oder ein Opt-in-Formular einzufügen, um Besucher zurückzugewinnen, sobald Ihr Geschäft wieder geöffnet ist.
Was Sie auf Ihre WooCommerce-Wartungsseite setzen sollten
Ich habe gelernt, dass eine generische „Im Bau“-Seite Besucher oft frustriert. Um Käufer glücklich und potenzielle Verkäufe warm zu halten, verwende ich eine spezifische Layout-Strategie.
Hier sind die drei nicht verhandelbaren Elemente, die ich auf jeder Wartungsseite platziere:
- Ein konkreter Zeitplan: Ich verwende immer den Block Countdown-Timer. Er beruhigt die Kunden, dass die Website nicht für immer kaputt ist, sondern nur kurzzeitig offline.
- Eine „Benachrichtigen Sie mich“-Option: Sie möchten diesen Traffic nicht verlieren. Ich platziere ein Optin-Formular prominent, damit ich interessierte Käufer in dem Moment per E-Mail benachrichtigen kann, in dem der Katalog wieder verfügbar ist.
- Notfallkontaktinformationen: Wenn ein Kunde auf eine Bestellung wartet, muss er Sie erreichen können. Ich füge normalerweise einen einfachen Block für soziale Profile oder einen Link zur Support-E-Mail am unteren Rand hinzu.
Sobald Ihre Seite so aussieht, wie Sie es möchten, klicken Sie oben rechts im Builder auf „Speichern“.
Schritt 3. Blenden Sie WooCommerce-Shop-Seiten aus, während Sie arbeiten
Standardmäßig blendet SeedProd Ihre gesamte Website aus. Wahrscheinlich möchten Sie jedoch Ihren Blog und Ihre Homepage weiterhin online schalten, während Sie an Ihren Produkten arbeiten.
Dazu verwenden wir Zugriffskontrollen, um nur bestimmte WooCommerce-Seiten auszublenden, während Ihre Homepage und Ihr Blog für normale Besucher weiterhin live geschaltet sind, während Ihr WooCommerce-Shop offline ist.
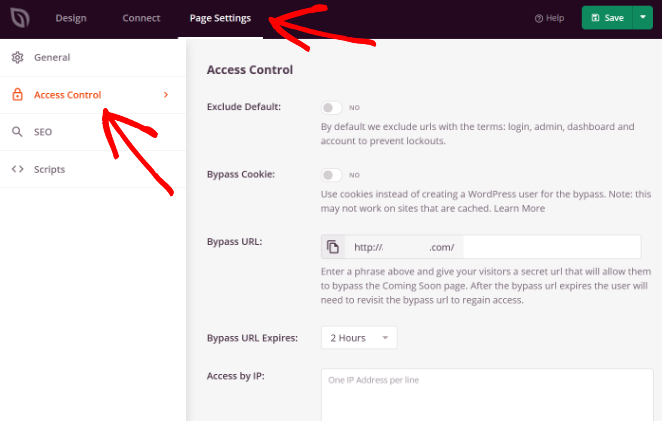
- Zugriffssteuerungen öffnen: Gehen Sie im SeedProd-Builder zu Seiteneinstellungen » Zugriffssteuerungen.
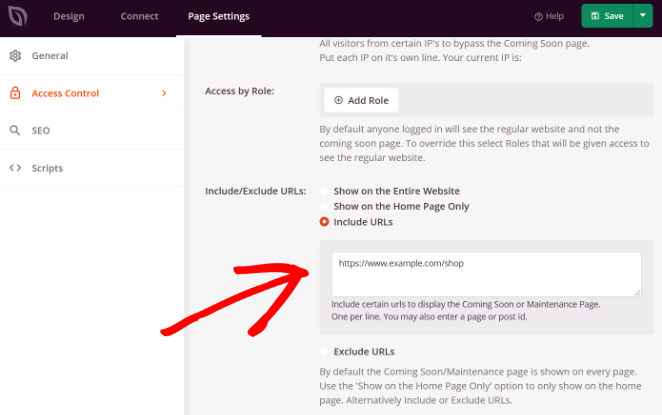
- URLs einschließen: Wählen Sie die Option „URLs einschließen“. Dies weist SeedProd an, Ihre Wartungsseite *nur* auf den spezifischen Links anzuzeigen, die Sie hier auflisten.
- WooCommerce-Seiten hinzufügen: Fügen Sie die URLs ein, die Sie ausblenden möchten. Stellen Sie sicher, dass Sie „example.com“ durch Ihren tatsächlichen Domainnamen ersetzen.
- https://yourdomain.com/shop
- https://yourdomain.com/cart
- https://yourdomain.com/checkout
- https://yourdomain.com/my-account
Profi-Tipp: Wenn bestehende Kunden auf ihre Downloads oder ihre Bestellhistorie zugreifen sollen, entfernen Sie den Link „mein-konto“ aus dieser Liste.
- Produktseiten schützen: Um alle Produktlisten auszublenden, verwenden Sie Platzhalter-URLs, damit jede Produkt- oder Kategorieseite ausgeblendet bleibt:
- https://yourdomain.com/product/*
- https://yourdomain.com/product-category/*
- https://yourdomain.com/product-tag/*
Schritt 4. WooCommerce-Wartungsmodus aktivieren
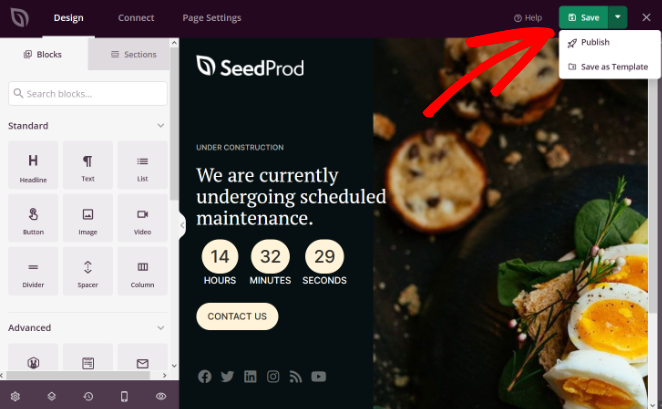
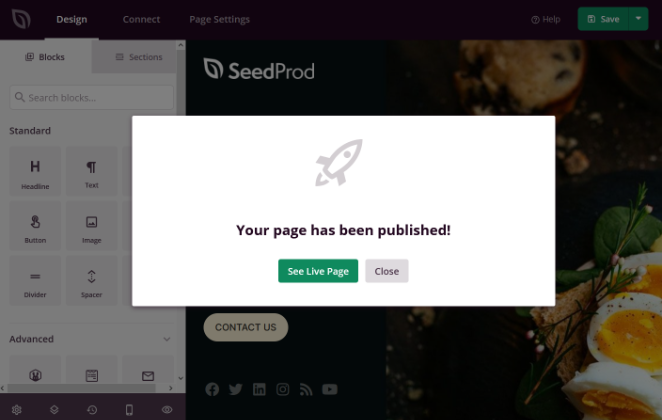
- Veröffentlichen: Klicken Sie im SeedProd-Builder auf den Dropdown-Pfeil neben der Schaltfläche „Speichern“ und wählen Sie „Veröffentlichen“.
- Vorschau: Sobald Ihre Seite live ist, klicken Sie auf „Live-Seite anzeigen“, um sicherzustellen, dass alles korrekt angezeigt wird.
- Wartungsmodus aktivieren: Gehen Sie in Ihrem WordPress-Dashboard zu SeedProd » Seiten. Unter „Wartungsmodus“ schalten Sie den Schalter von „Inaktiv“ auf „Aktiv“.
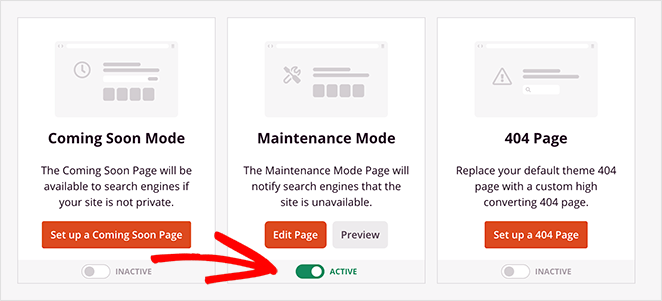
Ihr WooCommerce-Shop befindet sich nun im Wartungsmodus. Besucher sehen Ihre benutzerdefinierte WooCommerce-Wartungsseite, während Sie im Hintergrund sicher Updates durchführen.
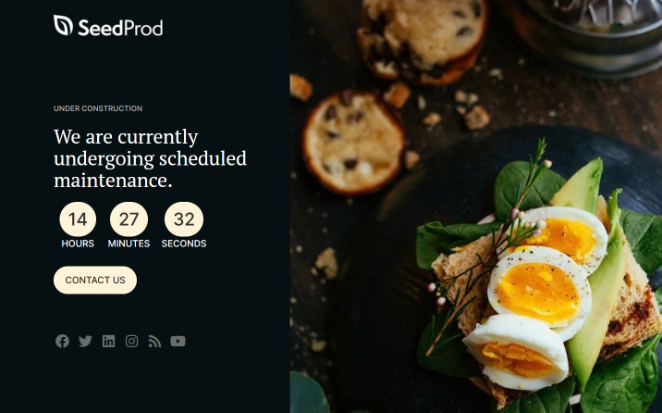
Hier ist ein Beispiel dafür, wie Ihre WooCommerce-Wartungsseite aussehen könnte, wenn sie live ist:
Überprüfen Sie, ob Ihre Wartungsseite funktioniert
Bevor Sie mit den Änderungen beginnen, nehmen Sie sich 60 Sekunden Zeit, um zu überprüfen, ob Ihre Wartungsseite tatsächlich für Besucher angezeigt wird. Ich habe gesehen, wie Shop-Besitzer diesen Schritt übersprungen und stundenlang an einem Shop gearbeitet haben, der für Kunden immer noch vollständig sichtbar war.
- Öffnen Sie ein Inkognito- oder privates Browserfenster und navigieren Sie zu Ihrer /shop-URL. Sie sollten Ihre Wartungsseite sehen, nicht Ihre Produkte.
- Besuchen Sie Ihre Homepage und Ihren Blog im selben Inkognito-Fenster. Diese sollten normal geladen werden, da sie nicht in Ihrer "Einschließen"-URL-Liste enthalten sind.
- Melden Sie sich in einem normalen Browser bei Ihrem WordPress-Admin an, um zu bestätigen, dass Sie immer noch auf das Dashboard zugreifen und arbeiten können, während Besucher die Offline-Seite sehen.
Wartungsmodus deaktivieren
Wenn Ihre Updates abgeschlossen sind, gehen Sie zurück zu SeedProd » Seiten und schalten Sie den „Wartungsmodus“ zurück auf „Inaktiv“.

Ihr WooCommerce-Shop ist jetzt wieder online und bereit für Käufer.
Bonus: Leads mit einer „Coming Soon“-Seite erfassen
Wenn Sie Leads erfassen möchten, während Ihr Shop offline ist, können Sie mit dem "Coming Soon"-Modus von SeedProd ein Anmeldeformular für die Warteliste hinzufügen. Sehen Sie, wie Sie mit SeedProd eine Landingpage für die Warteliste gestalten.
Häufig gestellte Fragen (FAQ)
Wird der Wartungsmodus WooCommerce Webhooks oder API-Aufrufe beeinträchtigen?
Das kann er. Ein vollständiger 503-Block kann Webhooks, Zahlungsgateways oder Integrationen von Drittanbietern stoppen.
Wenn Sie diese während der Updates aktiv benötigen, verwenden Sie stattdessen eine "Coming Soon"-Seite anstelle des strikten Wartungsmodus. Sie hält Ihre Website zugänglich, ohne den 503-Status auszulösen, der API-Verbindungen unterbrechen kann.
Wird Cloudflare oder mein CDN die Wartungsseite cachen?
Ja, und dies ist ein wichtiger Schritt zur Überprüfung. CDNs und Browser können Ihre temporäre Seite zwischenspeichern.
Wenn Sie Ihren Cache nicht leeren, nachdem Sie den Wartungsmodus deaktiviert haben, sehen Besucher möglicherweise immer noch die alte Wartungsseite anstelle Ihres Live-Shops. Leeren Sie immer Ihren CDN- und Website-Cache, wenn Sie fertig sind.
Wie lange kann mein Shop im Wartungsmodus bleiben, ohne SEO zu beeinträchtigen?
Da diese Anleitung zeigt, wie Sie nur Ihre Shop-Seiten ausblenden, ist das Gesamtrisiko gering. Halten Sie für die ausgeblendeten Seiten die Ausfallzeit idealerweise unter 24 Stunden.
Längere Ausfallzeiten können dazu führen, dass Google den 503-Status als permanenten Fehler behandelt. Wenn Sie eine längere Ausfallzeit benötigen, sollten Sie stattdessen zu einer „Coming Soon“-Seite wechseln, die kein 503-Signal sendet.
Sollte ich 503 oder noindex für den WooCommerce-Wartungsmodus verwenden?
Verwenden Sie einen 503 Service Unavailable-Status mit einem Retry-After-Header. Dies teilt Suchmaschinen mit, dass die Ausfallzeit vorübergehend ist und sie später erneut nachsehen sollen.
Vermeiden Sie noindex, da dies dazu führen kann, dass Ihre Shop-Seiten aus den Suchergebnissen entfernt werden. Der 503-Ansatz bewahrt Ihre Rankings, solange die Ausfallzeit kurz bleibt.
Muss ich WooCommerce für Plugin-Updates in den Wartungsmodus versetzen?
Das hängt von der Größe des Updates ab. Bei kleineren Plugin-Updates auf einer stabilen Website ist der Wartungsmodus optional, aber als Vorsichtsmaßnahme empfohlen.
Bei größeren WooCommerce-Versionsupdates oder Änderungen, die Plugin-Konflikte verursachen könnten, aktivieren Sie immer zuerst den Wartungsmodus. Dies verhindert, dass Kunden Fehler sehen, wenn während des Updates etwas schiefgeht.
Ihre Updates sind abgeschlossen und Ihre Kunden kehren zu einem funktionierenden Shop zurück. So sieht es aus, wenn man es richtig macht. Starten Sie mit SeedProd, um den WooCommerce-Wartungsmodus in wenigen Minuten einzurichten.
Weitere praktische WooCommerce-Tipps finden Sie in diesen hilfreichen Anleitungen:
- Die besten WooCommerce Affiliate Plugins zur Maximierung Ihrer Verkäufe
- Die besten WooCommerce-Plugins, um Ihren Umsatz zu steigern
- So passen Sie Ihre WooCommerce-Checkout-Seite an
- Die besten WooCommerce-SEO-Plugins für bessere Rankings
- So erstellen Sie eine benutzerdefinierte WooCommerce-Dankesseite
- So beschleunigen Sie Ihren WooCommerce-Shop (10 einfache Wege)
Danke fürs Lesen! Wir würden uns freuen, Ihre Gedanken zu hören. Treten Sie also gerne der Konversation auf YouTube, X und Facebook bei, um weitere hilfreiche Ratschläge und Inhalte für das Wachstum Ihres Unternehmens zu erhalten.


