
TL;DR: How to Customize the WooCommerce Additional Information Tab
The WooCommerce additional information tab shows product attributes and shipping details by default. Here are the key ways to customize it for your store.
- Add attributes – Go to Products » Attributes to create attribute fields, then assign them to individual products.
- Style the tab – Use SeedProd’s visual editor to change tab colors, typography, borders, and spacing without code.
- Rename the tab – Add a PHP snippet via WPCode to change “Additional Information” to any label that fits your products.
- Reorder tabs – Drag the Product Data Tabs block in SeedProd’s editor to rearrange the tab order on your product pages.
- Hide or remove the tab – Delete the Product Data Tabs block in SeedProd to hide it globally, or remove individual product attributes to clear it per product.
If your product page has a tab that shows up blank, looks out of place, or just says “Additional Information” without telling shoppers anything useful, you’re not stuck with it. The WooCommerce additional information tab is fully customizable, and most changes take just a few minutes.
In this guide, I’ll walk you through how to edit the additional information in WooCommerce to change its name, restyle it, move it, or remove it entirely, depending on what makes sense for your store.
- What's the WooCommerce Additional Information Tab?
- How to Add Additional Information to WooCommerce Products
- How to Customize the WooCommerce Additional Information Tab
- Frequently Asked Questions
What’s the WooCommerce Additional Information Tab?
The WooCommerce additional information tab is a product page tab that automatically displays your product’s weight, dimensions, and custom attributes. It appears only when a product has at least one attribute or shipping detail assigned, so if you see an empty tab, that’s usually why.
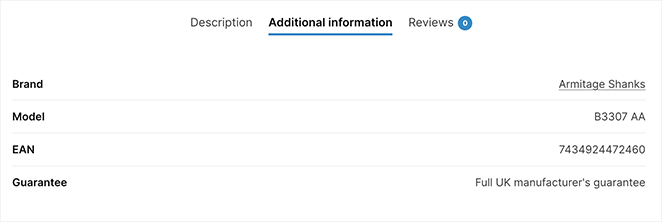
But the additional information tab can do more than list specs. It’s one of the first places shoppers look when they need to confirm a product is right for them. Leaving it generic or empty can cost you the sale.
How to Add Additional Information to WooCommerce Products
Before we explore the customization options, let’s look at how to add product details to the additional information tab in WooCommerce. WooCommerce’s built-in attributes feature is the right starting point for adding things like material, dimensions, or care instructions.
In your WordPress dashboard, go to Products » Attributes. This is where you’ll manage all the attributes of your products.
Give your attribute a descriptive name, such as “Battery Life,” “Material,” or “Warranty Info.” This is what customers will see on the front end.
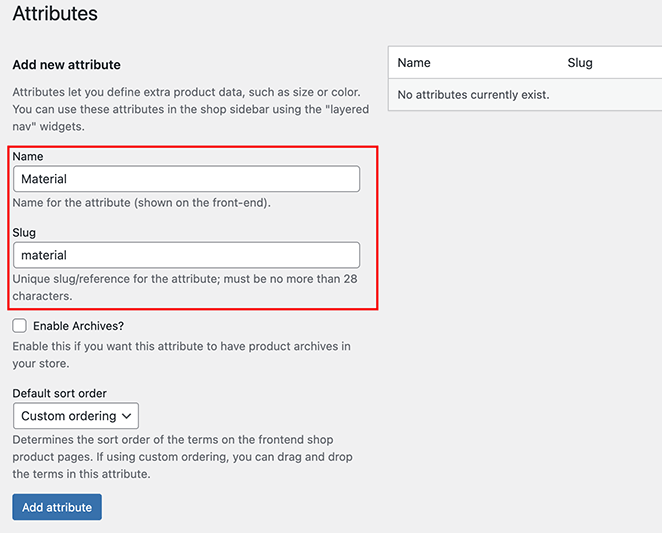
Then click Add Attribute.
Now, edit the product where you want to add this information, scroll down to the Product data section, and click the Attributes tab.
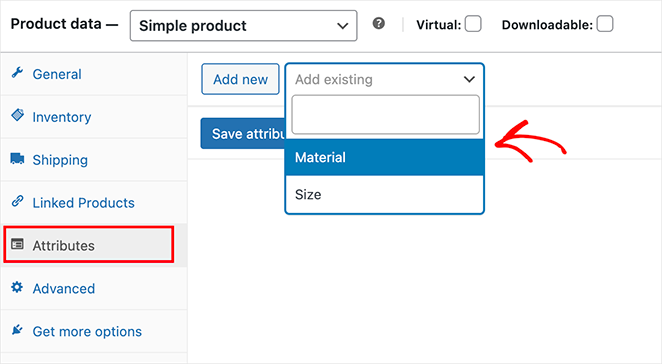
Choose your new attribute from the dropdown menu, then add the relevant information in the Value(s) field.
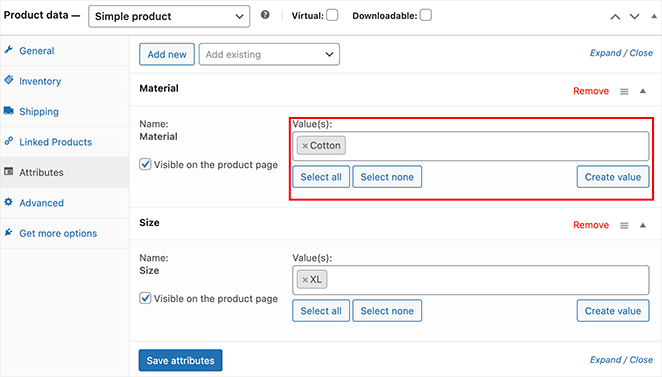
Now, click Save Attributes, then Update your product.
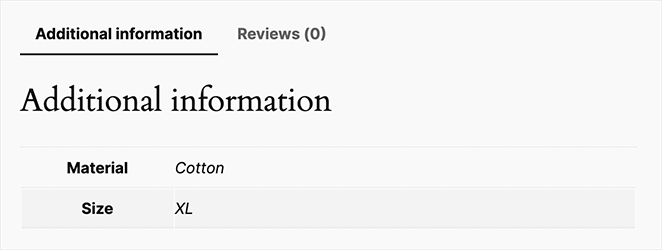
Your new attribute will now appear neatly organized on the Additional Information tab on the product page.
How to Customize the WooCommerce Additional Information Tab
You’ve added valuable product details to your Additional Information tab. Now let’s make it work harder for your store. A generic tab doesn’t guide shoppers toward a purchase. These methods give you real control over what it shows and how it looks.
Change Additional Information Tab Styling
SeedProd’s visual editor lets you customize WooCommerce product tabs without touching code. You can change colors, typography, spacing, and borders to match your brand, all from a drag-and-drop interface.

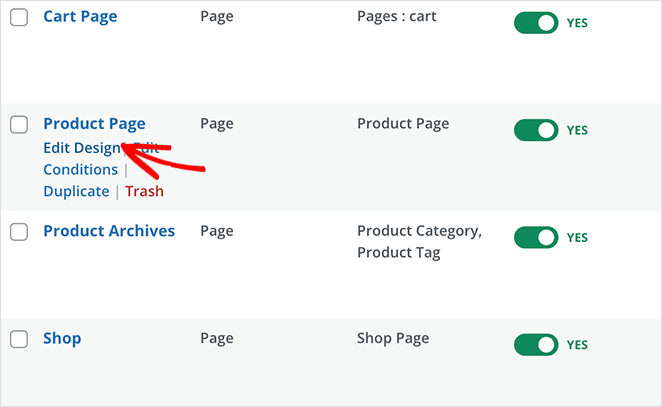
When you’re ready to style the Additional Information tab, head to SeedProd » Theme Builder from your WordPress dashboard and click “Edit Design” on the Product Page template.
Once inside the visual editor, look for the block called Product Data Tabs. This controls the layout for your WooCommerce product tabs, including the Additional Information section.
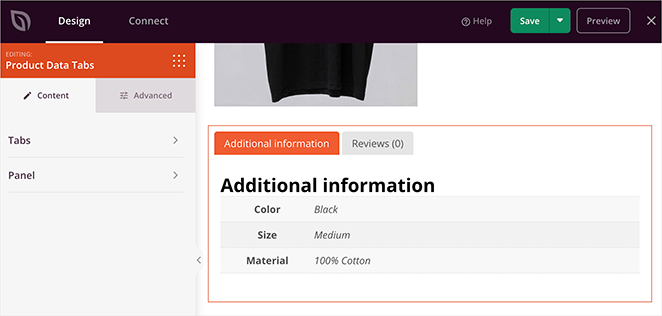
Click on the block to open its design settings, which gives you complete control over:
- Tab Colors: Change the background, text, and border colors for active and inactive states.
- Typography: Adjust the font, size, weight, and style of the tab’s text.
- Spacing and Padding: Control the spacing around and within the tab content.
- Borders: Add or customize borders to make the tab stand out.
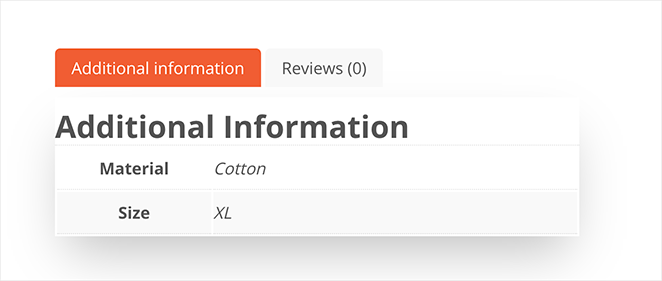
- Table Styles: Style the product data table, including text colors, padding, and even add a shadow effect.
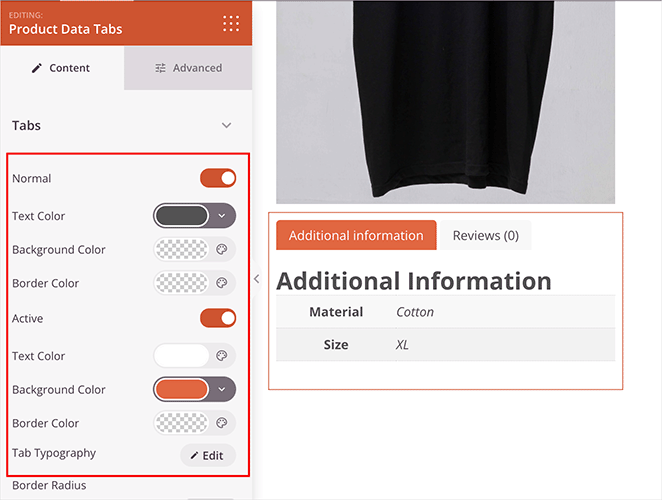
When you’re happy with the design, click “Save” and preview your changes. Here’s how my changes look when I preview the product page:
New to SeedProd? Check out this guide to learn how to set up an online store in WordPress.
Move Additional Information to the Description
Want to simplify your product page and make the key info easy to find? You can move the Additional Information content directly under your WooCommerce product description inside SeedProd.
First, edit the product page to view the visual editor. Depending on which block you’re using, drag the Product Data Tabs from its current location to below your product description.
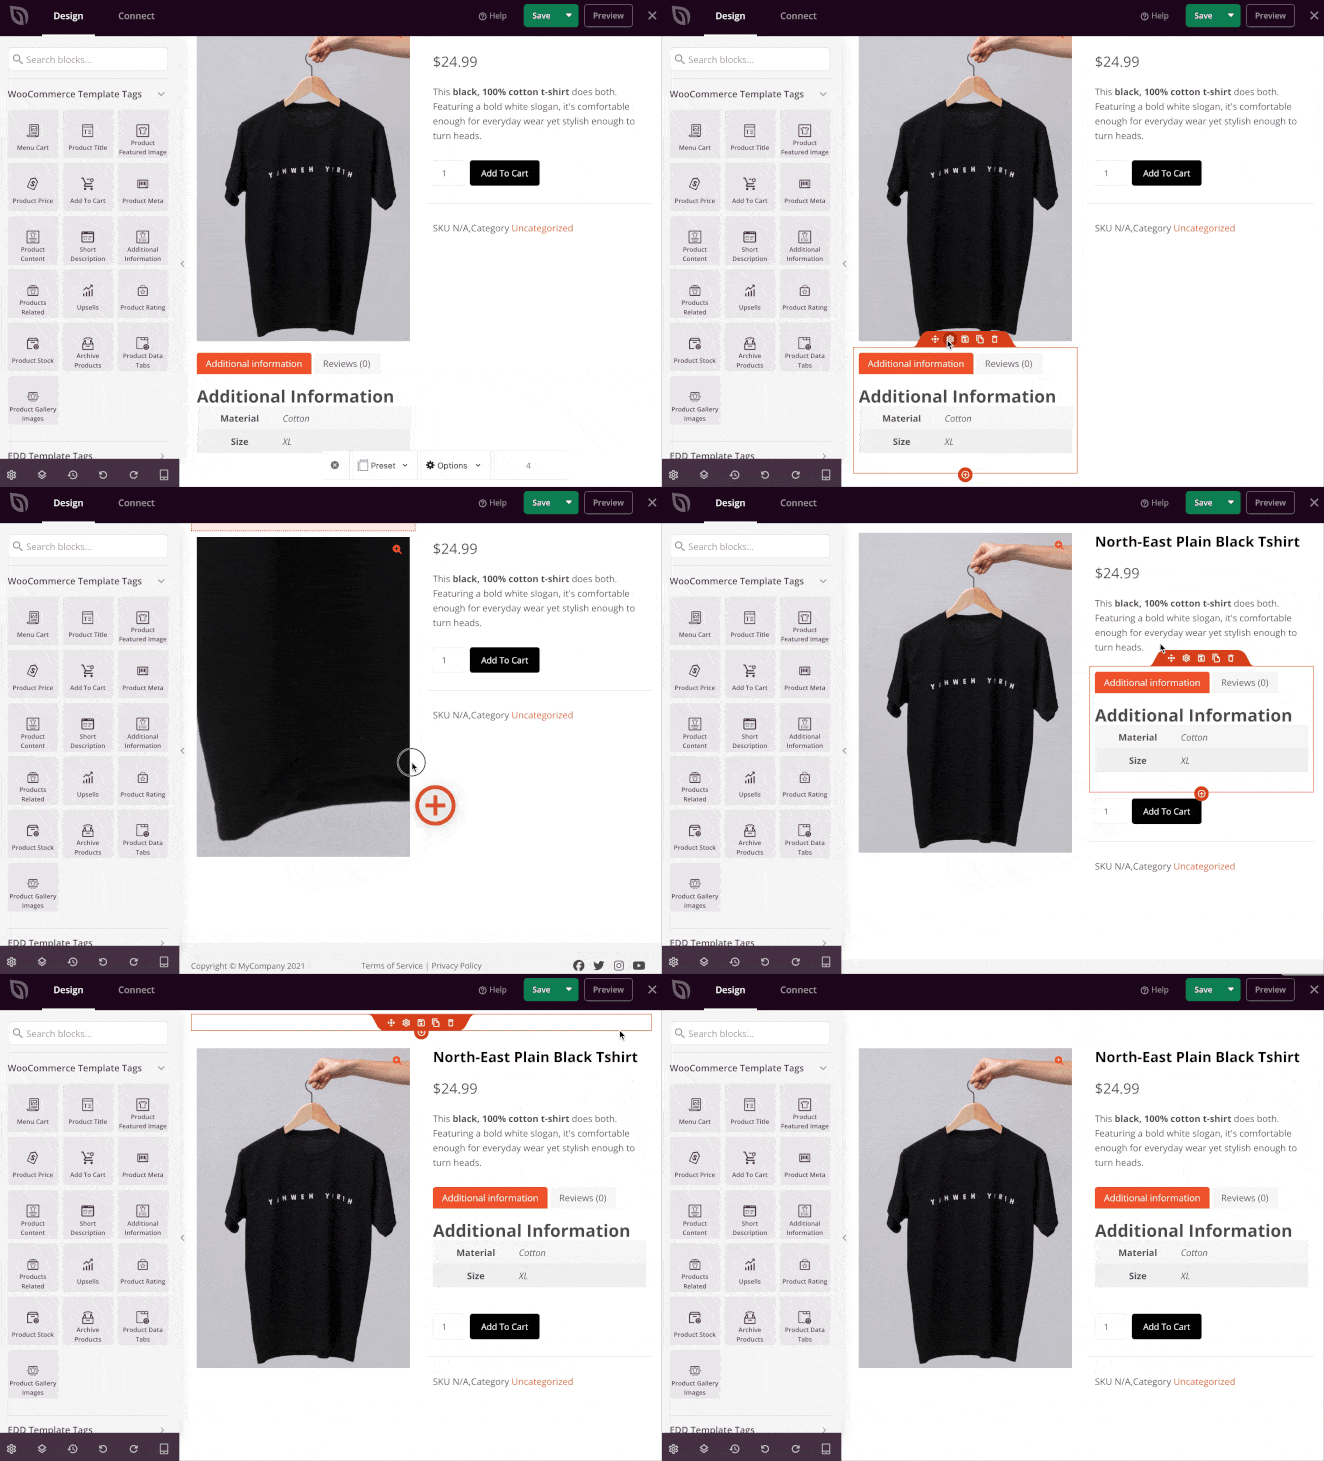
Now click “Save” and preview your product page to see how it looks.
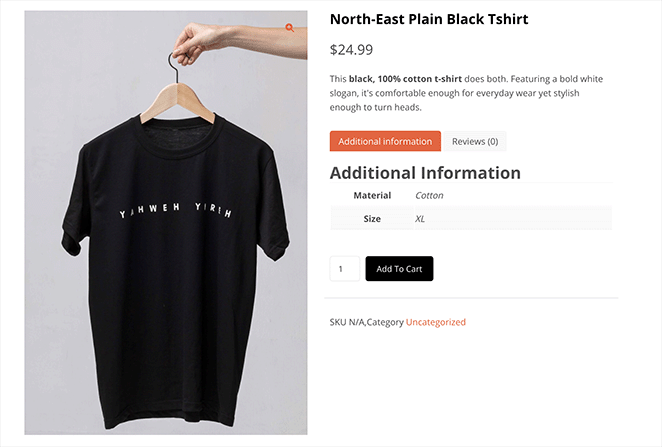
Hide WooCommerce Additional Information
If a product has no relevant attributes or shipping details, hiding the additional information tab keeps the product page clean. It’s a better choice than leaving an empty or sparse tab visible to shoppers.
If you’re using SeedProd to customize your WooCommerce product page, you can remove the Product Data Tabs block with a few clicks.
Hover over the Product Data Tabs block and click the trashcan icon to delete it.
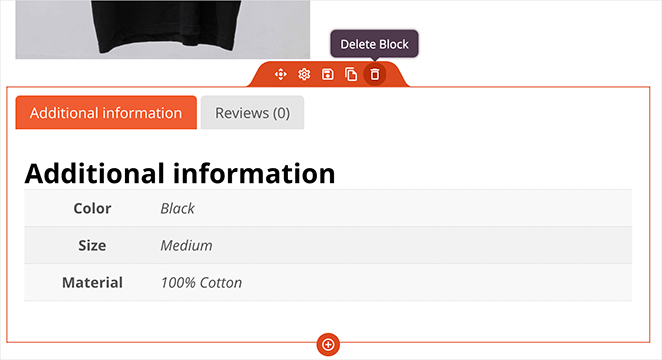
That’s it. Your product pages are now free of unnecessary clutter.
Need to hide the tab for specific product categories? The PHP snippet approach (covered in the Remove section below) can be extended to target only products in certain categories. That way, you hide additional information for products where it’s not relevant, without affecting the rest of your catalog.
Remove WooCommerce Additional Information
Want more granular control? You can remove additional information on a product-by-product basis. This option is good if you only want to declutter specific product pages.
To do this, go to “Products” in your WordPress dashboard and choose the product you want to edit.
In the “Product Data” panel, click on the “Attributes” tab. Then, click remove on the attributes you want to remove.
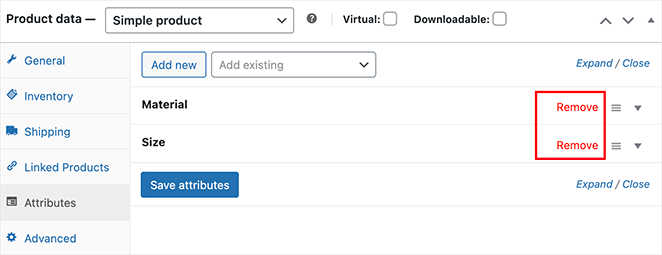
When you view that product page, the Additional Info tab will be gone.
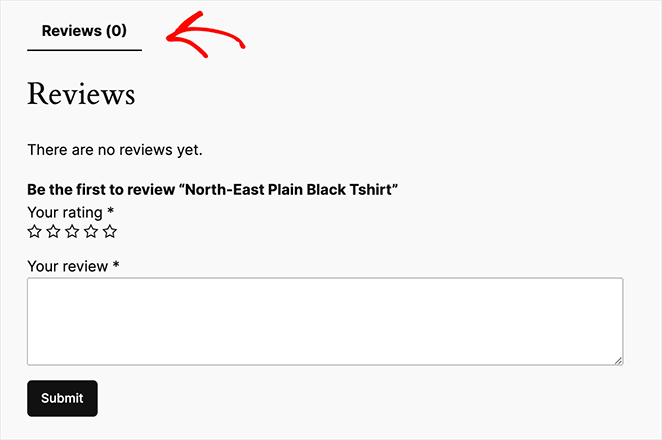
Rename the Additional Information Tab
“Additional Information” is a mouthful. If you want to edit the WooCommerce additional information tab to better reflect your product content, you can change the tab name with a quick code snippet.
If you haven’t already, install and activate the WPCode plugin.
Upon activation, go to Code Snippets » Add New and choose “Add Your Custom Code (New Snippet).”
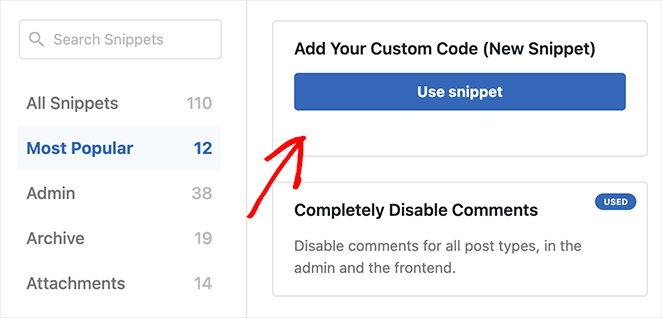
Next, give your snippet a title: Something like “Rename Additional Info Tab” will work. Then paste the following code into the code editor:
add_filter( 'woocommerce_product_tabs', 'rename_additional_information_tab', 10, 1 );

function rename_additional_information_tab( $tabs ) {
  $tabs['additional_information']['title'] = __( 'Your New Tab Name', 'your-theme-textdomain' ); // Customize the tab name here
  return $tabs;
}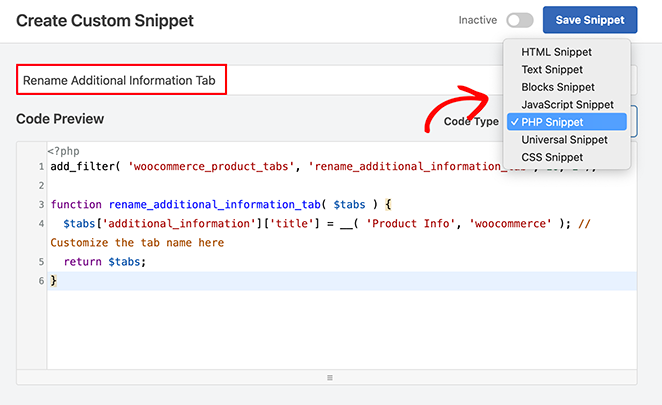
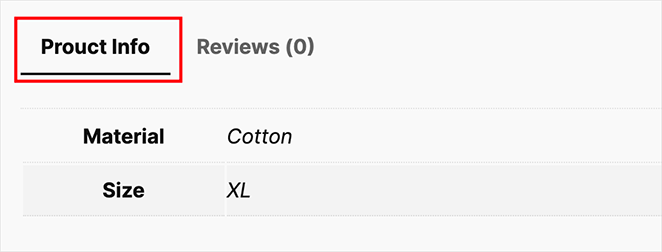
Now, replace ‘Your New Tab Name’ with your desired tab name (e.g., ‘Product Specs,’ ‘More Info’, etc.). I used “Product Info.”
If you’re unsure about your theme’s text domain, you can leave ‘your-theme-textdomain’ as ‘woocommerce.’
Under “Code Type,” select “PHP Snippet.”
Now, click the “Save Snippet” button, then toggle the “Inactive” switch to “Active.”
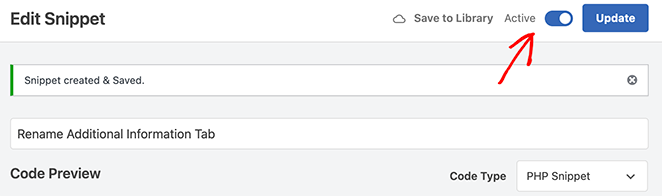
That’s it. Check out your product page. Your Additional Information tab now has a brand-new name.
How to Reorder WooCommerce Product Tabs
If the Additional Information tab doesn’t belong at the end of your product page, you can move it. SeedProd’s visual editor makes this straightforward with no code required.
From SeedProd » Theme Builder, open your Product Page template. In the visual editor, find the Product Data Tabs block and drag it to the position where you want the tab group to appear on the page.
To reorder individual tabs within the tab group, WooCommerce uses a priority system. The Additional Information tab has a default priority of 20, while the Description tab is 10 and Reviews is 30. A lower number appears first.
You can adjust tab order with a PHP snippet via WPCode. Add this code to change the Additional Information tab priority:
add_filter( 'woocommerce_product_tabs', 'reorder_additional_information_tab', 98 );

function reorder_additional_information_tab( $tabs ) {
  $tabs['additional_information']['priority'] = 5; // Lower number = appears first
  return $tabs;
}
Change the priority number to control the order. A value of 5 puts Additional Information before the Description tab, while 25 places it between Description and Reviews.
Add Custom Content to Additional Information Tab
Ready to go beyond basic product attributes? You can turn your Additional Info tab into a content hub. Here are two ways to add fields and dynamic content to the WooCommerce additional information tab.
Method 1: Using PHP Snippets
If you’re comfortable with a bit of code, PHP snippets give you more control over what content appears on your tab. I’ll use the WPCode plugin to keep things organized.
Create a new snippet with a descriptive title (e.g., “Add Custom Content to Additional Info Tab”).
Then, paste the following code into the snippet editor:
add_action( 'woocommerce_product_additional_information', 'add_custom_content_to_additional_info' );
function add_custom_content_to_additional_info() {
  // Add your custom content here!
  echo '<p>This is some custom content added to the Additional Information tab!</p>';
  echo '<ul>';
  echo '<li>You can add text, HTML, shortcodes...</li>';
  echo '<li>...even output content from custom fields!</li>';
  echo '</ul>';
}
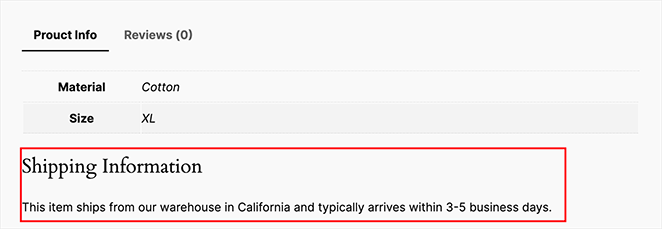
You can replace the example content within the echo statements with your desired content. In my example, I’ll add details about shipping information.
Then, save your snippet, set its “Code Type” to “PHP Snippet,” and activate it.
Now you can view your product page to see the new information:
Method 2: Using WordPress Plugins
Prefer a more visual approach? Several WooCommerce plugins make adding custom content to the WooCommerce additional information tab easier:
- Tabs Manager Plugins: Plugins like YITH WooCommerce Tab Manager and WooCommerce Product Tabs let you create entirely new tabs (not just customize the existing one) with drag-and-drop.
- Custom Fields Plugins: If you’re already using a plugin like Advanced Custom Fields (ACF) to manage custom product data, you can also use its features to display that content on the Additional Info tab.
Frequently Asked Questions
How do I add additional information to WooCommerce products?
Go to Products » Attributes in your WordPress dashboard and create a new attribute with a descriptive name. Then edit the product, open the Attributes tab in the Product Data panel, and assign your attribute with the relevant values. Click Save Attributes and update the product. The attribute will appear in the Additional Information tab on the product page.
How do I hide the WooCommerce additional information tab?
If you use SeedProd, open your Product Page template in Theme Builder and delete the Product Data Tabs block. This removes the tab globally for all products.
To hide it for specific product categories only, you can extend the PHP snippet approach using WPCode to target products by category, leaving the tab visible for products where it’s useful.
How do I rename the WooCommerce additional information tab?
Use WPCode to add a PHP snippet that filters the woocommerce_product_tabs hook. In the snippet, set $tabs['additional_information']['title'] to your preferred label, such as “Product Specs” or “More Info.” Save and activate the snippet, and your product pages will show the new tab name immediately.
Why is my WooCommerce additional information tab not showing?
The Additional Information tab only appears when a product has at least one attribute or shipping field (weight or dimensions) assigned. If the tab is missing, check the Attributes tab in the Product Data panel and confirm that at least one attribute has a value saved.
If you’re using SeedProd and the tab still doesn’t appear, verify the Product Data Tabs block is present in your Product Page template and hasn’t been deleted.
Ready to Create Product Pages That Convert?
Customizing the WooCommerce additional information tab is one of the faster wins available for any product page. Use SeedProd to make building beautiful, conversion-driven product pages easy without writing code.
Here are some more WooCommerce tips, tricks, and tutorials you may find helpful:
- How to Add View Cart Button in WooCommerce
- How to Change Shop Page Title in WooCommerce
- How to Create a Stunning Product Image Gallery in WooCommerce
- How to Add Star Rating to WooCommerce Product Pages
- How to Hide Out of Stock Products in WooCommerce
Thanks for reading! We’d love to hear your thoughts, so please feel free to join the conversation on YouTube, X and Facebook for more helpful advice and content to grow your business.