

TL;DR: How I Add SSL to WordPress
Most WordPress hosts now include a free SSL certificate, so the job is really two parts: turn the certificate on, then force WordPress to load over HTTPS. Here is the order I follow.
- Turn on the free certificate: Activate the SSL your host bundles (usually Let’s Encrypt) from your hosting dashboard.
- Force HTTPS with a plugin: Install Really Simple SSL to redirect every URL to HTTPS automatically.
- Update your site URLs: Change both addresses under Settings to HTTPS, manually or via the plugin.
- Fix mixed content: Track down any leftover HTTP images or scripts that block the padlock.
- Test it works: Confirm the padlock shows and run a quick SSL Labs check.
Need to add SSL to WordPress so your site shows the secure HTTPS padlock?
Most WordPress hosts now include a free SSL certificate with every plan. All you need to do is activate it in your hosting dashboard and force WordPress to load over HTTPS.
In this guide, I’ll walk you through each step, including how to use the free Really Simple SSL plugin and how to fix “Not Secure” warnings in Chrome.
- What Is an SSL Certificate in WordPress?
- Why Every WordPress Site Needs SSL
- Do You Need to Buy an SSL Certificate?
- How to Get a Free SSL Certificate
- How to Add SSL to WordPress Automatically (Plugin Method)
- How to Add SSL to WordPress Manually (Advanced)
- Fixing Common SSL Issues (Mixed Content Errors)
- How to Test Your SSL Is Working
- FAQs About Adding SSL to WordPress
What Is an SSL Certificate in WordPress?
An SSL certificate is a small data file that encrypts the connection between a visitor’s browser and your WordPress site. SSL is short for Secure Sockets Layer, the security protocol that protects information as it moves between the two.
We all share data when we browse, and on eCommerce sites it is often sensitive information like card details or login credentials.
Plain HTTP sends that data in the open, which leaves it exposed to anyone watching the connection. An SSL certificate, also known as HTTPS, closes that gap.
Your site needs a certificate issued by a recognized certificate authority. Once it is verified, your browser shows a padlock in the address bar and the URL switches from HTTP to HTTPS.
The protection comes from encryption. When you visit an SSL-certified site, your browser checks the certificate, then scrambles your data with the site’s public key so nobody in between can read it. The site decrypts it on arrival using a matching private key.
Why Every WordPress Site Needs SSL
Every site should run on SSL/HTTPS, because Google now treats a secure connection as a baseline web standard.
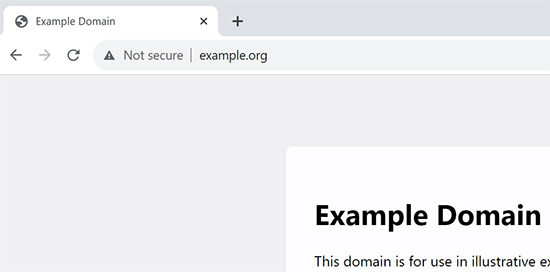
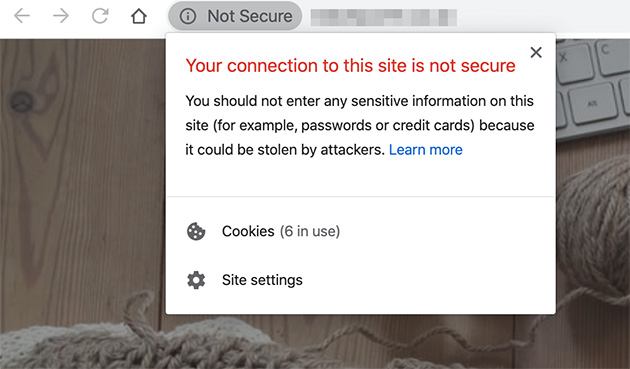
About 95% or more of all Chrome traffic now loads over HTTPS, according to Google’s HTTPS Transparency Report. If your site is still on HTTP, Chrome can show a “Not Secure” warning that chips away at visitor trust.
SSL matters most when you collect any of the following:
- Credit card details
- Payment information
- Login credentials
A verified certificate protects that data, and many payment services require HTTPS before they will let you take payments at all. If you run a store, SSL is one piece of a wider job, so it is worth knowing how to secure a WooCommerce store end to end.
That “Not Secure” flag does more than look bad. It pushes people to leave before they read a word, which quietly drags down engagement and conversions. SSL is a foundation, not the whole job, so it pairs naturally with the wider steps to protect your whole site against hackers.
Most people add SSL right when they are setting up or relaunching a site, which is the messy moment visitors should not see. I keep the front end hidden behind a branded coming soon page with SeedProd while I switch on the certificate and clear up any mixed content.
SeedProd is a drag-and-drop website builder for WordPress, and its coming soon and maintenance mode pages let you put up a polished holding page in a few minutes. Visitors see a tidy “we’re launching soon” message instead of a half-finished site throwing security warnings.
Do You Need to Buy an SSL Certificate?
For most sites, no. Your host’s free certificate is enough, and you do not need to pay for one.
This trips a lot of people up. I have seen site owners buy a $200 certificate without realizing the free Let’s Encrypt one their host already offers would have done the same job. A free certificate encrypts traffic exactly the same way a paid one does.
Paid certificates still have a place if you want extra validation or a warranty. Prices range widely, from under $10 a year for a basic domain-validated certificate to well over $100 for organization or extended validation. For a standard blog or small business site, that spend rarely changes anything a visitor sees.
A quick guide to the main types, if you do go paid:
- Domain Validated (DV): Fine for blogs, personal sites, and most small business sites.
- Organization or Extended Validation (OV/EV): Worth it for stores, memberships, and sites handling logins or payments.
- Wildcard or Multi-domain: Useful if you run subdomains like blog.example.com or several domains under one roof.
If you are unsure, start with the free certificate. You can always upgrade later. Here is how to turn the free one on.
How to Get a Free SSL Certificate
Most hosts now bundle a free certificate, so in most cases you just flip a switch. The free certificates come from Let’s Encrypt, a non-profit authority that made SSL free and automatic for small sites.
These WordPress hosting companies all include a free SSL certificate with their plans:
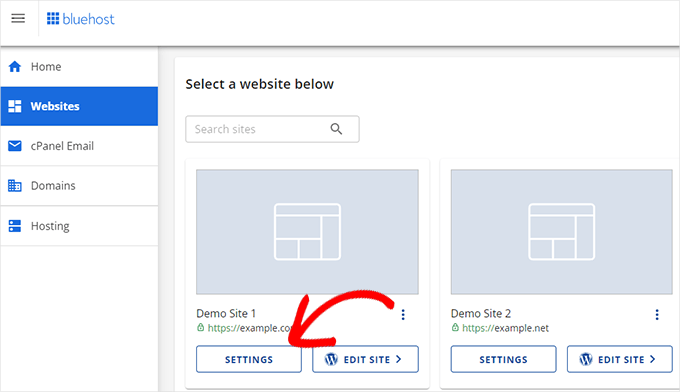
Using Bluehost as an example, go to the Websites section in your dashboard and click the Settings button below your site.
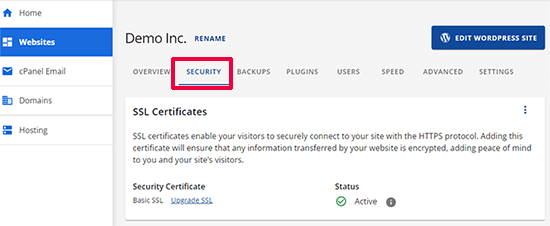
From there, switch to the Security tab and turn on the free SSL certificate. In most cases Bluehost enables this for you automatically.
If your host isn’t Bluehost, the steps may look a little different. You can ask your hosting provider to switch it on if you can’t find it in your admin area or cPanel.
If your host doesn’t offer SSL at all, you can buy one from authorities like Comodo, GeoTrust, GlobalSign, and RapidSSL, or get a free one direct from Let’s Encrypt.
One thing to know is, Let’s Encrypt certificates expire every 90 days. Managed hosts renew them automatically, so most people never touch renewal. If you set up the certificate yourself on your own server, you will need to automate renewal, or your site goes down the day it expires.
Now let’s get WordPress loading over HTTPS with your new certificate.
How to Add SSL to WordPress Automatically (Plugin Method)
With the certificate enabled at your host, the next job is to make WordPress use HTTPS for every URL on your site.
The easiest way is the Really Simple SSL plugin. It’s one of the best WordPress plugins for this, and it does most of the work for you. If you’re new to installing plugins, this step-by-step guide walks you through it.
After you activate the plugin, open its settings from your WordPress dashboard. Really Simple SSL detects your certificate and forces HTTPS across your URLs, then turns on the HTTP to HTTPS redirect automatically.
The plugin also rewrites old HTTP URLs that are baked into your posts and settings, fixing them on the fly as pages load. That saves you a manual database search-and-replace, which is the step most people miss.
Even a single leftover HTTP URL makes a browser treat the page as insecure. Really Simple SSL handles those for you, but if one slips through, the browser’s inspect tool will point you to it.
Launching or relaunching a site?
Hide the work behind a branded coming soon page
While you switch on SSL and clear up mixed content, keep visitors on a polished holding page instead of a half-finished site. SeedProd builds one in minutes, no code.
I want to build a coming soon pageHow to Add SSL to WordPress Manually (Advanced)
The plugin method above is the easiest route. But you may want to move your site from HTTP to HTTPS by hand instead.
This involves editing WordPress files, so only follow it if you’re comfortable pasting code snippets.
First, go to the Settings » General page in your dashboard. Change both the WordPress Address and Site Address fields from HTTP to HTTPS.
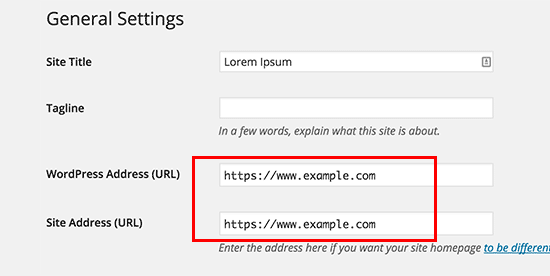
After you save, WordPress logs you out and you’ll need to log back in.
Update hard-coded URLs in your database: Those two fields only cover your main site address. Older sites also have HTTP URLs saved inside posts, pages, and options, and those won’t update on their own.
This is the step manual followers most often skip, and it’s why they still see mixed content afterward. Run a search-and-replace across the database to swap http:// for https://, using a plugin like Better Search Replace or the WP-CLI command wp search-replace 'http://example.com' 'https://example.com'. Back up your database first.
Redirect HTTP to HTTPS on Apache: Add this to your .htaccess file so every visitor lands on the secure version.
<IfModule mod_rewrite.c>
RewriteEngine On
RewriteCond %{HTTPS} off
RewriteRule ^(.*)$ https://%{HTTP_HOST}%{REQUEST_URI} [L,R=301]
</IfModule>
One caveat: if your host terminates SSL at a proxy or you use Cloudflare’s flexible SSL, this rule can read your connection as insecure and loop the redirect. On those setups, let your host or Really Simple SSL handle the redirect instead of editing .htaccess.
Redirect HTTP to HTTPS on Nginx: If your site runs on Nginx, add this to your configuration file instead. Replace “example.com” with your own domain.
server {
listen 80;
server_name example.com www.example.com;
return 301 https://example.com$request_uri;
}
These redirects stop the WordPress HTTPS not working error, because every page now loads over HTTPS.
Force SSL on the admin and login pages: To secure your login pages, add this line to wp-config.php, just above the “That’s all, stop editing!” line.
define('FORCE_SSL_ADMIN', true);This forces SSL and HTTPS across the entire WordPress admin area.
Fixing Common SSL Issues (Mixed Content Errors)
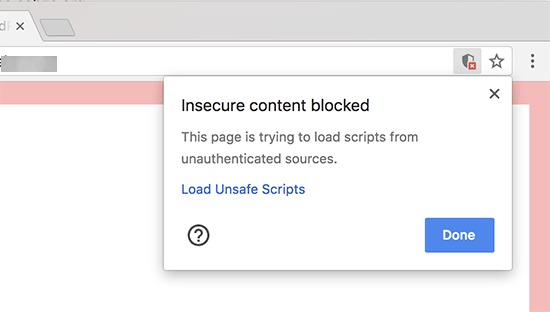
Once your site is on SSL, you may still see mixed content errors. These happen when images, scripts, or stylesheets still load over HTTP, which stops the padlock showing even though your certificate is active.
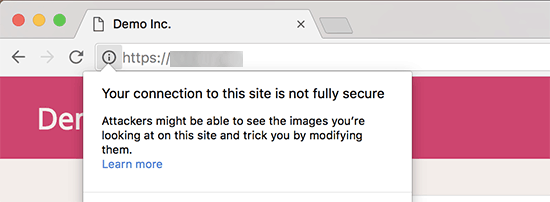
Some browsers block the unsafe resources and show a notification in the address bar instead.
To find what’s still on HTTP, open your browser’s Inspect tool and check the console. Each mixed content item shows up as a warning with the offending URL.
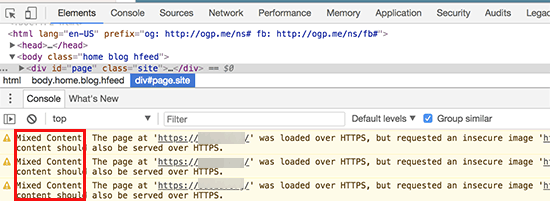
Most of these are images, iframes, and galleries, with the odd script or stylesheet from a plugin or theme.
You have two ways to fix them. The simplest is to let Really Simple SSL handle it, since it rewrites HTTP resources to HTTPS as pages load. If you’re not using the plugin, run a database search-and-replace (Better Search Replace or WP-CLI) to swap every http:// reference for https://, which clears the URLs at the source.
If a single resource still refuses to load securely, it’s usually hard-coded in a widget, a theme option, or an external embed. Update that one URL by hand and the padlock returns.
How to Test Your SSL Is Working
Don’t assume it worked. A quick check confirms the certificate is live and nothing is still loading over HTTP.
- Check the padlock: Visit your site and look for the padlock in the address bar, with the URL starting in https://.
- Run an SSL Labs test: Enter your domain at SSL Labs (ssllabs.com/ssltest) for a full report on your certificate and configuration.
- Scan for mixed content: Open a few key pages with the Inspect tool’s console open and confirm no HTTP warnings appear.
When the padlock shows on every page and SSL Labs gives you a clean grade, your site is fully on HTTPS.
FAQs About Adding SSL to WordPress
How long does it take for SSL to work on WordPress after I enable it?
Once you switch the certificate on at your host, it usually activates within a few minutes to a couple of hours. After that, forcing HTTPS with a plugin like Really Simple SSL takes effect immediately.
Do I need to update my database URLs after adding SSL, or does the plugin handle it?
Really Simple SSL rewrites old HTTP URLs in your content automatically as pages load, so most people never touch the database.
If you move a site manually instead, you’ll need a database search-and-replace with a tool like Better Search Replace or WP-CLI to swap http:// for https:// at the source.
Will adding SSL to an existing WordPress site break my links or images?
It shouldn’t, as long as you handle the URL switch properly. Really Simple SSL rewrites internal links and images to HTTPS for you.
The one thing to watch is mixed content, where a stray image or script still loads over HTTP. Fixing those URLs restores the padlock without breaking anything.
Does my SSL certificate renew automatically, or do I have to do it myself?
If your host issued the certificate, it almost always renews automatically, so you never have to think about it.
Let’s Encrypt certificates expire every 90 days. Managed hosts handle that for you, but if you installed one yourself on your own server, you’ll need to set up automatic renewal.
Get Your WordPress Site Fully Secure
That’s it. Once the padlock shows on every page, visitors trust your site more and you stop losing them to “Not Secure” warnings.
If you’re setting up SSL as part of a launch, SeedProd lets you keep the site behind a branded coming soon page while you finish the job. Get started with SeedProd and build one in minutes.
If you found this guide helpful, you might also like our tutorials on setting up a business email address and building a landing page in WordPress.
Thanks for reading! We’d love to hear your thoughts, so please feel free to join the conversation on YouTube, X and Facebook for more helpful advice and content to grow your business.


