

TL;DR: How to Create a Membership Landing Page Most membership plugins give you a bare registration form. This tutorial shows you how to build a proper membership landing page that convinces visitors to join before they ever see that form.
- Install SeedProd: Get your license key, install the plugin, and create your first landing page.
- Choose a template: Pick a Sales or membership template and give your page a name and URL.
- Add membership details: Write a conversion-focused headline, swap in your hero image, and set up your CTA button.
- Add social proof: Insert a testimonials section and customize it with real member quotes.
- Configure settings: Set SEO options, connect your email list (Plus plan and above), and add tracking scripts.
- Publish: Hit Publish, preview your live page, and drive traffic to it.
Most membership site owners send visitors straight to their plugin’s default registration page and wonder why signups are low. That bare form with fields and a Submit button doesn’t sell anything. It just asks people to hand over their credit card to something they’re not yet convinced they want.
Your membership landing page is the gap between “visitor who found you” and “person ready to join.” Whether you’re running an online fitness program, a coaching community, or a paid newsletter, this is the page that does the selling. The registration page just closes the deal.
In this guide, I’ll walk you through how I build a membership landing page in WordPress using SeedProd – the same drag-and-drop website builder I use on this site.
What Is a Membership Landing Page?
A membership landing page is a focused signup page designed to turn visitors into paying members – everything from the headline to the call-to-action is built around one goal: getting someone to join.
It isn’t meant for browsing blog posts or learning about your company background. Instead, it’s a streamlined pitch that highlights your offer, shows the value of becoming a member, and makes it easy to click “Join Now.”
This page is different from your membership plugin’s built-in registration or checkout page. The landing page does the persuading – it convinces visitors to click “Join Now.” The registration page is where they actually complete signup and pay. Think of it as: landing page convinces, registration page closes.
It’s also worth knowing the difference between a membership landing page and a membership sales page.
A sales page is typically long-form – it handles every objection and walks through the full value proposition. A landing page is shorter and more focused, designed to capture interest and drive a single action.
Both use the same tools; the distinction is length and how many objections you need to handle before someone clicks.
What Should Be on Your Membership Landing Page?
Before you start building, it helps to know what elements actually move people toward joining. I’ve seen membership pages succeed and fail based on whether they include these:
- Compelling headline: States the transformation your membership delivers, not a description of the product.
- Clear benefits subheading: One sentence that answers “what do I get and why does it matter to me?”
- Hero image or video: Shows the result, the community, or the experience – not a stock photo of a laptop.
- Social proof: Member count, testimonials, or recognizable names that validate the decision to join.
- Pricing tiers: What each plan includes and what it costs – no surprises on the next screen.
- FAQ or objection handler: Addresses the top 2-3 reasons someone would hesitate to join.
- Single CTA: One button, one action. Every section points toward the same click.
How to Create a Membership Landing Page in WordPress
The fastest way to build a paid membership landing page in WordPress is with a dedicated website builder. While some themes include basic landing templates, I’ve found they’re often limited. That’s why I always recommend using SeedProd.

SeedProd is my go-to because it gives me full control without code. I can drag and drop elements, swap images, and customize every detail in minutes.
It also comes with hundreds of mobile-ready templates that save me from starting with a blank page. And because it outputs bloat-free HTML, pages load fas. In my GTmetrix testing, SeedProd pages loaded at about 556ms compared to 1,882ms for Elementor, so your membership landing page won’t lose signups to slow load times.
So let me show you step by step how I use SeedProd to create a membership landing page that converts.
Step 1. Install and Activate SeedProd
The first step is to get a copy of SeedProd.
From there, install and activate the plugin on your WordPress website. Here’s a step-by-step guide on how to install a WordPress plugin if you need help.
If you want full access to 300+ templates for your paid membership page, you’ll need the Plus plan or above. The Basic plan includes 50+ templates, which is a solid starting point for most membership sites.
After installing SeedProd, head to your account area on the SeedProd website and click the Downloads tab. On that page, you can copy your license key.
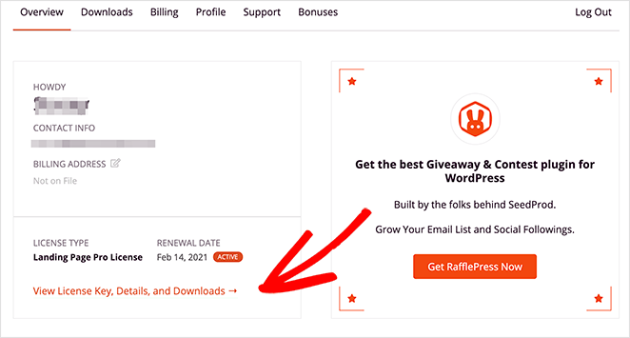
Now head back to your website, where you’ll see the plugin’s welcome screen. Then, paste your license key into the field and click Verify Key.

You can now scroll down the page and click the Create Your First Page button.

Step 2. Create a New Landing Page
SeedProd’s landing page dashboard is on the next screen. At the top of the page are landing page modes that let you enable a coming soon page, maintenance mode, 404, and login pages.
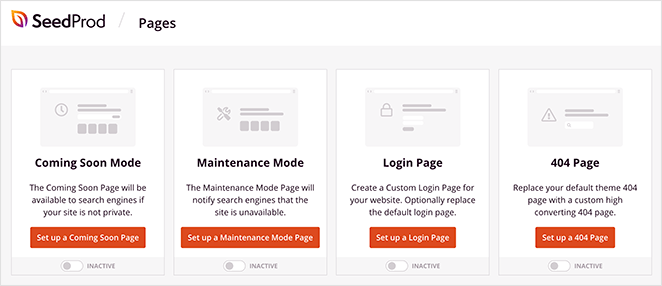
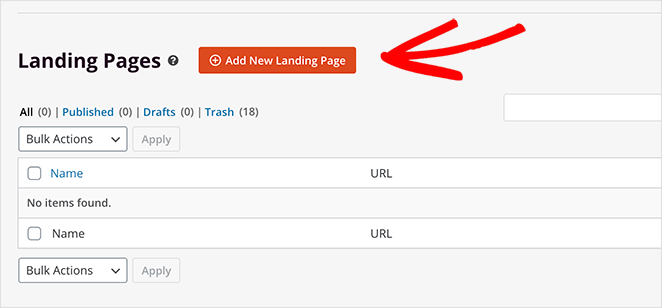
Below that is an area for creating single landing pages. So click the Add New Landing Page button to get started.
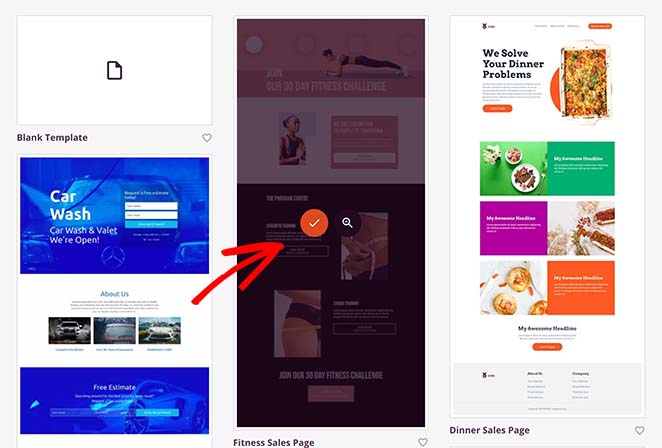
Now you can choose a template for your landing page design.
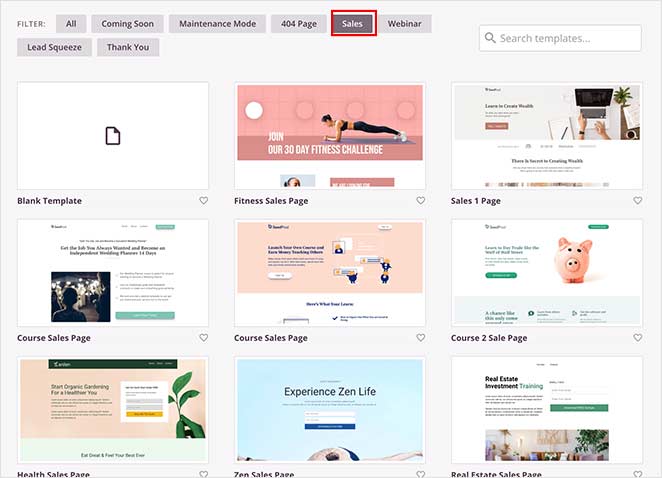
Click any tab along the top to filter the landing page templates by page type, including:
- Coming Soon
- Maintenance Mode
- 404 Page
- Sales
- Webinar
- Lead Squeeze
- Thank You
- Login
And when you find a design you like, hover over it and click the checkmark icon to choose it.
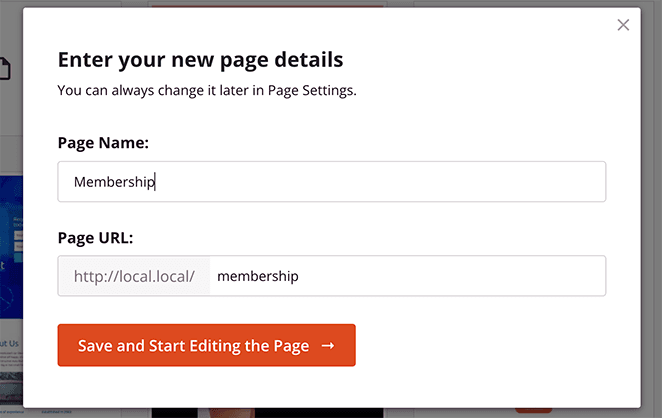
Next, enter a name and URL for your membership page, and click the Save and Start Editing the Page button. Your design will now launch in the visual editor.
Step 3. Add Details About Your Membership Program
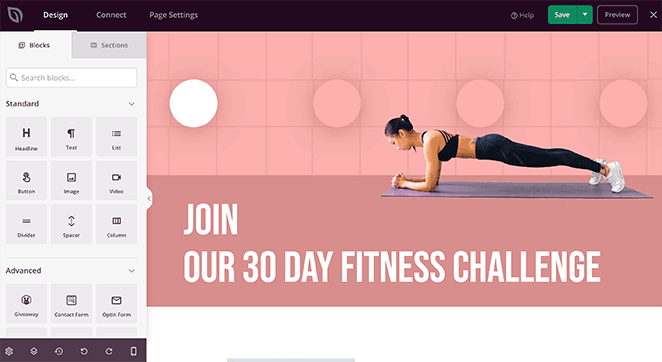
On the left are blocks and sections to build and customize your page. On the right, you can preview your design in real-time.
Let’s start by adding information about your membership program. That will help visitors learn more about your program and encourage them to sign up.
Click the headline and see its settings panel on the right. Change it to something that names the transformation your membership delivers – not a description of what’s inside.
A formula that works: “[Your membership name] helps [target person] achieve [specific outcome] without [common frustration].” For example: “The Photography Collective: Go from Hobbyist to Hired Photographer in 90 Days.” That’s a headline a visitor can actually picture themselves in.

You can also click the Advanced tab to control the headline’s color, font, spacing, and margin settings.
Now, let’s change the default hero image. Hover over the section until it has a purple outline and click it.
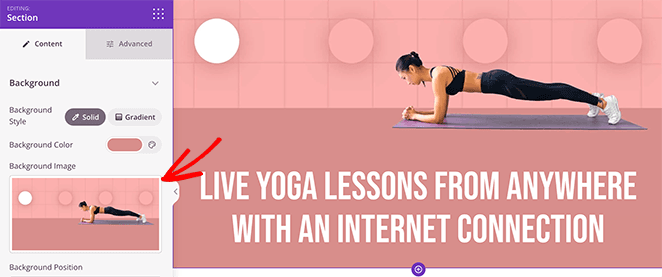
Click the trashcan icon to remove the image and upload a new one from your computer or WordPress media library.
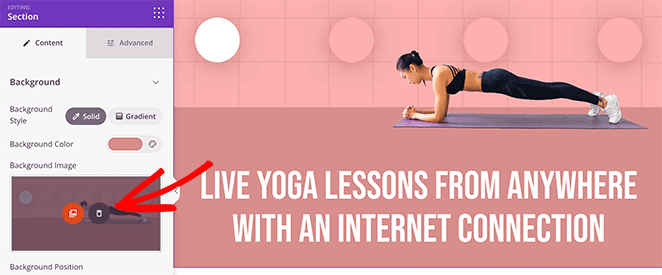
You can do that for any image on the page. Click it, remove it, and replace it with a new photo.
Next, you can add a call to action button that calls users to sign up. There are 2 ways to do this in SeedProd:
- Add a single CTA button that leads users to your sign up page
- Add a sign-up form directly on your membership landing page.
Since many WordPress sites use a membership plugin to handle registrations, we’ll use a single CTA button. That way, we can link the button to our dedicated membership registration page.
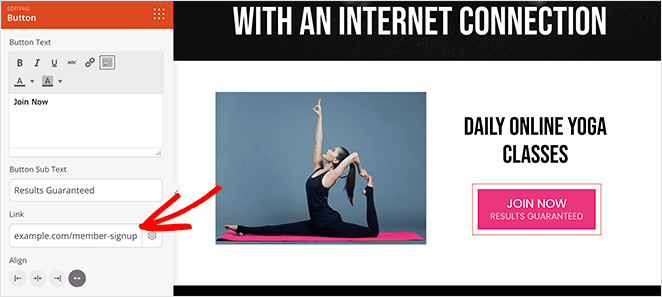
Luckily, this template already has a CTA button, so all you need to do is customize it.
Click the existing button and select the Advanced tab to change its color, spacing, and typography.
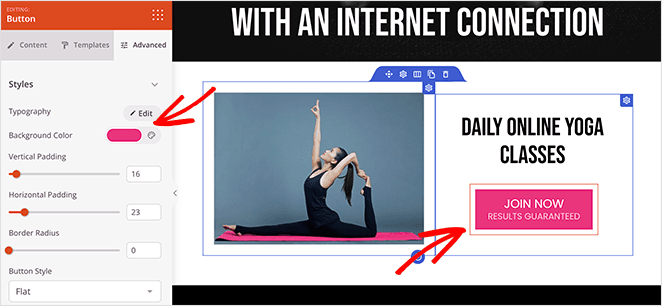
And in the Content tab, you can add a custom link to your signup page.
I also recommend adding a pricing table to this step. SeedProd includes a Pricing Table block – find it in the left panel and drag it onto your page. Set your tier names, monthly or annual prices, and a “Join Now” CTA for each tier. Visitors need to see what they’re paying before they click through to your membership registration page.
Step 4. Add Social Proof to Boost Trust
Visitors who’ve never heard of your membership will look for reasons to trust you before they hand over a credit card. A testimonials section answers that question before they have to ask.
SeedProd includes ready-made sections for testimonials. From the landing page editor, click the Sections tab on the right.

Scroll down to the Testimonial heading and choose a section from the many templates available.
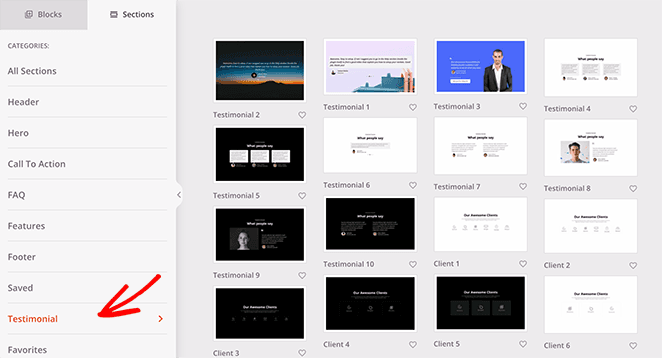
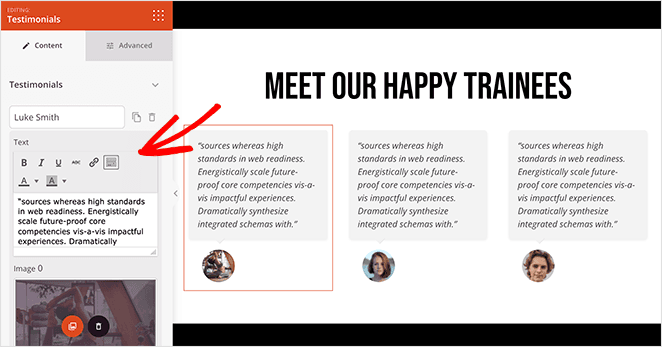
To add the section to your page, just click the plus icon. Then you can customize it as you would with any other SeedProd block.
For example, you can edit the testimonial content, add customer photos, enable comment bubbles, and even turn your testimonials into a scrolling carousel.
Continue customizing your membership page until you’re happy with how it looks.
Step 5. Configure Your Settings
After finishing your design, click the Page Settings tab at the top of your screen.
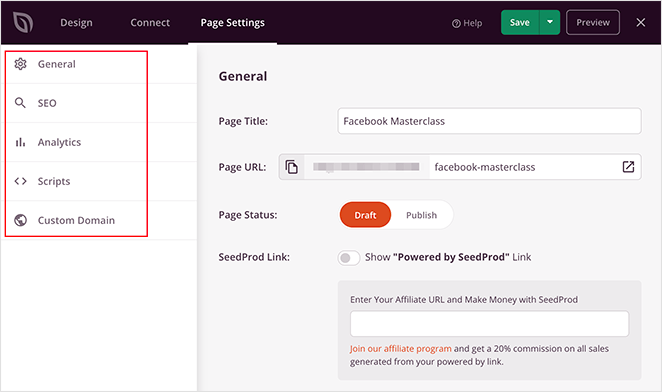
On this page, you can:
- Change your landing page name and URL
- Configure your on-page SEO Settings
- Install an Analytics plugin to monitor your performance
- Paste tracking and retargeting scripts
- Give your landing page a custom domain name
If you want to connect your membership signup page to an email list, click the Connect tab. Email marketing integrations are available on the Plus plan and above – popular services include Constant Contact, Mailchimp, ConvertKit, and 12 more.
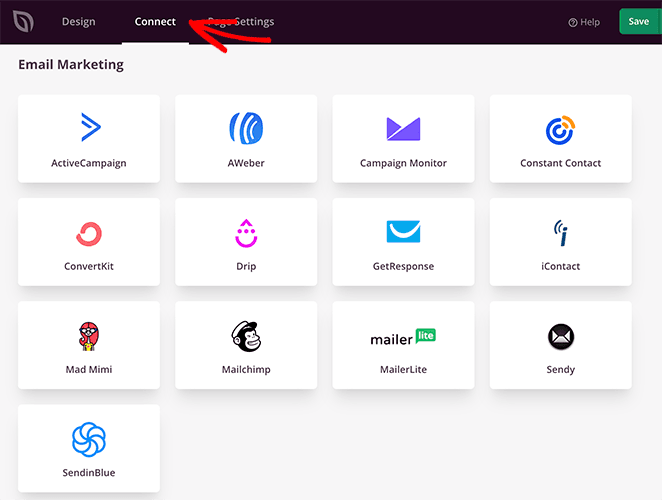
See our email integration documentation for more details on integrating your email list.
Step 6. Publish Your Membership Landing Page
Now it’s time to publish your membership landing page and start driving targeted traffic to it.
Head to the Save button in the top-right corner of the builder. Click the dropdown menu and click Publish.
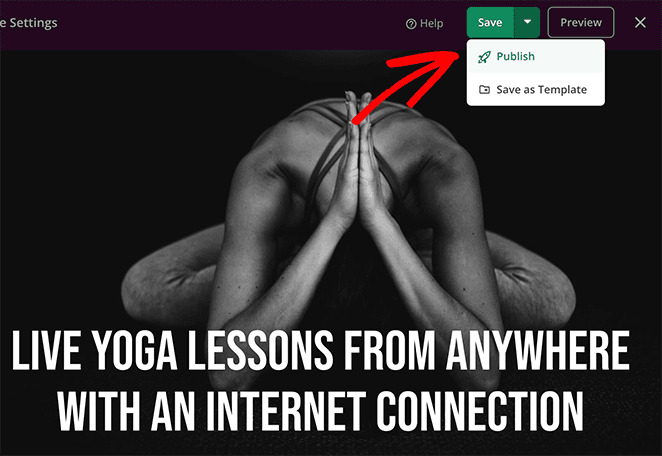
Your membership page is live. Preview it to confirm everything looks right before you start sending traffic.

Once your page is live, the next step is getting people to it. Share it with your email list, post it on social media, and run it as the destination URL for any paid ads you’re running. If you want to improve conversions over time, test your CTA button copy and hero image – small changes to these two elements tend to have the biggest impact on signup rates.
Membership Landing Page Frequently Asked Questions
What should be on a membership landing page?
A membership landing page needs a compelling headline that names the outcome visitors get, a benefits subheading, a hero image, social proof such as member count or testimonials, pricing tiers with clear CTAs, and an FAQ section that handles objections.
Every element should serve one purpose: convincing visitors to click “Join Now.” Remove anything that competes with that goal – navigation menus, unrelated links, and secondary offers all reduce conversion rates on a dedicated landing page.
What is the difference between a membership landing page and a registration page?
A membership landing page convinces visitors to join – it presents your offer, benefits, pricing, and social proof. A registration page is where they actually complete signup, entering their details and payment information.
Most membership plugins create a registration page automatically – but that bare form doesn’t do any selling. The landing page is what you build in SeedProd to do the selling before visitors ever reach the registration page.
Does SeedProd work with membership plugins like MemberPress or Paid Memberships Pro?
Yes. SeedProd creates your landing page as a standalone WordPress page, separate from your membership plugin. You build the landing page in SeedProd, then link the CTA button to your membership plugin’s registration or checkout URL.
This works with MemberPress, Paid Memberships Pro, WooCommerce Memberships, MemberMouse, and most other WordPress membership plugins. Check the SeedProd integrations documentation for the full list of supported tools.
Do I need a separate landing page or can I use my membership plugin’s default page?
You can use your plugin’s default page, but it won’t convert as well. Default registration pages are built for completing a transaction, not for persuading someone who’s on the fence.
A dedicated landing page built in SeedProd gives you control over the headline, hero image, benefits copy, social proof, pricing layout, and CTA – everything that turns a visitor into a paying member before they reach the registration form.
How do I connect my membership landing page to my email list?
In SeedProd, click the Connect tab in the Page Settings panel. Email marketing integrations are available on the Plus plan and above, and include Constant Contact, Mailchimp, ConvertKit, AWeber, GetResponse, and over a dozen other services.
Once connected, any visitor who submits a form on your membership registration page can be automatically added to your list. See the SeedProd email integration docs for setup instructions for your specific provider.
Build Your Membership Landing Page Today
If you’ve been sending visitors straight to your membership plugin’s default registration page, that’s the change that matters most. A purpose-built membership landing page does the selling before visitors reach the signup form – and that difference shows up in your conversion rate.
Get started with SeedProd and have your membership landing page live today.
Thanks for reading! We’d love to hear your thoughts, so please feel free to join the conversation on YouTube, X and Facebook for more helpful advice and content to grow your business.


