

TL;DR: How I Customize My WordPress Header Without Breaking My Theme
Your WordPress header is the first thing visitors see, and most themes give you far less control over it than you’d expect. Here are the four methods I use:
- SeedProd theme builder: Full point-and-click control over every header element, works with any theme, and keeps your changes when you update or switch themes.
- WordPress Theme Customizer (or Site Editor): Good for basic logo, title, and menu tweaks on classic themes. Modern FSE themes use Appearance » Editor instead.
- Insert Headers and Footers plugin: Best for adding scripts or simple code snippets to the header area without touching theme files.
- CSS and header.php edits: For advanced users only. CSS changes are safe; editing header.php directly requires a child theme to survive updates.
Your WordPress theme picked your header layout. Not you.
I’ve edited headers on dozens of WordPress sites over the years, and that’s the thing that frustrates people most. Whether you’re trying to add a logo, change your navigation, or drop in a call-to-action button, your header sets the tone for your whole site. With the right approach, you can even show different headers on different pages, something most WordPress themes can’t do on their own.
In this guide, I’ll walk you through how to edit your WordPress header using four methods, from the visual builder to CSS customization.
Quick Summary: How to Edit Your WordPress Header
- Edit header with a visual builder (no code)
- Edit header using your WordPress theme customizer
- Use a header plugin for simple changes
- Manually edit code (advanced)
What Is the WordPress Header?
The WordPress header is the section at the top of every page on your site. It typically includes your logo, navigation menu, and any CTAs like a phone number or sign-up button.
For example, here is how the header looks on the SeedProd website.

As you can see, it has the SeedProd logo, a navigation menu, and a call-to-action button to get started with SeedProd.
If your website has other needs, you can add extra elements to the header of your WordPress site. Like SeedProd, you could add call-to-action buttons or include a search box, social media icons, and other content.
You can find the details of your WordPress header in the header.php file of your WordPress theme. We only suggest editing that file if you’re an advanced user who understands what you’re doing.
What Can You Change in a WordPress Header?
The header is where most first impressions are made, and most WordPress themes give you almost no control over it. Understanding what’s actually editable helps you choose the right method below.
Most header customizations fall into these categories:
- Logo and site title
- Tagline
- Navigation menu
- CTA buttons (phone number, “Start Free Trial,” “Contact Us”)
- Search bar
- Social media icons
- Background color and fonts
- Sticky behavior (header that stays visible when scrolling)
- Mobile layout (hamburger menu, stacked vs. inline elements)
The method you choose determines how many of these you can actually control. A standard theme customizer might give you logo and tagline options but nothing else. SeedProd’s WordPress header builder gives you full control over all of them.
1. How to Customize Headers in WordPress with SeedProd
If you want complete control over your WordPress header, SeedProd gives you the most control. It’s the best WordPress theme builder plugin that lets you create a custom WordPress header template without writing any code.

SeedProd is a drag-and-drop WordPress website builder that lets you build a complete WordPress website and custom theme without touching code.
SeedProd’s theme builder is theme-agnostic. It replaces your active WordPress theme entirely, so changes you make are never lost when you update or switch themes.
Creating a custom header for your WordPress website takes just a few clicks, and you can add popular header elements with drag-and-drop.
With that said, here are the steps to edit your WordPress header with SeedProd.
Step 1. Install the SeedProd Theme Builder Plugin
The SeedProd theme builder works with any WordPress theme, so you don’t need to delete your existing setup first.
First, install and activate SeedProd on your WordPress site.
For help with this, see this step-by-step guide on how to install a WordPress plugin.
Note: You’ll need at least the Pro or Elite plan to unlock the theme builder.
After activating the plugin, go to SeedProd » Settings to enter your plugin license key. You can find this under your account on the SeedProd website.
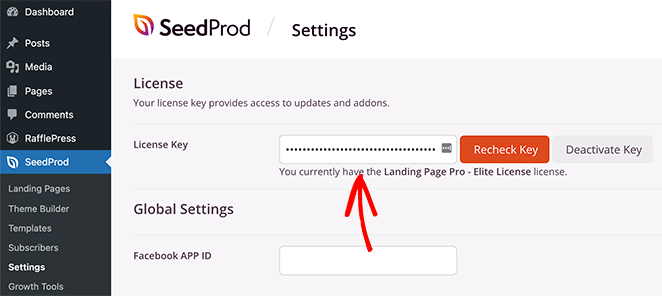
Once you enter your license key and click Verify Key, you’re ready to create a custom WordPress header using SeedProd.
Step 2. Choose a Starter Theme Template
To edit your header with SeedProd, you’ll first create a custom theme. Don’t worry, it’s simpler than it sounds.
Go to SeedProd » Theme Builder. You’ll see your current theme template files listed on this page.
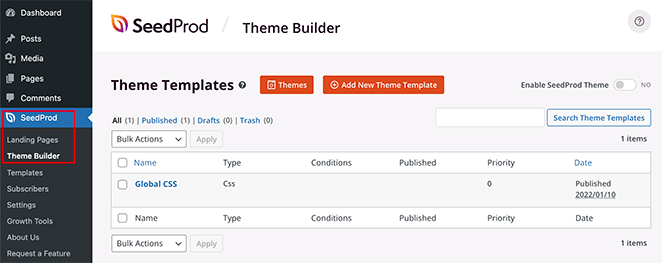
Because we haven’t started yet, you’ll only see a Global CSS template.
You have two options to get started:
- Use one of the ready-made SeedProd themes as a starting point
- Manually create theme templates from scratch
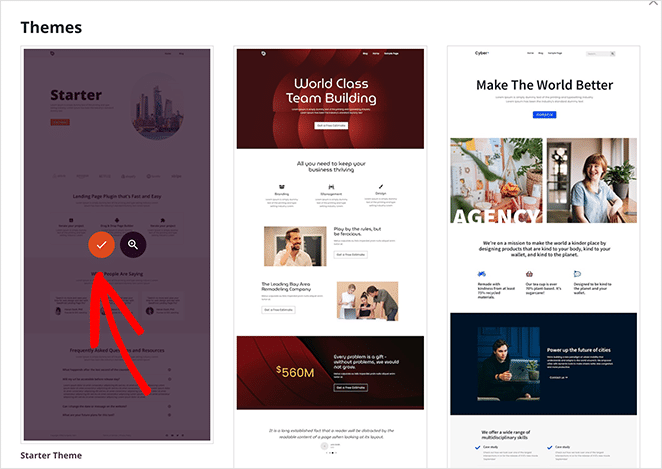
I recommend starting with an existing theme. SeedProd generates all the template files automatically, including the header, footer, and page templates. These are complete, professional-quality themes that give you a head start.
Click Themes and choose the one that best matches your site’s needs.
After choosing a theme, SeedProd automatically creates all the template files. From there, you can edit each template individually in the drag-and-drop editor.
Step 3. Customize the Header Section
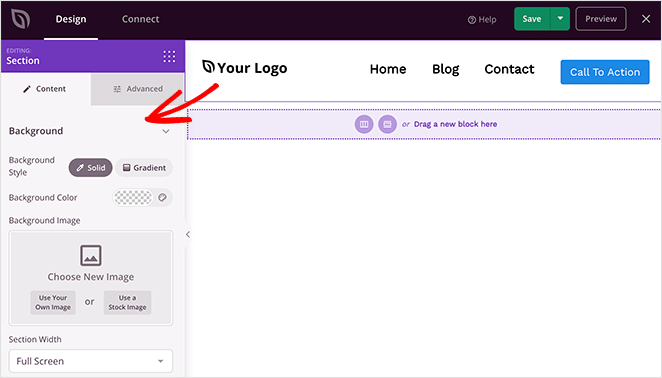
To edit your header with SeedProd, find the Header template and click Edit Design.
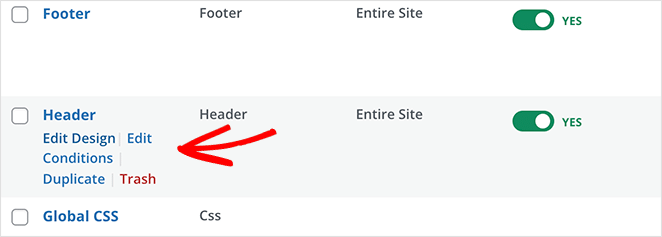
This opens the template file in SeedProd’s theme builder. You’ll see a live preview of your WordPress header template on the right, with an editing panel on the left.
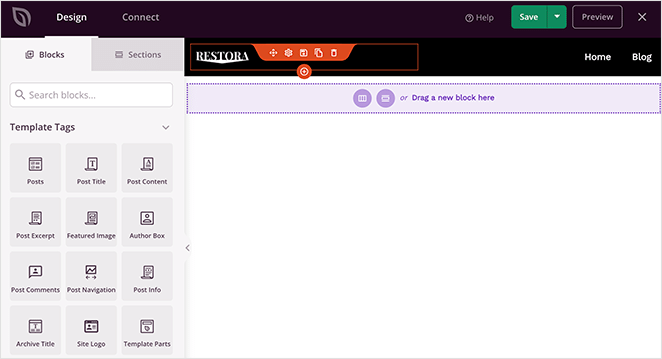
To change any item in your header template, point and click to edit it.
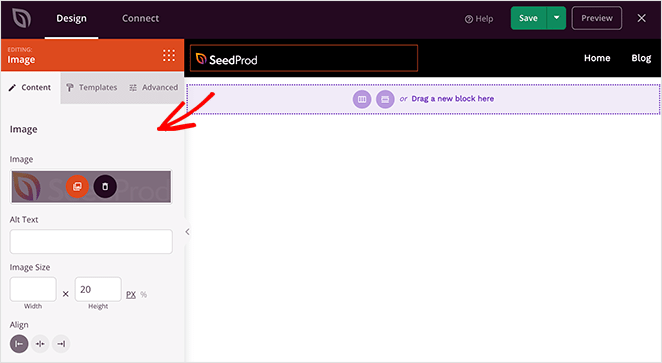
Depending on the item you click, you’ll see different editing options in the left column. You can change fonts, colors, background, spacing, and more.
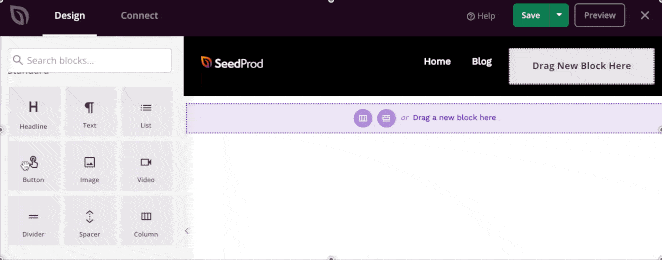
To add custom header items, drag SeedProd blocks from the left column into your template. Here are the block types available:
- Template Tags – Blocks that generate theme elements from your WordPress database such as blog posts, comments, and featured images.
- Standard Blocks – Common web design elements that let you add images, buttons, text, dividers, and more.
- Advanced Blocks – Blocks to add contact forms, social profiles, sharing buttons, WordPress shortcodes, Google Maps, and more.
- WooCommerce – If you run an online store, use these blocks to display products, shopping carts, and custom checkout pages.
Using Sections to Customize Your WordPress Header
Apart from individual blocks, you can also add complete sections to your header template.
Switch to the Sections tab under the Design panel.
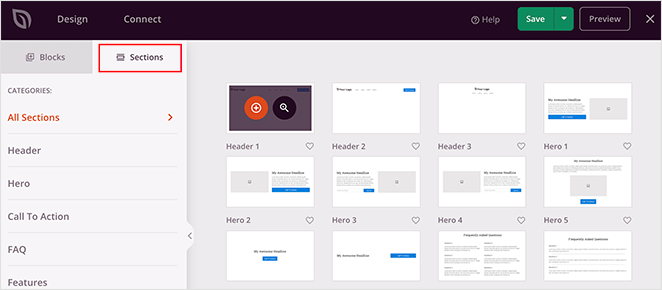
Sections are groups of blocks for different areas of your website design. You can find ready-to-use sections for your header, footer, calls to action, features, and more.
Click any header section to add it to your template, then edit it to your requirements.
When you’re happy with how your header looks, click Save in the top-right corner.
Now repeat this process for the other templates in your theme to create a completely custom WordPress theme.
Step 4. Publish Your Custom WordPress Header
When you’re satisfied with your custom WordPress header template, the final step is to activate it on your site.
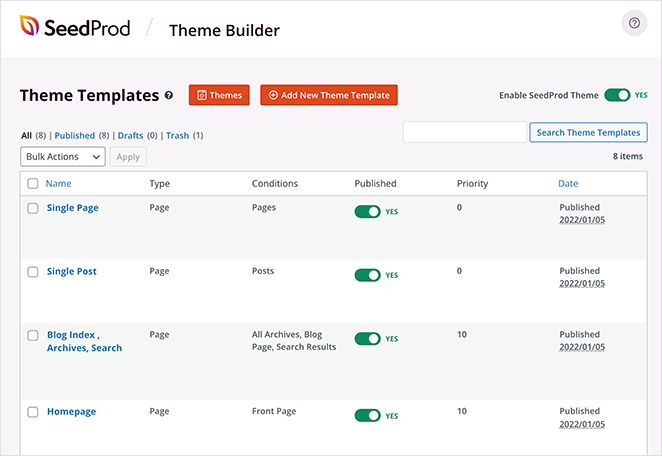
In SeedProd, you apply your custom WordPress header with a simple toggle.
Go to SeedProd » Theme Builder and toggle the switch next to ‘Enable SeedProd Theme’ to ‘Yes’.
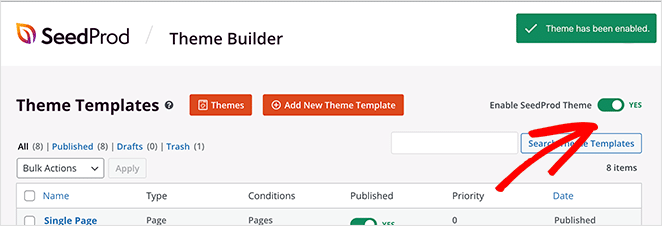
SeedProd replaces your existing design with the new WordPress theme and header.
Visit your website to see your custom WordPress header in action.

How to Make Your WordPress Header Sticky
A sticky header stays visible as visitors scroll down the page, which keeps your navigation and CTAs accessible at all times. Whether you’re using SeedProd or a standard theme, the approach is the same: a small CSS snippet.
Add this to your theme’s Additional CSS (go to Appearance » Customize » Additional CSS) or, if you’re using SeedProd, paste it into SeedProd » Theme Builder » Global CSS:
.site-header {
  position: sticky;
  top: 0;
  z-index: 999;
}
The selector .site-header varies by theme, so you may need to inspect your header element to find the correct class.
Creating Multiple Custom Headers with SeedProd
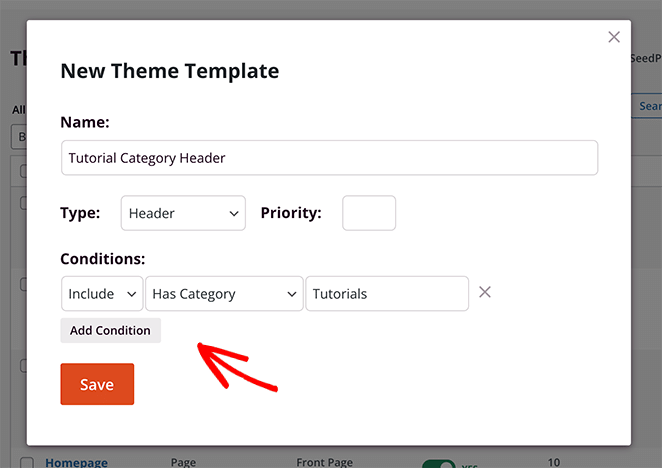
You can also create multiple headers for different sections of your website.
For instance, you may want a header that only shows on specific categories or landing pages. To do that, create a new template and change the display conditions to suit your needs.
Using SeedProd’s drag-and-drop theme builder, you can create any custom header layout your site needs.
While SeedProd’s visual editor offers the easiest way to edit your WordPress header, there are also other methods worth knowing.
2. Edit WordPress Headers with Theme Customizer
Most WordPress themes give you some control over your site’s header in the native WordPress Customizer. It won’t give you deep control, but you’ll get basic options to change how your header looks and behaves.
The available options depend on your theme. For most classic themes, go to Appearance » Customize from your WordPress admin. Then click Site Identity in the left column.
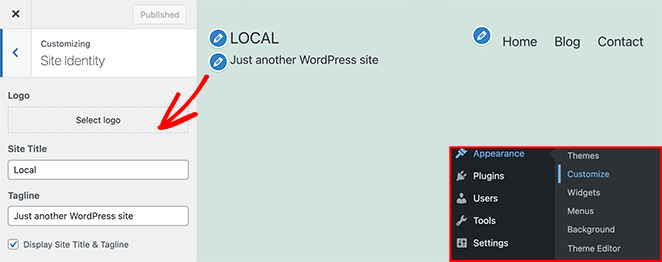
Most themes let you customize your logo, site title, and tagline from this panel.
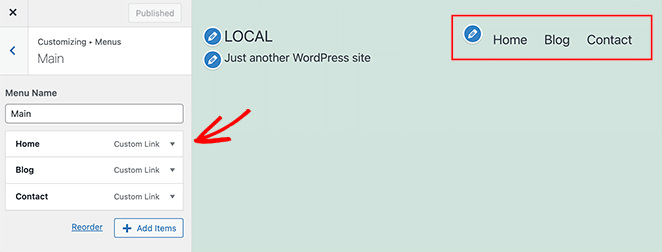
You can then click Menus to change your navigation menu’s layout.
Note: If you’re using a block-based (FSE) theme like Twenty Twenty-Five (the current default), the classic Customizer is not available. Instead, go to Appearance » Editor to edit your header using the full-site editing interface.
With the Site Editor, you can edit your WordPress header with the block editor just like any other post or page. It offers more flexibility than the classic Customizer but still less control than SeedProd’s dedicated WordPress header builder.
3. Customize Headers in WordPress with Header Plugin
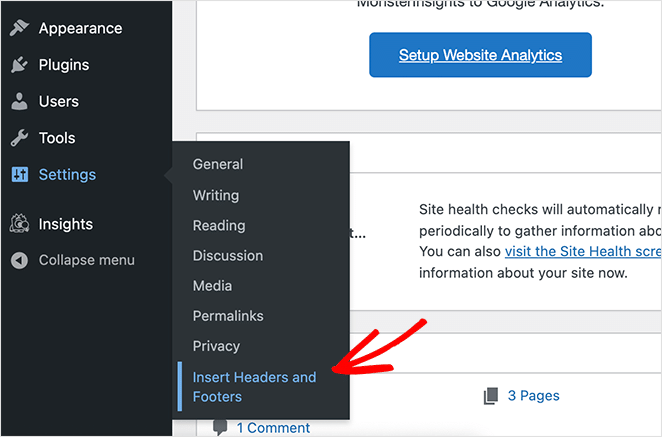
Another easy way to edit the header in WordPress is with a simple header plugin. This is a good option if you need to add scripts or code to your header without touching your theme files directly.
While there are hundreds of plugins to choose from, the free Insert Headers and Footers plugin is the most popular option.
After activating the plugin on your website, find it under Settings » Insert Headers and Footers.
From there, you can paste any code you want to add to your website’s header.
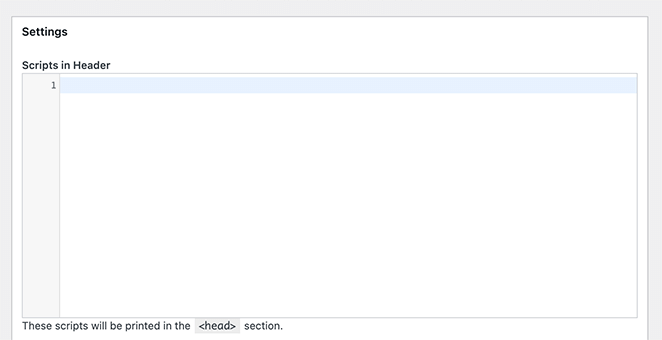
Any scripts you add here are automatically included in your WordPress site’s header tag. Click Save to store your changes.
4. Customize WordPress Header Code (Advanced)
If you’re an advanced user, you can edit your WordPress header directly using HTML, PHP, and CSS. This method isn’t suitable for beginners.
Important: If you plan to edit header.php directly, do this in a child theme. Otherwise, your changes get overwritten when you update your theme. The CSS-only approach below doesn’t have that problem.
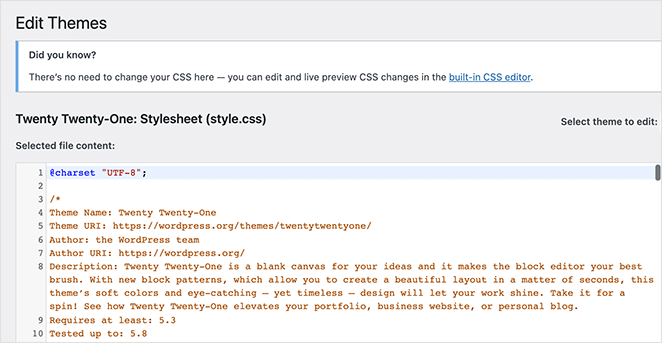
To edit your header’s code, go to Appearance » Theme Editor and open the Style.css file.
From there, scroll down to the Site Header section and add or remove code to adjust the styling.
You can also edit your header.php file for structural and functional changes. For example, if you want to add a phone number or restructure the header layout, that lives in header.php rather than CSS.
Those changes apply site-wide. If you want your mobile header to look different, here’s how to handle that separately.
How to Customize Your WordPress Header on Mobile
Desktop and mobile headers often need different layouts. A navigation menu that looks clean on a 1440px screen can become a cramped mess on mobile, and most themes don’t give you a visual way to fix that.
Here are the three ways to handle mobile header customization in WordPress:
- SeedProd responsive preview mode: In SeedProd’s header editor, click the mobile icon at the bottom of the screen to preview and edit your header at mobile size. You can hide elements, adjust spacing, and reorder blocks specifically for mobile without affecting the desktop layout.
- CSS media queries: For theme-based sites, add responsive CSS rules to target header elements at specific breakpoints. For example, to hide a tagline on mobile:
@media (max-width: 768px) { .site-description { display: none; } } - Your theme’s built-in mobile menu settings: Most themes handle the hamburger menu automatically, but check Appearance » Customize » Mobile (or a similar panel) for any mobile-specific header options your theme includes.
The most common issue I’ve seen is desktop and mobile header styles conflicting after a CSS edit. If that happens, check whether your CSS rule has a responsive breakpoint, or whether you’re editing the correct selector for mobile.
WordPress Header Frequently Asked Questions
How do I edit my WordPress header without breaking my theme?
The safest approach is to use SeedProd’s theme builder, which replaces your active theme entirely rather than modifying it. That means your custom header is never at risk when you update or switch themes. If you prefer to stay with your theme, stick to CSS edits via Appearance » Customize » Additional CSS and avoid editing header.php directly. If you do need to edit header.php, always use a child theme first.
What is the difference between WordPress.com and WordPress.org header editing?
WordPress.org (self-hosted) gives you full control over your header through theme customization, plugins, and direct file editing. WordPress.com is a hosted service with more restrictions. On WordPress.com, you edit your header via Site » Editor, and your options depend on your plan. The methods in this article apply to self-hosted WordPress.org sites only.
How do I make my WordPress header sticky?
Both SeedProd and standard theme setups use the same CSS approach. Add position: sticky; top: 0; z-index: 999; to your header element’s CSS class. For SeedProd users, paste it into SeedProd » Theme Builder » Global CSS. For standard themes, go to Appearance » Customize » Additional CSS. The exact class varies by theme, so inspect your header element to find the right selector.
Can I show a different header on specific pages in WordPress?
Yes, with SeedProd you can create multiple header templates and assign each one to specific pages, categories, or post types using display conditions. This is built into the theme builder and requires no coding. With a standard WordPress theme, showing different headers on different pages requires custom PHP or a plugin like Conditional Headers.
Customize Your WordPress Header Today
We hope this article helped you learn how to edit headers in WordPress.
The easiest way to get complete control over your custom header WordPress setup is with SeedProd. It offers a visual, drag-and-drop WordPress header builder, you don’t need to edit any code or theme files, and you can make all changes right inside the WordPress dashboard.
You might also like this guide on how to edit the footer in WordPress.
Thanks for reading! We’d love to hear your thoughts, so please feel free to join the conversation on YouTube, X and Facebook for more helpful advice and content to grow your business.


