I’ve built dozens of landing pages, but one type consistently brings in the best leads—gated content landing pages.
If you’re not using one on your WordPress site yet, you’re missing a simple way to grow your email list by offering exclusive resources people actually want.
In this guide, I’ll show you how to create a gated content landing page in WordPress without needing a developer, and how to make sure it converts.
What Is a Gated Content Landing Page?
A gated content landing page is a dedicated page that asks visitors to enter their email address in exchange for access to exclusive content.
This type of “locked content” could be anything your audience values but can’t get elsewhere on your site, like:
- Bonus blog content or checklists
- White papers or reports
- Product demo videos
- Case studies
- Free ebooks
To unlock the content, visitors usually fill out a simple sign-up form. From there, you can deliver the download instantly or send it by email from your list-building tool.
This strategy is common in inbound marketing and works especially well if the content solves a real problem. Search engines like Google can still index your landing page, so SEO isn’t impacted.
Here’s what one looks like in action:

What To Include On A Gated Content Landing Page?
The best gated content landing pages are simple, visual, and built to convert. They explain the value of your content and make it easy for people to sign up.
Here’s what I include on every gated content page I build with SeedProd:
- Clear value proposition – Let visitors know what they’ll get and why it’s worth giving up their email.
- Simple layout – A clean, modern design helps people focus on your offer.
- Visual media – Add images, color, or short videos to hold attention and explain key points.
- Short opt-in form – Fewer fields = more conversions. Just ask for what you need.
- Focused call-to-action – Use a CTA that tells them exactly what happens next.
I also recommend reviewing this landing page anatomy guide and these best practices before publishing.
Should You Gate Your Content?
Gated content works, but it’s not always the right choice. I’ve tested both locked and open content across different audiences, and here’s what I’ve learned.
When it makes sense: If your content solves a specific problem and feels “premium,” it’s a solid candidate. Think downloadable guides, industry reports, or exclusive videos, anything your reader can’t just Google elsewhere.
When to skip it: If your audience is new to your brand or just looking for quick answers, gating content too soon can hurt trust. Save it for when the value is clear and the ask is small (like just an email).
Here are a few gated content types I’ve had the most success with:
- Free ebooks or templates tied to a specific blog post
- Case studies with real results (especially in B2B)
- Early access to webinars or mini-courses
- Exclusive discount codes for email subscribers
Bottom line: Gating content can boost your leads, but only if the offer is worth it. Always test both versions and see what your audience responds to.
How to Make a Landing Page for Gated Content
You don’t need to code or hire a developer to create a gated content landing page in WordPress. SeedProd makes the whole process beginner-friendly.
I’ll show you how to use SeedProd to build your page step by step, from installing the plugin to publishing a mobile-friendly design that collects leads automatically.
Step 1. Install SeedProd Landing Page Pro
To build a high-converting gated content landing page, you’ll need SeedProd Pro. It unlocks the advanced features and email integrations you’ll use later in this guide.
このステップでヘルプが必要な場合は、WordPressプラグインのインストール方法に関するこちらのガイドに従ってください。
Note: there is a free version of SeedProd that you can use, but for this tutorial, we’ll use the Pro version because it has the advanced blocks and email integrations we need.
Upon activation, you need to enter the license key to verify your account. You can find your SeedProd license key in your account dashboard on the SeedProd website.

Click the Verify Key button, and you’ll see a success message. You can now go ahead and start building your page.
ステップ2.新しいランディングページを作成する
After verifying your key, go to SeedProd » Pages and click the ‘Add New Landing Page’ button to create your gated-content landing page.
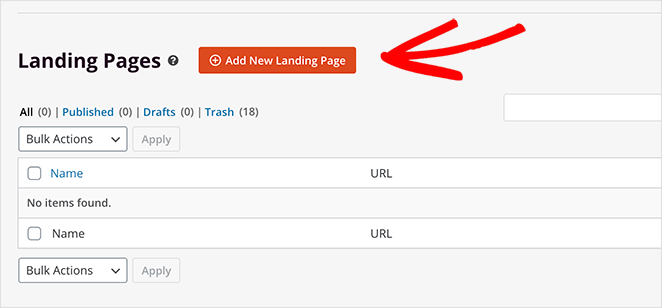
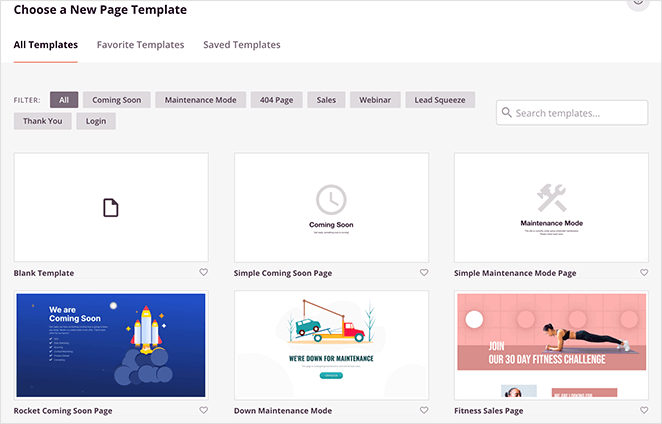
From there, you’ll see a new page with hundreds of templates you can use to get started quickly. Click any of the filters to find a design that closely matches your needs.
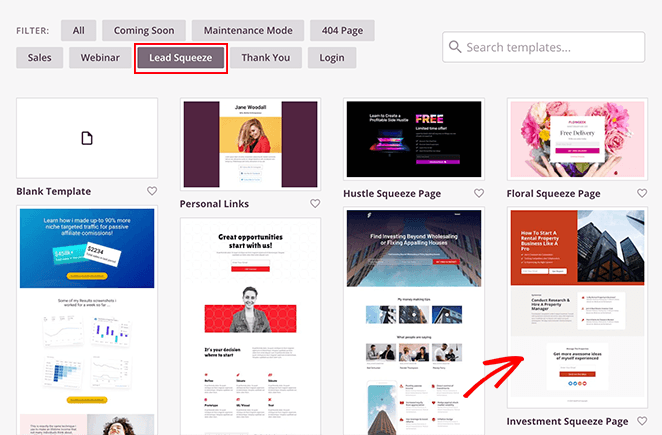
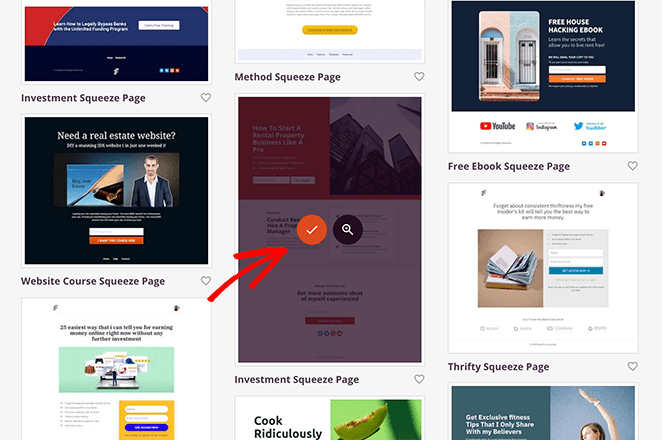
For this guide, we’ll click the Lead Squeeze filter and select the Investment Squeeze Page template.
To launch the template, move your mouse over the thumbnail and click the checkmark icon.
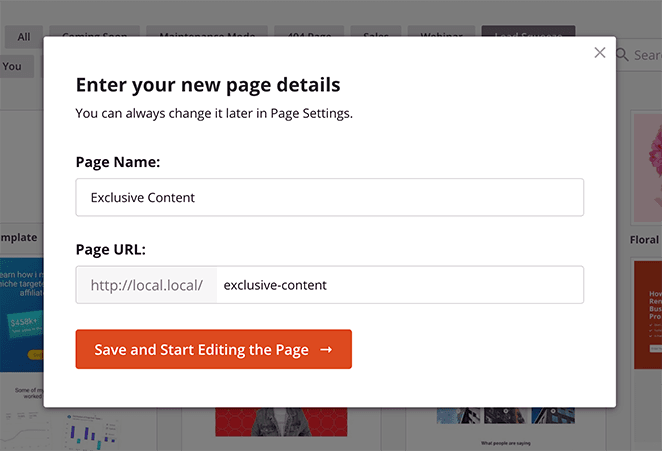
After choosing your template, a popup opens to enter a name and URL for your page. Then, click on the Save and Start Editing the Page button to continue.
Now, your new gated content landing page will open in SeedProd’s visual page editor.
Step 3. Customize Your Gated-Content Landing Page
SeedProd’s visual page builder makes it easy to add content and advanced features to your landing page.
For example, you can edit your page in real-time and preview it on the right-hand side of your screen. Similarly, you can find various content blocks, sections, and tools on the left-hand side.
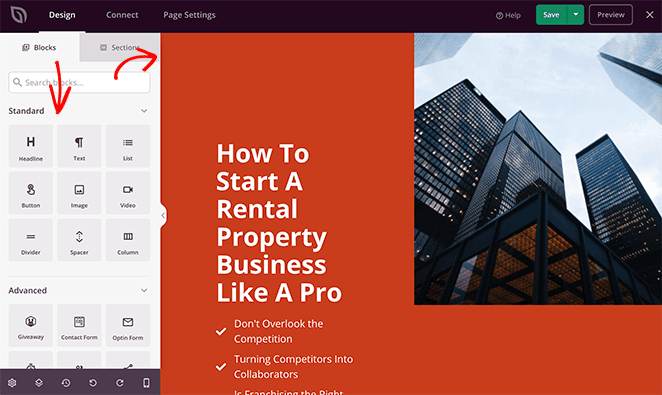
You’ll find that SeedProd offers a broad range of blocks to style your landing page, including:
- Standard – Basic content like headings, images, CTA buttons, and columns.
- Advanced – Lead-generating blocks like optin forms, countdown timers, social media embeds, testimonials, and more.
- WooCommerce – Content for your eCommerce store, including add-to-cart button, checkout, shopping cart, and product grids.
- Saved – Customized blocks you’ve saved to reuse on other pages.
Luckily a lot of the hard work is done for you with SeedProd’s responsive template designs. This means all you need to do is replace the default elements with your content and customize the styling.
Customizing Your Optin Form
First, let’s customize the optin form where users can sign up for your gated content.
To customize the default optin form, move your mouse over the form on your preview and click the gear icon. This opens the content settings panel on the left-hand side of your screen.
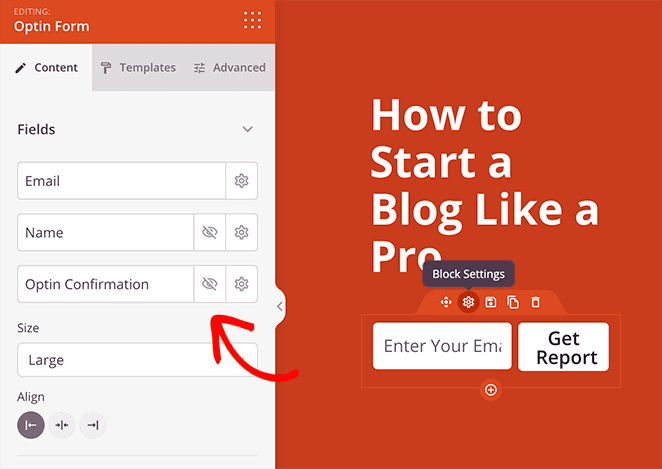
In this panel, you can enter custom form labels, show and hide specific form fields, and customize your form’s call-to-action button.
Additionally, you can choose what happens after users sign up. For example, you can show a custom success message or redirect users to another page on your website.
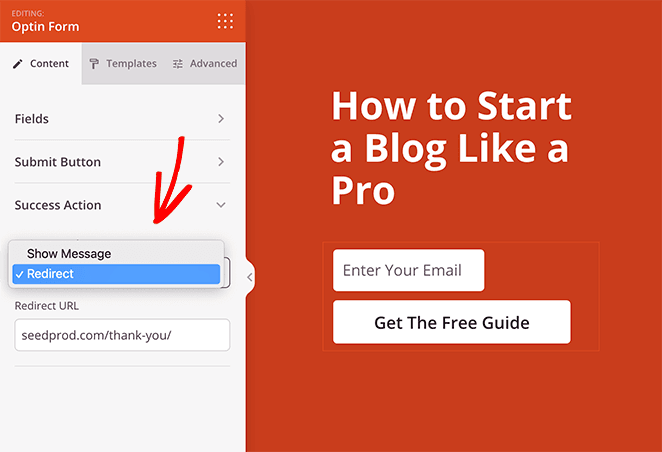
The Redirect action is an excellent way to deliver your free download to your users. Simply follow this guide to create a thank you page, and add a link that triggers the download.
Adding Custom Landing Page Text
Next, you can alter the default headings to suit your offer by clicking a heading and typing directly on your page preview.
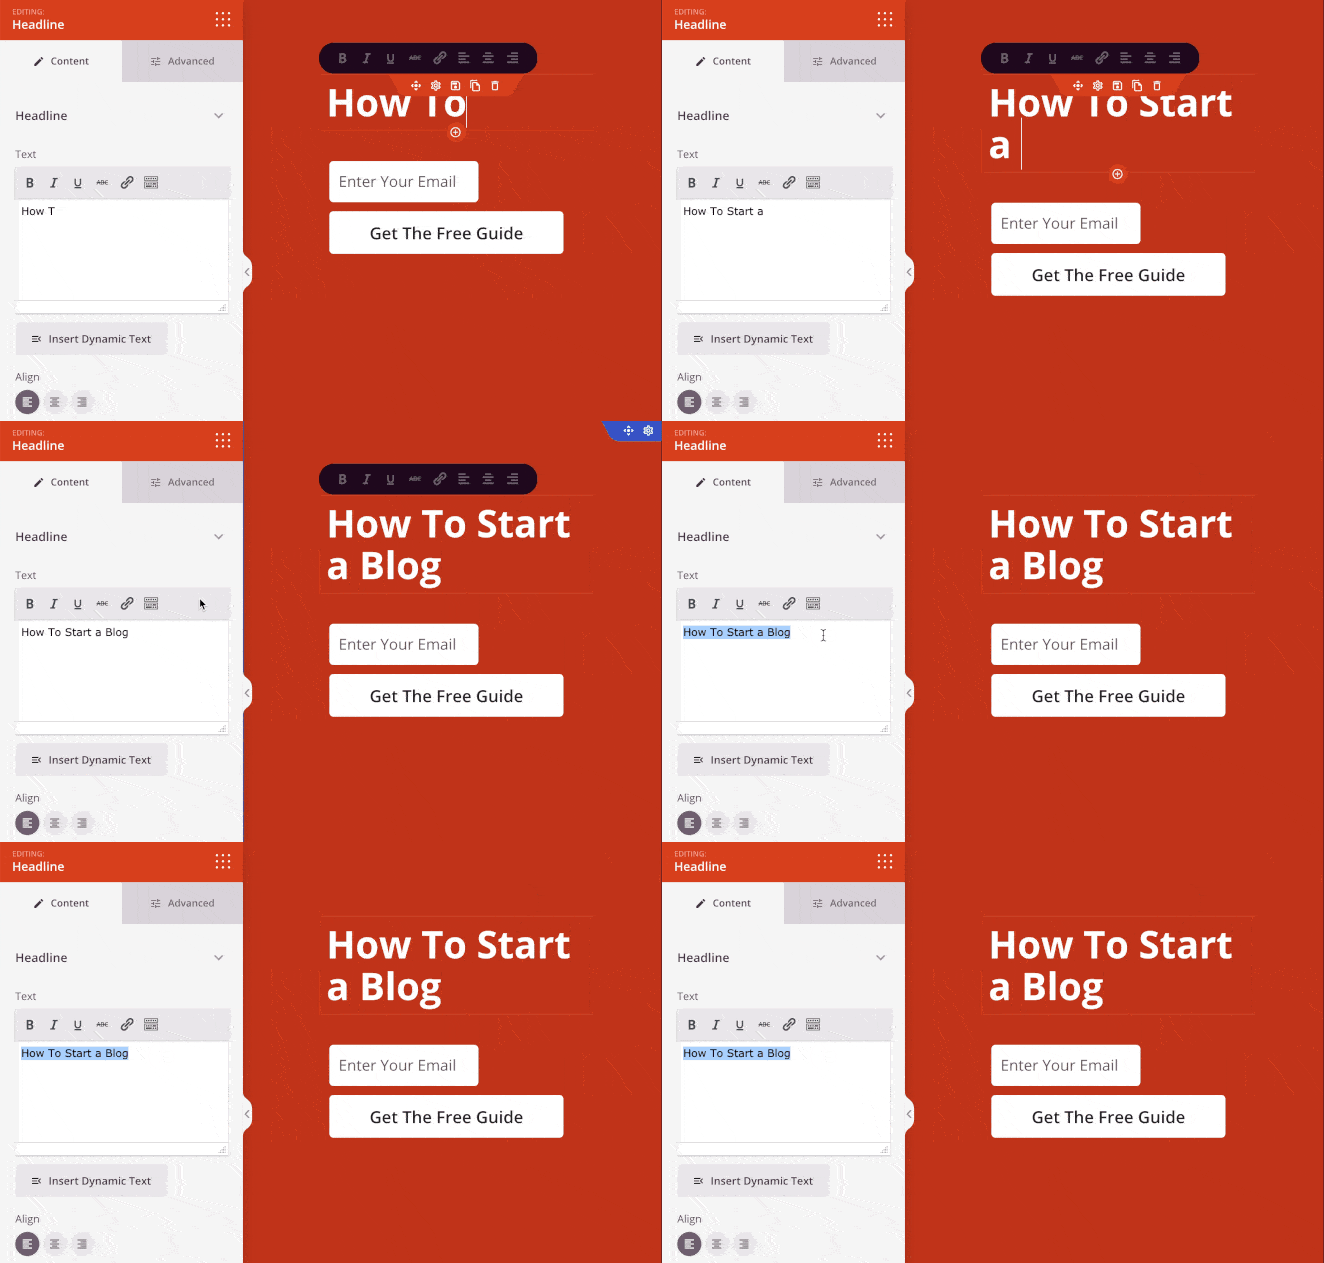
Or, if you prefer, you can enter your heading text in the heading settings panel on the left-hand side. In the same panel, you can adjust the alignment, font size, and heading level.
Repeat this step for any other written content on your template, including subheadings, bullet lists, and body text.
Customizing Your Icons
The template for this guide also includes handy icon boxes by default. This allows you to display eye-catching icons with a subheading and description beneath.
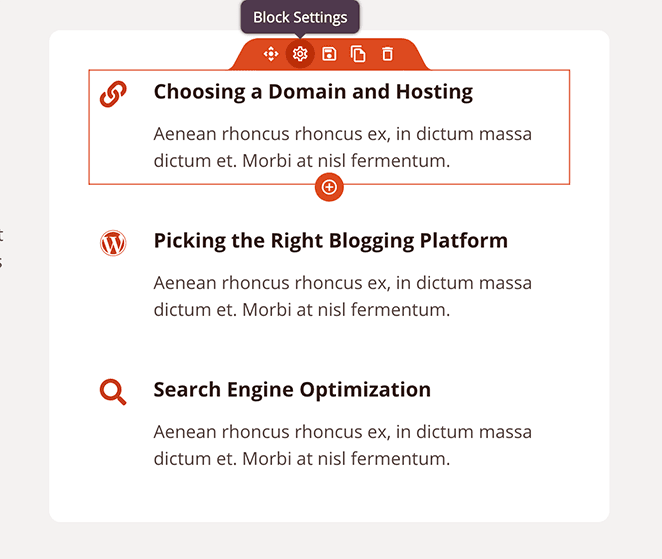
You can easily customize which icons you show by clicking the Block Settings icon on your preview. From there, you can remove the default icon and choose a more relevant design from SeedProd’s icon library.
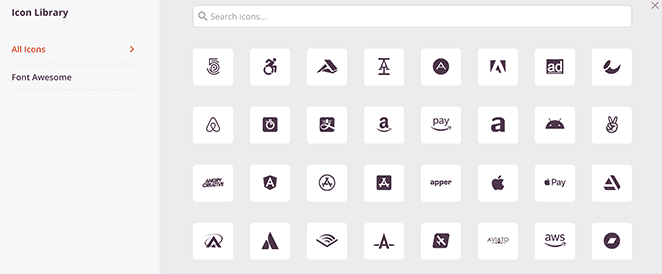
You can also change the icon color, alignment, and size in the same panel as the accompanying text.
Changing The Hero Image
Naturally, you’ll want to replace the default hero image with something better suited to your offer. To do this, click the existing image block and select the trash can icon to delete the image.
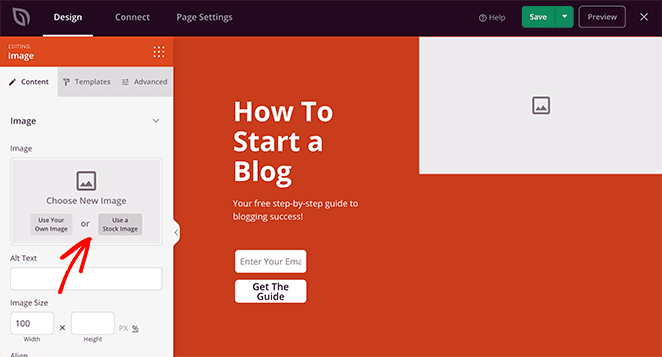
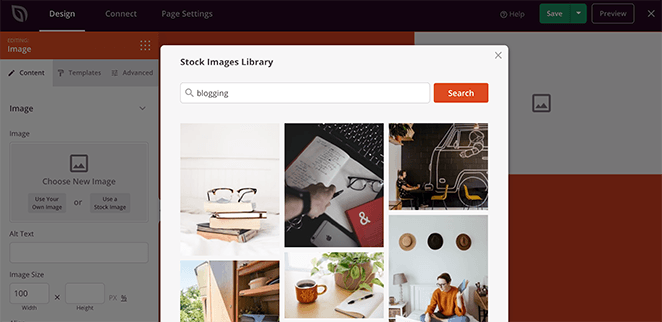
After, you can upload an image from your computer or click the Use Stock Image button to select a royalty-free photo.
Adding a Countdown Timer
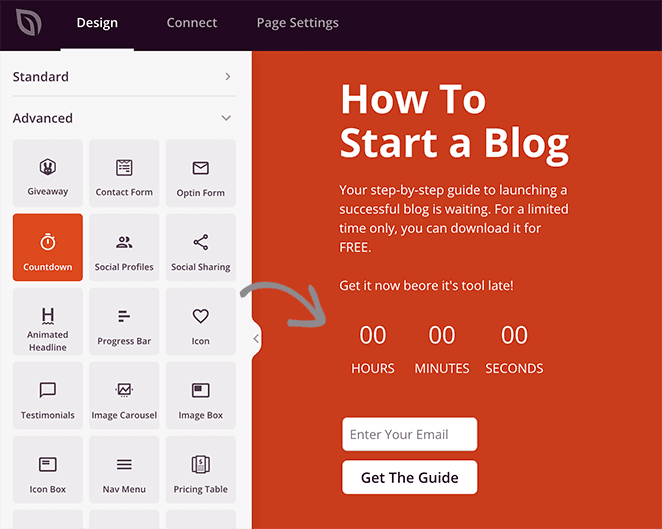
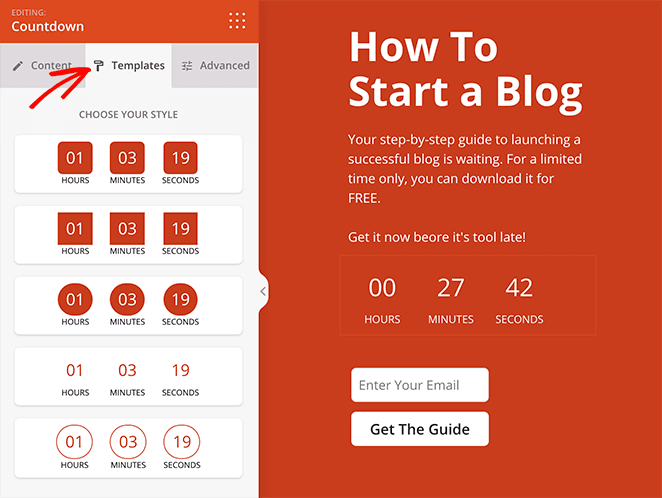
And if you want to evoke a sense of urgency in your landing page visitors, you can use SeedProd’s built-in countdown timer. Just drag the block from the left-hand panel and drop it onto your page.
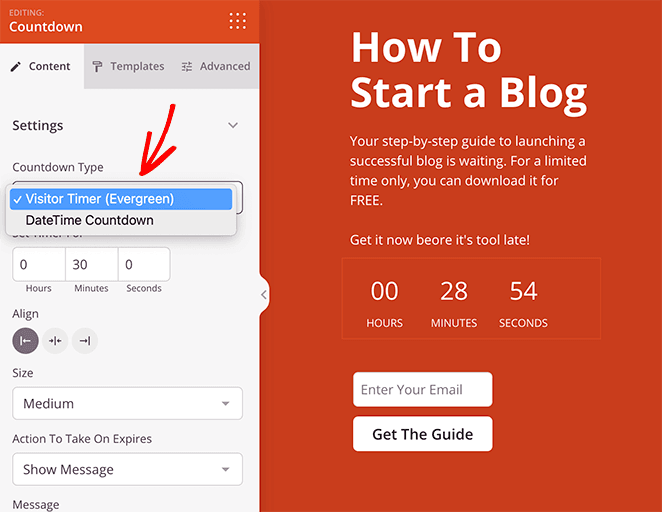
You can set the timer to expire on a specific date or make it evergreen by resetting it for each visitor in the settings panel.
And in the Templates tab, you can change the timer style easily with a few clicks.
Including Social Proof
Before we move on to customizing your page’s colors, there’s one more thing to add: social proof.
SeedProd makes it easy for you to include both Testimonials and Star Ratings to add weight to your offer’s claims. As a result, you can use positive comments from existing customers to persuade users to download your gated content.
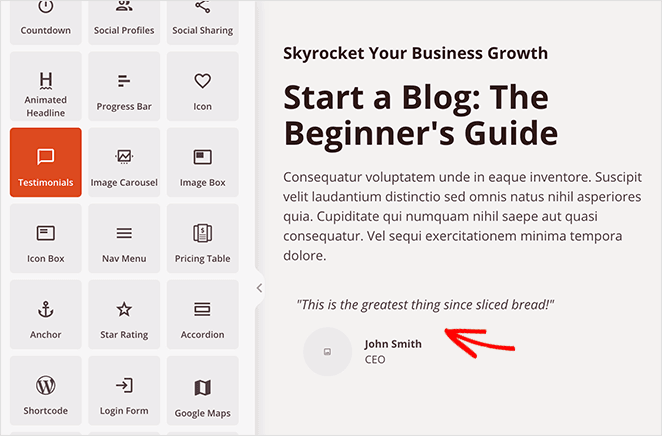
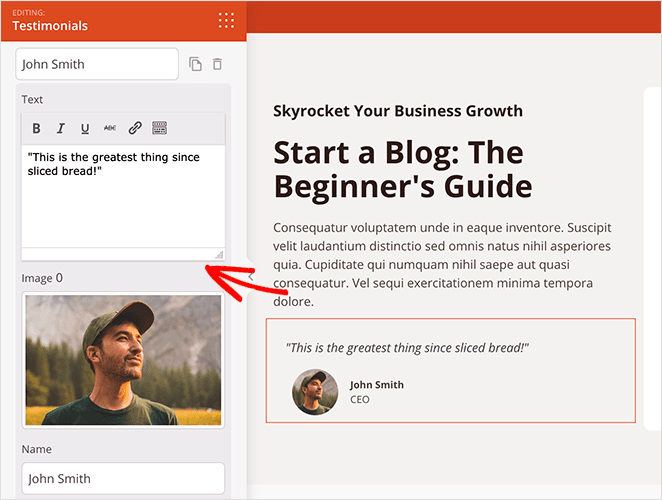
In the Testimonials settings panel, you can add multiple reviews with photos, the client’s name, and the title. You can also set testimonials to rotate on a user-friendly carousel slider.
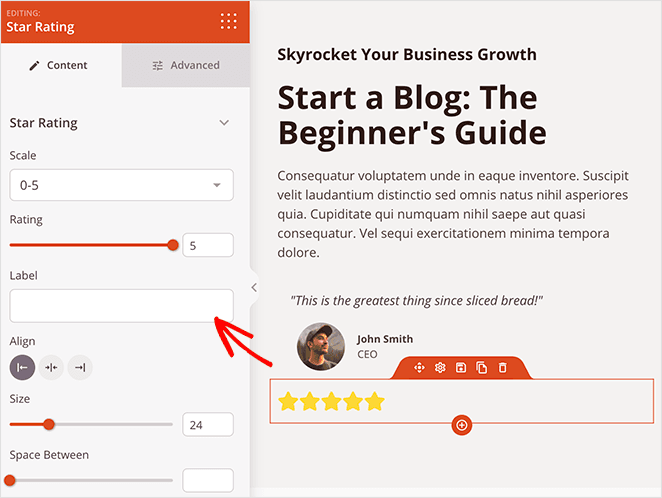
Additionally, the Star Rating block is an excellent way for users to see at-a-glance how people rate your business. This is yet another strategy that can persuade them to sign up.
Choose a Color Scheme
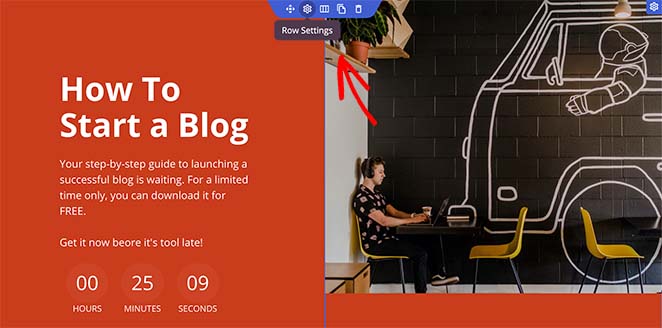
The last step in customizing your gated-content landing page is to customize your colors and typography. First, let’s change the background color of the hero section.
To do that, move your mouse over the hero section on your preview until you see a blue outline. Then, click the gear icon to view the settings panel.
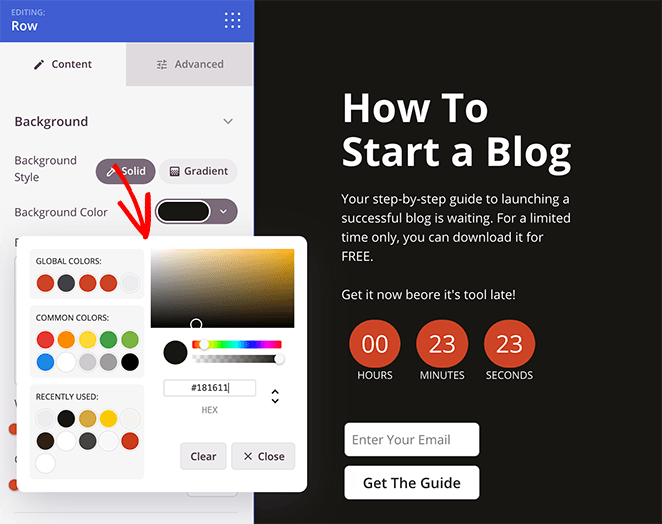
Now, click the color palette icon next to the Background Color heading and choose a color from the color picker.
But what about your icons, buttons, headings, and text?
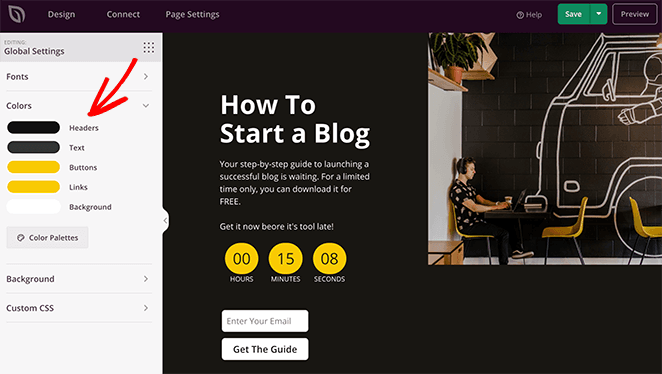
The good news is you can change all of these things in the Global Settings menu automatically. Just click the gear or cog icon in the bottom left corner of your screen to pull that menu up.
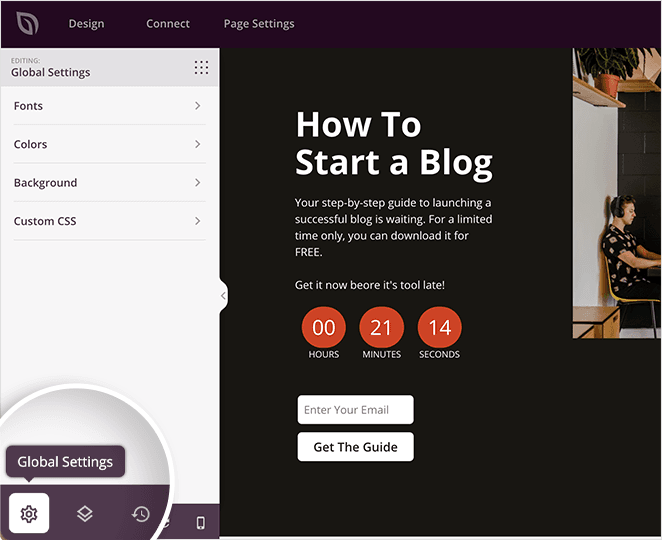
As you can see, it includes settings for:
- フォント
- カラー
- 背景
- カスタムCSS
Adjusting any of these settings adds those changes across your entire page. This saves you from changing them individually on each block.
For example, to change the default global color settings, click the Colors heading. Here you can change the heading, text, link, button, and background color for the whole page one by one.
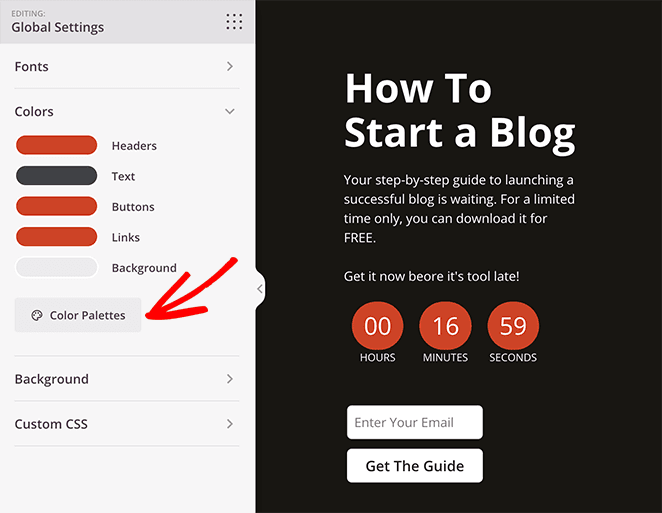
But if you’re not sure which colors to choose, you can use one of SeedProd’s predefined color schemes by clicking the Color Palettes button. From there, you can choose a color scheme and apply it with a single click.
And the result? A great-looking design that looks consistent across the board,
ステップ4.メールマーケティングサービスに接続する
Since one of your primary goals is to generate leads for your business with gated content, you’ll need a way to store users’ email addresses after they sign up.
SeedProd makes it super easy to connect your gated-content landing page to popular email marketing services like Constant Contact or Mailchimp. Simply switch to the ‘Connect’ tab and then select your email service provider.
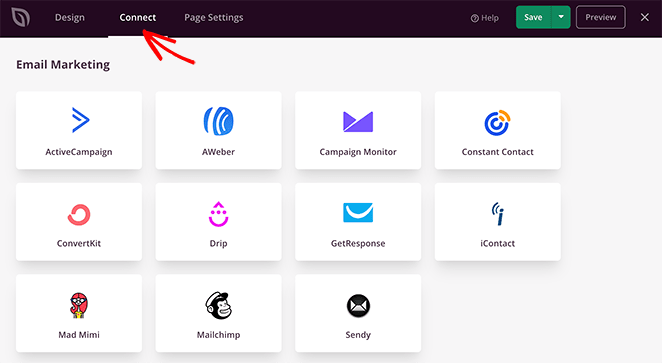
Need to connect to a service not listed there? Don’t worry; SeedProd works with Zapier, which acts as a bridge between SeedProd and more than 3000+ other apps and marketing automation tools on Zapier.
ステップ5.ランディングページの設定
Do you want to add tracking scripts to your landing page or give it a custom domain name? If that’s the case, switch to the Page Settings tab, where you can easily configure those settings.

The Custom Domain feature, in particular, allows you to use your WordPress website to create gated content landing pages, coming soon pages, product pages, geo-targeted ad campaigns, microsites, and more with their own domain names.
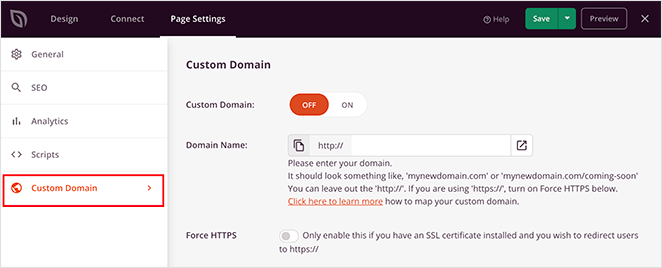
Instead of creating a WordPress multisite network or installing multiple WordPress websites, you can simply make a landing page and point it to your custom domain name.
Just make sure that your WordPress hosting provider allows you to use multiple domains and you have added the domain name to your hosting dashboard.
Step 6. Publish Your Gated Content Page
Before publishing your page, you should test it on different screen sizes to ensure it displays correctly. Luckily, you can preview your desktop site on mobile with SeedProd easily.
Just click the Design tab and select the mobile icon at the bottom of your screen.
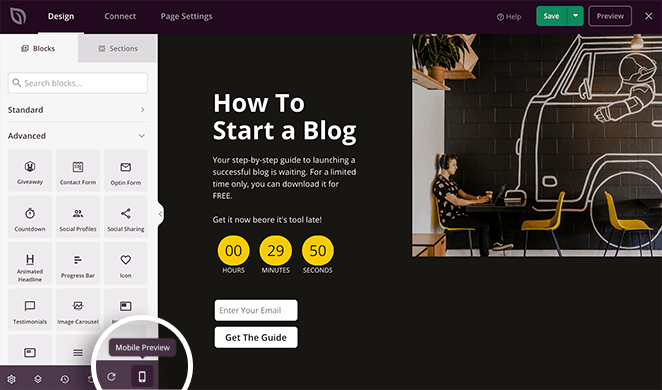
This shows a mobile preview of your page. If anything looks wrong, you can click anywhere on the preview to adjust the design.
For instance, to hide the hero image on mobile devices and make the page easier to scroll, you can click the image, head to the Advanced tab, and click the Hide on Mobile toggle in the Device Visibility section.
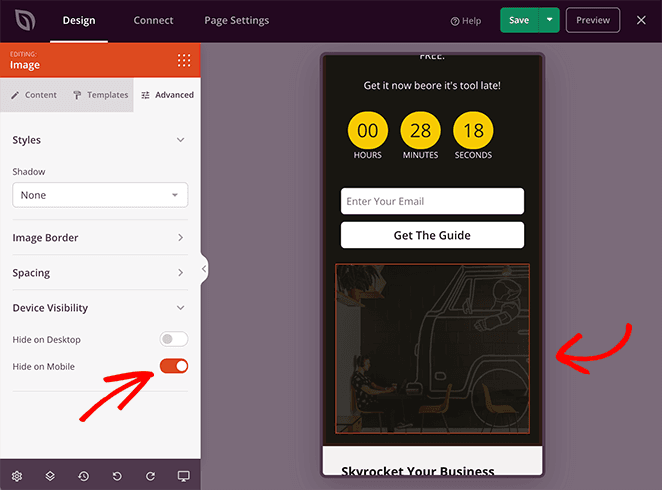
By doing that, the image won’t show on mobile devices once you publish the page.
After editing your page, click on the Save button and then choose Publish.
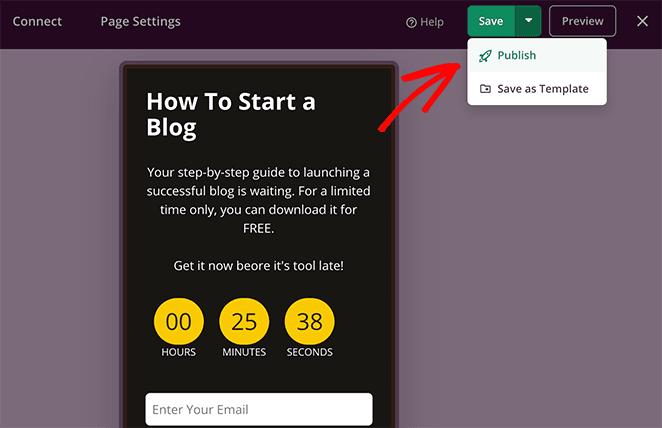
Now, you can click the See Live Page Button to preview the live version of your locked content landing page.

FAQs About Gated Content Landing Pages
I hope this article helped you learn how to create a gated content landing page with SeedProd easily.
You might also like this guide on how to create a dynamic landing page in WordPress. That way, you can personalize your page to different types of audiences.
お読みいただきありがとうございました。YouTube、Twitter、Facebookで、あなたのビジネスの成長に役立つコンテンツをもっとご覧ください。

