


TL;DR: So fügen Sie eine WordPress-Benachrichtigungsnachricht ohne Code hinzu
Zwei No-Code-Tools ermöglichen es Ihnen, in wenigen Minuten eine WordPress-Benachrichtigungsnachricht zu jeder Seite hinzuzufügen. Hier ist, was Sie wissen müssen:
- WordPress-Benachrichtigungsnachrichten sind formatierte Benachrichtigungsfelder, die Besuchern im richtigen Moment Updates, Fehler oder Werbeaktionen anzeigen.
- SeedProd's Alert-Block ermöglicht es Ihnen, Info-, Erfolgs-, Warn- oder Fehlermeldungen zu jeder Seite oder jedem Theme-Template hinzuzufügen, ohne Code anzufassen.
- OptinMonster erstellt schwebende Benachrichtigungsleisten, die am oberen oder unteren Rand Ihrer Website haften, für standortweite Ankündigungen.
- Beide Tools funktionieren ohne Code, mit Drag-and-Drop-Editoren und vorgefertigten Vorlagen.
- Der Alert-Block ist in allen SeedProd-Tarifen verfügbar, einschließlich Basic.
Ich habe Benachrichtigungsnachrichten in WordPress verwendet, um Kunden vor geringem Lagerbestand zu warnen, erfolgreiche Kassenabwicklungen zu bestätigen und sogar neue Blog-Funktionen hervorzuheben. Es handelt sich um jene kleinen, gestylten Boxen, die auf Ihrer Website erscheinen, um Updates, Fehler oder Hinweise anzuzeigen, genau dann, wenn Ihre Besucher sie sehen müssen.
WordPress zeigt standardmäßig einige Benachrichtigungen an, z. B. wenn ein Formular fehlschlägt oder eine Anmeldung erfolgreich ist. Diese sind jedoch begrenzt, und die Anpassung bedeutet normalerweise, dass man mit dem Code herumfummeln muss.
In diesem Leitfaden zeige ich Ihnen zwei einfache Möglichkeiten, Ihre eigenen Benachrichtigungsnachrichten mit Tools zu erstellen, die keinen benutzerdefinierten Code benötigen. Einfach ziehen, ablegen und loslegen.
Was ist eine Benachrichtigungsnachricht in WordPress?
Eine Benachrichtigungsnachricht ist ein formatiertes Benachrichtigungsfeld, das auf Ihrer WordPress-Website erscheint, um Besuchern wichtige Updates, Fehler oder Bestätigungen anzuzeigen. Sie können sie an verschiedenen Stellen auf Ihrer Website anzeigen, z. B. im Header, Footer, in der Seitenleiste oder in Blogbeiträgen und Seiten.
WordPress stellt standardmäßig Benachrichtigungsnachrichten für verschiedene Ereignisse bereit, z. B. wenn sich ein Benutzer erfolgreich anmeldet oder wenn beim Absenden eines Kontaktformulars ein Fehler auftritt. Diese standardmäßigen Benachrichtigungsnachrichten sind informativ und benutzerfreundlich gestaltet, aber möglicherweise nicht immer ausreichend für die spezifischen Bedürfnisse Ihrer Website.
Warum eine Benachrichtigungsnachricht zu Ihrer WordPress-Website hinzufügen?
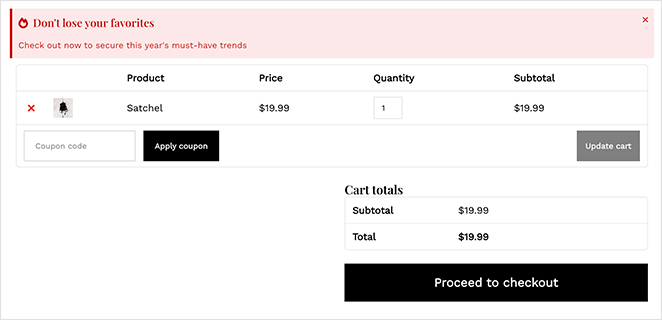
Ihr Besucher ist dabei, die Checkout-Seite zu verlassen, ohne seine Bestellung abzuschließen. Eine einzelne Warnmeldung, „Nur noch 2 Artikel auf Lager“, kann der Anstoß sein, der den Verkauf abschließt.
Sie möchten beispielsweise Benutzer über eine neue Funktion auf Ihrer Website informieren oder ihnen einen Rabattcode für ein E-Commerce-Produkt anbieten. Ebenso möchten Sie Benutzer möglicherweise vor Artikeln warnen, die sich noch in ihren Warenkörben befinden, und nach erfolgreichem Abschluss des Kaufs eine Erfolgsmeldung anzeigen.
Studien zeigen, dass die leistungsstärksten Benachrichtigungs-Popups eine Konversionsrate von über 9 % erzielen, ein erheblicher Anstieg im Vergleich zu Standard-Seitenlementen. Durch das Hinzufügen einer benutzerdefinierten Benachrichtigungsnachricht können Sie Ihrem Publikum wichtige Informationen mitteilen und die Dringlichkeit erhöhen.
Arten von Benachrichtigungsnachrichten, die Sie in WordPress verwenden können
Es gibt verschiedene Arten von Benachrichtigungsnachrichten in WordPress, manchmal auch WordPress-Benachrichtigungsfelder genannt, die Sie hinzufügen können, je nachdem, was Ihre Besucher tun oder wissen sollen. Jede hat einen anderen Zweck, und der Nachrichtenstil hilft den Benutzern, auf einen Blick zu erkennen, was vor sich geht.
- Info-Nachrichten: Verwenden Sie diese für allgemeine Tipps, Erinnerungen oder Updates, z. B. um Benutzer über neue Funktionen oder Blogbeiträge zu informieren.
- Erfolgsnachrichten: Diese bestätigen, wenn etwas funktioniert hat, z. B. das Absenden eines Formulars, die Erstellung eines Kontos oder ein abgeschlossener Kauf.
- Warn- oder Fehlermeldungen: Ideal für Benachrichtigungen, die dringende Aufmerksamkeit erfordern, wie z. B. geringer Lagerbestand, fehlgeschlagene Aktionen oder Systemfehler.
Hier ist eine kurze Anleitung, wie Sie jeden Typ mit dem richtigen Moment abgleichen:
- Info: Neue Funktionen, Ankündigungen oder hilfreiche Tipps, die keine Aktion erfordern.
- Erfolg: Bestellbestätigungen, Formularübermittlungen oder jede abgeschlossene Aktion.
- Warnung: Hinweise auf geringen Lagerbestand, ablaufende Angebote oder Artikel im Warenkorb.
- Gefahr: Systemfehler, Sicherheitswarnungen oder kritische Probleme, die sofortige Aufmerksamkeit erfordern.
So fügen Sie eine benutzerdefinierte Alert-Nachricht in WordPress hinzu (2 einfache Methoden)
Es gibt verschiedene Möglichkeiten, eine benutzerdefinierte Benachrichtigungsnachricht zu WordPress hinzuzufügen. Sie können die Funktionalität manuell codieren, ein WordPress-Benachrichtigungsleisten-Plugin installieren, ein Popup-Plugin verwenden oder Benachrichtigungssoftware ausprobieren. Heute zeige ich Ihnen, wie Sie 2 der einfachsten Methoden anwenden: die Verwendung eines WordPress Drag-and-Drop-Website-Builders und einer leistungsstarken Popup-Software.
Beide Lösungen sind einfach, erfordern keine technischen Kenntnisse und Sie müssen keine benutzerdefinierten CSS-, HTML-, PHP-, Javascript- oder andere Codes verwenden.
Wenn Sie mit der Bearbeitung von PHP und CSS vertraut sind, können Sie auch mit ein paar Codezeilen eine Alert-Leiste hinzufügen. Aber diese No-Code-Methoden sind schneller und erfordern keinen Entwickler.
Methode 1: WordPress-Alert-Nachricht mit SeedProd anzeigen
Für die erste Methode verwenden wir SeedProd. Es ist ein Drag-and-Drop-Website-Builder für WordPress mit über 1 Million Nutzern.

SeedProd macht es einfach, Alert-Boxen überall auf Ihrer WordPress-Seite hinzuzufügen, ohne Code anzufassen. Sie wählen den Typ, passen den Stil an und es ist live.
Wenn Sie also bereit sind, loszulegen, folgen Sie den nachstehenden Schritten, um eine benutzerdefinierte Alert-Nachricht in WordPress mit SeedProd zu erstellen.
Schritt 1: SeedProd-Plugin installieren und aktivieren
Als Erstes müssen Sie die Preisseite von SeedProd besuchen und das Plugin herunterladen. Wenn Sie dabei Hilfe benötigen, können Sie unserer Dokumentation zur Installation von SeedProd folgen.
Hinweis: SeedProd hat eine kostenlose Version, und wir werden SeedProd verwenden (der Alert-Block ist in allen Plänen verfügbar, einschließlich Basic).
Nachdem Sie das Plugin aktiviert haben, gehen Sie zu SeedProd » Einstellungen und fügen Sie Ihren Lizenzschlüssel in das Lizenzfeld ein.
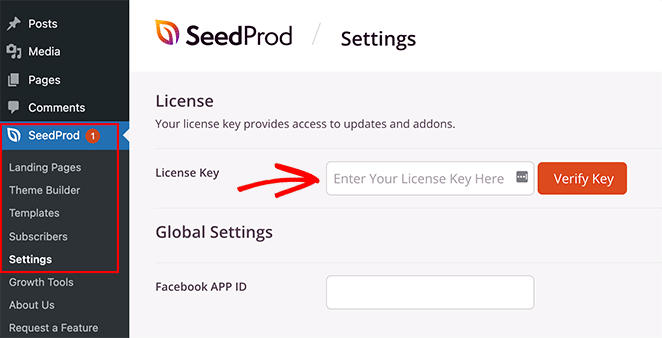
Der Lizenzschlüssel befindet sich auf der SeedProd-Website in Ihrem Konto-Dashboard. Nachdem Sie Ihren Schlüssel eingegeben haben, klicken Sie auf die Schaltfläche Schlüssel überprüfen.
Als Nächstes müssen Sie entscheiden, welche Art von Layout Sie erstellen möchten. Mit SeedProd können Sie entweder einzelne WordPress-Seiten mit dem Landing Page Builder erstellen oder benutzerdefinierte WordPress-Themes mit dem Theme Builder erstellen.
Wenn Sie Ihr aktuelles WordPress-Theme weiterhin verwenden möchten, empfehlen wir die Option Landing Page Builder. Wenn Sie jedoch Ihr Theme ersetzen und Alert-Boxen zu Ihrer Kopf-, Fußzeile, Seitenleiste und anderen Theme-Vorlagen hinzufügen möchten, ist der Theme Builder die beste Wahl.
Für dieses Tutorial verwenden wir die Option Theme Builder. Wenn Sie jedoch eine Landing Page erstellen möchten, können Sie dieser Anleitung folgen, wie man eine Landing Page in WordPress erstellt.
Profi-Tipp: Sie können die Alert-Box-Funktion mit beiden Optionen verwenden.
Schritt 2: Wählen Sie ein WordPress-Template-Kit aus
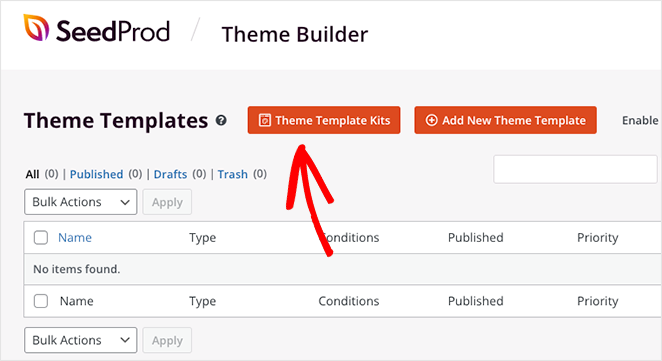
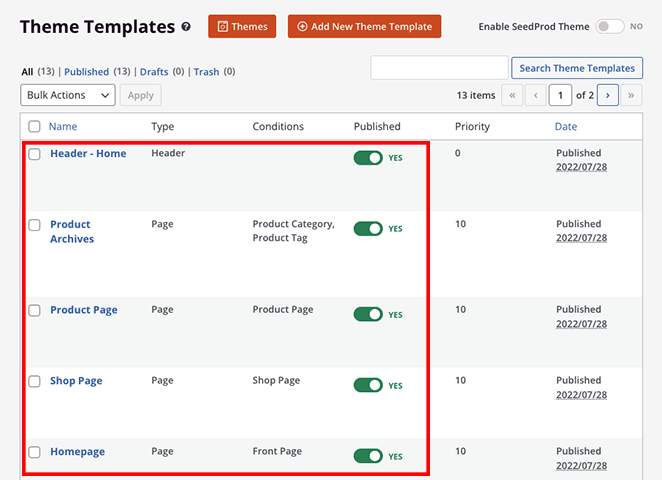
Da wir uns für die Theme Builder-Option entscheiden, besteht der nächste Schritt darin, die Seite SeedProd » Theme Builder zu besuchen. Auf dieser Seite müssen Sie auf die Schaltfläche Theme Template Kits klicken, um ein vorgefertigtes Website-Layout auszuwählen.
Sie sehen sofort eine Bibliothek von Website-Kits, die Sie mit einem einzigen Klick zu Ihrer Website hinzufügen können. Mit den Filtern in der oberen Leiste können Sie die Vorlagen nach Beliebtheit, Neuheit, WooCommerce und mehr sortieren.
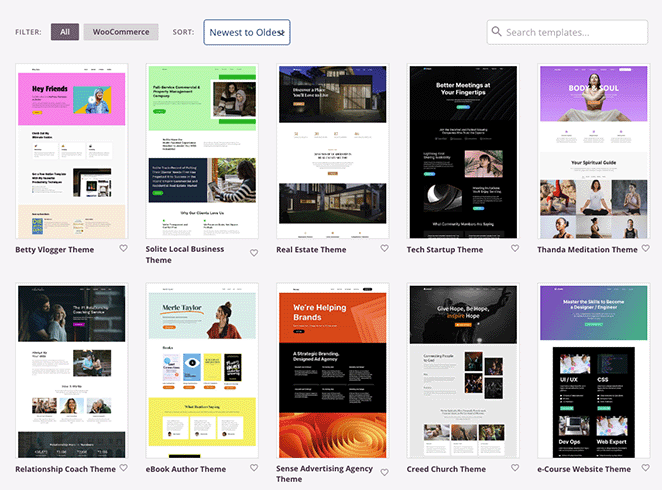
Wenn Sie eine Vorlage finden, die Ihnen gefällt, fahren Sie mit der Maus darüber und wählen Sie das Häkchen-Symbol aus, um sie zu Ihrer WordPress-Website hinzuzufügen. In wenigen Sekunden importiert SeedProd die gesamte Vorlage, einschließlich spezifischer Seiten und Inhalte aus der Demo.

Von dort aus sehen Sie die einzelnen Teile, aus denen Ihr Theme in Ihrem WordPress-Dashboard besteht. Sie können jedes Theme-Teil anpassen, indem Sie mit der Maus darüber fahren und auf den Link Design bearbeiten klicken.
Zum Beispiel können Sie mit Hilfe der folgenden Tutorials:
- Eine benutzerdefinierte Blog-Seite erstellen
- Eine benutzerdefinierte Einzelbeitrags-Vorlage erstellen
- Ihre WordPress-Homepage bearbeiten
- Ihren WordPress-Header anpassen
- Ihren WordPress-Footer bearbeiten
- Eine benutzerdefinierte Seitenleiste erstellen
- Und mehr.
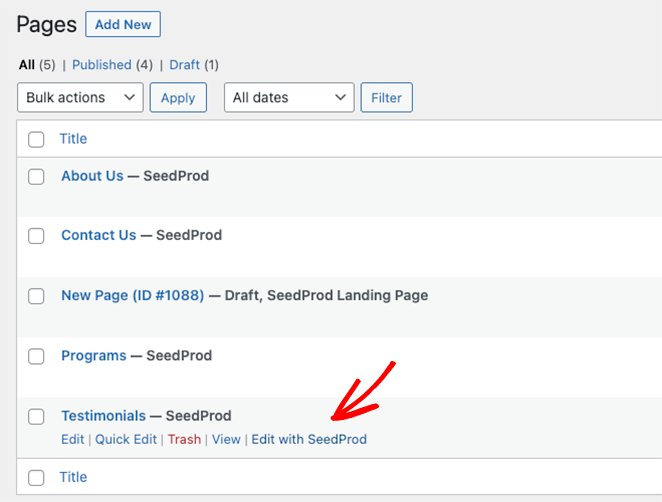
Darüber hinaus können Sie einzelne Seiten wie Ihre Über uns-, Kontakt- und Dienstleistungsseite anpassen. Besuchen Sie einfach Seiten » Alle Seiten und klicken Sie auf den Link Mit SeedProd bearbeiten neben der Seite, die Sie anpassen möchten.
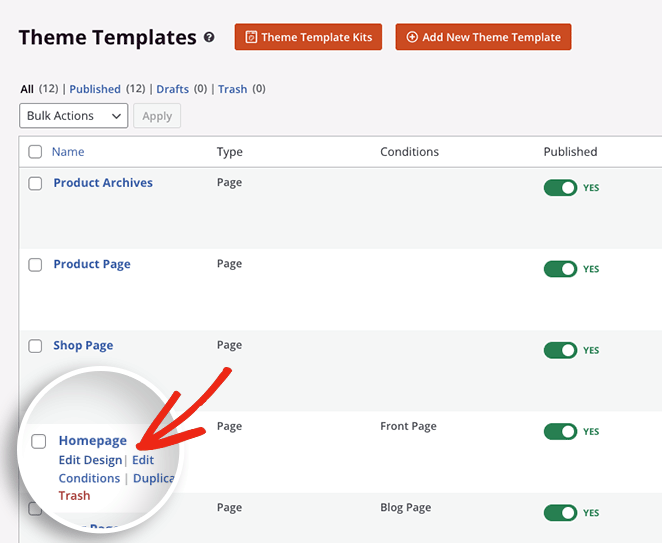
Um zu beginnen, zeigen wir Ihnen, wie Sie eine Alert-Nachricht zu Ihrer WordPress-Homepage hinzufügen. Fahren Sie also mit der Maus über die Homepage-Vorlage und klicken Sie auf den Link Design bearbeiten.
Schritt 3: Block für Benachrichtigungsnachrichten hinzufügen und anpassen
Wenn Sie die Vorlage öffnen, sehen Sie den Drag-and-Drop-Website-Builder von SeedProd. Auf der linken Seite befinden sich WordPress-Blöcke und Einstellungen, und auf der rechten Seite eine Live-Vorschau Ihrer Homepage.
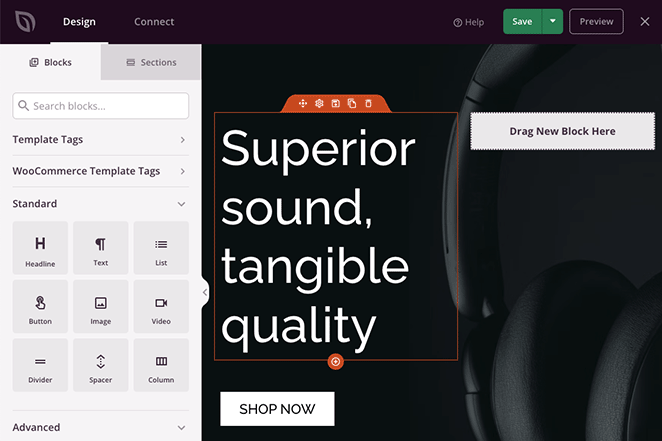
Sie können auf jeden Bereich der Vorschau klicken, um den Vorlageninhalt anzupassen und die Änderungen in Echtzeit zu sehen. Zusätzlich können Sie neue WordPress-Blöcke aus dem linken Bereich auf Ihre Seite ziehen, um weitere Funktionen hinzuzufügen.
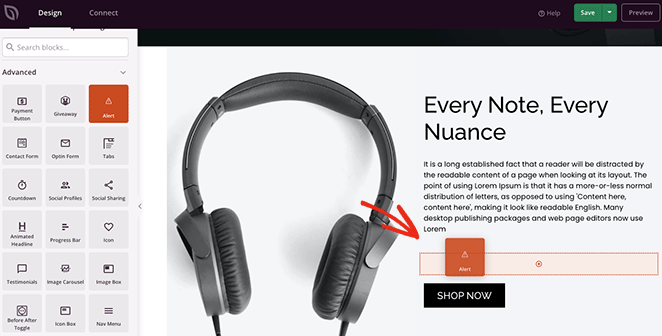
So fügen wir der Homepage eine Benachrichtigungsnachricht hinzu. Suchen Sie den Benachrichtigungsblock im Bereich Erweiterte Blöcke und ziehen Sie ihn dorthin, wo Sie ihn anzeigen möchten.
Sobald der Block platziert ist, können Sie sein Aussehen und die Nachricht, die er Ihren Website-Besuchern anzeigt, anpassen.
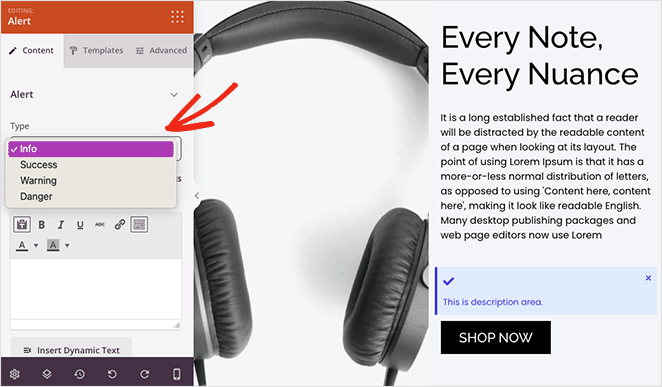
Klicken Sie zuerst auf das Dropdown-Menü 'Typ' und wählen Sie einen Benachrichtigungstyp, wie Info, Erfolg, Warnung oder Gefahr.
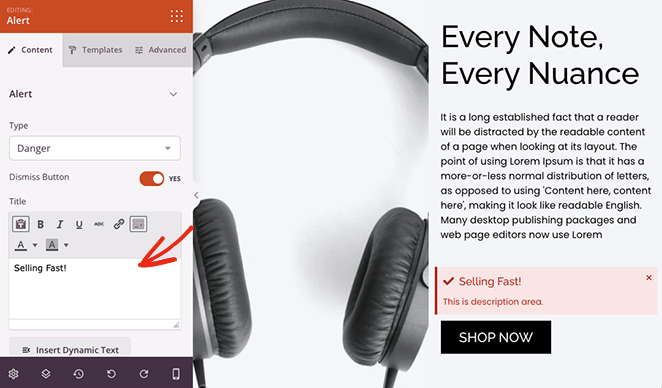
Geben Sie als Nächstes Ihrer Benachrichtigung einen Titel. Sie können auch die Schließen-Schaltfläche aktivieren oder deaktivieren, mit der Benutzer die Nachricht ausblenden können.
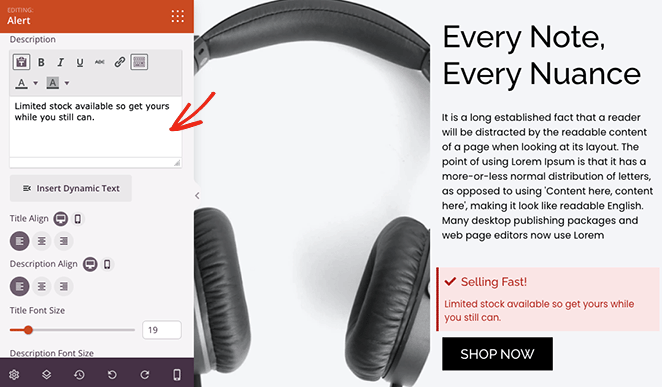
Geben Sie nun eine Beschreibung für Ihre Benachrichtigung ein, um den Benutzern weitere Informationen zu geben. Darunter können Sie die Größe, Ausrichtung und Überschriftenebene von Titel und Beschreibung ändern.
Um die Benachrichtigung hervorzuheben, können Sie ein benutzerdefiniertes Symbol hinzufügen. SeedProd verfügt über Hunderte von Font Awesome-Symbolen, sodass es viele Optionen gibt.
Wenn Sie benutzerdefinierte Farben für Ihre Benachrichtigungsnachricht verwenden möchten, klicken Sie im Block-Einstellungsfenster auf die Registerkarte Erweitert. Hier können Sie die Typografie bearbeiten, die Farben für Beschreibung, Titel und Hintergrund ändern und einen Textschatten auswählen.
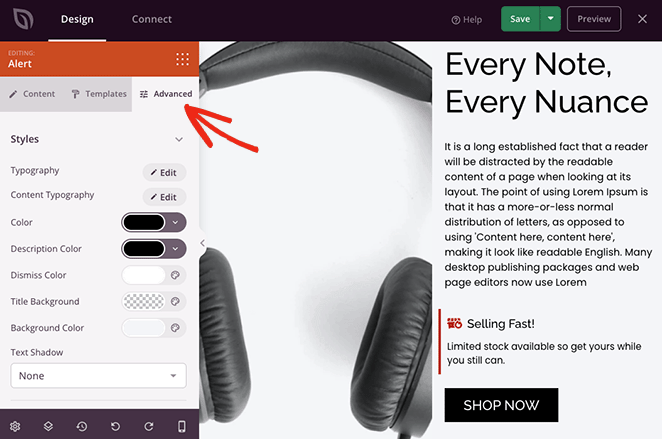
Im selben Bereich können Sie den Blockabstand und die Sichtbarkeit bearbeiten und sogar eine Animation hinzufügen, um ihn auffälliger zu gestalten.
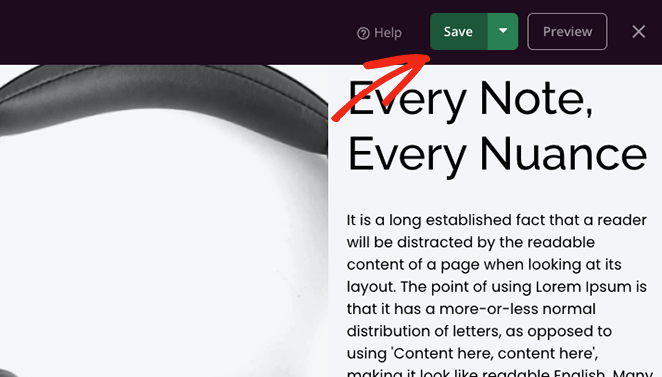
Stellen Sie sicher, dass Sie auf die Schaltfläche Speichern klicken, bevor Sie andere Seiten anpassen.
Alert-Nachrichten sind eine großartige Möglichkeit, auf andere Bereiche Ihrer Website aufmerksam zu machen. In der folgenden Abbildung haben wir eine Erfolgsmeldung zu einer Bestellbestätigungsseite eines Online-Shops hinzugefügt.
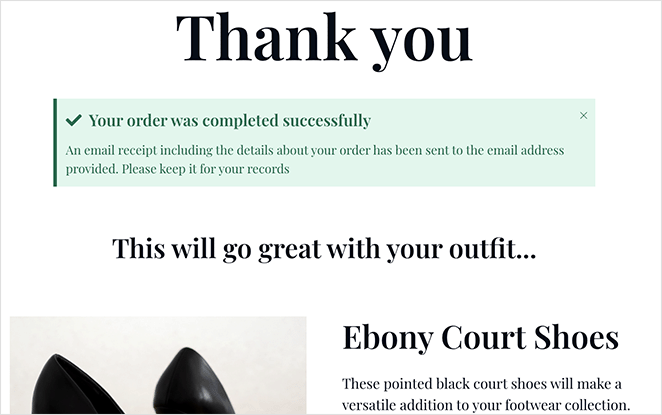
Seien Sie also kreativ mit benutzerdefinierten Benachrichtigungen und befolgen Sie dann den letzten Schritt, um sie auf Ihrer Website live zu schalten.
Schritt 4: Veröffentlichen Sie die Benachrichtigungsnachricht auf Ihrer WordPress-Site
Nachdem Sie eine SeedProd-Theme-Vorlage bearbeitet haben, müssen Sie das Theme aktivieren, um die Änderungen auf Ihrer Live-Website anzuzeigen. Gehen Sie dazu aus dem Page Builder heraus und zurück zum Theme Builder-Dashboard.
Finden Sie dort den Schalter SeedProd Theme aktivieren und stellen Sie ihn auf die grüne Position „Ja“.
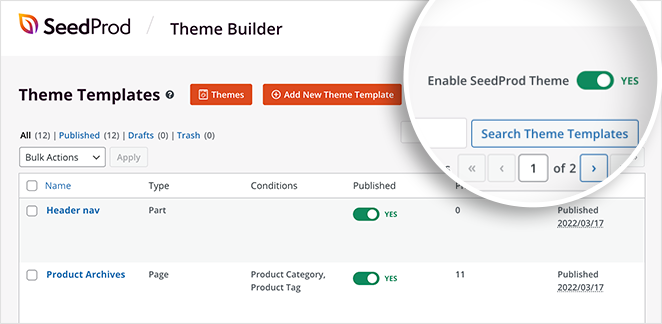
Jetzt können Sie Ihre Website besuchen und Ihre Benachrichtigungsnachricht in Aktion sehen!

Verwendung von Alert-Nachrichten auf WooCommerce-Seiten
Wenn Sie einen WooCommerce-Shop betreiben, werden Benachrichtigungen noch nützlicher in den wichtigsten Momenten: Warnungen bei geringem Lagerbestand auf Produktseiten, Bestellbestätigungen oder Anstöße für abgebrochene Warenkörbe.
SeedProds Theme Builder gibt Ihnen die volle Kontrolle über WooCommerce-Seitenvorlagen. Sie können den Alert-Block direkt zu Ihren Warenkorb-, Checkout- oder Produktseitenvorlagen hinzufügen, indem Sie denselben Drag-and-Drop-Workflow wie in Methode 1 verwenden.
Hier sind einige Anwendungsfälle, mit denen ich beginnen würde:
- Geringer Lagerbestand: Fügen Sie Produktseitenvorlagen eine Warnmeldung hinzu, z. B. „Nur noch 3 Stück übrig, bestellen Sie, bevor sie weg sind.“
- Checkout-Erfolg: Fügen Sie Ihrer Dankesseitenvorlage eine Erfolgsmeldung hinzu, um zu bestätigen, dass die Bestellung erfolgreich war.
- Abgebrochener Warenkorb: Fügen Sie der Warenkorbseite eine Warnmeldung hinzu, z. B. „Sie haben Artikel in Ihrem Warenkorb. Schließen Sie Ihre Bestellung ab, um den heutigen Preis zu sichern.“
Gehen Sie dazu zu SeedProd » Theme Builder und öffnen Sie die WooCommerce-Vorlage (Warenkorb, Checkout oder Einzelprodukt), die Sie bearbeiten möchten. Befolgen Sie dann dieselben Schritte wie in Methode 1, um den Alert-Block hinzuzufügen und zu konfigurieren.
Methode 2: Eine Benachrichtigungsleiste in WordPress mit OptinMonster anzeigen
Eine weitere Möglichkeit, eine Benachrichtigung zu Ihrer WordPress-Website hinzuzufügen, ist die Erstellung einer schwebenden Benachrichtigungsleiste. Die Alert-Leiste wird am oberen oder unteren Rand Ihrer Website angezeigt und zeigt Besuchern eine benutzerdefinierte Nachricht an.
Für diese Methode verwenden wir OptinMonster, ein Tool zur Konversionsoptimierung, das zur Awesome Motive-Familie gehört.
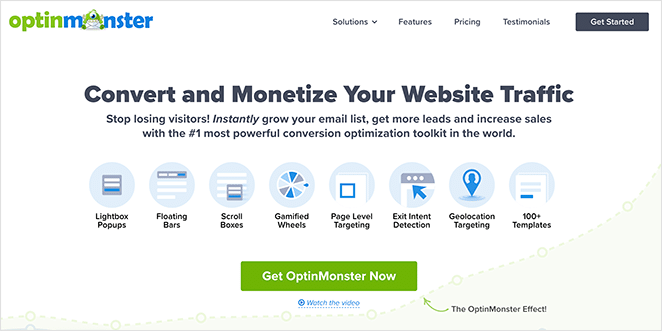
OptinMonster ermöglicht es Ihnen, schwebende Benachrichtigungsleisten hinzuzufügen, die am oberen oder unteren Rand Ihrer Website haften bleiben. Sie können sie für zeitlich begrenzte Angebote, Produktwarnungen oder Website-weite Ankündigungen verwenden, alles ohne Code.
Hier ist die, die wir in diesem Tutorial erstellen werden:

Legen wir los!
Schritt 1: OptinMonster installieren und Ihre Website verbinden
Gehen Sie zuerst auf die OptinMonster-Website und melden Sie sich für Ihr Konto an.
Installieren und aktivieren Sie als Nächstes das OptinMonster WordPress-Plugin. Hilfe hierzu finden Sie in dieser Anleitung zur Installation eines WordPress-Plugins.
Das OptinMonster-Plugin ermöglicht es Ihnen, Ihre Website mit wenigen Klicks einfach mit der Software zu verbinden.
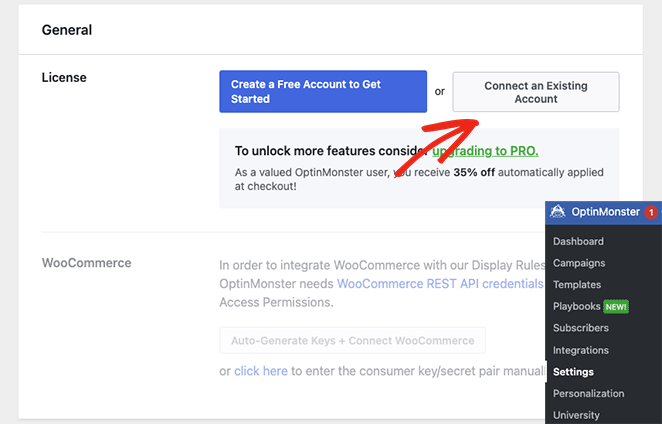
Nach der Aktivierung des Plugins müssen Sie Ihr Konto verbinden. Gehen Sie dazu in Ihrem WordPress-Adminbereich zu OptinMonster » Einstellungen.
Klicken Sie dort auf die Schaltfläche Bestehendes Konto verbinden.
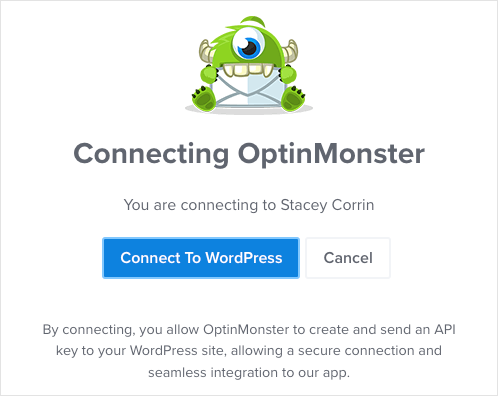
Ein Fenster wird angezeigt, in dem Sie Ihre E-Mail-Adresse eingeben können. Sobald Sie Ihre E-Mail-Adresse eingegeben haben, klicken Sie auf die Schaltfläche Mit WordPress verbinden.
Schritt 2: Eine Vorlage für schwebende Benachrichtigungsleisten auswählen
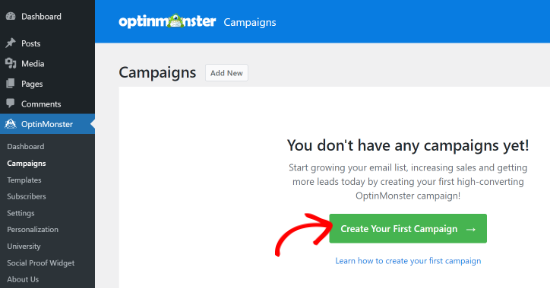
Nachdem Sie Ihr OptinMonster-Konto verbunden haben, gehen Sie in Ihrem WordPress-Dashboard zu OptinMonster » Kampagnen. Klicken Sie nun auf die Schaltfläche Erste Kampagne erstellen.
Wenn Sie mit Ihrer Alert Bar zufrieden sind, klicken Sie oben auf dem Bildschirm auf die Schaltfläche Speichern.

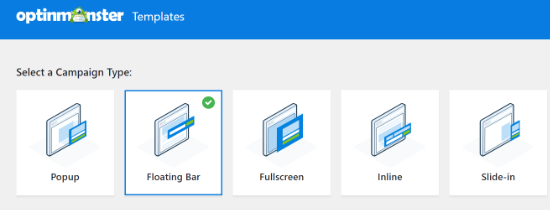
Wählen Sie auf dieser Seite den Floating Bar als Kampagnentyp aus, um Ihre Alert-Leiste zu erstellen.
Als Nächstes sehen Sie eine Auswahl verschiedener Kampagnenvorlagen. Um eine Vorlage auszuwählen, fahren Sie mit der Maus darüber und klicken Sie auf die Schaltfläche Vorlage verwenden.
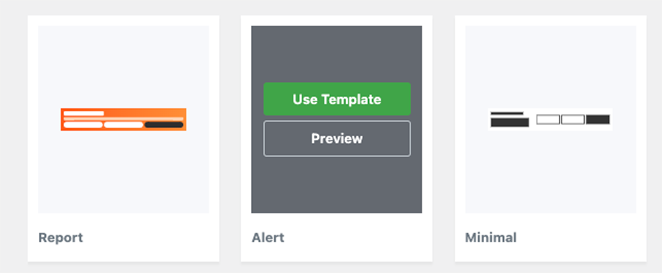
Wir verwenden die Vorlage „Alert“ für unsere Alert Bar.
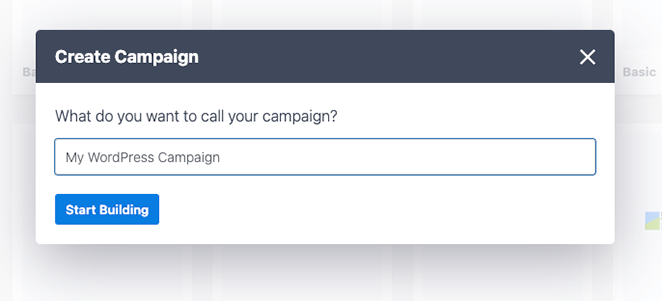
Nachdem Sie die Vorlage ausgewählt haben, werden Sie aufgefordert, Ihrer Kampagne einen Namen zu geben. Sobald Sie Ihren Namen eingegeben haben, klicken Sie auf die Schaltfläche Mit dem Erstellen beginnen.
Schritt 3: Text und Design Ihrer Alert Bar bearbeiten
Auf dem nächsten Bildschirm sehen Sie den Kampagnen-Editor von OptinMonster. Hier können Sie Ihre Alert-Nachricht gestalten und anpassen.
Standardmäßig wird die Alert Bar oben auf Ihrem Bildschirm angezeigt. Um den Text auf der Floating Bar zu ändern, klicken Sie auf den Bereich, den Sie bearbeiten möchten, und geben Sie Ihre benutzerdefinierte Nachricht ein.
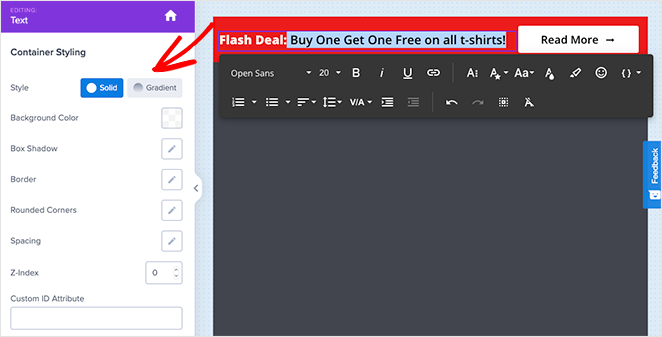
Sie können auch Schriftart, Schriftgröße, Farbe und mehr ändern.
Wenn Sie die Dringlichkeit Ihrer Alert Bar erhöhen möchten, können Sie den Countdown-Block per Drag & Drop auf die Floating Bar ziehen.

Von dort aus können Sie den Timer der Vorlage auswählen, seine Einstellungen anpassen und Ihr gewünschtes Enddatum und Ihre gewünschte Endzeit eingeben.
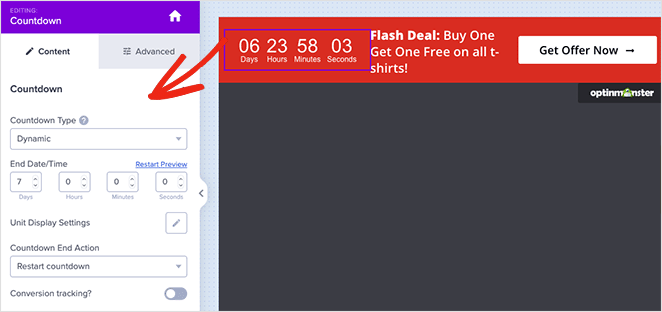
Sie können den Timer auch als Evergreen-Countdown einstellen. Ein Evergreen-Countdown wird für jeden Besucher Ihrer Website separat eingestellt.
Wenn Sie mit Ihrer Alert-Leiste zufrieden sind, klicken Sie oben auf dem Bildschirm auf die Schaltfläche Speichern.
Schritt 4: Anzeigeregeln und Trigger-Einstellungen festlegen
Der nächste Schritt ist, zum Tab „Anzeigeregeln“ zu gehen und festzulegen, wann und wo Ihre Bar angezeigt werden soll. Die Standardregel zeigt die Bar an, nachdem ein Besucher 5 Sekunden auf der Seite war.
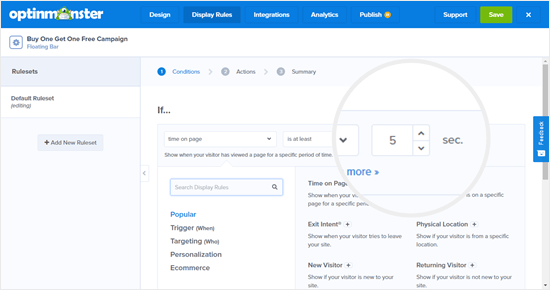
Wir ändern dies auf 0 Sekunden, damit eine Alert-Nachricht sofort erscheint. Ändern Sie dazu einfach den „Sekunden“-Countdown auf 0.
Sobald Sie dies getan haben, klicken Sie auf die Schaltfläche Nächster Schritt, um die Aktioneinstellungen zu ändern. Sie können das Dropdown-Menü „Kampagnenansicht anzeigen“ auf Optin belassen und auswählen, ob Sie einen Soundeffekt abspielen möchten, wenn die Alert-Leiste erscheint.

Klicken Sie nach den Änderungen auf die Schaltfläche Weiter. Auf der nächsten Seite sehen Sie eine Zusammenfassung Ihrer Kampagne.
Wenn Sie mit den Einstellungen zufrieden sind, klicken Sie auf die Schaltfläche Speichern.
Schritt 5: Alert Bar auf Ihrer WordPress-Website veröffentlichen
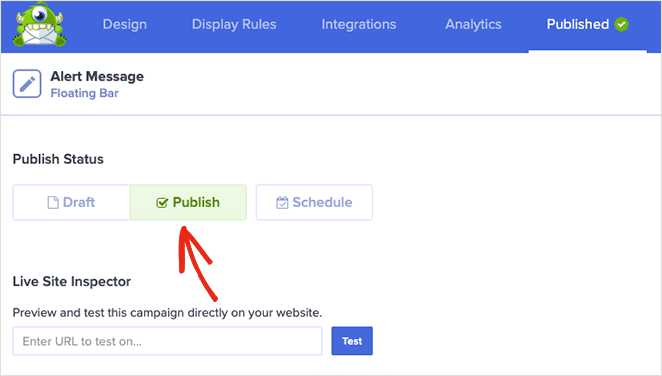
Der nächste Schritt ist der Wechsel zum Tab „Veröffentlichen“ und die Änderung des Veröffentlichungsstatus auf Veröffentlichen.
Der letzte Schritt ist die Aktivierung der Kampagne auf Ihrer WordPress-Website.
Schließen Sie dazu den Kampagnen-Editor und gehen Sie zu OptinMonster » Kampagnen. Sie sehen Ihre Kampagne in der Liste, und der Status wird „Ausstehend“ sein.
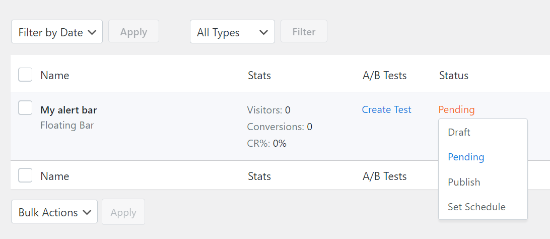
Um dies zu ändern, klicken Sie auf den Status „Ausstehend“ und wählen Sie im Dropdown-Menü Veröffentlichen.
Jetzt können Sie jede Seite Ihrer Website besuchen und Ihre Alert Bar in Aktion sehen.
Häufig gestellte Fragen
Benötige ich SeedProd Pro, um Alert-Nachrichten in WordPress hinzuzufügen?
Nein. Der Alert-Block ist in allen SeedProd-Plänen verfügbar, einschließlich des kostenlosen Basic-Plans. Sie können Informations-, Erfolgs-, Warn- oder Gefahrenmeldungen zu jeder Seite hinzufügen, ohne ein Upgrade durchzuführen.
Was ist der Unterschied zwischen einer Alert Bar und einer Alert Box in WordPress?
Eine Alert Box ist ein Inline-Nachrichtenblock, der innerhalb einer Seite oder eines Beitrags platziert wird; er befindet sich innerhalb Ihres Inhalts, wo Sie ihn platzieren. Eine Alert Bar ist ein schwebender Streifen, der am oberen oder unteren Rand Ihrer Website haftet und sichtbar bleibt, während Besucher scrollen.
Der Alert-Block von SeedProd erstellt Inline-Alert-Boxen. Die Floating Bar von OptinMonster erstellt Website-weite Alert Bars.
Kann ich eine WordPress-Alert-Nachricht nur auf bestimmten Seiten anzeigen?
Ja. Mit SeedProd fügen Sie den Alert-Block zu einzelnen Seiten- oder Vorlagendateien hinzu, sodass er nur dort erscheint, wo Sie ihn platzieren. Mit OptinMonster verwenden Sie die Anzegegel „Page-Level Targeting“, um Ihre Alert Bar auf bestimmte URLs oder Seitentypen zu beschränken.
Wie füge ich eine WooCommerce-Alert-Nachricht für geringen Lagerbestand oder für den Checkout hinzu?
Verwenden Sie den Theme Builder von SeedProd, um Ihre WooCommerce-Warenkorb-, Checkout- oder Produktseitenvorlagen zu bearbeiten. Ziehen Sie den Alert-Block in die Vorlage, stellen Sie den Typ auf „Warnung“ oder „Erfolg“ und fügen Sie Ihre Nachricht hinzu.
Zum Beispiel kann eine Warnmeldung auf der Warenkorbseite („Nur noch 2 auf Lager“) den Checkout-Abbruch ohne benutzerdefinierten Code reduzieren.
Kann ich eine Alert-Nachricht zu WordPress hinzufügen, ohne ein Plugin zu verwenden?
Ja, Sie können eine WordPress-Nachrichtenbox mit benutzerdefiniertem HTML und CSS direkt in einer Seite oder einem Beitrag hinzufügen oder PHP zur functions.php-Datei Ihres Themes hinzufügen. Dieser Ansatz erfordert jedoch Programmierkenntnisse und kann fehlschlagen, wenn Ihr Theme aktualisiert wird.
Die Verwendung eines Plugins wie SeedProd ist schneller, sicherer und erfordert keinen Entwickler.
Beginnen Sie noch heute mit dem Hinzufügen von WordPress-Alert-Nachrichten
Alert-Nachrichten sind eine der schnellsten Möglichkeiten, mit Besuchern im richtigen Moment zu kommunizieren: Warnungen bei geringem Lagerbestand, Checkout-Bestätigungen oder Website-weite Ankündigungen.
Der Alert-Block von SeedProd erleichtert das Hinzufügen überall auf Ihrer Website ohne Code. Holen Sie sich SeedProd und beginnen Sie mit dem Erstellen.
Danke fürs Lesen! Wir würden uns freuen, Ihre Gedanken zu hören. Treten Sie also gerne der Unterhaltung auf YouTube, X und Facebook bei, um weitere hilfreiche Ratschläge und Inhalte für das Wachstum Ihres Unternehmens zu erhalten.


