

Resumo: Como Adicionar um Formulário de Contato no WordPress Este é o caminho mais rápido para ter um formulário de contato funcionando em seu site.
- Instale o WPForms – Baixe e ative o WPForms Lite (gratuito) ou o WPForms Pro no painel da sua conta.
- Crie seu formulário – Vá para WPForms » Adicionar Novo, nomeie seu formulário e selecione o modelo de Formulário de Contato Simples.
- Configure as opções – Defina o nome do seu formulário, proteção contra spam e opções de GDPR em Configurações » Geral.
- Defina as notificações – Escolha quem recebe e-mail quando um formulário é enviado e adicione tags inteligentes para respostas automáticas.
- Adicione uma mensagem de confirmação – Defina uma mensagem de agradecimento ou redirecione os visitantes para uma página após o envio.
- Publique o formulário – Adicione o bloco WPForms a qualquer página ou post, selecione seu formulário e publique.
Quer aprender como adicionar um formulário de contato no WordPress? Um formulário de contato é a maneira mais fácil de permitir que os visitantes entrem em contato com você sem expor seu endereço de e-mail a spam.
Neste tutorial, mostrarei passo a passo como adicionar um formulário de contato no WordPress usando um plugin amigável para iniciantes. Ao final, você terá um formulário funcional que poderá adicionar a qualquer página, post ou barra lateral do seu site.
- Por que Criar um Formulário de Contato no WordPress?
- É Possível Adicionar um Formulário de Contato no WordPress Sem um Plugin?
- Como Adicionar um Formulário de Contato no WordPress
- Escolhendo um Plugin de Formulário de Contato para WordPress
- Tutorial em Vídeo
- Passo 1. Baixe o Plugin de Formulário de Contato WPForms para WordPress
- Passo 2. Adicione um Formulário de Contato no WordPress
- Passo 3. Defina as Configurações Gerais do Seu Formulário
- Passo 4. Defina as Configurações de Notificação para o Seu Formulário
- Passo 5. Configure Suas Mensagens de Confirmação
- Passo 6. Adicione um Formulário de Contato a uma Página do WordPress
- Crie Sua Página de Contato com SeedProd
- Como Proteger seu Formulário de Contato do WordPress contra Spam
- Perguntas Frequentes sobre Como Adicionar um Formulário de Contato no WordPress
Por que Criar um Formulário de Contato no WordPress?
Você pode se perguntar se é melhor apenas listar seu endereço de e-mail em seu site. Na realidade, um formulário de contato do WordPress oferece mais controle, melhor segurança e uma maneira mais fácil para os visitantes entrarem em contato com você.
Aqui estão os principais benefícios de adicionar um formulário de contato em vez de exibir um endereço de e-mail:
- Colete os detalhes corretos: Escolha quais campos são obrigatórios para que você sempre receba as informações de que precisa.
- Simplifique a comunicação: Facilite para os visitantes o envio de perguntas, ideias ou feedback diretamente pelo seu site.
- Mantenha-se organizado: Use linhas de assunto e campos estruturados para classificar e responder rapidamente às mensagens.
- Proteja contra spam: Oculte seu endereço de e-mail e use filtros de spam integrados para reduzir mensagens indesejadas.
- Atenda às necessidades de conformidade: Adicione caixas de seleção de consentimento para ajudar seu site a estar em conformidade com o GDPR e outras leis de privacidade.
É por isso que a maioria dos sites WordPress, incluindo este, usa um formulário de contato. É mais seguro, mais rápido e mais profissional do que postar um endereço de e-mail.
É Possível Adicionar um Formulário de Contato no WordPress Sem um Plugin?
Sim, você pode adicionar um formulário de contato no WordPress sem um plugin usando serviços de terceiros. A maioria dessas ferramentas fornece um código de incorporação que você copia e cola em seu site.
No entanto, essa abordagem tem desvantagens. Frequentemente, você precisará lidar com código HTML, e a personalização do formulário geralmente requer etapas extras. Para iniciantes, isso pode parecer confuso e demorado.
Uma opção gratuita é o Google Forms. Você cria um formulário no Google, obtém o código de incorporação e o cola em um bloco de HTML Personalizado no WordPress.
É simples de configurar, mas o formulário carrega a estilização padrão do Google. Ele não corresponderá ao design do seu site, e as entradas do formulário vão para o Google Sheets em vez do seu painel do WordPress.
A opção mais fácil é usar um plugin de formulário de contato para WordPress. Plugins permitem que você crie, personalize e publique formulários diretamente em seu painel, sem a necessidade de habilidades de codificação.
Então, vamos ver como criar um formulário de contato no WordPress passo a passo.
Como Adicionar um Formulário de Contato no WordPress

A maneira mais fácil de adicionar um formulário de contato no WordPress é com o WPForms. É o plugin construtor de formulários mais amigável para iniciantes, confiável por mais de 6 milhões de sites, e vem com uma biblioteca de modelos pré-fabricados para que você possa criar qualquer tipo de formulário em minutos.
Ao contrário de plugins como Jetpack ou Contact Form 7, o WPForms oferece um verdadeiro construtor de formulários de arrastar e soltar. Isso significa que você pode adicionar campos personalizados, habilitar notificações e até usar tags inteligentes sem tocar em uma única linha de código.
O WPForms tem uma versão gratuita e paga. A versão Lite gratuita é perfeita para formulários simples. Para opções avançadas como pagamentos, pesquisas e integrações, a versão Pro desbloqueia tudo o que você precisa para expandir seu site.
Você também pode conferir nossa análise completa do WPForms para obter ainda mais detalhes.
Escolhendo um Plugin de Formulário de Contato para WordPress
Antes de instalar qualquer coisa, é útil saber qual plugin se encaixa no seu site. Veja como os quatro plugins de formulário de contato mais populares se comparam para iniciantes no WordPress:
| Plugin | Facilidade de Uso | Proteção contra Spam | Versão Gratuita |
|---|---|---|---|
| WPForms | Construtor de arrastar e soltar, sem codificação necessária | Anti-Spam Moderno (padrão), reCAPTCHA, hCaptcha, Cloudflare Turnstile | Sim (WPForms Lite) |
| Contact Form 7 | Baseado em Shortcode, requer configuração manual | reCAPTCHA, Akismet | Sim |
| Jetpack Forms | Integrado ao Jetpack, configuração mínima | Integração com Akismet | Sim (com Jetpack gratuito) |
| Gravity Forms | Lógica avançada e fluxos de trabalho personalizados | reCAPTCHA, honeypot | Não (apenas pago, a partir de R$ 59/ano) |
O WPForms é a melhor escolha para a maioria dos iniciantes. A versão Lite gratuita cobre formulários de contato simples, e o construtor de arrastar e soltar significa que você não precisa tocar em uma única linha de código. O restante deste guia o guiará pela configuração do WPForms.
Tutorial em Vídeo
Passo 1. Baixe o Plugin de Formulário de Contato WPForms para WordPress
O primeiro passo é baixar uma cópia do WPForms e fazer o download do plugin para o seu computador.
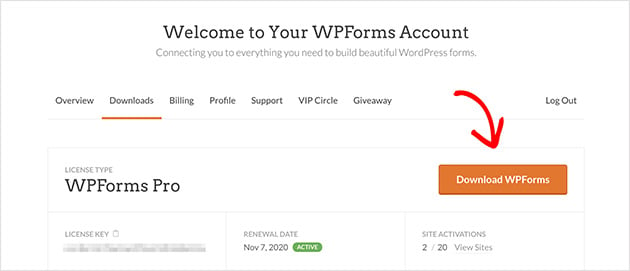
Em seguida, depois de criar sua conta WPForms, acesse a página de login do WPForms. Aqui você pode acessar o painel da sua conta e clicar em Ver Chave de Licença, Detalhes e Downloads.

Você será então direcionado para a página com os detalhes da sua chave de licença e o link para baixar o plugin.
Agora clique no botão Download WPForms. Em seguida, salve sua chave de licença em um bloco de notas para uso posterior.
Agora adicione e ative o plugin no seu painel do WordPress. Para obter instruções sobre como instalar plugins do WordPress, consulte este guia prático para iniciantes.
Passo 2. Adicione um Formulário de Contato no WordPress
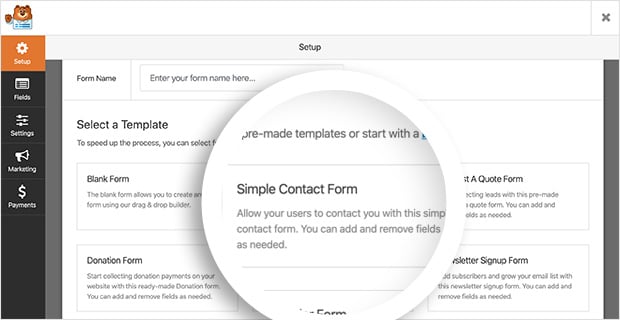
Com o WPForms instalado e ativado em seu site, é hora de criar um novo formulário de contato. Para fazer isso, vá para WPForms Plugins » Adicionar Novo para criar um formulário de contato no WordPress.
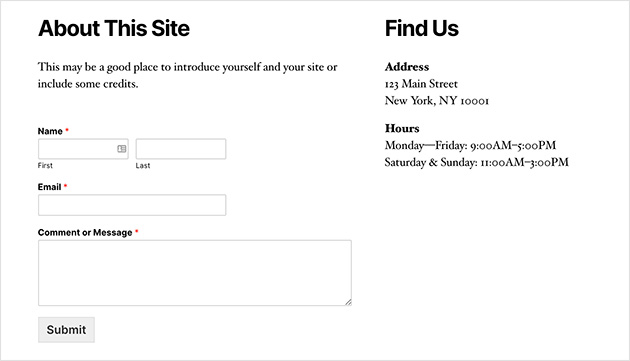
Digite o nome do seu formulário e clique no modelo Formulário de Contato Simples na tela seguinte.
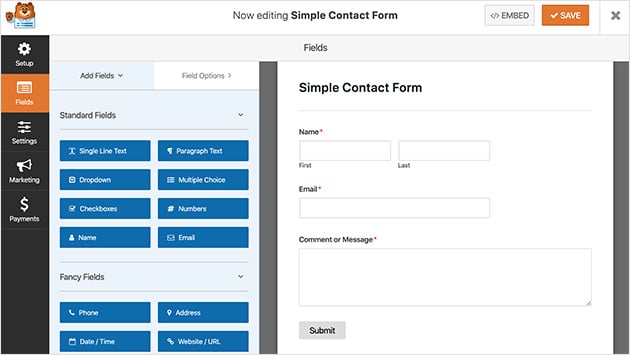
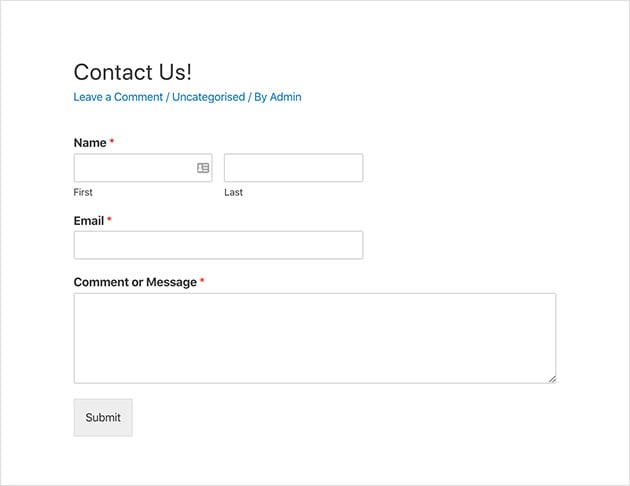
O WPForms cria automaticamente um formulário de contato simples para você. Ele inclui os seguintes campos de formulário padrão:
- Nome – O primeiro e o último nome dos visitantes que enviam o formulário.
- E-mail – Os endereços de e-mail dos visitantes são obrigatórios por padrão.
- Comentário ou Mensagem – Um espaço para os visitantes inserirem suas perguntas.
- Texto do Botão do Formulário – O botão de envio que envia a mensagem para você.
A partir daqui, é fácil adicionar um tipo de campo de formulário extra arrastando-o do painel esquerdo para a direita. Por exemplo, se você quiser dar aos usuários a capacidade de enviar um documento, você pode arrastar o campo de upload de arquivo e soltá-lo em seu formulário. Você também pode adicionar um campo de assunto de e-mail e tornar qualquer área de texto um requisito para os usuários preencherem.
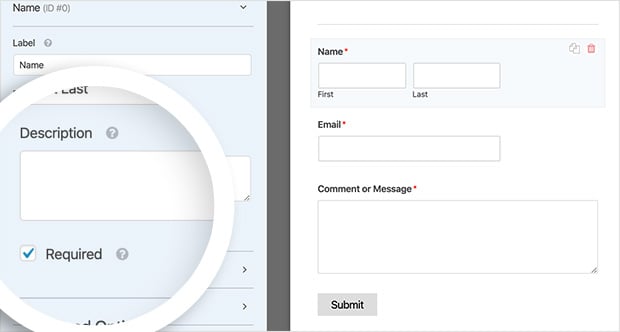
Você também pode clicar em qualquer campo para editar o nome, incluir uma descrição e muito mais. Você pode até clicar e arrastar campos para reorganizar a ordem do seu formulário de contato.
Em seguida, em Opções Avançadas, você pode editar as seguintes preferências:
- Tamanho do Campo – Defina o tamanho dos campos do formulário como pequeno, médio ou grande.
- Placeholder – Adicione texto de placeholder para os campos de primeiro e último nome.
- Ocultar Rótulo – Oculte os rótulos e sub-rótulos dos campos do formulário do usuário final.
- Layouts – Escolha um layout personalizado para o seu formulário sem usar nenhum código.

Você também pode incluir classes CSS personalizadas se desejar mais personalizações. Quando estiver satisfeito com suas personalizações, clique em Salvar.
Agora vamos definir as configurações gerais dos seus formulários.
Passo 3. Defina as Configurações Gerais do Seu Formulário
Para definir as configurações gerais do seu formulário, vá para Configurações » Geral.

Nesta seção, você pode configurar as seguintes configurações:
- Nome do Formulário – Renomeie seu formulário se desejar chamá-lo de algo diferente.
- Descrição do Formulário – Dê um nome a uma descrição para ajudá-lo a lembrar para que serve.
- Texto do Botão de Envio – Altere o rótulo do botão de envio.
- Prevenção de Spam – Evite envios de bots de spam ativando o recurso de honeypot anti-spam.
- Conformidade com GDPR – Você pode desativar o armazenamento de informações de entrada no WordPress, como endereços IP e agentes de usuário, para ajudá-lo a cumprir o GDPR.
Quando estiver satisfeito com essas configurações, clique em Salvar.
Veremos como adicionar notificações de formulário em seguida.
Passo 4. Defina as Configurações de Notificação para o Seu Formulário
Configurar notificações para o seu formulário de contato é uma excelente maneira de receber um alerta quando alguém envia um formulário em seu site. No entanto, se você não desativar esse recurso no menu suspenso de configurações do formulário, receberá notificações toda vez que alguém enviar um formulário.
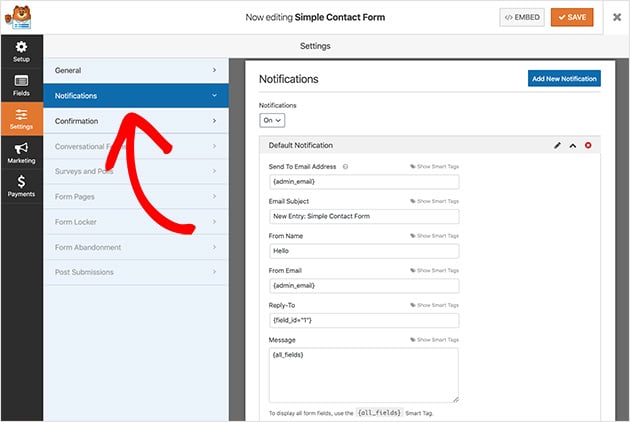
Você pode usar tags inteligentes no WPForms para alertar os visitantes do site quando eles completarem um formulário de contato. Isso os informa que você recebeu o formulário deles e garante que a mensagem foi enviada.
Consulte a documentação para saber mais sobre como configurar notificações e confirmações no WordPress.
Com suas notificações configuradas, vamos ver como configurar as confirmações do seu formulário.
Passo 5. Configure Suas Mensagens de Confirmação
Uma mensagem de confirmação é uma breve nota exibida aos visitantes do site após o envio de um formulário em sua página de contato. Ela informa que a mensagem foi recebida e dá a você a oportunidade de dizer quais são os próximos passos.
No WPForms, existem 3 tipos de mensagem de confirmação para escolher:
- Mensagem – Este tipo de confirmação é a opção padrão para mostrar uma nota rápida informando aos visitantes que eles enviaram o formulário.
- Mostrar Página – O tipo Mostrar Página leva os visitantes a uma página específica em seu site, como uma página de agradecimento, após o envio do formulário.
- Ir para URL (Redirecionar) – Esta opção é para quando você deseja enviar os visitantes para um site diferente.
Para definir sua mensagem de confirmação, clique em Configurações » Confirmação. Em seguida, selecione o tipo de confirmação que você deseja. Para este guia, selecionaremos Mensagem.

Agora insira a mensagem que você deseja que seus visitantes vejam e clique em Salvar.
A parte emocionante é a próxima, que é publicar seu formulário em seu site!
Passo 6. Adicione um Formulário de Contato a uma Página do WordPress
Com seu formulário de contato criado, é hora de adicioná-lo a uma nova página no WordPress.
Com o WPForms, você pode adicionar formulários em qualquer lugar do seu site. Isso inclui páginas de contato do WordPress, posts de blog e até mesmo um widget em sua barra lateral ou cabeçalho.
A escolha mais comum é incorporar o formulário de contato em um post ou página. Você pode usar um shortcode ou um bloco de conteúdo, o que explicaremos como fazer agora.
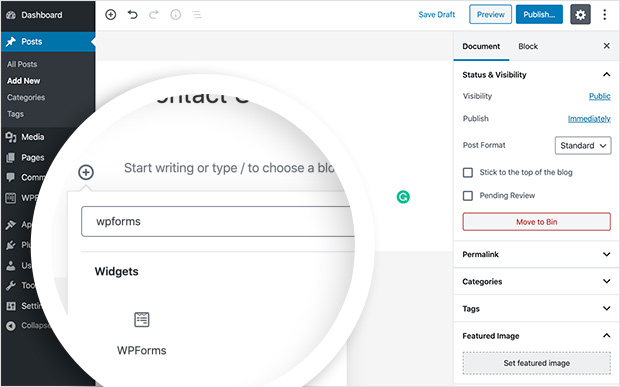
Primeiro, crie uma nova página ou post de blog e, no editor de posts ou páginas, clique no ícone de mais para adicionar um novo bloco do WordPress.
Em seguida, digite WPForms na barra de pesquisa de blocos, e o bloco WPForms aparecerá. Clique nele para adicioná-lo à sua página.
Em seguida, um bloco aparecerá em sua tela para você escolher seu formulário de contato no menu suspenso. Então o formulário aparece em sua página do WordPress.
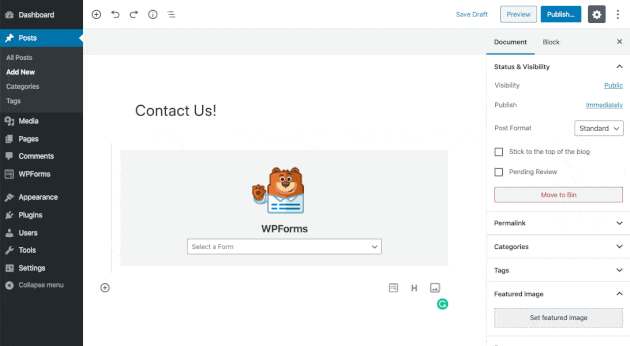
Agora tudo o que você precisa fazer é publicar sua página. Então você poderá ver o formulário ao vivo em seu site.
Bônus: Crie sua Página de Contato com SeedProd
Se você ainda não tem uma página de contato personalizada, SeedProd facilita a criação de uma do zero sem tocar em código.
SeedProd é um construtor visual de sites para WordPress. Eu o uso para criar landing pages e layouts completos de sites, incluindo a página de contato deste site. Você pode começar com um modelo pré-fabricado ou em branco, arrastar seus blocos de layout para o lugar e publicar sem escrever nenhum CSS.
Para um guia passo a passo, veja nosso guia sobre como criar uma página personalizada no WordPress.

Quando sua página estiver pronta, adicione o widget WPForms ao layout, selecione seu formulário no menu suspenso e publique.

Sua página de contato estará no ar e estilizada para combinar com seu site.
Como Proteger seu Formulário de Contato do WordPress contra Spam
Envios de spam são um problema real quando seu formulário de contato começa a receber tráfego. A boa notícia é que o WPForms inclui várias opções integradas para bloquear bots.
A primeira camada é a Proteção Moderna Anti-Spam do WPForms, que está habilitada por padrão. Ela executa uma verificação em várias camadas em segundo plano, incluindo uma armadilha de honeypot que captura bots, sem pedir nada aos visitantes.
Para segurança extra, você pode adicionar um desafio CAPTCHA. O WPForms suporta Google reCAPTCHA v2 e v3, hCaptcha e Cloudflare Turnstile. Configure sua opção preferida em WPForms » Configurações » CAPTCHA.

Se você já usa o Akismet em seu site para spam de comentários, também pode conectá-lo ao WPForms. Ele roteia os envios de formulário através dos filtros do Akismet como uma camada adicional.
A maioria dos formulários de contato permanece limpa apenas com a Proteção Moderna Anti-Spam habilitada. Adicione um CAPTCHA se o spam ainda passar.
Adicionando um Formulário de Contato à Sua Barra Lateral
O WPForms também facilita bastante a adição de um formulário de contato à barra lateral do seu site. O plugin vem com um widget de formulário de contato integrado, que você pode arrastar e soltar em qualquer área pronta para widgets do WordPress.
Acesse Aparência » Widgets na sua área de administração do WordPress para fazer isso você mesmo.
Aqui você verá o widget WPForms que pode arrastar e soltar na sua barra lateral. Alternativamente, clique no widget e selecione uma barra lateral na lista de opções. Em seguida, clique em Adicionar Widget.

Quando terminar, dê um título ao widget, escolha seu formulário na lista suspensa e clique em Salvar.
Veja como ficará usando o tema padrão Twenty Twenty do WordPress em seu site.
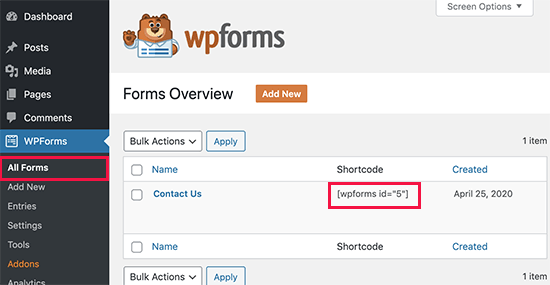
O WPForms também oferece a opção de adicionar um formulário de contato usando um shortcode do WordPress. Você pode encontrar o shortcode do seu formulário de contato visitando WPForms » Todos os Formulários e copiando o shortcode de lá.
Em seguida, basta colar o shortcode onde você deseja exibir seu formulário no WordPress usando um widget de texto simples.
Rastreando as Conversões do Seu Formulário WordPress
Depois de criar um formulário no WordPress, você deve aprender o quão bem seus formulários estão performando.
Se você rastrear seus formulários no WordPress, poderá ver quantas visualizações e conversões seus formulários obtêm e suas taxas de conversão de formulário. Você também pode ver qual formulário está obtendo mais conversões e visualizações.
A maneira mais fácil de rastrear conversões de formulário é com MonsterInsights, o melhor plugin do Google Analytics para WordPress.

MonsterInsights tem um poderoso complemento de rastreamento de formulários que rastreia automaticamente suas conversões de formulário.
É fácil de configurar e leva apenas alguns cliques. Basta instalar o MonsterInsights Forms, e ele começará a rastrear imediatamente. Ele também é totalmente compatível com WPForms e outros plugins de formulário para WordPress.
Confira este guia para aprender como rastrear conversões de formulários do WordPress.
Perguntas Frequentes sobre Como Adicionar um Formulário de Contato no WordPress
Como adicionar um formulário de contato no WordPress?
A maneira mais fácil é com o WPForms. Instale e ative o plugin, vá para WPForms » Adicionar Novo e selecione o modelo Formulário de Contato Simples. O WPForms cria o formulário automaticamente com campos de nome, e-mail e mensagem. Em seguida, abra qualquer página ou postagem, adicione o bloco WPForms, escolha seu formulário no menu suspenso e publique. Todo o processo leva menos de 15 minutos.
Como adicionar um formulário de contato a uma página do WordPress sem um plugin?
Você pode usar o Google Forms. Crie seu formulário em forms.google.com, clique em Enviar, copie o código de incorporação e cole-o em um bloco de HTML Personalizado em qualquer página do WordPress. O formulário é exibido em sua página e roteia as submissões para uma Planilha Google. A desvantagem é que o formulário carrega a estilização padrão do Google, portanto, não combinará com o design do seu site.
Como impedir spam no meu formulário de contato do WordPress?
O WPForms inclui Proteção Moderna contra Spam, que está habilitada por padrão e funciona silenciosamente em segundo plano usando um honeypot e verificação de token em várias camadas. Para spam mais agressivo, adicione um CAPTCHA em WPForms » Configurações » CAPTCHA. O WPForms suporta Google reCAPTCHA, hCaptcha e Cloudflare Turnstile. Se você já usa o Akismet para spam de comentários, pode conectá-lo ao WPForms como uma terceira camada.
Para onde vão as mensagens do formulário de contato no WordPress?
Por padrão, as mensagens do formulário de contato vão para o endereço de e-mail configurado nas configurações de notificação do WPForms. Vá para Configurações » Notificações para atualizar o e-mail do destinatário. Com o WPForms Pro, as entradas enviadas também são salvas dentro do seu painel do WordPress em WPForms » Entradas, para que você possa revisá-las sem verificar o e-mail.
Qual é o melhor plugin de formulário de contato gratuito para WordPress?
O WPForms Lite é o melhor plugin gratuito de formulário de contato para WordPress. Ele inclui um construtor de arrastar e soltar, modelos pré-fabricados, proteção básica contra spam e funciona com qualquer tema do WordPress. A versão gratuita lida bem com formulários de contato simples. Para recursos avançados como upload de arquivos, lógica condicional e integrações de pagamento, o WPForms Pro desbloqueia tudo o que você precisa.
Adicionar um formulário de contato no WordPress é uma das maneiras mais fáceis de tornar seu site mais profissional e fácil de usar. Com o plugin certo, você pode coletar os detalhes de que precisa, reduzir o spam e oferecer aos visitantes uma maneira fácil de entrar em contato.
Se você deseja uma solução rápida e sem código, WPForms é o melhor plugin de formulário de contato para iniciantes e pequenas empresas. Você pode começar com a versão gratuita ou desbloquear recursos avançados com o Pro para lidar com pagamentos, pesquisas e muito mais.
Agora que você sabe como adicionar um formulário de contato no WordPress, pode se conectar com seu público, capturar leads e expandir seu site com confiança.
Você também pode achar os seguintes guias úteis:
- Como Criar uma Landing Page com um Formulário no WordPress
- Como Criar um Formulário de Registro de Usuário WordPress com Campos Personalizados
- Como Criar um Formulário de Registro de Eventos do WordPress
- Como Criar um Formulário de Múltiplas Etapas no WordPress
- Como Criar um Formulário de Upload de Arquivos no WordPress
- Como Criar um Formulário Estilo Typeform no WordPress
- Como Criar um Formulário de Pedido Online para o Seu Site WordPress
Obrigado por ler! Adoraríamos saber sua opinião, então sinta-se à vontade para participar da conversa no YouTube, X e Facebook para mais conselhos e conteúdo úteis para expandir seus negócios.


