

TL;DR:
You can set up a complete wordpress event registration form in about 15 minutes using WPForms. Here’s the full process:
- Install WPForms: the free version handles basic registration; Pro plan required for payment processing via Stripe or PayPal.
- Choose the event registration template: search for “event registration” in WPForms >> Add New to load the pre-built template.
- Customize your fields: keep the essential event fields (name, email, ticket type, date preference) and remove what you don’t need.
- Add payment processing: connect Stripe (works on free Lite) or PayPal to collect ticket payments directly through the form.
- Configure notifications: set up admin alerts for new registrations plus a confirmation email sent automatically to each attendee.
- Publish and test: add the form to any WordPress page, submit a test entry, and verify notifications and payments work before going live.
If you’re running an event and need to register attendees and collect ticket payments in one place, WPForms is the fastest way to get there. In this guide, I’ll walk you through the exact steps I use to build a wordpress event registration form that handles everything from name and email collection to Stripe payments and automatic confirmation emails.
- What You Need Before You Start
- Video Tutorial
- Step 1: Install the WPForms Plugin
- Step 2: Choose the WordPress Event Registration Form Template
- Step 3: Customize Your Registration Form
- Step 4: Confirm Your Form Settings
- Step 5: Configure Your Form Notifications
- Step 6: Define Your Form Confirmations
- Step 7: Choose Your Form Payment Settings
- Step 8: Publish Your Event Registration Form in WordPress
- Frequently Asked Questions
- Bonus: Build a Dedicated Event Registration Page
What You Need Before You Start
Before diving into the steps, make sure you have these in place:
- WPForms plugin: the free version handles basic registration; the Pro plan ($49.50/year) is required for payment processing via Stripe or PayPal
- A WordPress site: self-hosted WordPress.org installation (not WordPress.com)
- About 15 minutes: from install to a live, published form
Video Tutorial
Step 1: Install the WPForms Plugin
The first step to creating an event registration form in WordPress is to find the best tool for the job. In this tutorial, I’m using WPForms to build the form.
WPForms is the most beginner-friendly WordPress form plugin available. Over 6 million websites use WPForms to build their forms, and it’s my go-to for registration forms because of how quickly you can go from install to working form.
Not sure if WPForms is the right choice? Read this WPForms review for the full breakdown.
To get started, get the WPForms plugin here, then install the plugin and activate it on your site.
Next, you’ll need access to the event registration form template.
In older versions of WPForms, this required installing a separate Form Templates Pack addon. In current versions, templates are accessible directly from WPForms » Add New without a separate addon install.
Check your WPForms version first, and if you see a full template library in Add New, you can skip the addon step.
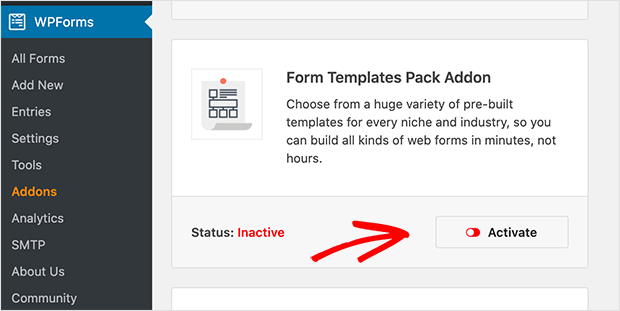
If the addon is required in your version, navigate to WPForms » Addons, scroll to find the Form Templates Pack addon, click Install Addon, and then Activate.
You’re now ready to create your event registration form.
Further Reading: How to Create a WordPress User Registration Form With Custom Fields
Step 2: Choose the WordPress Event Registration Form Template
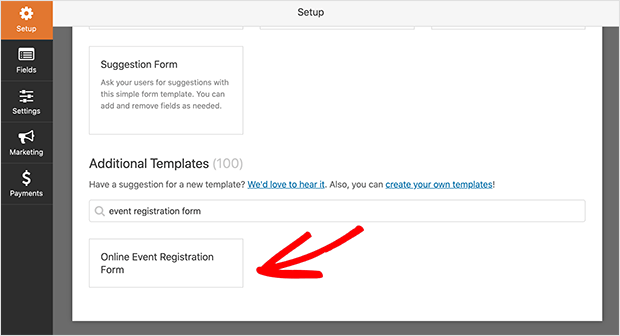
Go to WPForms » Add New. Give your form a name at the top of the screen.
In the template search bar, type “event registration form” and the template will appear. Click it and WPForms creates a new form with pre-built event registration fields ready for you to customize.
Now let’s move on to customizing your form.
Step 3: Customize Your Registration Form

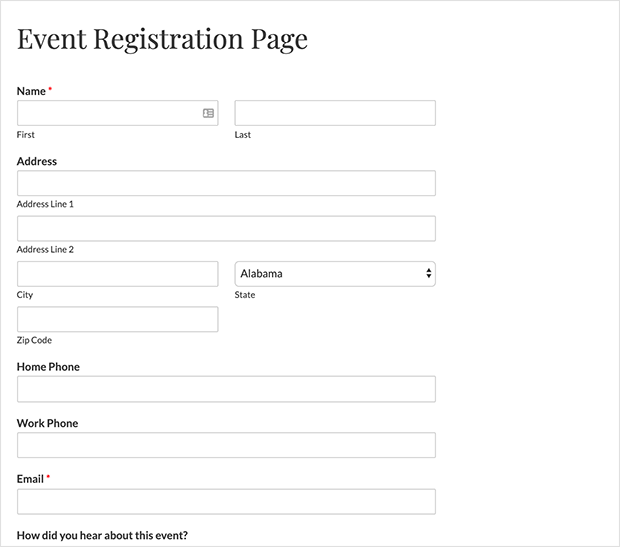
Customizing your registration form in WPForms is straightforward. The template includes fields automatically, but most event forms only need four core fields:
- Name: so you know who’s attending
- Email: to send purchase confirmations and event details
- Multiple Items (ticket type/quantity): lets attendees choose ticket tier and see a total price
- Date/time preference: useful for multi-session or multi-day events
The template may include additional fields like Home Phone and Work Phone. Remove any that aren’t relevant by clicking the red trash can icon on the field. You can always add more fields later by dragging from the left-hand panel.
One thing I’ve noticed using the Multiple Items field for event tickets: label each ticket tier clearly (General Admission, VIP, etc.) and add the price directly to the item rather than a separate price field. WPForms calculates the total automatically once the attendee selects their ticket type.
For free events where you’re not collecting payment, skip the payment fields entirely. Name and Email is all you need for basic registration.
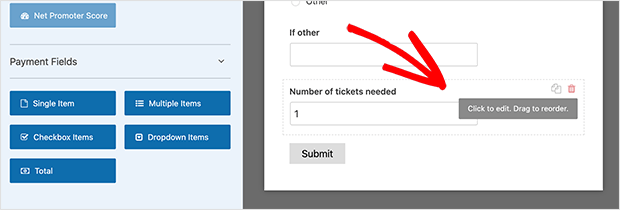
For ticket payment collection, remove the default dropdown field and navigate to Payment Fields. Click the Multiple Items field to add it to your form.
Click the Multiple Items field in the form preview and edit the label to something like “Ticket Type.” Add the price for each ticket tier. Click the plus (+) icon to add more than 3 ticket options.
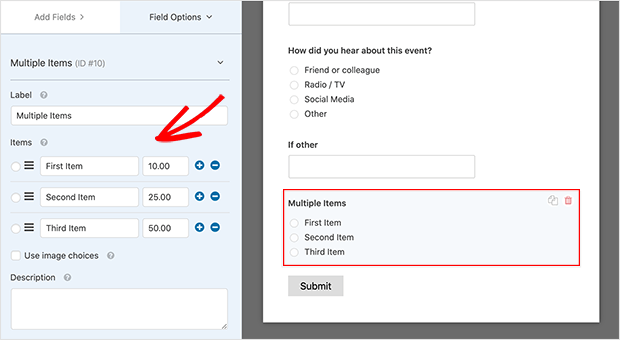
When attendees select their ticket type, they’ll see the total price update in real time. When you’re happy with your fields, click Save.
Step 4: Confirm Your Form Settings
Now it’s time to configure your form’s settings. Head to Settings >> General.
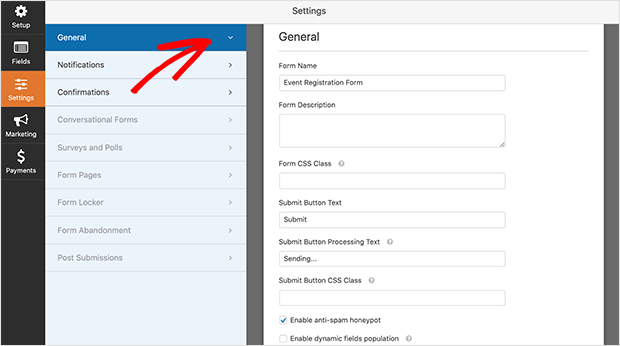
On this page, you can customize the following settings:
- Form Name: give your form a new name if you like.
- Form Description: add a description to help you remember what the form is for.
- Submit Button Text: change the label to something like “Register Now.”
- Anti-Spam: use the anti-spam honeypot feature to prevent spam registrations and secure your website.
- Information Storing: disable the storing of sensitive information like IP addresses to comply with GDPR.
When you’re happy with your settings, click Save.
Step 5: Configure Your Form Notifications
Notifications in WPForms send an email whenever someone registers for your event. By default, you’ll get an email every time someone submits the form.

The default notification goes to your admin email. That handles your side of the confirmation. But you also need to send a confirmation to the registrant themselves.
To send an automatic confirmation email to each attendee, add a second notification. Click Add New Notification in the Notifications panel.
In the Send To Email Address field, use a smart tag to pull in the registrant’s submitted email: type {field_id="2"} (where 2 is the field ID of your Email field) or use the Show Smart Tags link to select the Email field from the dropdown.
Customize the email subject and message body so the registrant receives a clear confirmation with event details and payment confirmation. You can learn how to set up form notifications in the WPForms documentation.
Click Save when you’re done, then move on to setting your form confirmation messages.
Step 6: Define Your Form Confirmations
The Confirmations area in WPForms lets you display a message when users successfully submit their form. They’re a good way to let people know their registration went through and what to expect next.
There are 3 Confirmation types in WPForms:
- Message: the default confirmation type. When users submit the registration form, they see a note confirming the form went through.
- Show Page: takes visitors to a specific page on your website, often a thank you page.
- Go to URL (Redirect): sends visitors to another website after submitting.
Click the Confirmations tab from the form builder Settings page.
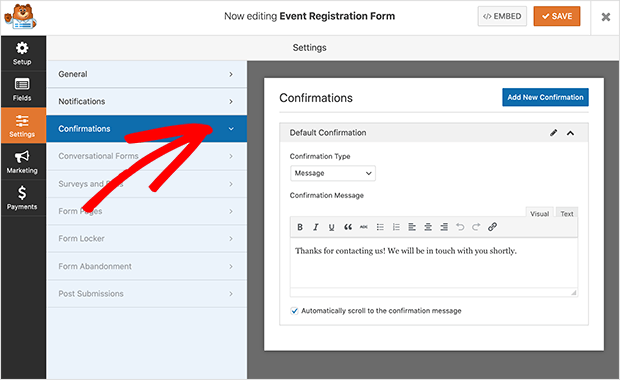
Choose the confirmation type you want, customize your message, and click Save.
Step 7: Choose Your Form Payment Settings
If you’re selling tickets through your event registration form, this step connects WPForms to your payment processor. WPForms handles the full payment flow itself. You don’t need WooCommerce or any separate ecommerce plugin to accept payments on a registration form.
WPForms supports several payment options:
- Stripe: the primary recommendation. The Stripe addon works with WPForms Lite (free plan) and connects in minutes. See how to accept Stripe payments in WordPress.
- PayPal: a solid option if your attendees prefer PayPal checkout. Works on WPForms Pro and above.
- Square and Authorize.Net: available on the WPForms Elite plan for organizations that need these processors.
To set up your chosen payment method, navigate to Payments in the form editor and install the relevant addon from WPForms addons.
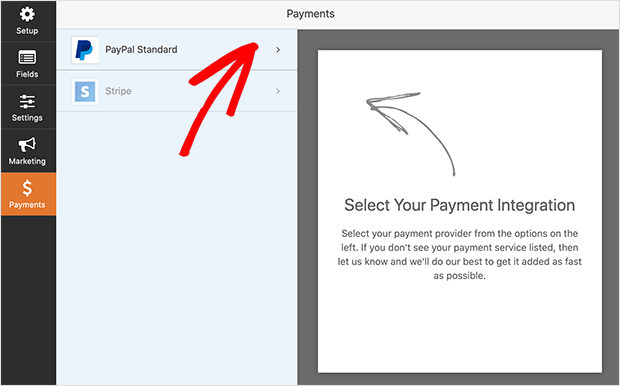
For PayPal specifically: enter your PayPal email address, select Production mode, and choose Products and Services as the payment type.
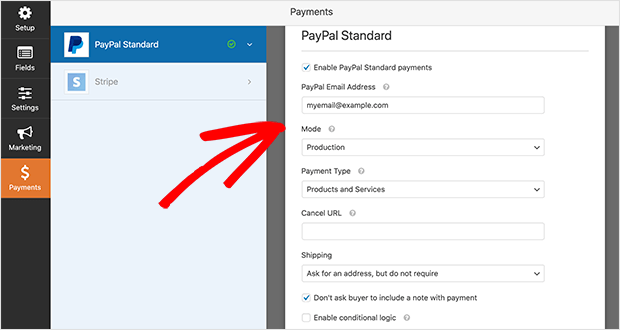
Adjust the other settings to suit your needs and click Save.
You can also let attendees choose their own payment method through WPForms conditional logic.
Step 8: Publish Your Event Registration Form in WordPress
Unlike many WordPress event registration plugins, WPForms lets you add forms to almost anywhere on your WordPress website. You can publish your form in posts, pages, and even WordPress sidebar widgets.
Let’s embed your registration form on a new page. Go to Pages » Add New from your WordPress dashboard and click the plus (+) icon to add a new content block.
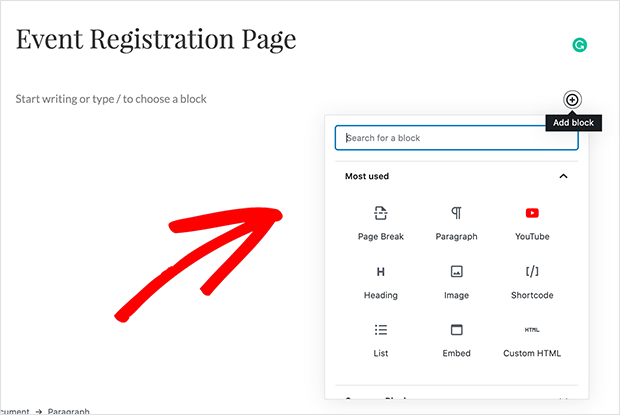
In the search box, type “WPForms” to locate the WPForms content block and click to add it to the editor.
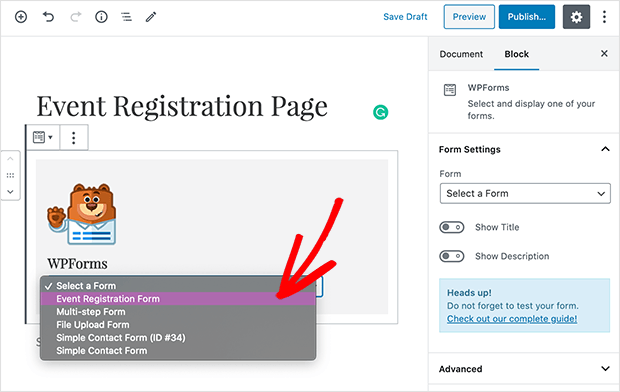
With the WPForms block in your page editor, click the drop-down menu to find your event registration form. This adds your form to the page so you can preview how it looks before publishing.
When you’re happy with your form, click Publish so site visitors can register.
Before you send traffic to the page, run three quick checks:
- Submit a test entry: fill out the form yourself and verify the entry appears in WPForms >> Entries
- Verify notification emails: check that your admin notification arrived and that the attendee confirmation email was sent
- Test payment processing: Stripe and PayPal both support test mode; run a test transaction before going live
Frequently Asked Questions
Can I create a WordPress event registration form for free?
Yes, WPForms has a free version that handles basic registration without payments. You can collect attendee names, email addresses, and custom information at no cost. If you need to collect ticket payments or access the event registration form template, you’ll need the Pro plan starting at $49.50/year. For free events with no payment required, the free version covers everything you need. If payments are a future consideration, check out our guide on WordPress Stripe payment plugins.
How do I collect payments on a WordPress event registration form?
WPForms handles the full payment flow through its Stripe, PayPal, Square, or Authorize.Net addons. You don’t need WooCommerce or a separate ecommerce plugin. Connect Stripe (available even on the free Lite plan) or PayPal (Pro plan and above), add a Multiple Items payment field to your form, and WPForms processes payments when attendees submit. The payment is captured alongside the registration data in one submission.
What fields should I include in an event registration form?
Keep the form focused on what you actually need. The four essential fields for most events are: Name, Email, ticket type or quantity (using WPForms’ Multiple Items payment field), and date or session preference for multi-day events. For free events with no payment required, Name and Email is often enough. Additional fields like phone number or address are worth including only if your event specifically requires them, since longer forms lead to lower completion rates.
How do I send a confirmation email to event registrants?
In WPForms, go to Settings >> Notifications and click Add New Notification. In the Send To Email Address field, use the smart tag for your Email form field (click Show Smart Tags and select Email) to automatically route the confirmation to each registrant’s submitted address. Customize the email subject and body with event details. WPForms sends this confirmation automatically every time someone registers. See the WPForms notification documentation for more detail.
Bonus: Build a Dedicated Event Registration Page
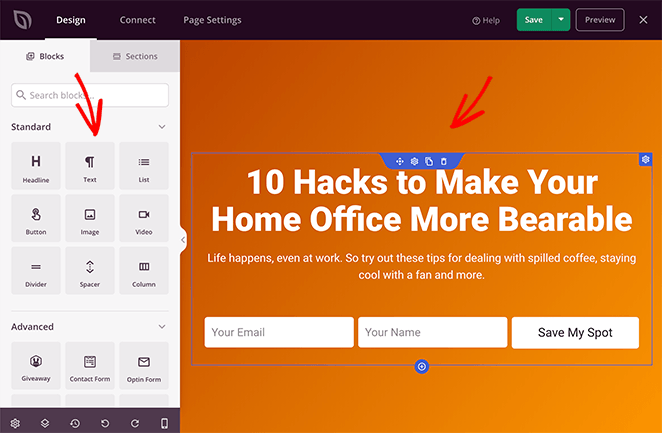
A registration form embedded in a generic WordPress page gets the job done. But a page designed around your specific event, with speaker bios, the event schedule, and your brand colors, converts better because it gives attendees everything they need to commit in one place.
That’s where SeedProd comes in. SeedProd is a drag-and-drop website builder that lets you build complete WordPress landing pages and complete websites without code.

SeedProd comes with pre-built event landing page templates you can customize for your specific event. Pick a template, drop in your WPForms event registration form, add your event details and images, and you have a complete registration page that matches your brand.
For a complete walkthrough, check out our guide on how to create an event landing page in WordPress. You can also read our tutorial on how to create a landing page with a form for a step-by-step setup.
Get Your Event Registration Form Live Today
With WPForms, your wordpress event registration form is ready to take registrations, process payments, and send automatic confirmations to every attendee. The whole setup takes about 15 minutes.
If you want to take it further, pair your form with a dedicated event landing page built with SeedProd for a complete event registration experience.
If you’re building other types of forms with WPForms, these tutorials walk through the full process:
- How to Create a Multi-Step Form in WordPress
- How To Create A WordPress Form With File Upload
- How To Create a Typeform-Style Form On WordPress
- How to Create an Online Order Form for Your WordPress Site
- How to Create a Contact Form in WordPress
- How To Add A Survey To Your WordPress Website
Thanks for reading! We’d love to hear your thoughts, so please feel free to join the conversation on YouTube, X and Facebook for more helpful advice and content to grow your business.


Hi. Thanks for such a useful article.
May I know where to get the data of people who have registered via the form so that I can download into Excel?
Hi Iskandar. From your forms dashhboard, click the form you want to export data from. At the top of the next page, there should be an option to “Export All” Here’s a step-by-step guide to help you out: https://wpforms.com/how-to-export-wordpress-form-entries-to-csv/