When I first started selling my services online, I wished I could accept payments right from the page I used to attract clients. It was frustrating to send people to a separate checkout page, only to see many of them change their minds before completing the purchase.
Adding a payment gateway page made my life as a freelancer so much easier. Clients could accept payments on the landing page itself without being redirected, keeping the experience simple and smooth.
In this guide, I’ll share two methods I’ve personally used to create a high-converting payment landing page in WordPress. From choosing the right tools to optimizing your payment gateway for better conversions, I’ll cover everything you need to know based on my experience.
In this guide, you’ll learn:
- Why collect payments directly on your landing page
- How to use SeedProd to create a payment page
- How to use WP Simple Pay for payment forms
- Answers to common payment gateway questions
Why Collect Payments on Your Landing Page?
Key Takeaway: Letting users pay directly on your landing page keeps the buying process simple and fast, which means fewer drop-offs and more completed sales.
As I’ve discovered, adding a payment system directly on your landing page makes buying easier for customers and potential clients. Instead of being sent to a separate checkout page—where they might change their minds—they can pay instantly right there. This helps stop them from changing their minds before they buy, and can lead to more sales.
Offering multiple payment methods like credit cards, PayPal, and others can boost sales even more. By providing customers with their preferred way to pay, you make it more convenient for them to complete the transaction. In fact, Ottu found that businesses offering multiple payment choices sometimes see up to a 30% increase in sales.
So what exactly do you need to get started with taking payments on your landing page? Let’s find out.
What You Need to Set Up a Payment Gateway Page
Key Takeaway: To accept payments on your page, you need a payment processor like Stripe or PayPal, an SSL certificate, and basic security compliance — most tools handle this for you.
Based on my experience, you’ll need a few essentials for accepting payments on your page:
- A Payment Processor: Think of services like Stripe, PayPal, or Square as secure payment processors. They handle all the technical details of accepting different payment methods (like credit cards).
- SSL Certificate: This is like a digital lock for your page. It scrambles any information customers share while being sent so it can’t be stolen.
- PCI Compliance: This means following a set of rules to protect customer credit card information. It sounds complicated, but your payment service will help you figure out what you need to do.
So, how do you build a payment gateway landing page? Follow the 2 methods I’ve used on my projects below to learn how.
Method 1. Use a Page Builder to Create a Payment Landing Page
Key Takeaway: SeedProd makes it easy to build a fully customized landing page with built-in Stripe payments, no code or extra plugins needed.
First, I’ll show you how to create a landing page and add payment integration with SeedProd. Essentially, it’s a simple way to create a Stripe landing page.

SeedProd is one of the best website and landing page builders for WordPress. It lets you create any part of your web design without writing code.
In the past, I’ve used SeedProd to build landing pages like:
- Páginas de ventas de alta conversión
- Sitios web completos de WooCommerce con páginas de pago, páginas de productos y mucho más.
- Custom headers, footers, sidebars, and templates
I even made a full website design with its theme builder (you can see how I did it in this guide on creating a custom WordPress theme).
Añadir funciones a tu sitio es fácil con sus plantillas personalizables, bloques de WordPress y secciones.
Por ejemplo, puede incrustar botones para seguir y compartir en las redes sociales para dar a conocer la marca y conseguir más seguidores. También puedes utilizar elementos que generen clientes potenciales, como formularios de suscripción, temporizadores de cuenta atrás y botones de llamada a la acción, para aumentar tu lista y potenciar las ventas.
One of the elements I’ll use in this method is SeedProd’s Payment Button block, which has payment gateway integration. It lets you start accepting online payments using the Stripe payment processor. It’s quick and easy to set up and requires zero coding.
So follow the steps below to create a payment gateway page with Stripe.
Step 1. Install and Activate SeedProd Landing Page Builder
The first step is to go to the SeedProd pricing page and choose a plan. For this guide, I’ll be using SeedProd Pro for its advanced features, but you can use the Stripe Payment Button on any plan, including the unlimited free trial of SeedProd.
After picking a plan, log into your SeedProd account and download the plugin file. You can also copy your license key on the same page if you’re using the premium version.
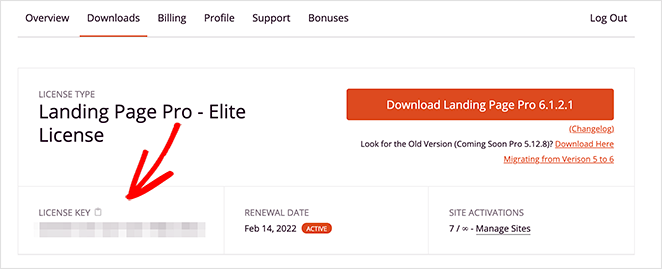
Ahora vaya a su sitio web WordPress y cargue el plugin SeedProd. Si necesitas ayuda, sigue esta guía sobre cómo instalar y activar un plugin de WordPress.
Una vez hecho esto, vaya a la página SeedProd " Configuración y pegue su clave de licencia.
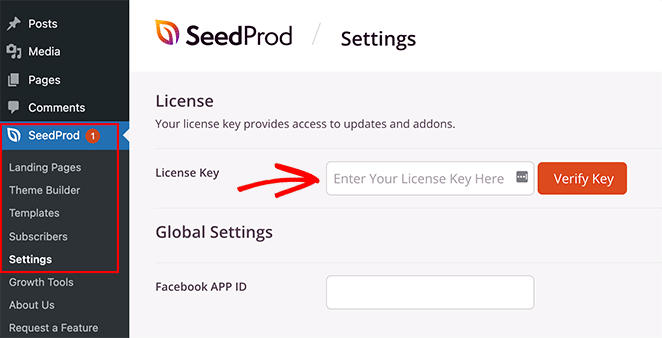
Ahora siga adelante y haga clic en el botón Verificar clave para almacenar la configuración de su licencia.
Paso 2. Elija una plantilla de página de destino
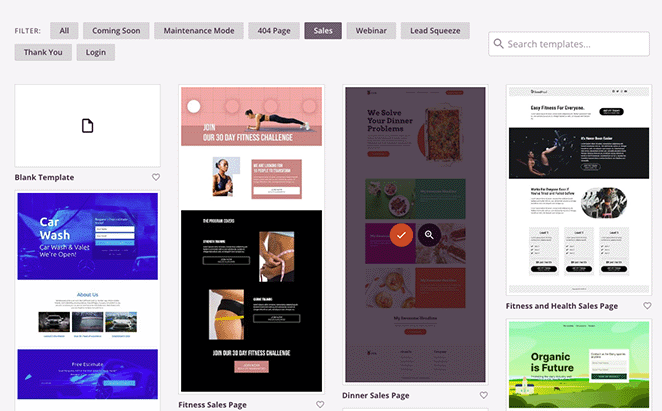
The next step is to select a template design for your page. To do that, you can go to SeedProd » Landing Pages and click on the Add New Landing Page button.
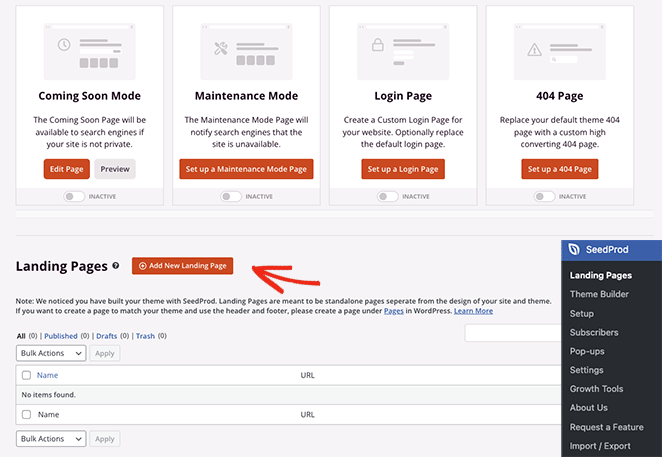
En la siguiente pantalla, verá una biblioteca de plantillas de páginas de destino diseñadas por profesionales.
You can click any of the filters at the top to narrow down your search. For example, clicking the Sales filter will only show the sales page designs.
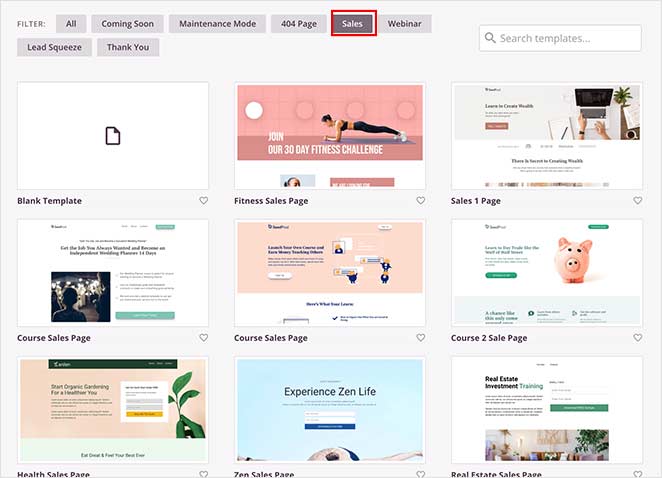
Cuando hayas encontrado un diseño que te guste, haz clic en el icono de la marca de verificación.
After, a popup will open asking you to enter your page name and URL. Don’t worry if you can’t think of a good name; I’ll show you how to edit it later.
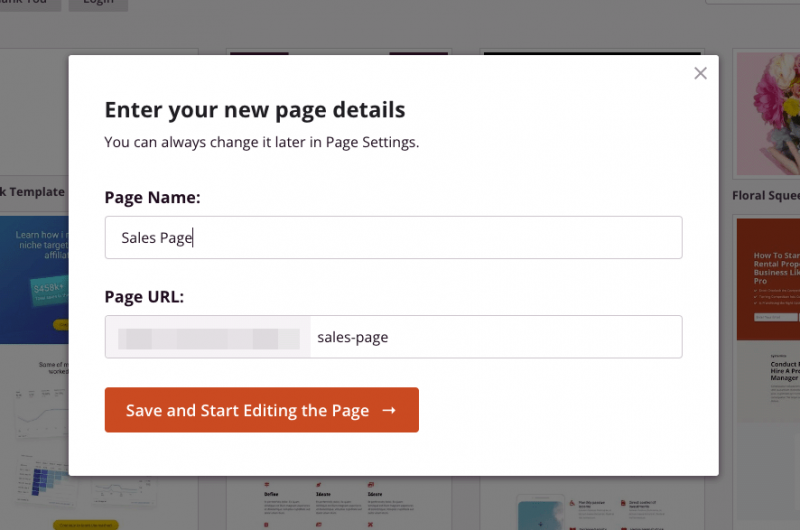
Ahora haga clic en el botón Guardar y empezar a editar la página.
Paso 3 Añadir el bloque del botón de pago
En la siguiente pantalla, verá un diseño similar al del ejemplo siguiente:
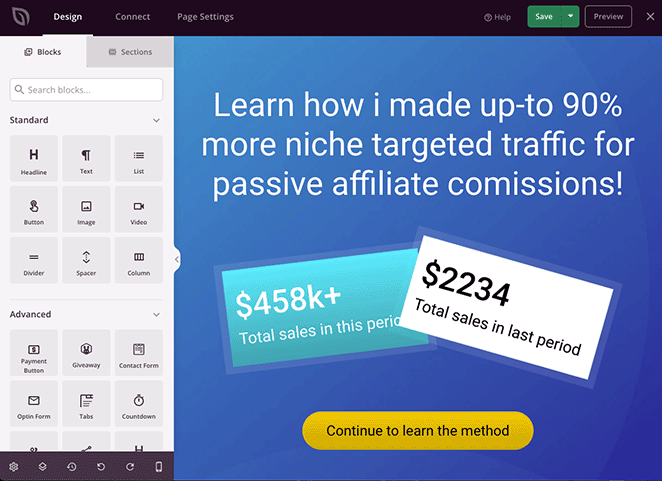
A la izquierda están los bloques y secciones de WordPress que puedes añadir al diseño de tu página de aterrizaje. Luego, a la derecha hay una vista previa en vivo donde puedes previsualizar los cambios que hagas en tiempo real.
You can customize any part of your payment gateway landing page by clicking anywhere on the live preview. For example, clicking the headline lets you type directly on the design to change the content.

También se abrirá un panel de configuración a la izquierda, donde podrás acceder a los ajustes avanzados para personalizar tus fuentes, colores, espaciado, HTML y mucho más.
Como puedes ver en este ejemplo, también puedes editar secciones para cambiar la imagen de fondo fácilmente. Solo tienes que hacer clic en un elemento y personalizarlo para que tenga exactamente el aspecto que deseas.


“A cluttered landing page design can easily distract users away.
To avoid this, make sure that you keep your landing page layout clean and simple. Using lots of empty space, color contrast, and large fonts can help you easily achieve that simplicity.” How to Increase Your Landing Page Conversions by 300%.
— Syed Balkhi, Founder and CEO of WPBeginner.
Adding an online payment gateway to your page is just as easy. Simply search for the Payment Button WordPress block and drag it onto your page.
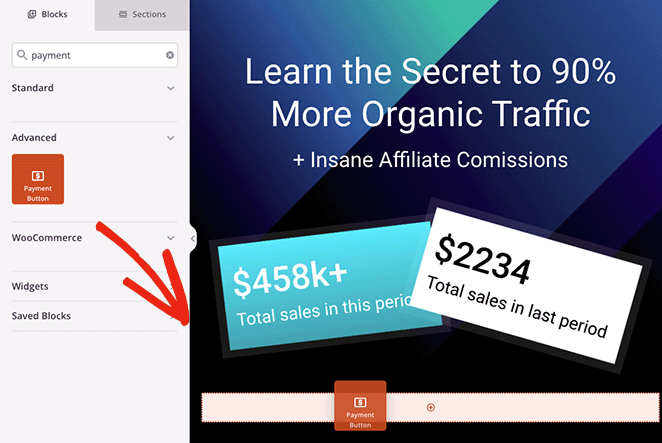
After doing that, the block settings will open, where you can click the Connect with Stripe button to set up a merchant account and link it.
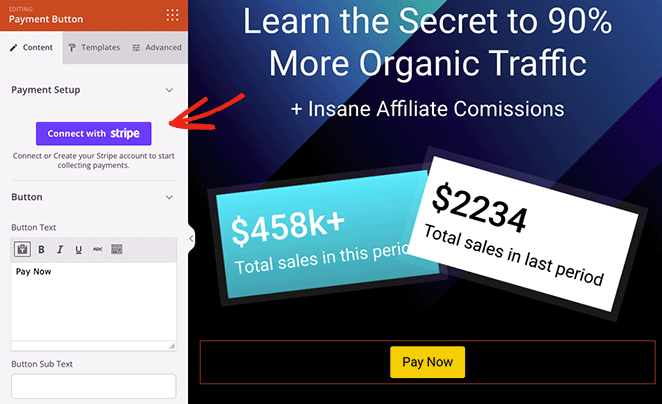
Automáticamente irás a la pantalla de inicio de sesión de Stripe, donde podrás introducir tu código de verificación, pero volverás directamente al diseño de tu página de destino una vez se haya completado la conexión.

Una vez que haya autorizado la conexión con Stripe, puede personalizar la configuración del botón de pago.
Por ejemplo, puede editar los siguientes ajustes:
- Importe del pago
- Descripción del pago
- Moneda de pago
- Éxito URL

La URL de éxito es la página a la que desea redirigir a los compradores después de que completen su compra. Por ejemplo, puede crear una página de agradecimiento con SeedProd y redirigir a los clientes a esa página cuando hayan realizado la compra correctamente.
In addition to the above settings, you can customize the button text, sub-text, alignment for mobile and desktop, and button size, and even add Font Awesome icons.
¿Necesita más opciones de personalización? Simplemente haga clic en la pestaña Avanzado para encontrar el estilo de los botones, el color, la fuente, el espaciado, la configuración de los márgenes y mucho más.
With payments set up, you can continue customizing your page until you’re happy with how the design looks.
No olvide pulsar el botón Guardar en la esquina superior derecha para guardar los cambios.

Paso 4. Configure sus ajustes
I mentioned earlier that you can change your page settings before publishing your page. To do that, click the Page Settings button at the top of the page builder screen.
In the General settings, you can edit your page name and URL, publish your page and show your SeedProd affiliate link.

Si tiene instalado un plugin SEO para WordPress como All in One SEO, puede hacer clic en la pestaña SEO para introducir la configuración de optimización para motores de búsqueda.
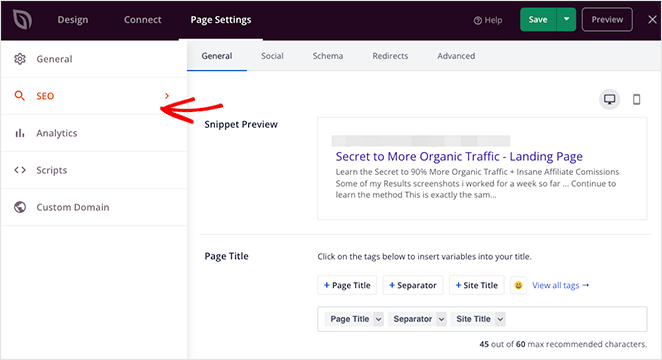
Otros ajustes a los que puede acceder son los siguientes:
- Track the performance of your page with MonsterInsights, a powerful Google Analytics plugin for WordPress.
- Añada secuencias de comandos personalizadas al encabezado, cuerpo y pie de página de su página web para realizar seguimientos y retargeting.
- Give your page a custom domain name separate from your website (Elite plans only).
You can also click the Connect tab at the top of the page to link your page to your email marketing service, Google Analytics, spam protection, and Zapier.
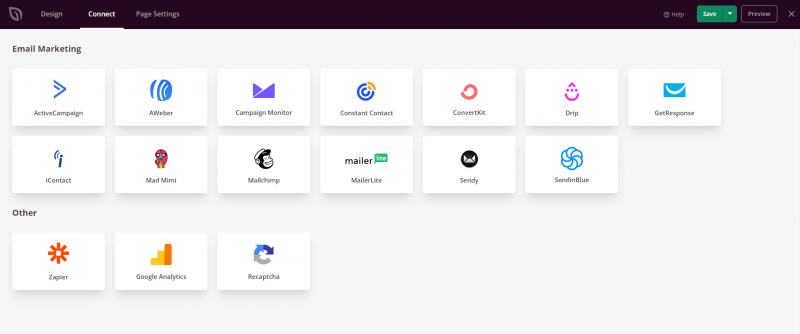
Step 5. Publish Your Payment Gateway Landing Page
When you’re ready to make your page live, click the Save button and select the Publish option.
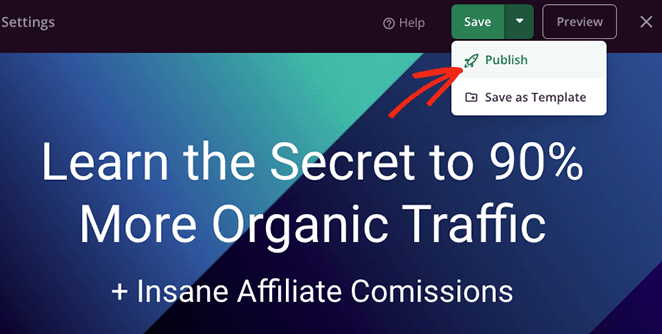
Now, when visitors click your payment button, they’ll be able to check out using Stripe.

At this point, you’ve created a complete online payment landing page that’s ready to start converting visitors into paying customers.
📢 Expert Tip
While Stripe is a powerful payment provider, it’s not your only option. Other popular choices include PayPal, Square, and more.
PayPal is known for its widespread use and buyer protection. Square offers excellent point-of-sale solutions for physical products as well. Consider which gateway aligns best with your target audience and business needs.
For a more in-depth comparison of payment options, check out this guide on the Best WooCommerce Payment Gateways for WordPress.
Method 2. Use a Plugin to Add a Landing Page Payment Gateway
Key Takeaway: WP Simple Pay is a great option if you want to quickly add a Stripe payment button to any WordPress page without building a full landing page layout.
Another way to create a landing page with a payment option is to use a WordPress payment plugin.
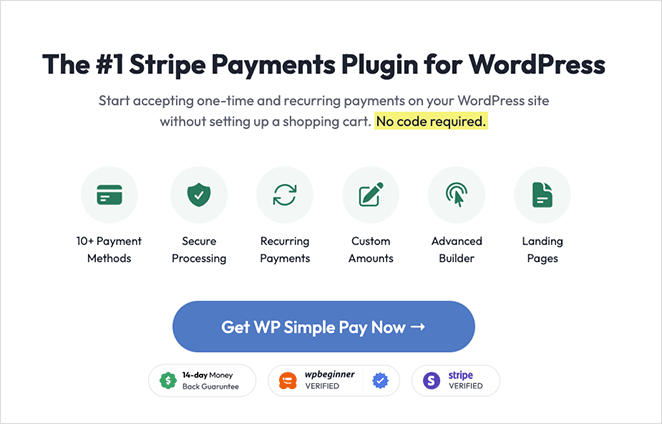
WP Simple Pay is one of the best and easiest-to-use WordPress payment plugins. It lets you add Stripe WordPress payment form to any post or page on your WordPress site without code.
So, if you don’t want to create a high-converting landing page and need a more straightforward option, WP Simple Pay is a great alternative to page builders.
Nota: para aceptar pagos usando WP Simple Pay; necesitarás un certificado SSL activo. Aquí tienes una guía para añadir SSL a WordPress si necesitas ayuda.
Paso 1. Instalar y activar WP Simple Pay Instalar y activar WP Simple Pay
The first step is to get your copy of WP Simple Pay from their website. Then, install and activate the plugin on your website.
Una vez que el plugin esté activo, verás automáticamente el Asistente de configuración, que automatiza todo el proceso de configuración.
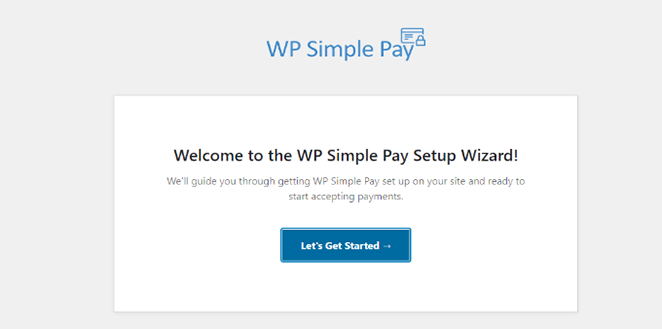
Para iniciar el asistente de configuración, haga clic en el botón Comencemos.
Segundo paso Complete el asistente de configuración
The setup process has four steps. First, you’ll be asked to enter your WP Simple Pay license key, which you’ll find in your account dashboard’s Downloads section.
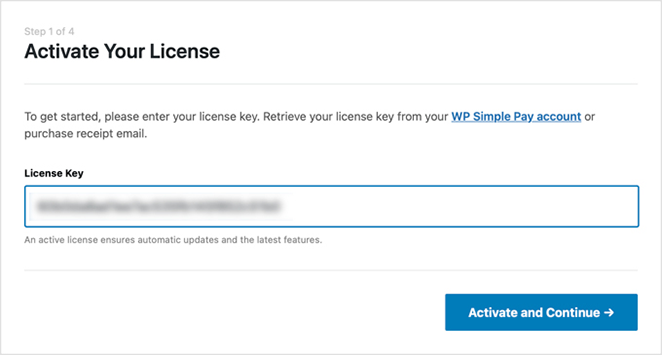
Introduzca su clave de licencia y haga clic en el botón Activar y continuar.
En la siguiente pantalla, tendrá que conectar con su cuenta de Stripe, así que haga clic en el botón Conectar con Stripe.
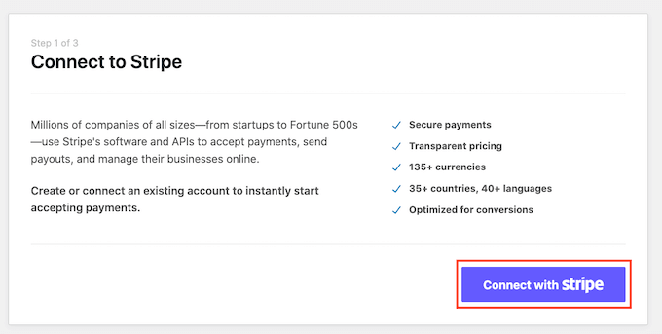
Now, you’ll need to log into your Stripe account and verify the connection.
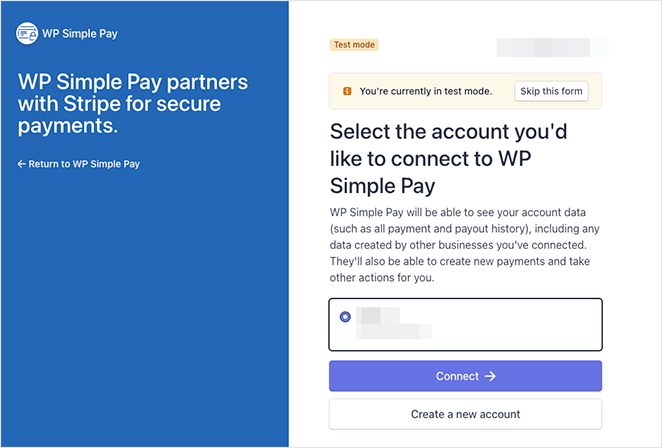
Una vez hecho esto, volverás al asistente de configuración, donde podrás elegir qué correos electrónicos recibirán los clientes tras completar un pago.
Por ejemplo, puede enviar un recibo de pago, una notificación de pago, un recibo de factura y una próxima factura.
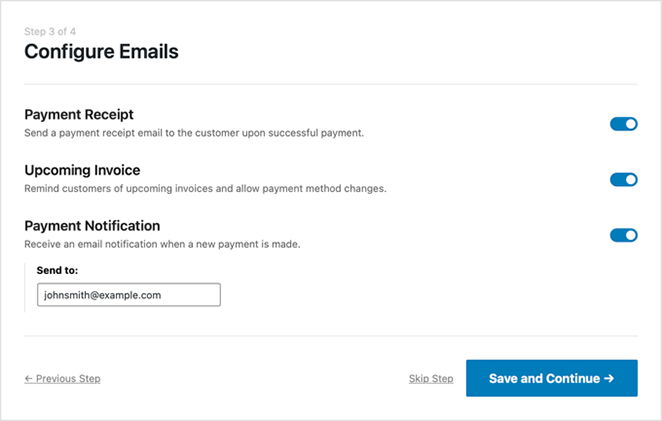
After picking your email notifications, click the Save and Continue button.
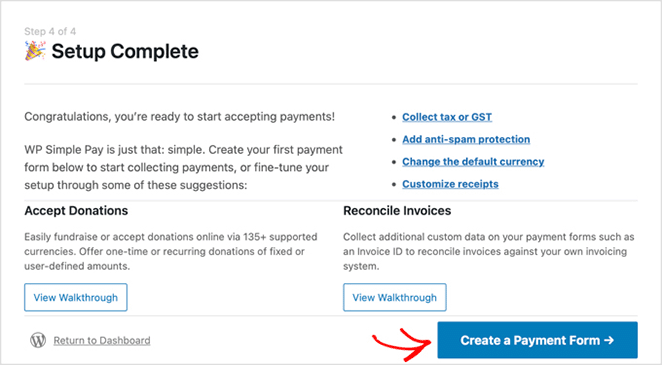
The setup is now complete. The next step is to create a form for shoppers to enter their payment details. To do that, click the Create a Payment Form button.
Paso 3. Crear un formulario de pago
En la siguiente pantalla, verás las diferentes plantillas de formularios de pago disponibles con WP Simple Pay. Puedes elegir entre diferentes tipos de formularios, incluyendo Recaudación de Fondos, Productos y Servicios, Registros, Donaciones y más.
For this tutorial, we’ll select the Payment Button template. To do so, hover over the template and click the Use Template button.
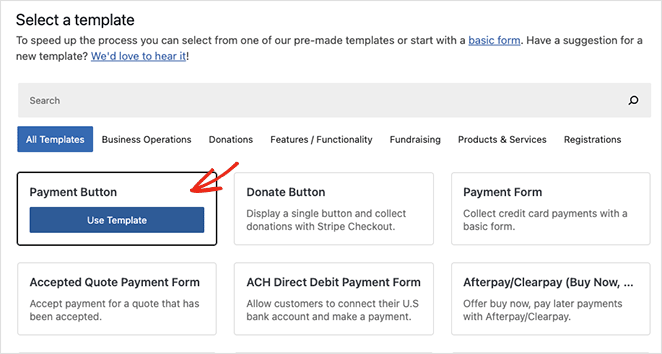
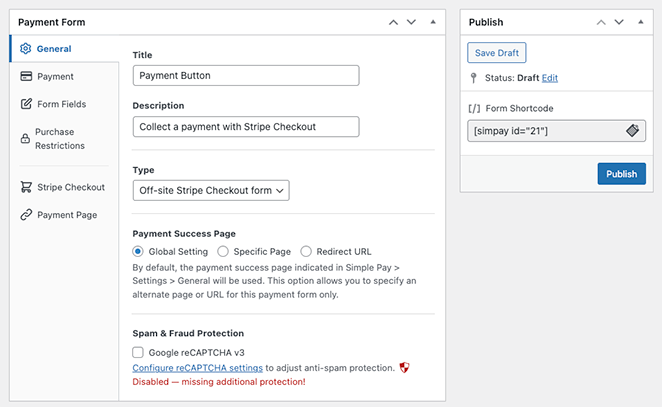
Your payment button settings will now open on the next screen. Here, you can edit general settings, including the button name, description, type, and payment success page.
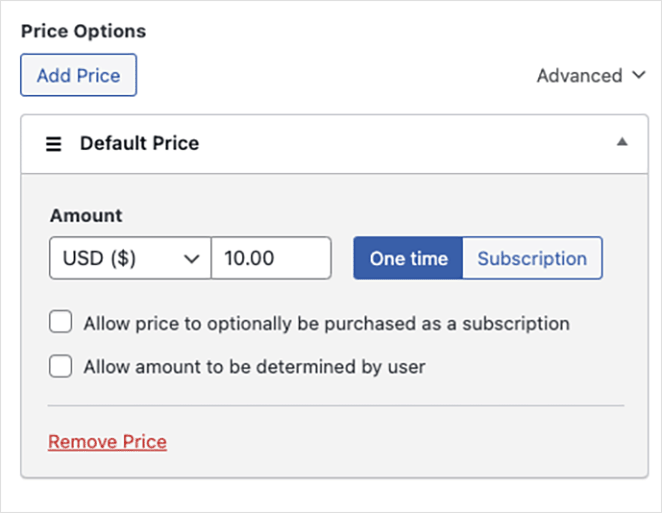
En la pestaña de pago, puede configurar el precio por defecto de su botón de pago y elegir entre pagos únicos o periódicos.
You can also pick from multiple payment methods, including credit card, direct debit, Alipay, Klarna, and Clearpay.
Una vez que haya terminado de personalizar la configuración del botón de pago, haga clic en el botón Publicar.
Step 4. Add Payment Button to Your Landing Page
The next step is to add the payment button to your page. The WP Simple Pay WordPress block allows you to add it anywhere on your page.
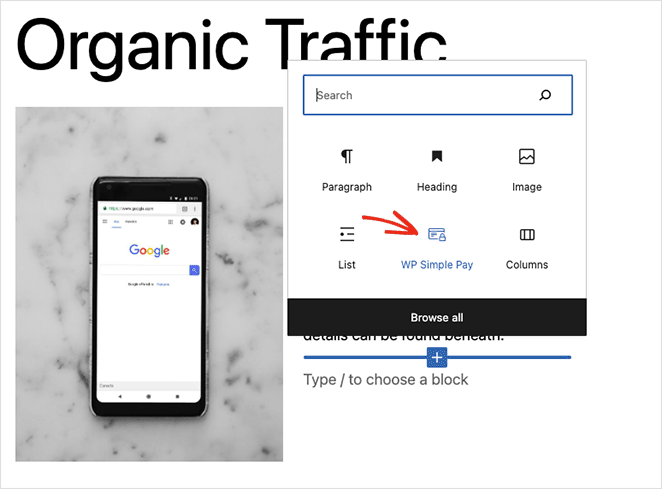
Para ello, cree o edite una página de WordPress y, a continuación, en el editor de contenido, haga clic en el botón más y seleccione el bloque WP Simple Pay.
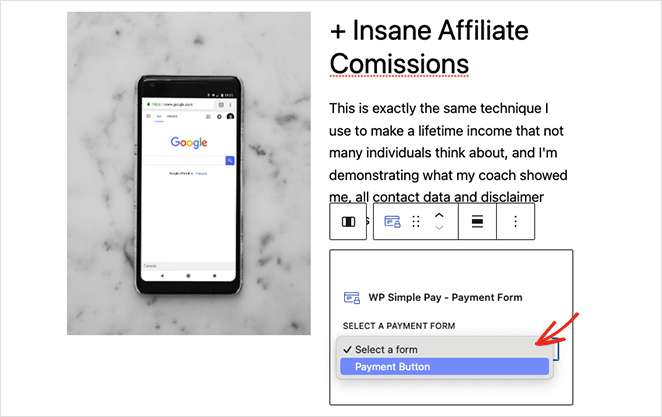
A continuación, puede seleccionar el botón de pago en el menú desplegable.
After updating or publishing your payment page, you can preview your payment button and gateway in action.

After you publish the page, you’ll have a fully functional checkout landing page in WordPress, complete with a Stripe-powered payment button.
Which Method Should You Use?
If you want full design control with drag-and-drop ease, go with SeedProd. But if you just need a fast Stripe payment button without building a whole page, WP Simple Pay is a great pick.
Preguntas frecuentes
Bonus Guides for eCommerce Websites
You now know how to make your landing page with payment gateway functionality.
Si estás interesado en crear una tienda de comercio electrónico completa, aquí tienes algunos tutoriales que pueden ayudarte:
- Cómo añadir un botón personalizado Add-to-Cart en WooCommerce
- Cómo mostrar categorías de productos y etiquetas en WooCommerce
- Cómo personalizar fácilmente la página de tu tienda WooCommerce
Gracias por leernos. Nos encantaría conocer tu opinión, así que no dudes en dejarnos un comentario con tus preguntas y comentarios.
También puede seguirnos en YouTube, X (antes Twitter) y Facebook para obtener más contenidos útiles para hacer crecer su negocio.

