I remember staring at a blank page trying to design my first service page in WordPress. I knew what I offered, but actually showing it in a way that looked clear and trustworthy felt harder than I expected.
If you’re feeling stuck too, this guide will walk you through how to build a professional service page design in WordPress. I’ll show you the exact steps I used, including the tools that made the biggest difference.
You can build one main services page or a separate page for each service using a visual builder like SeedProd. I’ve done both, depending on how much detail I want to show.
To design your WordPress service page, here are the steps I followed:
- Step 1: Install SeedProd for WordPress
- Step 2: Choose a Service Page Template
- Step 3: Customize Your Service Page Layout
- Step 4: Add a Services Section
- Step 5: Publish Your WordPress Service Page
- Alternative: Use Block Editor Instead of SeedProd
なぜサービスページのデザインが必要なのか?
A strong services page layout design shows what your business offers and why someone should work with you. On your service details page, you might want to include things like pricing, benefits, FAQs, and more.
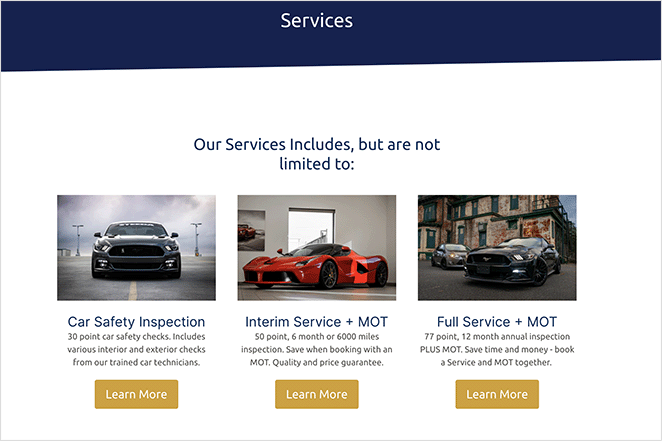
You can go with one main service page that lists everything, or make separate pages for each offer. I’ve done both depending on how detailed I want things to be.
For example, you could add a short our services section design on your homepage and link to deeper service listing page designs for more info. You can even include a CTA button for people to book a call or contact you.
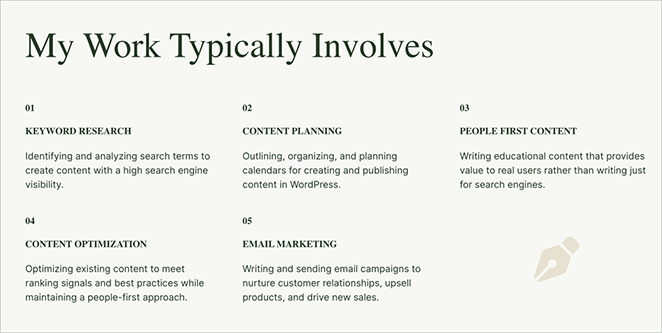
Here’s how I did it on my own site. I added a simple services section in my About page, and it works well to highlight what I do in a friendly, clear way.
Why Service Pages Matter for Conversions
Your service page isn’t just there to list what you do. It’s one of the most important pages for turning visitors into customers.
When I first built mine, I was focused on listing every detail. But once I simplified the layout, added a clear call-to-action, and showed a few results, I started getting way more inquiries.
Here’s why a good service page can seriously boost your conversions:
- Clarity: It shows what you do and who it’s for — fast
- Trust: It gives visitors a reason to believe you can help
- Direction: It tells them exactly what to do next (book a call, fill out a form, etc.)
If someone lands on your service page and feels confused, they’ll leave. But if they instantly understand what you offer and how it solves their problem, they’re much more likely to stick around, and convert.
How to Create a WordPress Service Page Template with SeedProd
When I wanted more control over how my service page looked, I used SeedProd. It let me move things around exactly how I pictured them. You don’t need any coding skills, and you can easily create your own services section design using built-in blocks and templates.

I like using SeedProd because it’s easy to figure out, even if you’re brand new to WordPress. That’s why it’s my favorite tool for building pages like this.
It comes with tons of services page inspiration thanks to its pre-built sections and templates. It also lets you create full custom themes, so if you offer services in WordPress (like web design or development), it’s a great fit.
I also like the extras it comes with. You can preview your page on mobile, connect email tools, and customize headers and footers. It all works without extra plugins.
SeedProdでサービスページのデザインを作成するには、以下のチュートリアルの手順に従ってください。
ステップ1.SeedProdのインストールとアクティベート
まず、WordPressウェブサイトにSeedProdプラグインをインストールし、有効化する必要があります。SeedProdのインストール方法については、こちらをご覧ください。
ドキュメントでは、インストール手順とSeedProdライセンスキーのアクティベーション方法を説明します。
ステップ2.ランディングページのテンプレートを選ぶ
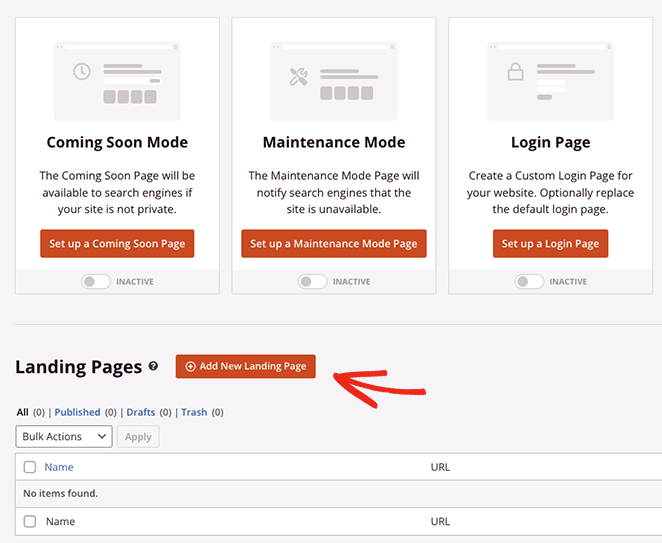
プラグインを有効にしたら、WordPressの管理パネルからSeedProd " Landing Pagesに移動し、新しいランディングページを追加ボタンをクリックします。
Now choose a layout that fits your services page design ideas.
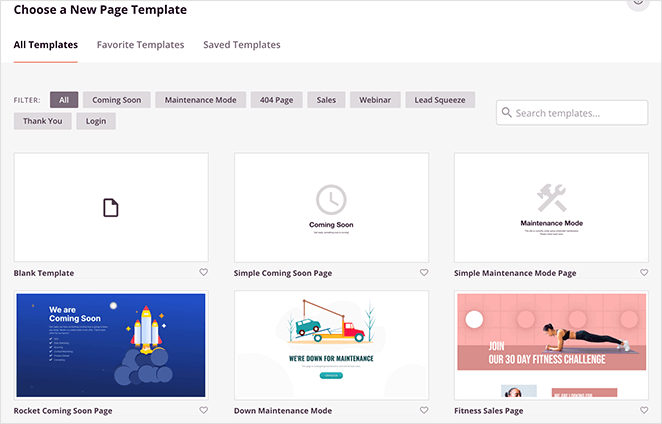
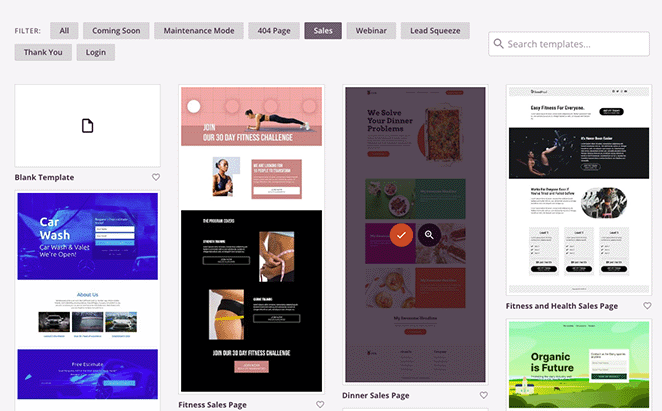
上部のフィルターを使って、近日公開、リードスクイーズ、セールスページ、ウェビナーなど、さまざまなキャンペーンタイプのテンプレートを見ることができます。
気に入ったテンプレートが見つかったら、オレンジ色のチェックマークアイコンをクリックするだけです。
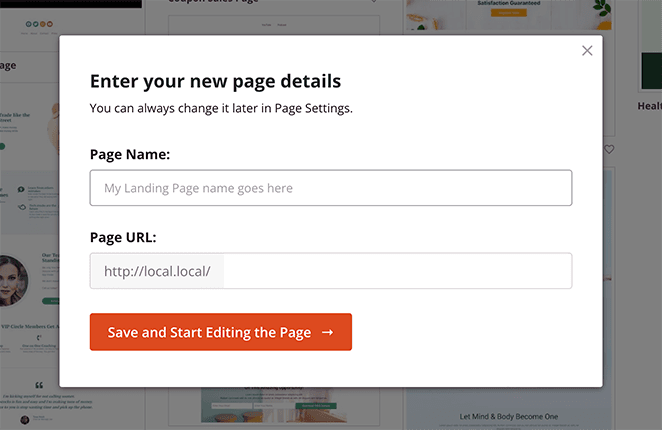
保存してページの編集を開始する」ボタンをクリックする前に、ページに名前とURLを付けることができます。
Step 3. Customize Your WordPress Service Page Layout
次の画面では、テンプレートがSeedProdのビジュアルドラッグアンドドロップページビルダーに読み込まれます。右側にはライブプレビューがあり、左側にはいくつかのWordPressブロックと設定があります。
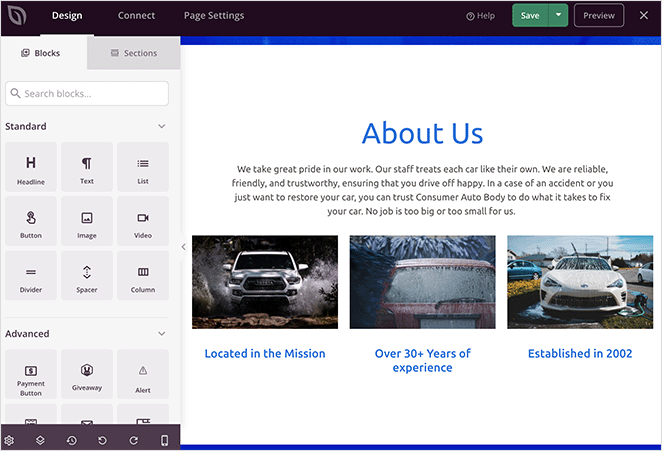
SeedProdのテンプレートの多くは、全体的なレイアウトを構成するためにブロックを使用しています。それらをカスタマイズするには、1つをクリックするだけで、左側のメニューにある設定が開きます。
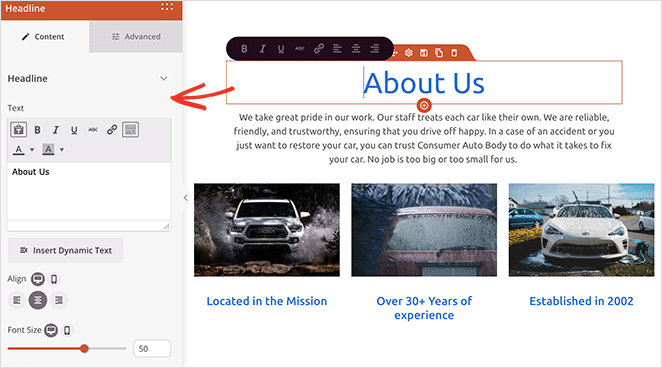
例えば、見出しやテキストブロックをクリックすると、内容、フォントサイズ、スタイルなどを変更するための設定が開きます。
Or, if your our services page template includes a pricing table, you can click to edit each item, change the fonts, or even rearrange columns.
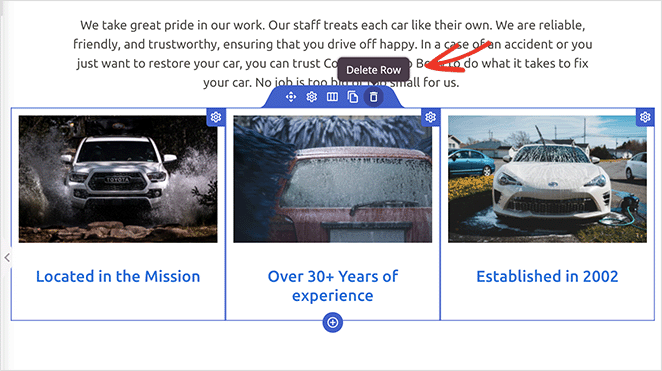
不要な要素を削除するには、その要素にカーソルを合わせてゴミ箱アイコンをクリックするだけと簡単です。
コールトゥアクションボタンのような新しい要素をデザインに追加したい場合は、左側のパネルからブロックをドラッグしてプレビュー上の所定の位置にドラッグします。
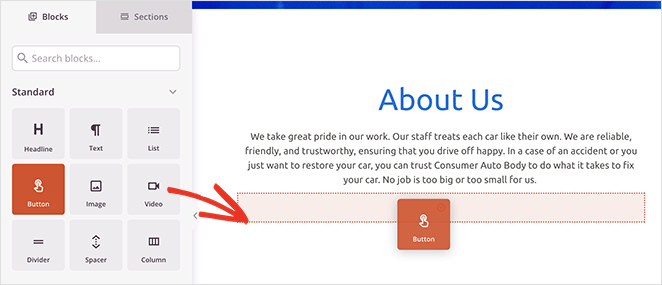
それを選択して、外観や内容、その他の設定をカスタマイズすることができる。
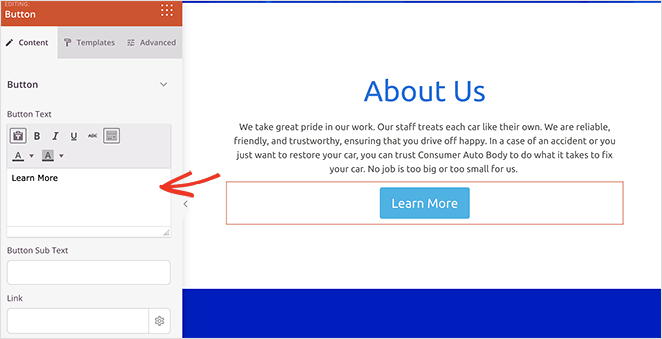
Before you settle on a layout, be sure you’re not falling into WordPress layout mistakes that hurt conversions. Small things like cluttered menus or weak CTAs can make a big difference.
Step 4. Add a Services Section to Your WordPress Page
Another helpful SeedProd feature is its premade Sections. The Feature sections are perfect for building a visual services section. You can find them by clicking the Sections tab in the left-hand panel.
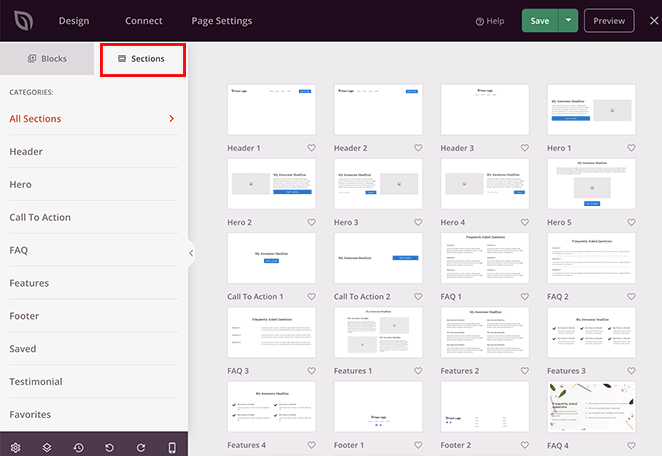
セクションとは、行、列、ブロックを組み合わせたミニテンプレートのようなもので、FAQ、ヒーローエリア、ヘッダーなど、あらかじめ用意されたデザインを作ることができます。
例えば、特集セクションはWordPressページにサービスセクションを追加するのに理想的です。見出し、画像、段落、カラムを組み合わせて、サービス情報を魅力的にレイアウトすることができます。
Look for layouts with a mix of images, text, and buttons. These are ideal for a clean, professional service section design.
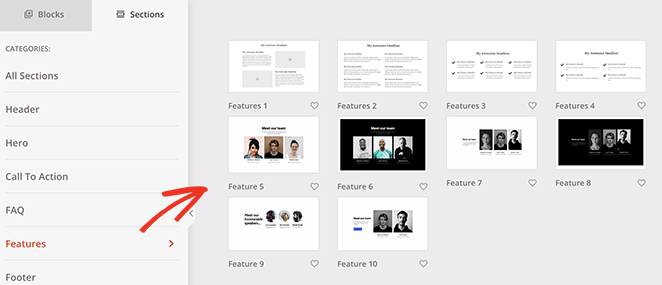
下には、Call to Action 6のセクションがあり、3つのサービスとカスタムヒーロー画像のためのスペースがあります。
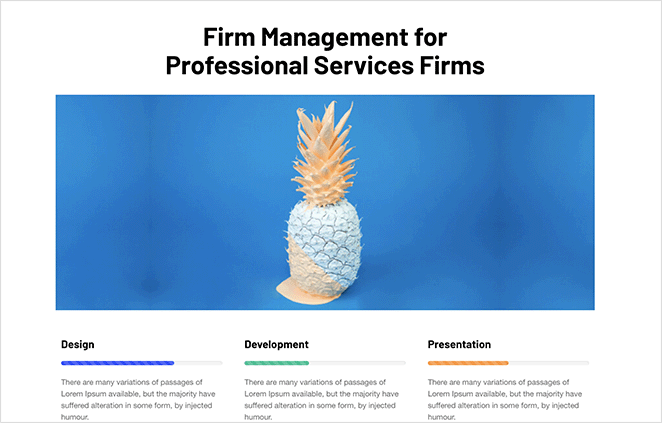
ページにセクションを追加するには、そのセクションにカーソルを合わせ、オレンジ色のプラスアイコンをクリックします。
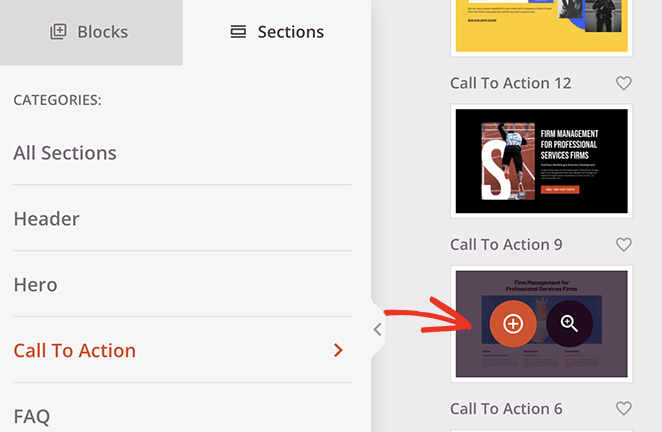
デフォルトでは、新しいセクションはページの一番下に表示されます。しかし、セクション全体をクリック、ドラッグ、ドロップすることで、適切な場所に移動させることができます。
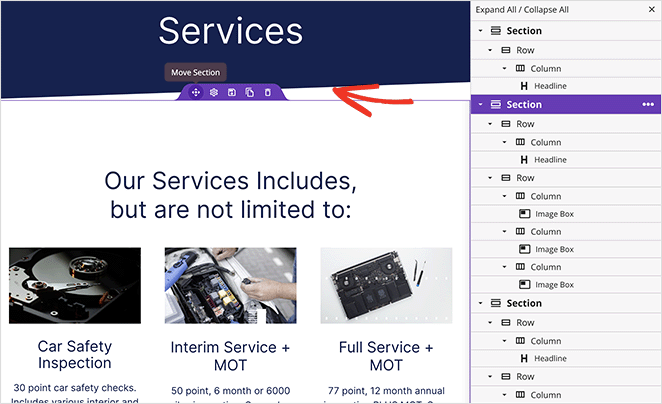
セクションの位置を変更したら、要素をクリックしてコンテンツをカスタマイズできます。例えば、画像を入れ替えるには、画像をクリックし、左パネルのゴミ箱アイコンを選んで削除します。
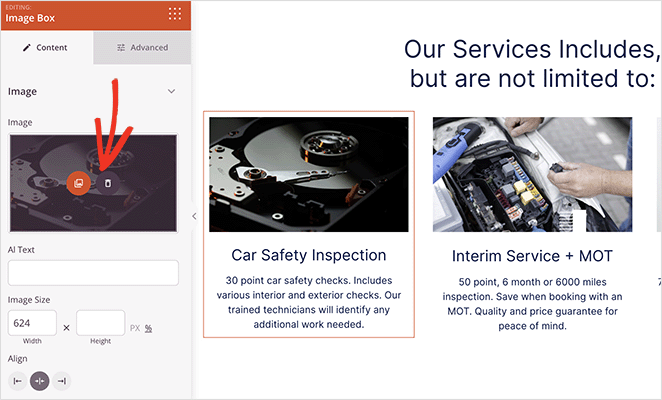
そこから、コンピュータまたはWordPressのメディアライブラリから新しい画像をアップロードすることができます。
Continue customizing your services page until you’re happy with how it looks. You may want to include your phone number to help users get in touch, or even an events calendar for upcoming webinars and conferences.
ステップ5.サービスページのデザインをWordPressで公開する
When you’re happy with your service section design, click the dropdown arrow on the Save button and choose Publish.
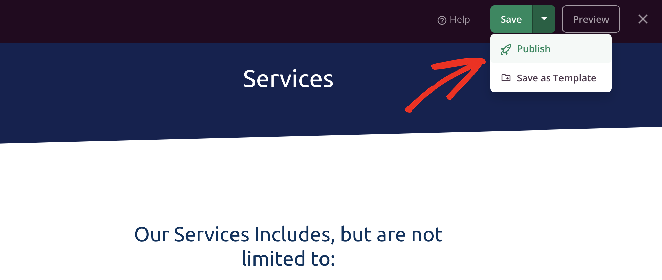
このページは、あなたのWordPressサイト上で自動的に公開され、潜在的な顧客があなたのサービスを一度に見ることができます。

If you’re deciding between the default WordPress block editor and using SeedProd to design your service page, here’s a quick side-by-side comparison to help.
| 特徴 | Block Editor | シードプロ |
|---|---|---|
| Ease of Use | Basic blocks, not very visual | Drag-and-drop with live preview |
| テンプレート | Theme-dependent | Dozens of pre-built service page templates |
| Mobile Preview | Requires switching views | Built-in preview for phone, tablet, desktop |
| Design Control | Manual tweaks or custom CSS | Visual controls with no code needed |
| Custom Sections | Manual block setup | Pre-built sections like FAQs, services, CTAs |
代替案WordPressのブロックエディタを使ってサービスセクションを作成する
Another way to add services to your WordPress website is with the Service Box Showcase plugin. It’s simple and lets you create a services section in WordPress using shortcodes.
It’s not as flexible as SeedProd, but still a quick option for building a clean services page layout.
まずは、WordPressサイトにサービスボックスショーケース プラグインをインストールして有効化してください。WordPressプラグインのインストールと有効化については、こちらのガイドをご覧ください。
プラグインを有効化したら、WordPressのダッシュボードからService Box " Add New Service Boxに移動します。次に、新しいサービスボックスのタイトルを入力します。
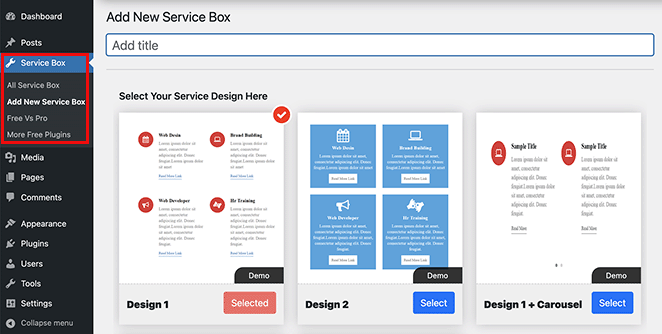
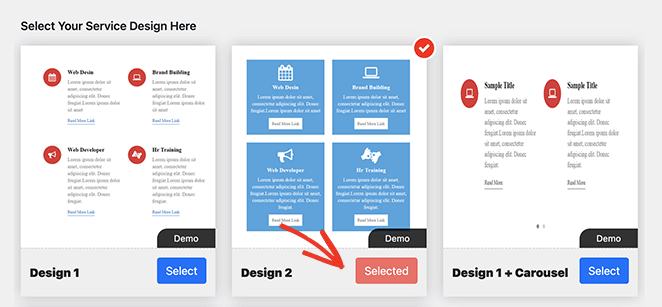
次に、「選択」ボタンをクリックして、あらかじめ用意されているテーマからサービスボックスのデザインを選択します。
デフォルトでは2つのボックスがあります。それ以上必要な場合は、「新しいサービスボックスを追加」ボタンをクリックしてください。
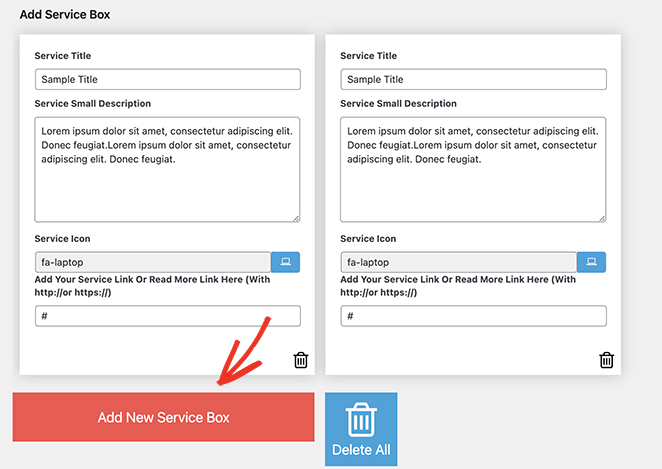
これで、各サービスボックスにタイトルと説明を追加できます。訪問者があなたのウェブサイトを閲覧する際にこのテキストが表示され、必要なサービス情報を見つけるのに役立ちます。
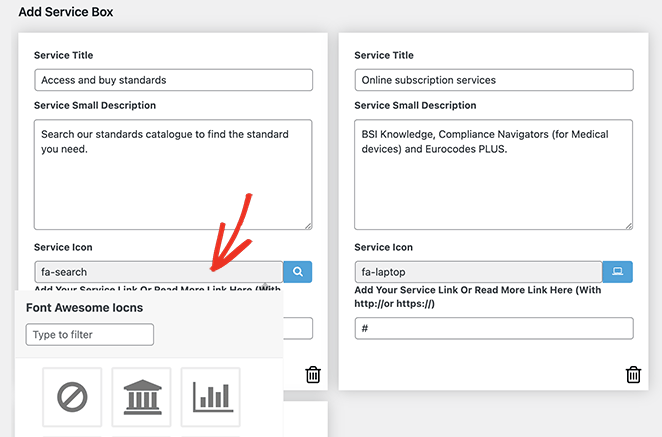
各ボックスには、デフォルトで同じアイコンが表示されます。しかし、「サービス・アイコン」フィールドをクリックすることで、各ボックスのアイコンをより適切なものに変更することができます。
ポップアップボックスが表示され、様々なFont Awesomeアイコンを検索して選択することができます。
その下に、各サービスのカスタムURLを追加することができます。これは、各サービスの専用ページやお問い合わせフォームにリンクしたい場合に便利です。
サービス情報を入力した後、サービスボックスの設定パネルを使用してスタイルをカスタマイズすることができます。これらの設定は一般的に使いやすく、テキストの色やサイズ、フォントファミリー、カラムレイアウトなどのオプションがあります。
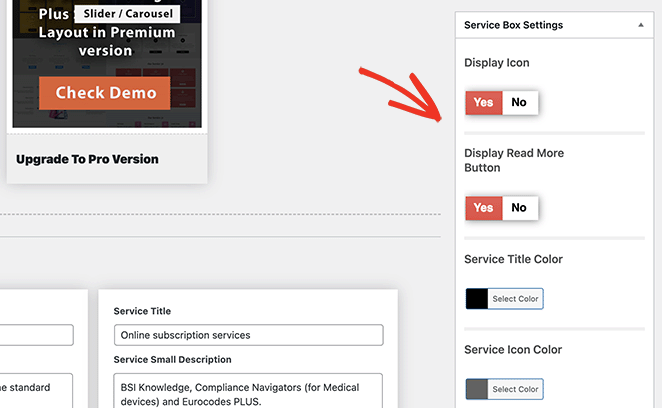
サービスセクションのアイコンを非表示にしたい場合は、アイコンの表示スイッチを無効にする必要があります。
あなたのスタイルに合うように、これらの設定を弄ってみてください。後でいつでもこのページに戻って変更することができます。
サービスボックスに満足したら、画面右上の「Publish」ボタンをクリックしてください。
その後、Service Box Shortcodeセクションまでスクロールダウンし、最初のフィールドからショートコードをコピーします。
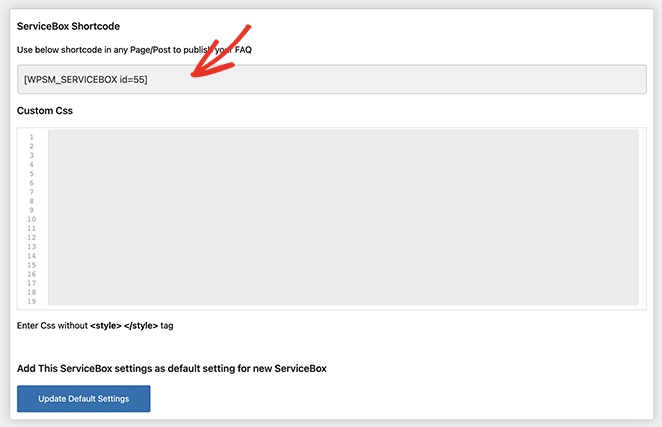
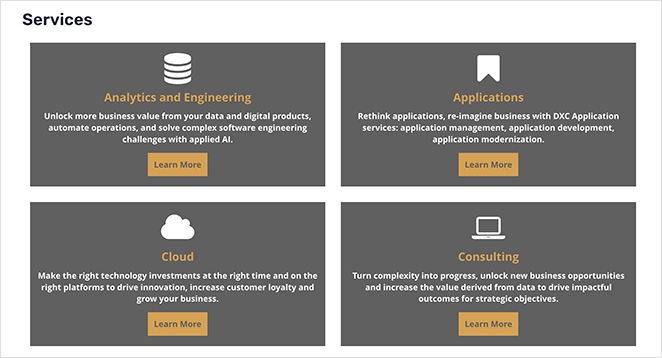
このショートコードをコンテンツエディターに貼り付ければ、WordPressサイトのどの投稿やページにも追加できる。そこから、投稿やページを公開または更新するだけで、変更が反映されます。
How to Optimize Your WordPress Service Page for SEO
Want your service page to show up higher in search results? Here are some simple SEO tips I use to make sure each page has the best chance of ranking — even without any advanced tools or code.
- Use your target keyword in the page title, URL, and main headline
- Add a short meta description that clearly explains what you offer
- Use clear subheadings for each individual service you list
- Link to other helpful pages — like blog posts, testimonials, or your contact form
- Mention your location if you offer local services (great for local SEO)
- Add alt text to all images so search engines know what they’re showing
サービスページのデザインに関するFAQ
– Hero section with a headline
– Short intro about your business
– A clear services section
– Social proof like testimonials
– A CTA to book a call or contact you
Bonus Guides for Creating WordPress Pages
I hope this guide made it easier to build a professional service page in WordPress.
If you’re ready to take the next step, try SeedProd to start designing your own custom services section today, with no code needed.
You might also like these tutorials:
- How to Write a Welcome Page for Your Website
- How to Create an About Us Page in WordPress
- カスタムWordPress著者ページの作成方法
- WordPressで404ページを作る方法
- WordPressにチーム紹介ページを追加する方法
- How to Make a FAQ Page in WordPress
- ワードプレスでブログページを作成する方法
- How to Create a Client Login Page in WordPress
お読みいただきありがとうございました!ご質問やご意見がありましたら、お気軽にコメントをお寄せください。
また、YouTube、X(旧Twitter)、Facebookでも、ビジネスの発展に役立つコンテンツを配信しています。

