


TL;DR: How to Customize Password-Protected Pages in WordPress
The default WordPress password screen is plain and unbranded. Here are the three methods covered in this guide.
- Enable password protection – Set any page to “Password Protected” in the WordPress Visibility settings.
- Design your page with SeedProd – Use the drag-and-drop builder to add your logo, colors, and a custom password form.
- Set access controls – Specify which URLs show your custom password page using SeedProd’s include/exclude URL settings.
- Use CSS Hero for quick edits – Change colors and fonts on the default password form without writing code.
- Go site-wide with SeedProd – Switch the Coming Soon Mode toggle to Active to apply your custom page across your entire site.
I have found that customizing this simple page is one of the easiest ways to improve site professionalism. It reassures clients and members that they are in a secure, branded environment.
In this guide, I’ll show you the three most effective ways to replace that default form with a design that actually fits your brand.
- Why Customize a WordPress Password Protected Page?
- How to Password Protect a WordPress Page
- Method 1. Customize Specific Password Protected Pages
- Method 2: Customize the Default WordPress Password Form with CSS Hero
- Method 2b: Customize with Custom PHP Code (No Plugin)
- Method 3: Create a WordPress Password Wall (Lock Page) for Your Entire Site
- Bonus: Creative Uses for WordPress Password Protected Content
- WordPress Password Protection FAQs
Why Customize a WordPress Password Protected Page?
If you share exclusive content with clients or members, the built-in WordPress password protect page feature helps you secure that content quickly. It lets you lock individual pages or your entire site with a simple password.
I often use it for private landing pages still in development, but it’s also great for online courses, downloads, or premium articles. The problem is, WordPress shows a plain gray password screen that doesn’t match your site’s design or tone.

Customizing that screen helps your site feel more professional and builds trust. Research from Lucidpress indicates that consistent branding across all pages can improve trust by up to 33%.
Here is why it matters:
- Reinforce brand consistency. Your logo and colors stay visible on locked content too.
- Improve user experience. A branded design makes visitors feel confident they’re in the right place.
- Guide users clearly. Add a short message explaining what’s behind the page and how to access it.
In short, styling your password page is about trust, clarity, and a consistent experience for your visitors.
When to Use WordPress Password Protected Pages or Posts
You don’t always need a full membership plugin to protect your content. In many cases, a simple password does the job just fine.
Here are some of the most useful ways to use password-protected pages and posts:
| Use Case | Description / Example |
|---|---|
| Client Pages | Share design mockups, reports, or contracts privately with clients. |
| Under Construction Pages | Hide pages you’re building until they’re ready to go live. |
| Internal Team Content | Keep internal schedules, SOPs, or announcements private. |
| Limited-Time Offers | Create secret promotion pages for VIPs or email subscribers. |
| Personal Projects | Hide unfinished drafts or test pages from public view. |
| Protected Blog Posts | Secure sensitive or premium articles using WordPress’s built-in password protection. |
Using password protection this way keeps your workflow simple while maintaining privacy and professionalism.
How to Password Protect a WordPress Page
Note: You only need to enable this built-in WordPress setting if you plan to use Method 2 (CSS Hero) or the default styling. If you use Method 1 or Method 3 (SeedProd), you can skip this section because SeedProd handles the protection automatically.
Many users want to know how to password protect a site, individual page, or category. If you are using the default method or CSS Hero, you can enable protection for specific pages from the editor:
- Open the page or post you want to protect in the WordPress editor.
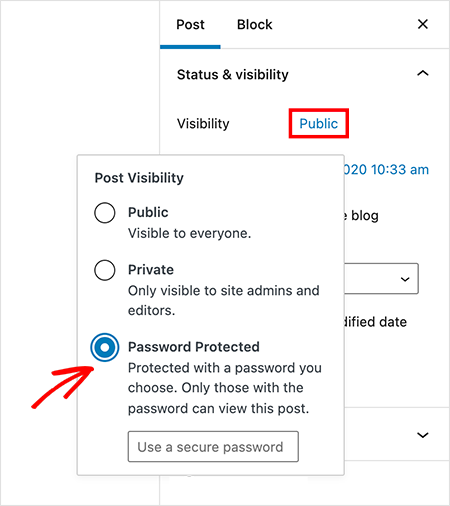
- In the ‘Summary’ panel on the right, click the link next to ‘Visibility’.
- Choose ‘Password Protected’ from the options that appear.
- Enter a secure password in the text field.
- Click the ‘Update’ or ‘Publish’ button to save your changes.
You have now password protected the specific page. However, the result is the default, unbranded screen shown below:

Now, let’s go over some ways to customize WordPress password protected page content so it matches the rest of your site.
Method 1. Customize Specific Password Protected Pages
| Pricing: Starts at $39.50/year |
| Free Plan / Trial: Yes (limited features) |
| Standout Features: |
| 🔹Drag-and-drop builder for full design control 🔹Access Controls to protect individual pages 🔹Custom password form shortcode and design tools |
| Rating: A+ |
| Best For: Users who want fully branded password-protected pages without coding |
The best way to create a fully custom password-protected page is with SeedProd, a drag-and-drop WordPress website builder. It allows you to design a page from scratch and replace the default password screen on any page.
Unlike standard password pages, SeedProd lets you add marketing elements like opt-in forms or countdown timers directly to the locked screen.

For this method, our strategy is to use SeedProd’s drag-and-drop builder to design a new, custom page. We will then configure it to appear in place of the default WordPress password screen, but only for the specific URLs you choose to protect.
Alternatively, you can follow these written instructions:
Step 1: Install and Open SeedProd
First, install and activate the SeedProd plugin. Once activated, navigate to SeedProd » Landing Pages from your WordPress admin dashboard.
Step 2: Create a Coming Soon or Maintenance Page

In the ‘Coming Soon Mode’ panel, click the Set Up a Coming Soon Page button.

You will now see a library of professional templates. Hover over the template you wish to use and click the checkmark icon to select it.

The template will open in SeedProd’s drag-and-drop builder.
Step 3: Customize the Page with Drag-and-Drop Blocks

On the left, you will find a variety of blocks you can use to build your page. Drag any block from the panel and drop it onto your page preview on the right. Click on any element on the page to open its settings and customize its content and style.

You can add standard blocks like headlines and images, or advanced blocks like contact forms, giveaways, and countdown timers.

Step 4: Add a Custom Password Form Shortcode in WordPress
To add the password entry field, drag the ‘Custom HTML’ block from the left panel onto your page.

Click the block to edit the content. Then, paste the following shortcode directly into the HTML field:
<div class="row"> <div class="col-md-12 seperate"> <div class="input-group"> <input type="password" id="cspio-bypass" class="form-control input-lg form-el sp-form-input" placeholder="Password"></input> <span class="input-group-btn"> <button id="cspio-bypass-btn" class="btn btn-lg btn-primary form-el noglow">Enter</button> </span> </div> </div> </div> <script> jQuery( document ).ready(function($) { $( "#cspio-bypass-btn" ).click(function(e) { e.preventDefault(); window.location = "?bypass="+$("#cspio-bypass").val()+'&return='; }); }); </script>
This shortcode generates the actual password input box and submit button on the live page. It will not appear in the editor, but you can see it on the live preview.
Step 5: Control Access to Password Protected Content in WordPress
Next, you need to configure the page’s access controls. Click the ‘Page Settings’ tab at the top of the screen, then select ‘Access Controls’.

Find the ‘Bypass URL’ section. Enter your desired password in the field. This functions exactly as the password your visitors will enter.
Under ‘Include URLs’, paste the URLs of the pages you want to protect with this custom design.

Step 6: Publish Your Design and Activate the Page
First, publish the page design you created. Inside the SeedProd builder, click the dropdown arrow next to the ‘Save’ button and select ‘Publish’. A confirmation message will appear, and you can click ‘See Live Page’ to preview your work.

Next, you must activate the mode to make the page live on your selected URLs. Navigate back to your SeedProd » Landing Pages dashboard. Under the ‘Coming Soon Mode’ section, switch the toggle from ‘Inactive’ to ‘Active’.

Don’t worry, this will not take your whole site offline. The Access Controls you configured in the previous step ensure this page only protects the specific URLs you selected. Your custom password-protected page is now live!

Want to create your own branded, password-protected page in minutes?
Method 2: Customize the Default WordPress Password Form with CSS Hero
| Pricing: Starts at $29/year |
| Free Plan / Trial: No |
| Standout Features: |
| 🔹Point-and-click CSS editor 🔹Change fonts, colors, and background images 🔹Works with any WordPress theme |
| Rating: B+ |
| Best For: Quick visual tweaks to the default password page |
If you only need to make small visual adjustments to the default password page, you can use a visual CSS editor plugin like CSS Hero. This tool provides a point-and-click interface for editing your theme’s design without writing code, making it a quick option for changing colors, fonts, and spacing.
Step 1: Install and Launch CSS Hero
First, install the CSS Hero plugin. Once activated, navigate to the password-protected page on the front end of your site. From the WordPress admin bar at the top, click Customize with CSS Hero.

This opens the CSS Hero visual editor interface.

Step 2: Style Your Password Page Elements
With the editor active, click on any element on the page, such as the title, form container, or button. The CSS Hero panel on the left will display styling options for that element, including typography, colors, spacing, and backgrounds.

Use the panel to make your desired changes. You can select a new background color, adjust the font size, or change the button style. All changes will be reflected in the live preview.

Continue customizing until the design matches your brand. Keep in mind that CSS Hero can only style existing elements; it cannot add new ones like contact forms or email signup fields.
Step 3: Save and Preview Your Changes
Once you are satisfied with your design, click the Save and Publish button at the bottom of the CSS Hero panel. To exit the editor, click the ‘Quit’ icon in the top right corner.

You will now see your newly styled password-protected page.

Method 2b: Customize with Custom PHP Code (No Plugin)
If you want to customize the password form without installing a plugin, WordPress’s the_password_form filter gives you direct control over the HTML output. I’ve used this approach on client sites when I needed a branded form without adding another plugin to the stack.
Add the following snippet to your theme’s functions.php file. For safer code management, I’d use WPCode instead. It lets you toggle snippets on or off without touching theme files directly.
add_filter( 'the_password_form', 'custom_password_protected_form', 10, 2 );
function custom_password_protected_form( $output, $post ) {
    $label = 'pwbox-' . ( empty( $post->ID ) ? rand() : $post->ID );
    return '<form action="' . esc_url( site_url( 'wp-login.php?action=postpass', 'login_post' ) ) . '" class="post-password-form" method="post">
        <p>This content is password protected. Enter your password to view it.</p>
        <label for="' . esc_attr( $label ) . '">Password:
            <input name="post_password" id="' . esc_attr( $label ) . '" type="password" />
        </label>
        <input type="submit" value="Enter" />
    </form>';
}
Once the snippet is active, style the form with CSS targeting the .post-password-form class. Add it in Appearance > Customize > Additional CSS or in your theme stylesheet.
.post-password-form {
    max-width: 400px;
    margin: 40px auto;
    padding: 30px;
    background: #f9f9f9;
    border-radius: 8px;
}
.post-password-form input[type="password"] {
    width: 100%;
    padding: 10px;
    margin: 10px 0;
    border: 1px solid #ddd;
    border-radius: 4px;
}
.post-password-form input[type="submit"] {
    background: #0073aa;
    color: white;
    padding: 10px 20px;
    border: none;
    cursor: pointer;
    border-radius: 4px;
}
Keep in mind this method only customizes the form itself. It won’t give you a full custom page layout like SeedProd does, but it’s a solid option if you’re comfortable working with WordPress code snippets.
Method 3: Create a WordPress Password Wall (Lock Page) for Your Entire Site
| Pricing: Starts at $39.50/year |
| Free Plan / Trial: Yes (limited features) |
| Standout Features: |
| 🔹One-click site-wide password wall 🔹Apply custom designs across your entire site 🔹Exclude admin and key pages from lockout |
| Rating: A |
| Best For: Temporarily protecting entire sites (under construction or maintenance) |
You can also use SeedProd to protect your entire website behind a single password wall. This is useful for sites under construction, during maintenance, or for private client previews. This method uses the same custom page you designed in Method 1 but applies it globally.
To enable site-wide password protection, navigate to SeedProd » Landing Pages from your WordPress dashboard. In the ‘Coming Soon Mode’ panel, click Edit Page.

In the SeedProd editor, go to the Page Settings tab and select Access Controls. Scroll down to the ‘Include/Exclude URLs’ section and select the ‘Show on the Entire Website’ option.

Finally, click ‘Save’ to update your settings. Once the ‘Coming Soon Mode’ is active, your custom page will appear on every URL. This effectively creates a site-wide WordPress password wall.
Bonus: Creative Uses for WordPress Password Protected Content
WordPress password protection isn’t just for hiding unfinished pages. You can use it to add exclusivity, deliver private experiences, or manage client access.
You might ask, “How can I customize the password page for these specific needs?” The answer lies in using the tools above to match your design to the use case. Here are a few creative ideas:
| Creative Use | Why It’s Effective |
|---|---|
| Gated Newsletters | Give subscribers access to bonus posts or insider updates using one shared password. |
| Premium Videos | Protect exclusive tutorials or training replays, keeping them private for members. |
| Client Dashboards | Offer clients a private space with progress updates, assets, and resources. |
| Mini Membership Areas | Create lightweight member-only areas without needing a full plugin. |
| Private Events | Hide event details or registration links behind a password-only page for attendees. |
Each of these examples lets you use simple password protection to build trust, exclusivity, and professionalism without extra tools.
WordPress Password Protection FAQs
How do I remove the “Protected:” prefix from the page title in WordPress?
WordPress automatically adds “Protected: ” before the page title when password protection is enabled. To remove it, add this snippet to your functions.php file or use WPCode: add_filter('protected_title_format', function() { return '%s'; }); This replaces the default format with just the title. If you’re using SeedProd’s custom password page, the prefix doesn’t appear at all, since you design the full page layout from scratch.
Can I use the same password for multiple WordPress pages?
Yes. In the WordPress editor, set the same password in the Visibility settings for each page you want to protect. If you want a single password to cover multiple pages simultaneously, SeedProd’s Access Controls feature lets you list multiple URLs under one password wall, so visitors only need to enter the password once to access all of them.
How do I customize the password-protected page without a plugin?
Use WordPress’s the_password_form filter to replace the default form with your own HTML. Add the filter code to your theme’s functions.php file, then style the form with CSS targeting .post-password-form. This method lets you change the layout, colors, and copy without any plugin, though the result won’t match a full custom page design the way SeedProd does.
What is the difference between a password-protected page and a private page in WordPress?
A password-protected page can be viewed by anyone with the password, no account or login required. A private page is only visible to logged-in WordPress users with editor or administrator roles and is hidden from everyone else. Password protection is the right choice when you want to share content with clients, members, or subscribers who don’t have WordPress accounts.
Are password-protected pages indexed by Google?
WordPress adds a noindex meta tag to password-protected pages, which tells Google not to index the content behind the password wall. The page URL may still appear in search results if other sites link to it, but the protected content itself won’t be indexed or displayed. If you need the URL to stay completely invisible, SeedProd’s maintenance mode is a better option.
There you have it!
Choosing the Right Password Protection Method
Customizing password-protected pages in WordPress is simple once you know the right tools. You don’t need to touch code or edit theme files to password protect your content securely.
- Use SeedProd if you want full design control with a drag-and-drop builder and custom access settings.
- Use CSS Hero if you only need quick visual edits to the default password form, like changing colors or fonts.
- Use SeedProd’s site-wide protection if you’d like to lock down your entire website behind a single password page during maintenance or development.
Each method offers a secure, professional way to protect content while keeping your brand consistent and your visitors confident in your site.
For even more tips on password-protecting your WordPress site, please see these expert guides:
- How to Password Protect a WordPress Site: The Ultimate Guide
- How to Password Protect a WordPress Page (Step by Step)
- How to Password Protect a WordPress Site While Under Development
- How to Secure Your WordPress Site from Hackers (17 Expert Tips)
Thanks for reading! We’d love to hear your thoughts, so please feel free to join the conversation on YouTube, X and Facebook for more helpful advice and content to grow your business.


