Do you want to learn how to build a Facebook landing page?
One of our readers recently asked if Facebook ads are a good way to generate new leads without the costs of traditional marketing. Our response is yes, but creating a great ad without the right landing page can leave you with wasted clicks, low conversion rates, and a poor return on your ad spend.
So in this article, we’ll show you how to create a Facebook landing page in WordPress step-by-step.
What Is a Facebook Landing Page?
A Facebook landing page, also known as a Meta landing page, is a dedicated page on your website that users land on after clicking a link in a Facebook post.
Similarly, Facebook ads landing pages are pages that people visit after they click through your pay-per-click (PPC) Facebook advertising campaign. These pages differ from others on your site as they complement your Facebook ads.
Typical pages provide information about your business. But a landing page made specifically for Facebook ads encourages Facebook users to sign up for or claim an offer designed just for them, like a free trial, lead magnet, or special offer.
Take this eCommerce landing page example that we found from Craftsy. Their Facebook ad campaign has a clear call-to-action button (CTA button) inviting users to click and learn more on their product page.

Clicking the button from the Facebook timeline took us to a dedicated page to learn more about the product or service and even claim a coupon.

Why Should I Make a Facebook Landing Page?
There are several reasons why you should make a dedicated Facebook landing page on your website instead of relying on your Facebook business page.
For one, your Facebook audience often requires more motivation to go from clicking an ad to making a purchase. These users are still discovering your business and need more information after clicking your ad.
Showing these users a landing page with focused information and consistent messaging is one of the best ways to kickstart lead generation and turn them into paying customers.
Here are a few other reasons why creating a landing page for Facebook is the best choice:
- They’re less distracting than homepages which have lots of different information.
- It’s easier for mobile browsers to get the details they need.
- They’re highly focused, forcing people’s attention on your offer.
- It’s simpler to evaluate the effectiveness of your content marketing campaigns.
Besides making a landing page for Facebook ads, you could also create a Facebook group landing page to entice users to join your community or, quite simply, to encourage your website visitors to check out your Facebook page.
Bottom line: Creating a landing page is one of the easiest ways we’ve found to convert Facebook users into leads and customers.
How to Create a Facebook Landing Page in WordPress
You might think it’s hard to create a landing page on your WordPress website. But with the right tools, it’s actually relatively straightforward.
Using a landing page builder like SeedProd, you can easily create a Facebook landing page, link it to your ad campaign, and launch it in under 30 minutes. But what is SeedProd?
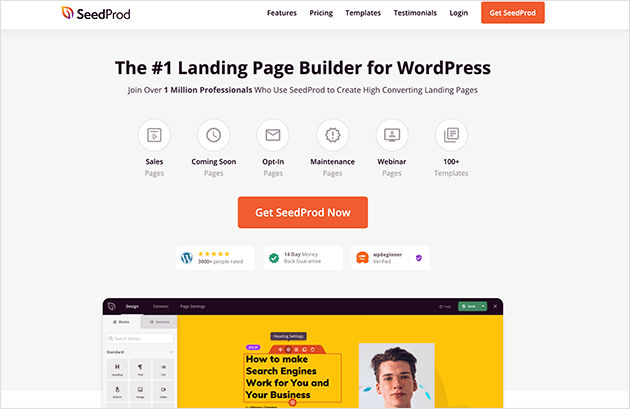
SeedProd is one of the best WordPress theme builders and WordPress landing page builders with drag-and-drop functionality. We’ve used it many times to create WordPress themes and high-converting landing pages without hiring a developer.
Besides designing stunning themes and landing pages, it has built-in coming soon, maintenance mode, 404 pages, and login page modes.
This allows you to quickly set up user-friendly pages like:
- Coming soon notice
- Maintenance mode screen
- 404 error message
- カスタムWordPressログインページ
And you can do it all without installing individual WordPress plugins for each page.
With 100+ customizable and multipurpose landing page templates and starter WordPress themes, we’ve found that designing any layout in WordPress is a breeze.
Did you know you can get an unlimited free trial of SeedProd? Click the link to find out how.
ビデオ・チュートリアル
ステップ1.SeedProdのインストールとアクティベート
With the essentials aside, we’ll now show you how to create a Facebook landing page in WordPress, with practical tips and screenshots to guide you through.
First, head to the pricing page to get started with SeedProd and download the plugin to your computer. After downloading the plugin, install and activate it on your WordPress site.
If you need help with this step, follow these instructions for installing a WordPress plugin.
After activating SeedProd, you’ll see a welcome screen. You’ll need to enter your SeedProd license key in the field provided. You can find your license key in the Downloads area of your SeedProd account.
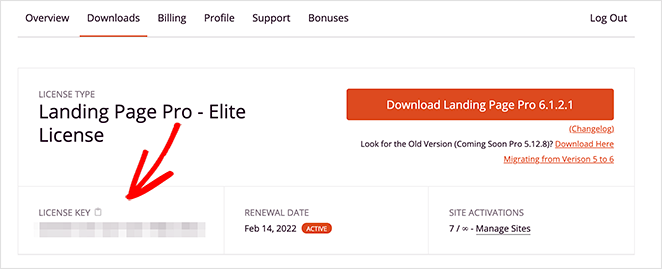
Copy your license key, paste it into the field and click the Verify Key button.
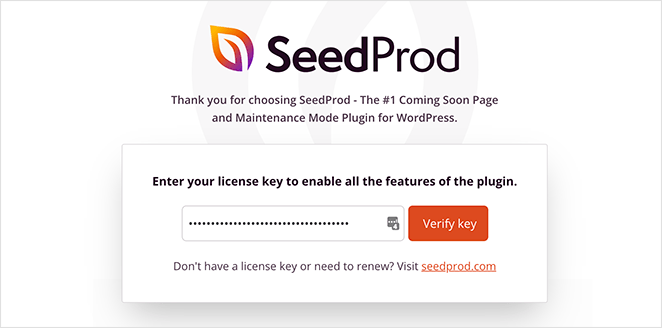
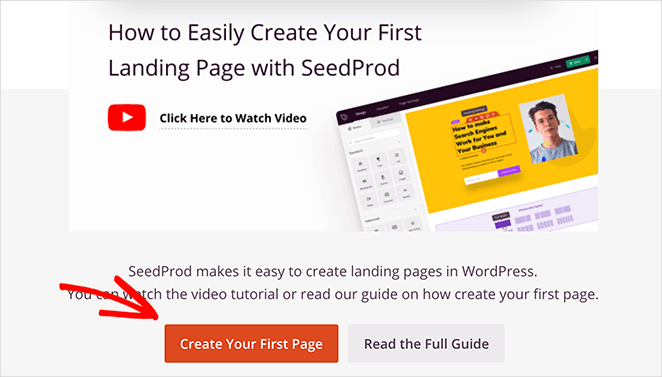
After verifying your SeedProd plugin, scroll down the page and click the Create Your First Page button.
This will take you to SeedProd’s landing page overview.
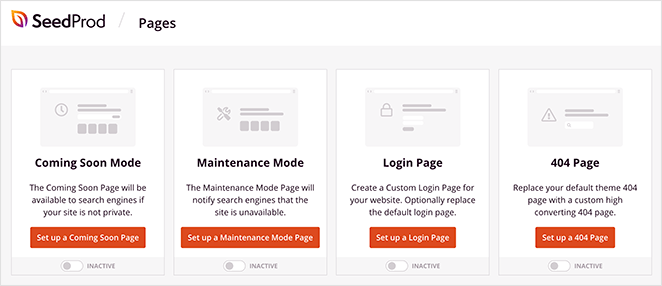
At the top of this page, you’ll see the different page modes you can activate in SeedProd, which include:
- カミングスーン・モード
- メンテナンス・モード
- ログインページ
- 404ページ
Enabling any of these modes is as simple as clicking the toggle under each heading and turning it from Inactive to Active.
Under that section is where any other landing page you make with SeedProd is shown. This is the section we need for this tutorial.
Step 2. Create a New WordPress Landing Page
To start creating your landing page, click the Create New Landing Page button under the Landing Pages section.

Clicking the button directs you to SeedProd’s selection of versatile landing page template, including options ideal for a Facebook landing page.
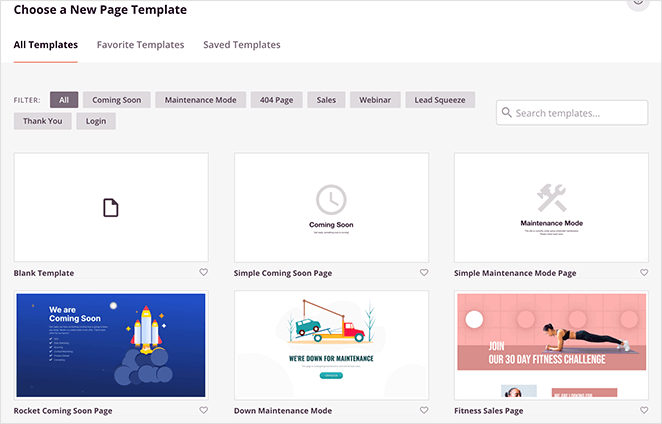
You can filter templates by clicking the tabs along the top of the screen, which include:
While SeedProd may not have any specific Facebook landing page templates, you can customize any design to match the look you want to achieve.
For this guide, we’ll use the Masterclass 2 Sales Page, which you can find under the Sales tab.
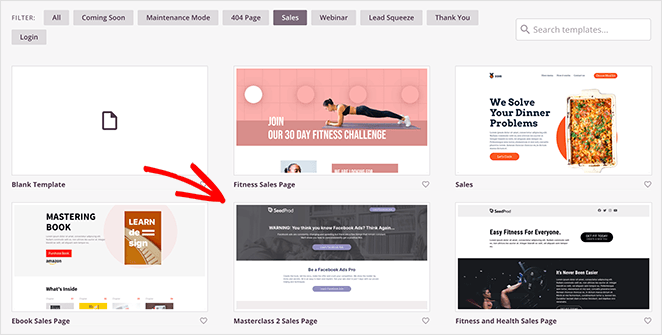
Hover your mouse over the template thumbnail and click the tick icon to choose a template.
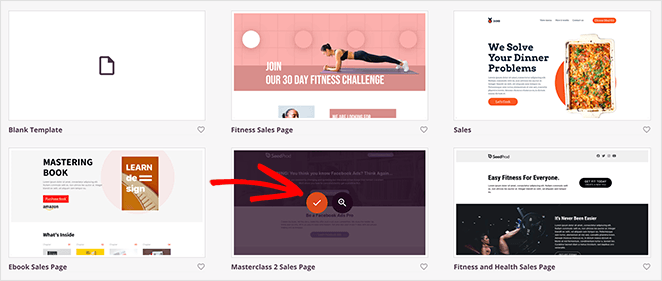
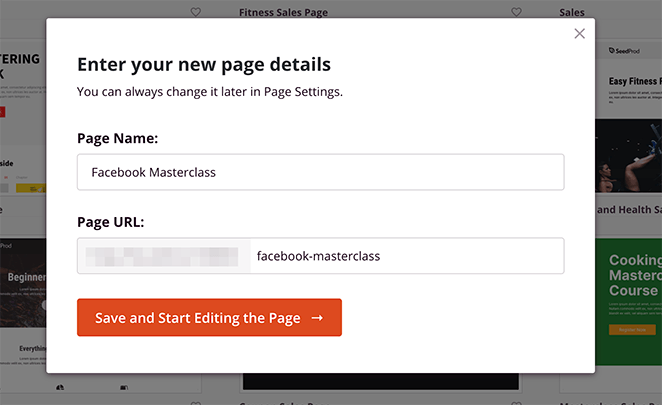
After, you’ll see a popup asking you to enter your landing page name and URL. Once you enter this information, click the Save and Start Editing the Page button.
Step 3. Customize Your Landing Page for Facebook
After launching your landing page template, it opens in SeedProd’s drag-and-drop page builder, where you can customize and optimize your design.
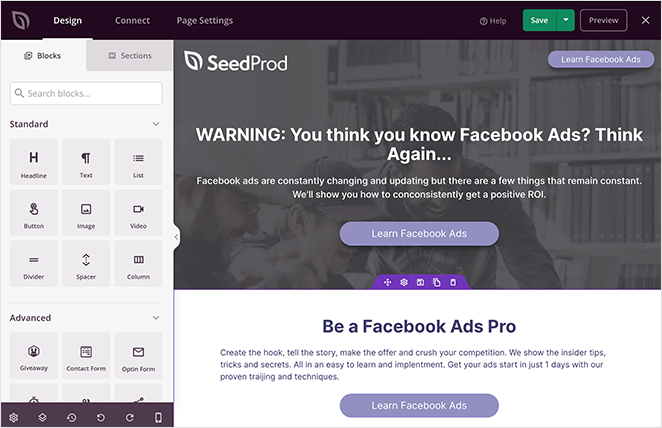
The blocks and sections you can drag and drop onto your page are in the left-hand panel. On the right is a preview of how your landing page looks.
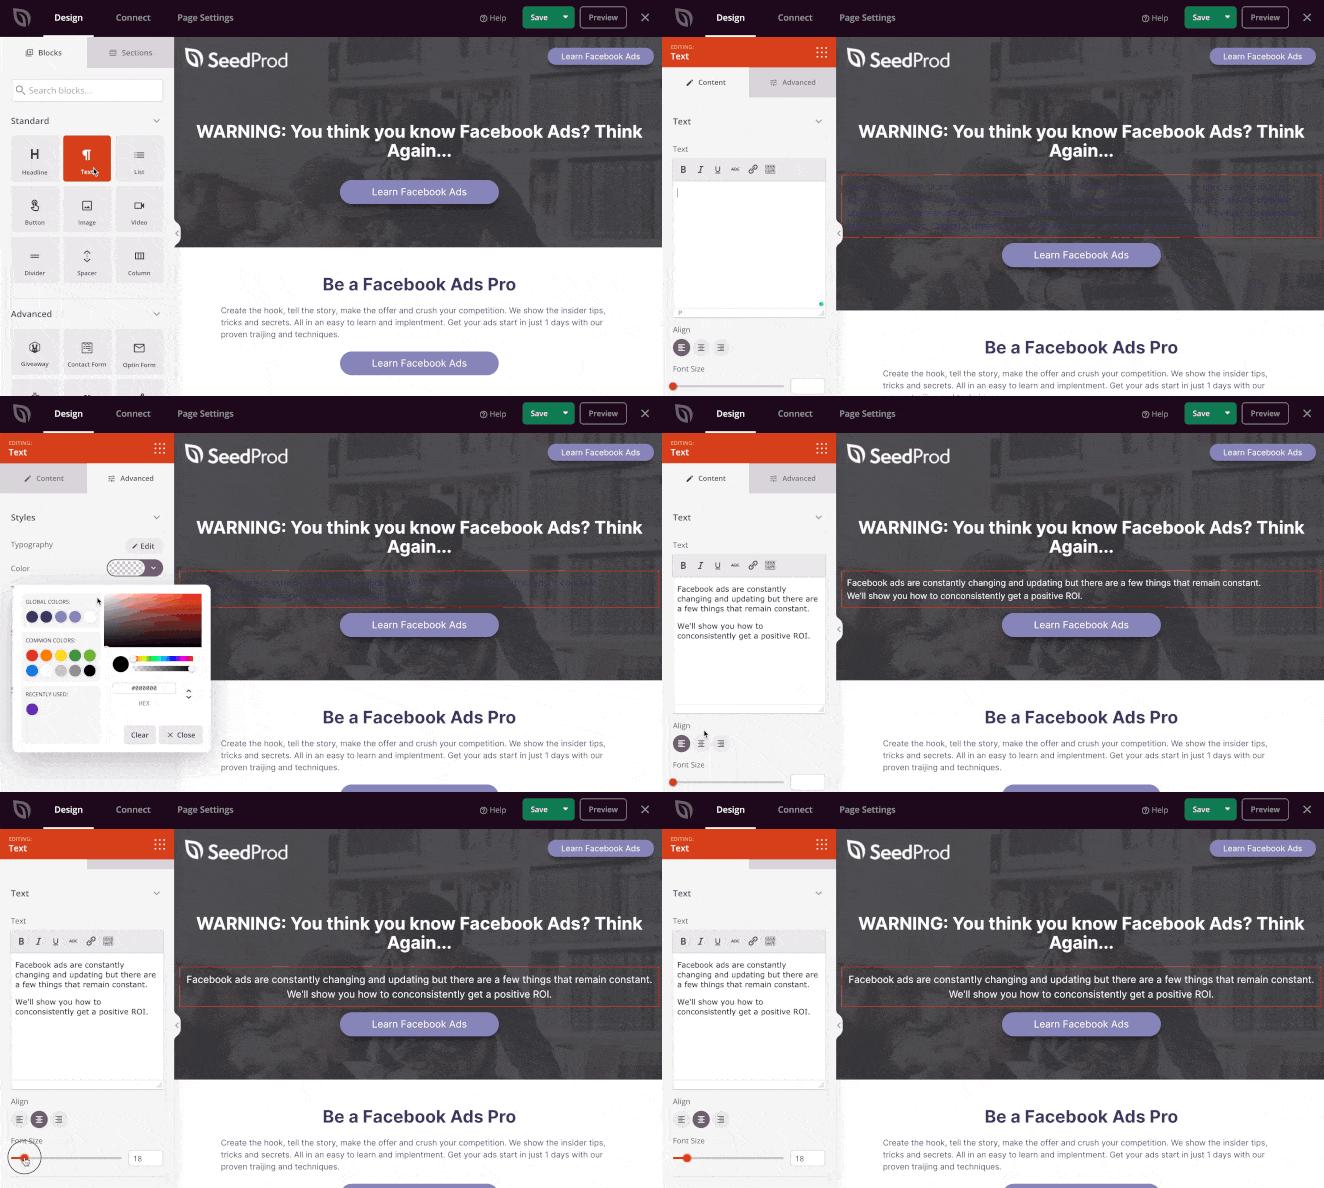
To add content, simply drag a block from the left panel and drop it onto the preview on the right. You can then click the block on your page to open its settings panel on the right and customize the content.
What Should I Include on My Facebook Landing Page?
Facebook landing pages are an excellent opportunity to make a great first impression on your visitors. Here are some things you should consider including on your page:
- Strong and eye-catching images: Your images should be high-quality, visually appealing, and relevant to your brand or business.
- A brief introduction: Write a short introduction to your brand or business. This should be concise and to the point, highlighting your unique selling points.
- A call-to-action: Including a call-to-action on your landing page can help drive engagement and encourage visitors to take a specific action, such as signing up for your newsletter.
- Links to your other social media profiles: If you have a presence on other social media platforms, consider including links to your profiles on those platforms on your landing page.
- Information about your products or services: Use the space below your introduction to highlight your products or services and why they are valuable to your customers.
- Contact information: Make it easy for visitors to get in touch with you by including your email address, phone number, or a link to your contact page.
- Reviews and testimonials: If you have positive reviews or testimonials from customers, consider featuring them on your landing page to build trust and credibility with visitors.
Using SeedProd WordPress Blocks
Many of SeedProd’s content blocks also have ready-made block templates. This allows you to quickly change the look and feel of your content with just a few clicks.
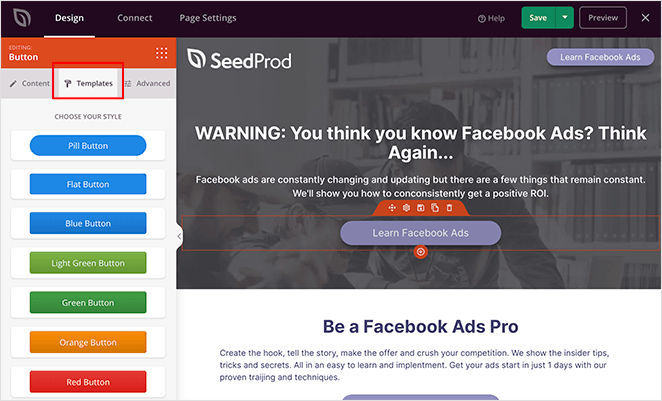
For example, clicking a button block on your page preview shows the content settings on the left. You can then click the Templates tab to see several different button styles. Just click one to add that style to your landing page.
You’ve probably noticed that SeedProd doesn’t just offer the standard building blocks for creating a successful landing page.
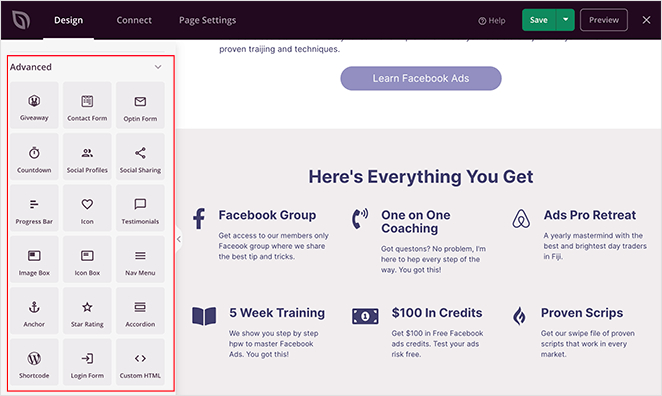
In the Advanced blocks section, you can choose from various page elements explicitly designed to generate leads for your business.
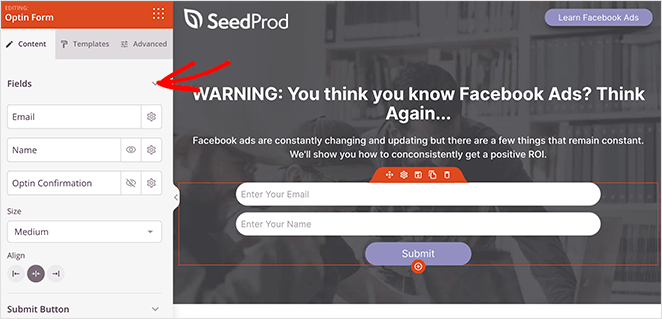
For instance, if you want your Facebook audience to sign up for a webinar, you can use the Optin Form block to collect webinar registrations.
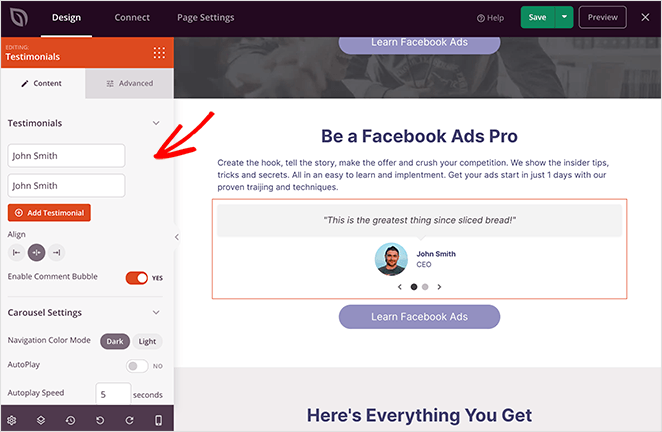
Or you can add testimonials from happy customers to use as social proof and reassure visitors of the value they’ll get from signing up.
Related: How to Embed Facebook Events on WordPress
Adding Landing Page Sections
Besides page blocks, you can also add sections to your landing page. Sections are complete page areas like:
- ヘッダー
- フッター
- ヒーロー
- コール・トゥ・アクション
- 特徴
They include all the information that area of your page would need, and you can add it to your page with 1 click. This saves you from having to build these areas block by block manually.
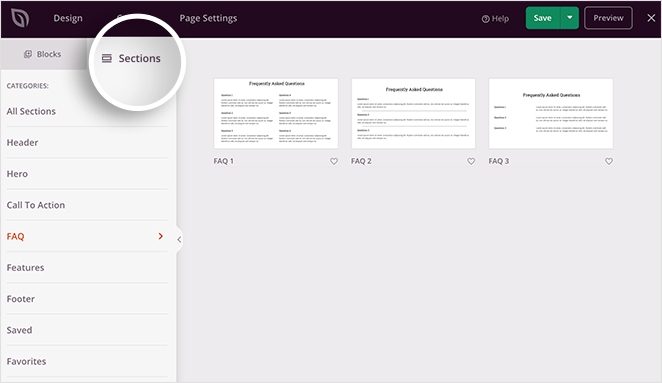
For example, clicking the Sections tab and selecting FAQ shows several FAQ sections you can add to your page.

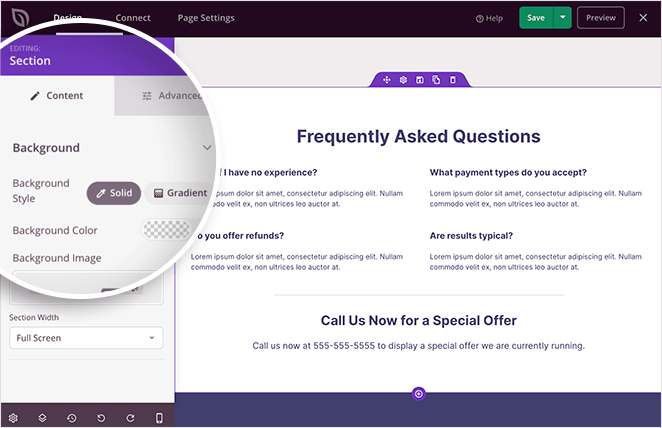
You can then customize the section as you would with any other page block.
Facebook Landing Page Size: Optimize for Success
When customizing your landing page for Facebook, it’s crucial to consider the size of various elements, especially images. The size of your images can impact how quickly your landing page loads, which in turn affects your conversion rates.
Ideal Image Sizes
- Header Image: Aim for a header image that is around 1200 x 628 pixels. This size is optimized for both desktop and mobile views.
- Product Images: For showcasing products or services, use images that are at least 800 x 800 pixels to ensure high quality.
- Background Images: These should also be around 1200 x 800 pixels to maintain quality without slowing down your page load time.
Text and Buttons
- Font Size: Keep your primary headlines between 30-40 pixels and sub-headlines between 20-30 pixels for readability.
- CTA Buttons: Make sure they are large enough to be easily clickable but not so large that they distract from other content. A height of 50 pixels is generally effective.
According to Google, 53% of mobile users leave a page that takes longer than three seconds to load. Therefore, optimizing the size of your images and elements is crucial for keeping your audience engaged and converting.
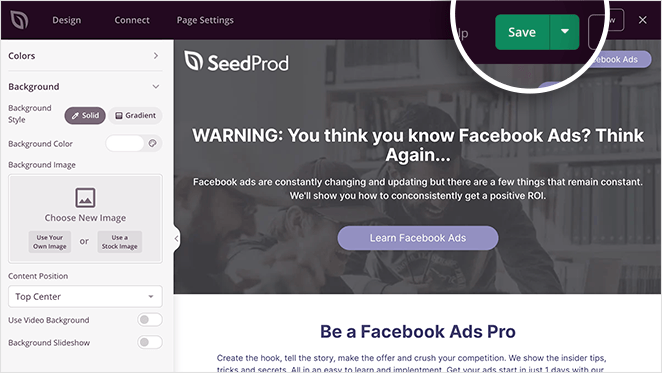
Remember to save your changes periodically by clicking the green Save button in the top-right corner of your screen.
ステップ4.ランディングページの設定
If part of your marketing strategy is to collect email addresses, you’ll need to link your landing page to your email marketing and automation service. This makes it easier to manage all the new leads joining your email list.
Fortunately, integrating your email marketing provider with SeedProd is straightforward. Just click the Connect tab at the top of your screen.
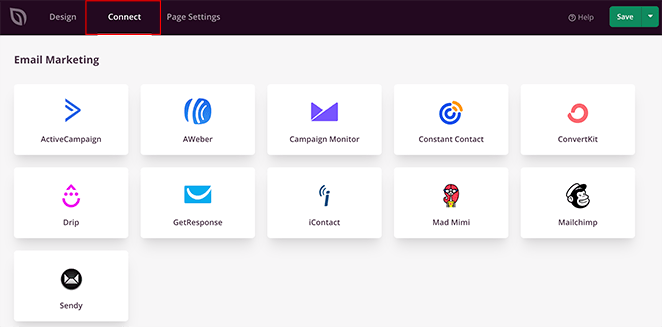
On this page, you’ll see all the popular email marketing services that integrate with SeedProd. So go ahead and choose your preferred service, click Connect and follow the steps to authorize your account.
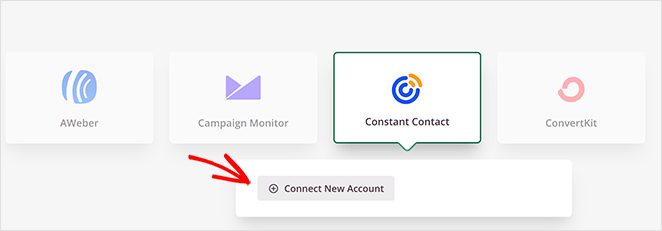
You can find instructions for each email marketing provider in SeedProd’s email integration documentation.
Besides connecting your email provider, you can also collect emails right inside SeedProd. The details of anyone who signs up on your landing page are shown in SeedProd’s subscriber overview.
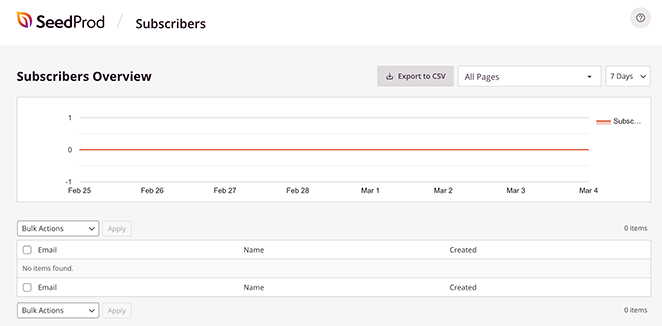
You can view this dashboard by navigating to SeedProd » Subscribers from your WordPress admin area.
After connecting your email service to SeedProd, there are a few more settings to configure before publishing your page. To find them, click the Page Settings tab along the top of your screen.

On this page, you can edit the following settings:
- General – Change your page name and URL, publish or set your page to draft, and put your landing page in isolation mode.
- SEO – Click to see the SEO settings of your landing page in a WordPress SEO plugin like All in One SEO.
- Analytics – View the Google Analytics metrics of your landing page in an Analytics plugin like MonsterInsights.
- Scripts – Enter crucial scripts to your landing pages, such as your Facebook tracking pixel and retargeting scripts.
- Custom Domain – Give your landing page a different domain name from your existing website.
You can learn more about each of these in the Page Settings documentation.
Step 5. Publish Your Landing Page in WordPress
Before publishing, ensure your Facebook landing page is mobile-friendly. If your landing page content doesn’t show properly on mobile screens, you could lose potential leads.
The good news is that you can preview your landing page on mobile easily in SeedProd.
From the Design screen, click the mobile icon at the bottom of the page builder.
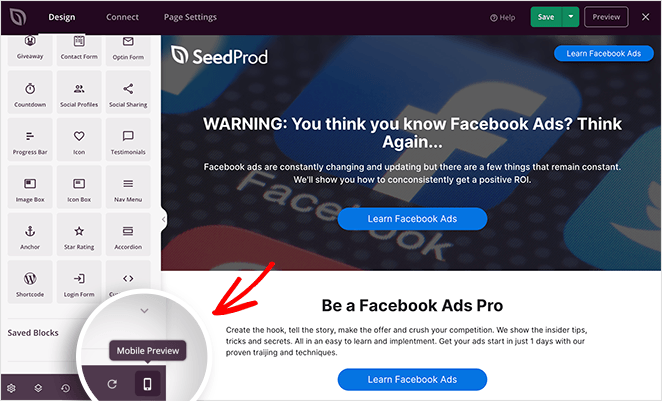
This opens your landing page in a mobile preview so you can check that every element displays correctly.
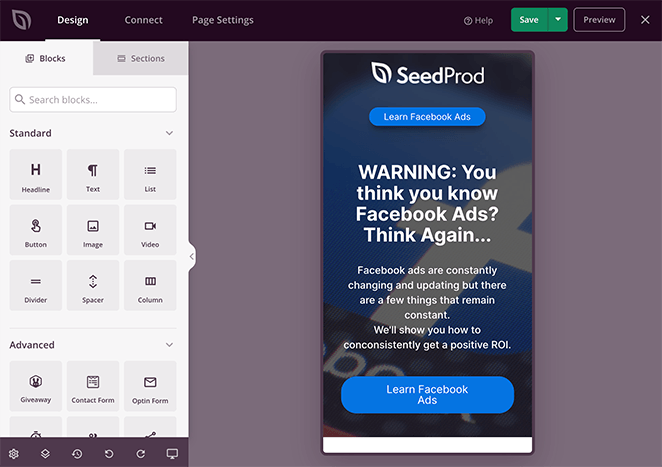
Scroll through your mobile preview and click to edit any page block that doesn’t look right. When you’re happy with how your page looks, you’re ready to make it live.
To do that, click the down arrow next to the green Save button and click Publish.
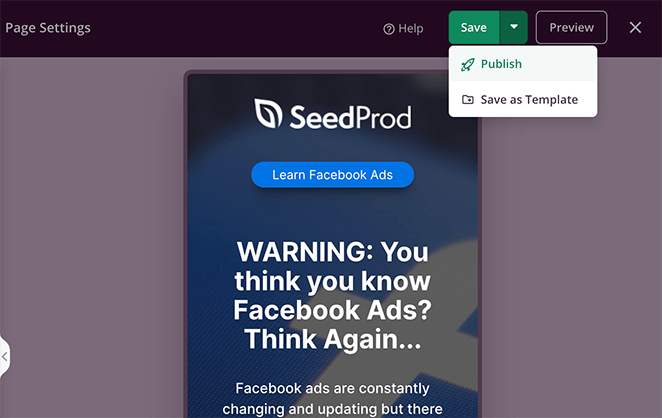
A popup then appears, telling you that your page has been published.
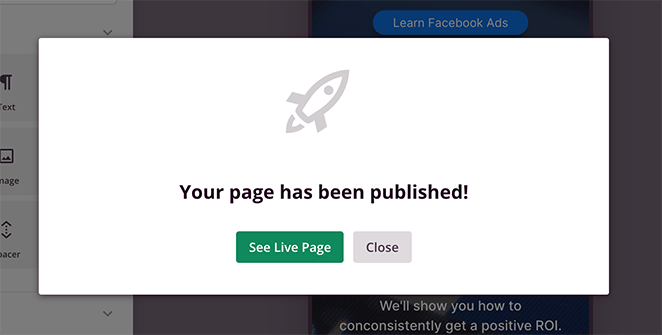
Click the See Live Page button to see a preview of how it looks.
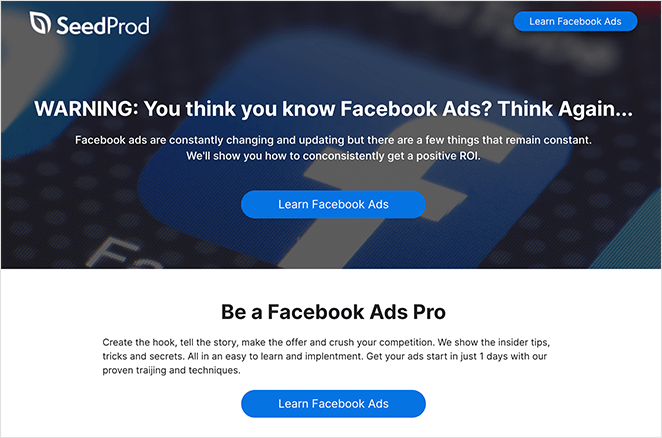
Here is the final look at the Facebook landing page that we created on our test site:
Setting Up Redirects for Your Facebook Landing Page
Alright, so you’ve got your Facebook landing page up and running. But what if you need to point your visitors somewhere specific after they take action?
Maybe you’ve got a thank-you page, or perhaps you want to funnel them into a different part of your site. That’s where redirects come into play.
Setting up a redirect in WordPress is a piece of cake, especially if you’re using SeedProd. Here’s how:
First, edit your landing page and choose the action element such as the opt-in form block. Inside the block settings, expand the “Success Action” heading and select the Redirect option.
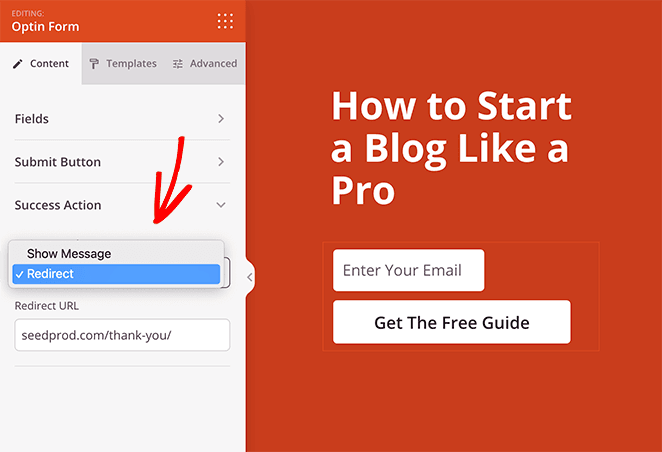
Now enter the URL you’d like to redirect users to after completing the form.
Inspiring Facebook Landing Page Examples
Wondering what a high-converting landing page looks like? There are plenty of examples online, but we’ve hand-picked some of our favorite Facebook landing page examples to give you some inspiration.
Sakuraco
First, here is the Facebook ad you’ll see before visiting the Sakuraco landing page:
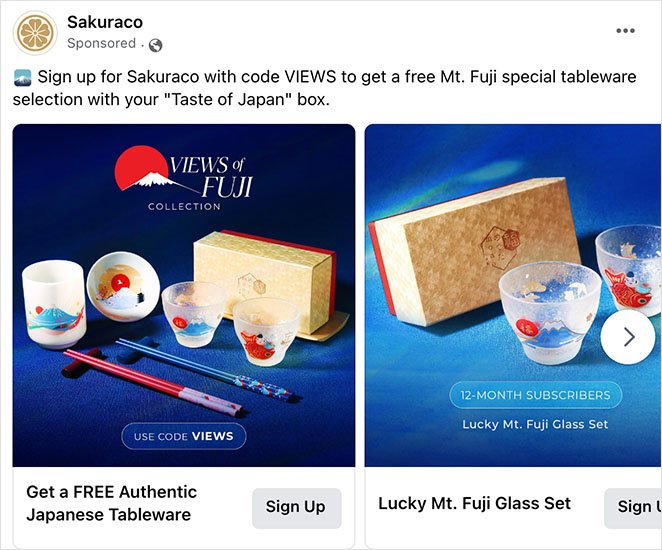
When you click the ad, you’ll notice that the landing page is consistent with the ad design. This reassures visitors that they’re in the right place.
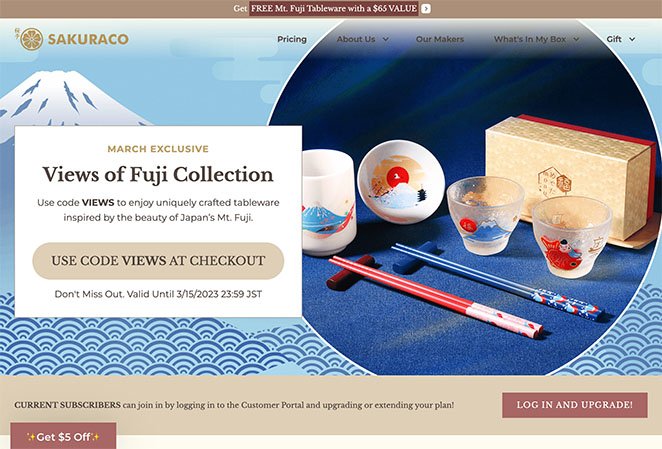
The page also entices visitors with an exclusive discount code for a free gift.
Craft Gin Club

This ad from the Craft Gin Club uses a video to engage Facebook users. Coupled with the star rating, it makes for an excellent ad to stop gin lovers in their tracks and encourage them to click.

When users reach the Facebook ad landing page, they can claim 50% off their first box, which is an attractive offer. The page is also bold, easy to navigate, and includes easily clickable buttons.
Smol

Smol uses user-generated content to attract attention to its Facebook ad. Since positive testimonials from other people have a greater impact on purchase decisions, it’s an excellent tactic to drive more clicks.
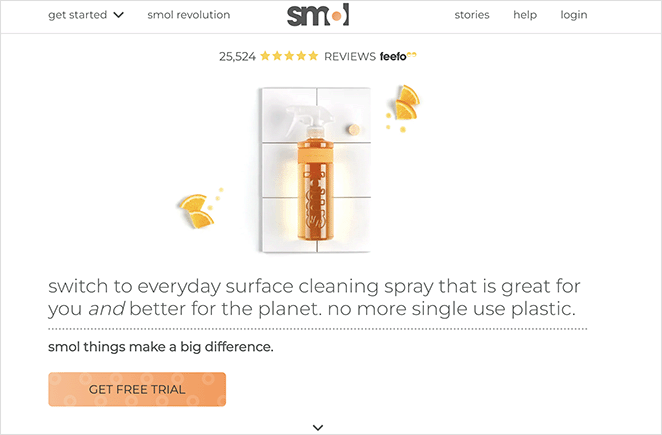
When users visit the Facebook ad landing page, they’ll again see social proof in the form of star ratings. This, combined with the offer of a free trial, presents very little risk to potential customers, making the decision to try the product a no-brainer.
Facebook Landing Page Rules
Facebook has specific guidelines or policies that all landing pages must adhere to for ad approval. These rules are designed to protect users from misleading or harmful content and to ensure that all ads are relevant and high-quality.
Some of the key rules for Facebook landing pages include:
- The landing page must be relevant to the ad. This means that the content of the landing page must be consistent with the promises made in the ad.
- The page must be functional and easy to use. The page must load quickly, be free of errors, and allow users to easily find the information they are looking for.
- Your landing page must not contain any misleading or deceptive content, including false, misleading, or incomplete content.
- The landing page must not contain any harmful or unsafe content, such as content that is illegal, violent, or harmful to children.
- Your page must comply with all applicable laws and regulations.
In addition to these general rules, there are also specific rules that apply to certain types of landing pages.
For example, landing pages that collect personal information must have a privacy policy that is clearly visible to users. Moreover, landing pages that promote financial products or services must also comply with additional regulations.
Facebook Landing Page FAQs
How do I create a Facebook landing page for free?
With the free version of SeedProd, you can create a free landing page specifically for Facebook ads. It comes with all the basic building blocks to create your landing page design, allowing you to generate leads at no cost.
Do Facebook ads need a landing page?
You should always link your Facebook ad to a landing page to encourage clicks and conversions. At the same time, you need to optimize your landing page to keep users on your page long enough to convert.
How to link a landing page to Facebook?
You can link your landing page to Facebook by adding the URL to your profile. If you want to link your landing page to a Facebook Ad, add the landing page URL to the website link section in the Ad creative inside the Facebook ad manager.
How do I optimize my Facebook landing page for conversions?
Once your landing page is complete, it’s important to perform optimizations to improve conversions. This means ensuring that the page is easy to use, visually appealing, and persuasive. You can also use A/B testing to test different elements of your landing page to see what works best.
How do I analyze the performance of my Facebook landing page?
To analyze the performance of your landing page, you can use Facebook Insights or third-party analytics tools, such as Google Analytics. These tools allow you to track metrics such as page views, bounce rate, time on page, and conversion rate.
You can also use heat maps and user recordings to see how visitors interact with your page and identify areas for improvement.
Understanding Landing Page Views in Facebook Analytics
When analyzing the performance of your Facebook landing page, one metric you shouldn’t overlook is the “Landing Page View” which is available in Facebook Analytics.
A “Landing Page View” is counted when a person clicks on an ad link and loads the landing page. Unlike the “Link Click” metric, which only counts clicks on your ad, the “Landing Page View” ensures the user reached and loaded your page
To track this metric, you’ll need to have the Facebook Pixel installed on your landing page. Once it’s set up, you can monitor Landing Page Views from your Facebook Ads Manager.
それで終わりだ!
You now know how to create a Facebook landing page in WordPress. All that’s left is to add your landing page link to your Facebook campaigns so users can see it in their news feeds. As a result, you can increase conversions, leads, and sales.
You might also like this guide on how to add a Facebook page to WordPress.
お読みいただきありがとうございました!ご質問やご意見がありましたら、お気軽にコメントをお寄せください。
また、YouTube、X(旧Twitter)、Facebookでも、ビジネスの発展に役立つコンテンツを配信しています。

