

Resumen: Cómo crear una página de destino con IA en WordPress
Sí, puedes crear una página de destino de WordPress con IA en unos 30 a 45 minutos, incluyendo texto, imágenes y diseño. La misma página me llevó unas 3 horas a mano, así que la IA redujo mi tiempo de creación aproximadamente un 75%.
- Planifica con ChatGPT: pídele que describa las secciones de tu página, los titulares y las llamadas a la acción (CTA).
- Elige una plantilla: empieza con una plantilla de SeedProd en lugar de una página en blanco.
- Escribe el texto con IA: genera titulares y texto del cuerpo en el editor de SeedProd, luego edítalos.
- Añade imágenes con IA: crea imágenes personalizadas dentro del mismo constructor, sin fotos de stock.
- Optimiza y publica: deja que AIOSEO escriba tu título y meta, luego pulsa publicar.
Tienes un lanzamiento en pocos días y una plantilla en blanco mirándote. No hay ningún diseñador disponible, ningún redactor publicitario, y eres tú quien tiene que rellenar la página.
Ese es exactamente el momento en que recurro a la IA. Esta guía te muestra cómo crear una página de destino con IA en WordPress utilizando herramientas que se ejecutan dentro de tu propio sitio, para que la página sea tuya para conservarla y controlarla.
Una cosa para aclarar primero. La mayoría de los consejos sobre "páginas de destino con IA" implican que la IA crea y publica toda la página por sí sola, y así no es como funciona todavía. El método a continuación combina algunas herramientas de IA con un constructor, que es la parte que realmente pone una página en línea.
- ¿Qué es una página de destino con IA (y puede la IA crear toda la página)?
- Cómo crear una página de destino con IA en WordPress
- Crea una página de destino mediante indicaciones con WPVibe
- Los mejores generadores de páginas de destino con IA para WordPress comparados
- Preguntas frecuentes sobre la creación de una página de destino con IA
¿Qué es una página de destino con IA (y puede la IA crear toda la página)?
Una página de destino de WordPress con IA es una página independiente donde la IA se encarga del texto, las imágenes y el diseño mientras tú la ensamblas y publicas en un constructor. La IA hace el trabajo pesado del contenido; tú mantienes el control del resultado final.
Entonces, ¿puede la IA crear y publicar una página de destino por sí sola? No por sí sola en una configuración estándar de WordPress. Puede escribir texto, sugerir diseños y generar imágenes, pero todavía necesitas un constructor de WordPress para ensamblar y publicar el resultado final.
Sin embargo, esa línea está cambiando. Los agentes de IA ahora pueden controlar un constructor de forma conversacional, y cubro esa vía en la sección WPVibe cerca del final. Para el flujo de trabajo principal, el enfoque más práctico es combinar herramientas.
En mis pruebas, utilizo ChatGPT para esbozar el contenido de la página, DALL-E para crear imágenes personalizadas y AIOSEO para escribir títulos SEO y meta descripciones con OpenAI. Cada herramienta se encarga de una parte del trabajo.
El eslabón perdido es un constructor que conecta todo dentro de WordPress. SeedProd lo resuelve al integrar la escritura y la generación de imágenes con IA directamente en el editor de páginas, para que no tengas que saltar entre aplicaciones para crear una sola página.
Cómo la IA redujo mi tiempo de creación de 3 horas a 45 minutos
Crear una página de destino a mano en WordPress me llevó alrededor de 3 horas, desde el boceto hasta la publicación. Con las herramientas de escritura e imágenes con IA de SeedProd, la misma página me llevó menos de 45 minutos, una reducción aproximada del 75% en el tiempo de creación.
La mayor parte de ese ahorro de tiempo proviene de no empezar desde cero. Un generador de sitios web con IA puede encargarse de las partes lentas y ayudarte a:
- Redactar titulares, llamadas a la acción y secciones de contenido en segundos
- Generar imágenes e ilustraciones para tu marca
- Sugerir un diseño de sección que puedas ajustar
- Optimizar el texto para SEO y legibilidad
- Redactar textos alternativos que puedas usar como variaciones de prueba A/B
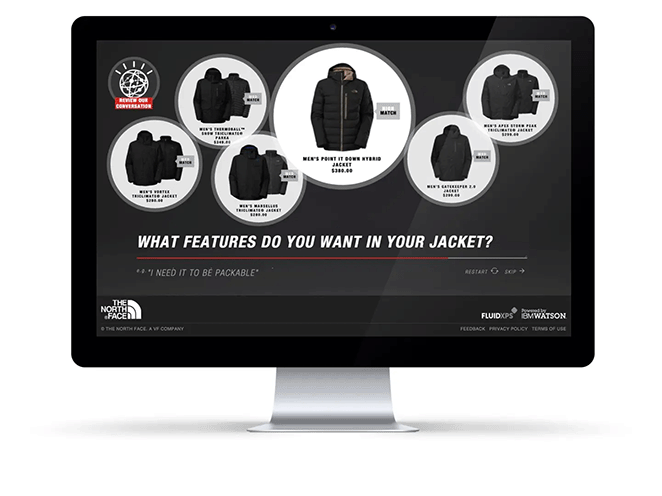
Incluso las grandes marcas utilizan IA para mejorar la experiencia del cliente. The North Face utilizó IA para personalizar las recomendaciones de productos y vio un aumento notable en las ventas.
He notado la misma ventaja en mi propio flujo de trabajo. Antes de la IA, creaba páginas de destino manualmente. Ahora diseño, escribo y publico una página completa en menos de la mitad de tiempo.
| Característica | Constructor Manual | Generador de IA |
|---|---|---|
| Estructura de la Página | Creada desde cero | Esbozada por IA en segundos |
| Redacción de Contenido | Escribe todo el texto tú mismo | Genera contenido con indicaciones |
| Diseño de imágenes | Sube o usa fotos de archivo | Crea elementos visuales dentro del constructor |
| Velocidad | Horas para completar | Hecho en minutos |
Cómo crear una página de destino con IA en WordPress
Así es como uso SeedProd para crear una página completa con la ayuda de la IA.

SeedProd es un constructor de sitios web para WordPress de arrastrar y soltar que te permite ensamblar y publicar una página de destino sin tocar código. Su asistente de escritura e imágenes con IA genera titulares, textos y imágenes personalizadas en unos pocos clics.
En mi experiencia, todo el proceso dura entre 30 y 45 minutos, desde la planificación hasta la publicación.
Lo que necesitarás
Antes de empezar, asegúrate de tener:
- Un sitio de WordPress autohospedado
- Plugin SeedProd (Plan Básico o superior)
- Complemento de IA de SeedProd (disponible al finalizar la compra)
- Un objetivo claro para la página: para quién es y la única acción que quieres que los visitantes realicen
¿Puedes crear una página de destino con IA gratis?
Puedes llegar a la mayor parte del camino de forma gratuita. Empieza con una plantilla gratuita de SeedProd, luego escribe tu texto en ChatGPT gratis y pégalo manualmente en la página.
Eso todavía te ahorra la parte más lenta, que es escribir desde una página en blanco. El complemento de IA de pago de SeedProd es la ruta más rápida, ya que genera texto e imágenes directamente en el editor sin copiar y pegar entre pestañas.
1. Planifica tu página de destino con IA
El primer paso es usar un chatbot de IA como ChatGPT para crear un esquema estructural detallado para tu página de destino.
Para empezar, ve a ChatGPT e introduce tu indicación.
En este ejemplo, le pedí a la IA que esbozara una página de destino para promocionar un seminario web: “Esboza una página de destino sencilla de cuatro secciones para un seminario web.”
Aquí está la respuesta con el esquema para mi página:
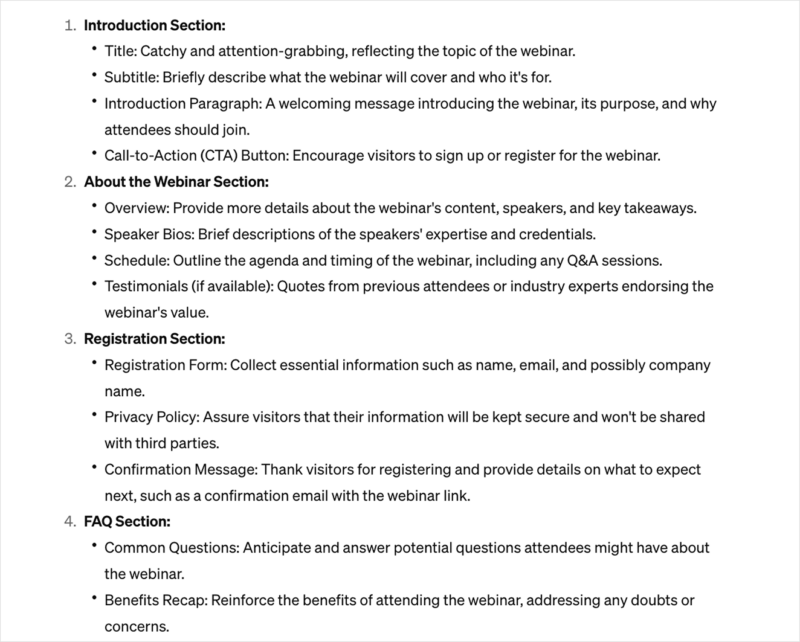
ChatGPT me dio una guía sencilla para mis titulares, llamadas a la acción (CTA), texto de la página de destino, formularios y preguntas frecuentes. Esto me da un marco sólido para trabajar durante el proceso de diseño.
2. Instalar SeedProd
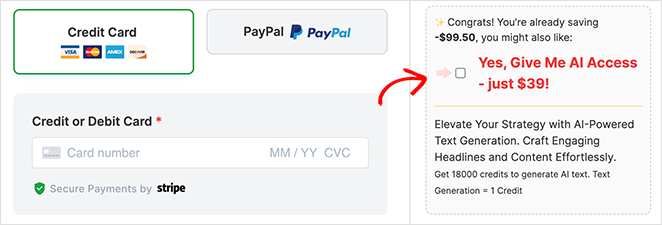
A continuación, instala y activa SeedProd en tu sitio web. Para usar las funciones de IA, necesitas un plan premium de SeedProd, y puedes añadir el complemento de IA durante el proceso de pago.
Si necesitas ayuda, sigue estos pasos que te muestran cómo instalar SeedProd.
3. Crear tu Página de Destino
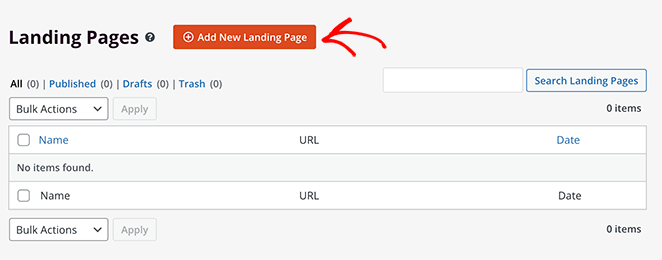
Después de instalar SeedProd, ve a SeedProd » Páginas de destino en tu administrador de WordPress y haz clic en el botón Añadir nueva página de destino.
Ahora verás la biblioteca de plantillas de páginas de destino responsivas de SeedProd. Haz clic en las pestañas de la parte superior para filtrar los diseños por propósito.
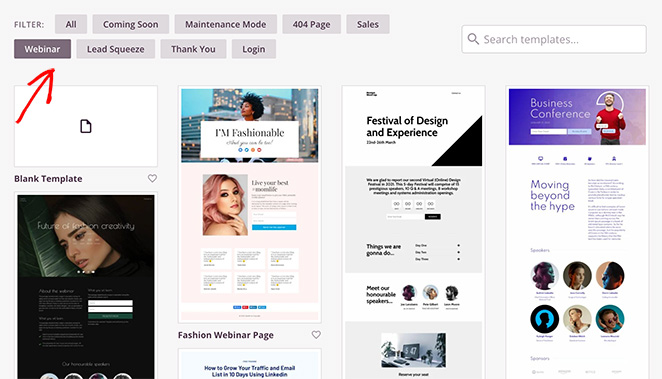
Como estoy creando una página de destino para webinar, haré clic en la pestaña Webinar. Empezar desde una plantilla significa que las secciones esenciales ya están en su lugar, por lo que solo personalizo el contenido y la marca.
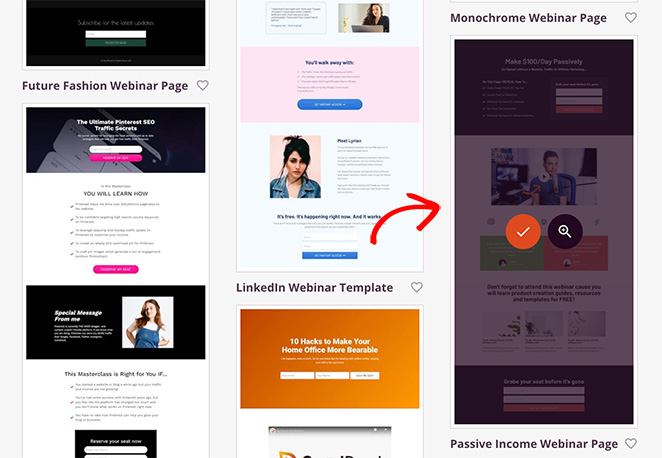
Para elegir una plantilla, pasa el ratón sobre un diseño que te guste y haz clic en el icono de la marca de verificación.
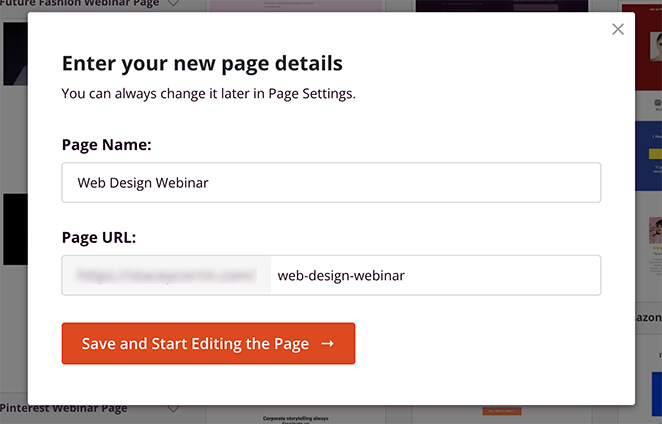
A continuación, ponle un nombre a tu página y haz clic en el botón Guardar y empezar a editar la página.
Tu plantilla se abre en el editor visual de SeedProd. A la izquierda verás los bloques que puedes añadir a tu página, y a la derecha hay una vista previa en vivo que se actualiza mientras trabajas.
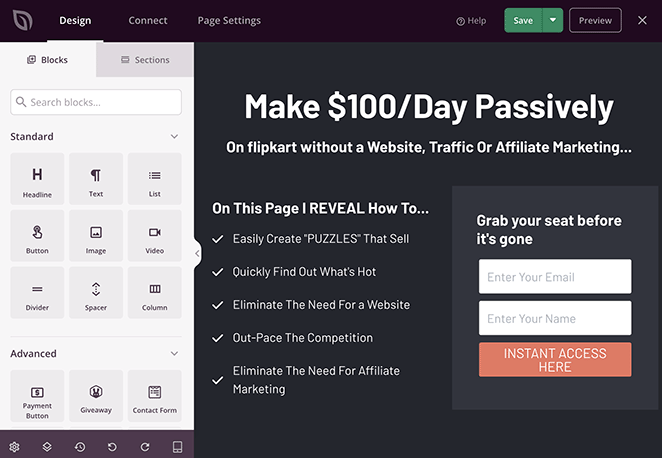
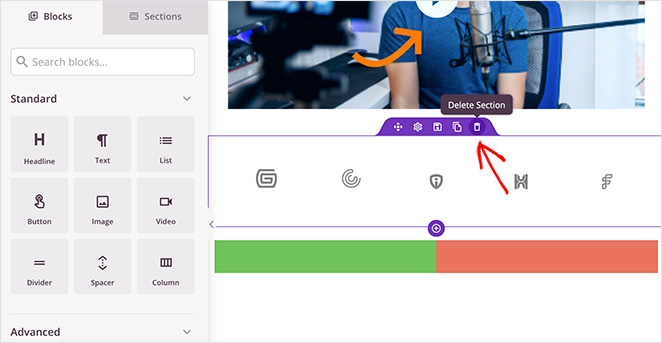
Empieza por eliminar los elementos que no necesites. Pasa el ratón sobre ellos y haz clic en el icono de la papelera.
A continuación, da forma a la página en torno a tu esquema de ChatGPT. Por ahora, puedes copiar y pegar las sugerencias así:
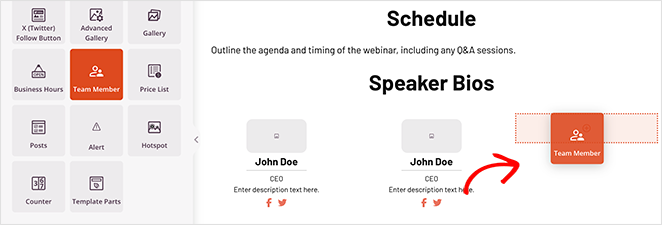
Como mi esquema incluye ponentes, añadiré marcadores de posición usando el bloque Miembros del equipo. Búscalo en la barra lateral izquierda y arrástralo a tu página.
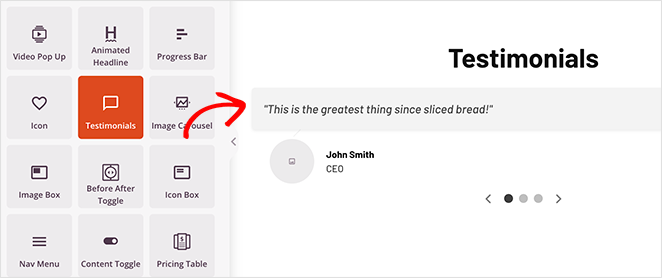
Haré lo mismo para la sección de prueba social utilizando el bloque de Testimonios.
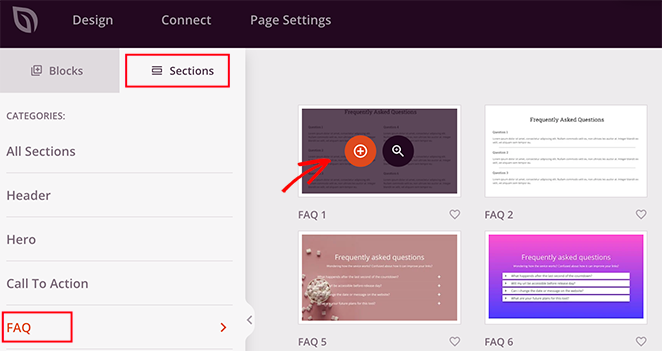
Una sección final que necesito son las preguntas frecuentes. SeedProd tiene secciones de preguntas frecuentes listas para usar que puedes añadir con un solo clic.
Para encontrarlas, haz clic en la pestaña Secciones en la barra lateral izquierda y haz clic en el encabezado 'Preguntas frecuentes'.
Ahora elige una sección de preguntas frecuentes predefinida que te guste y haz clic en el icono más para añadirla al final de tu página de destino.
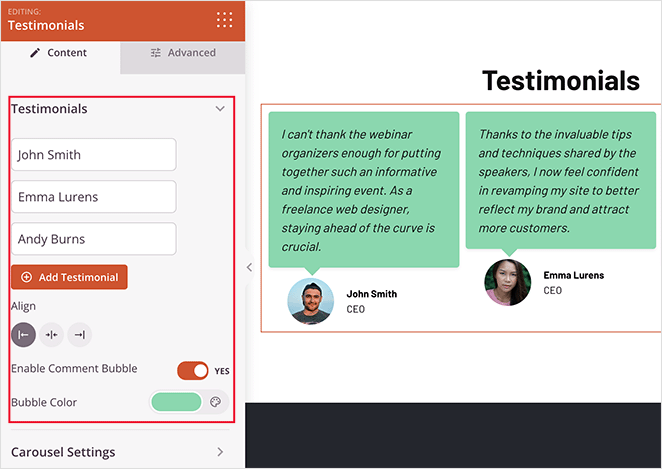
Personalizar cualquiera de estos nuevos elementos es fácil. Haz clic en ellos y verás sus ajustes en la barra lateral.
Por ejemplo, en el bloque de Testimonios, puedes habilitar un carrusel deslizante, añadir fotos y ajustar las fuentes y los colores sin CSS ni HTML.
4. Escribir Contenido con SeedProd AI
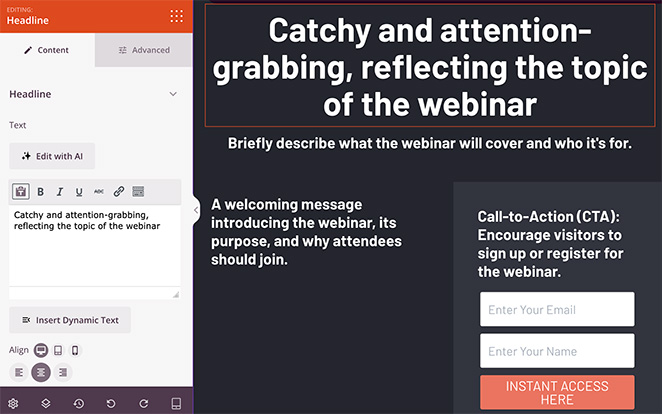
Una vez que la estructura de la página esté en su lugar, utiliza el asistente de escritura de IA integrado de SeedProd para redactar tus titulares y texto principal.
SeedProd AI y su asistente de redacción se encargan de este paso. Selecciona cualquier bloque de titular y haz clic en Editar con IA, y el asistente redactará un titular en unos segundos.
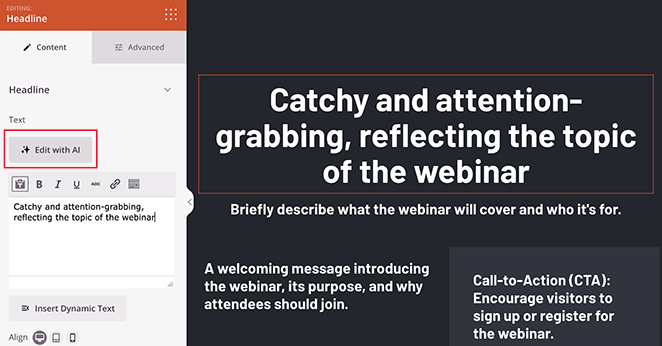
En la ventana emergente 'Escribir con IA', escribe tu indicación y haz clic en Generar texto. Utilicé esta indicación: "Crea un título de página emocionante, animando a la gente a unirse a nuestro seminario web de diseño web."
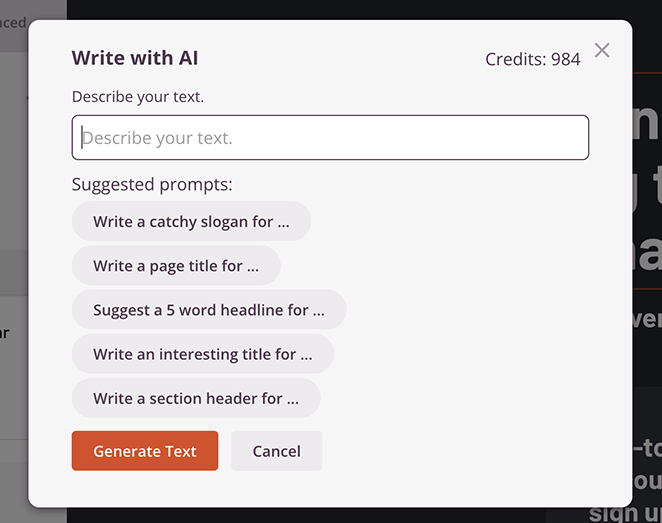
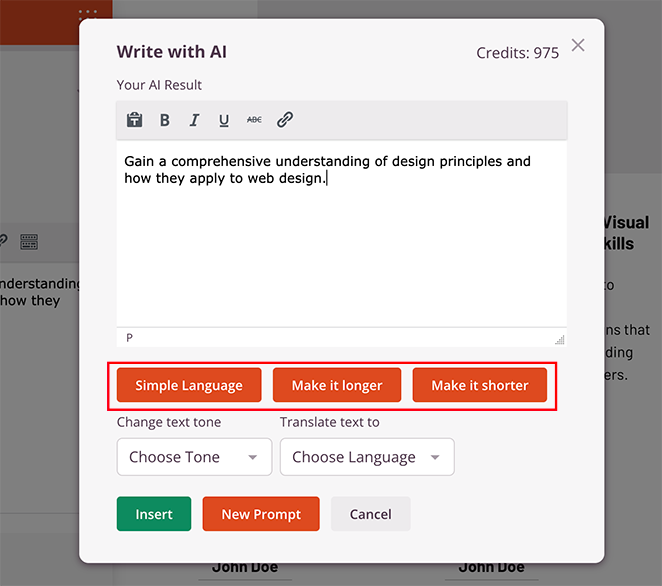
Después de unos segundos verás tu titular generado por IA. Puedes usarlo tal cual, o hacer clic en los botones para acortar, alargar o simplificar el lenguaje.
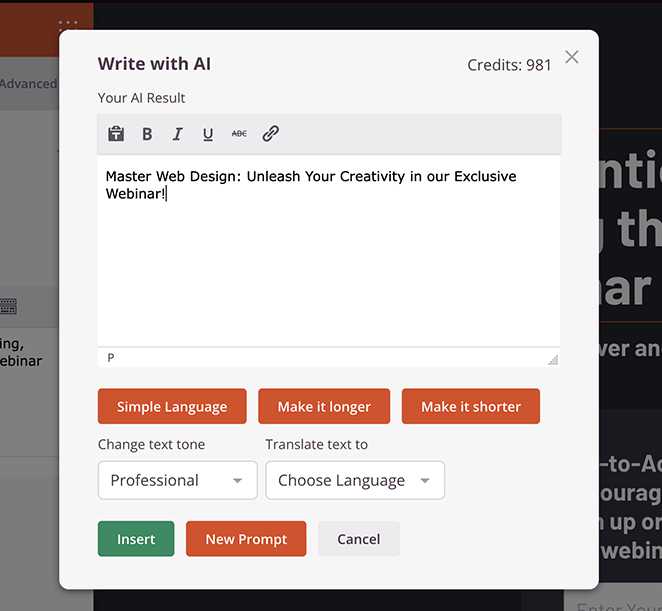
Cuando estés satisfecho con el titular, haz clic en Insertar para añadirlo a tu página. El texto generado por IA es un buen punto de partida, pero siempre revísalo y personalízalo para que coincida con la voz de tu marca.
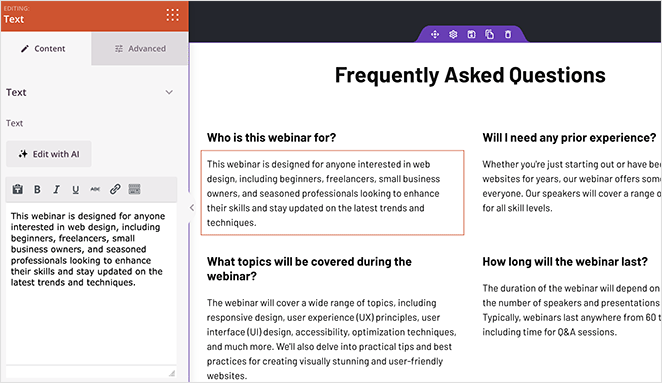
Repite este paso para generar contenido de página de destino para cualquier parte de tu diseño. Haz clic en el botón 'Escribir' o 'Editar con IA' en cualquier bloque de texto e introduce una indicación relevante.
Utilicé este enfoque para redactar mis respuestas a las preguntas frecuentes:
Para más detalles, consulta mi guía sobre cómo usar la IA para escribir contenido.
5. Crea imágenes de página de destino con IA
Ahora añadamos una imagen para ayudar a los visitantes a visualizar lo que obtendrán. Para esto usaré el bloque de Imagen de SeedProd, que tiene creación de imágenes con IA integrada.
Para usar la IA para generar imágenes, arrastra el bloque de Imagen a tu página, luego haz clic en el botón "Añadir con IA" en la configuración del bloque.
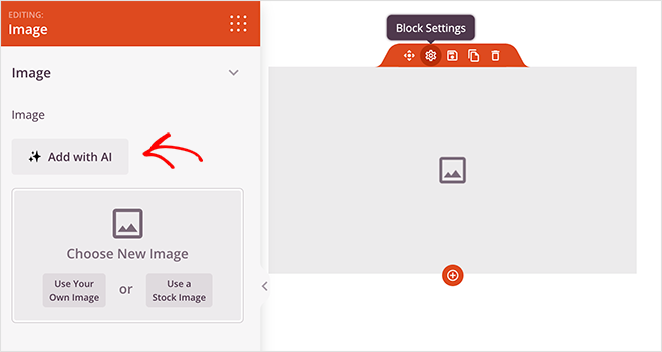
En la interfaz de chat, introduce tu indicación y haz clic en “Generar imagen”.
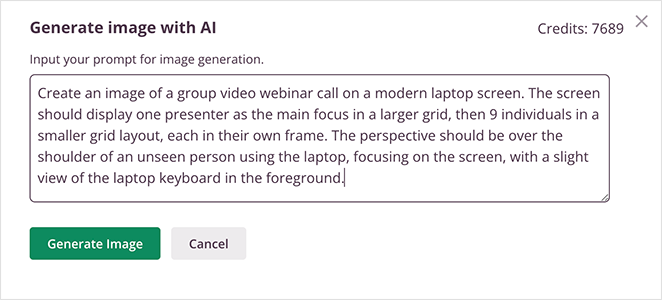
Utilicé la indicación:
"Crea una imagen de una videollamada grupal en la pantalla de un portátil moderno. La pantalla debe mostrar un presentador como foco principal en una cuadrícula más grande, luego 9 personas en una cuadrícula más pequeña, cada una en su propio marco. La perspectiva debe ser por encima del hombro de una persona no visible que usa el portátil, centrándose en la pantalla, con una vista leve del teclado del portátil en primer plano."
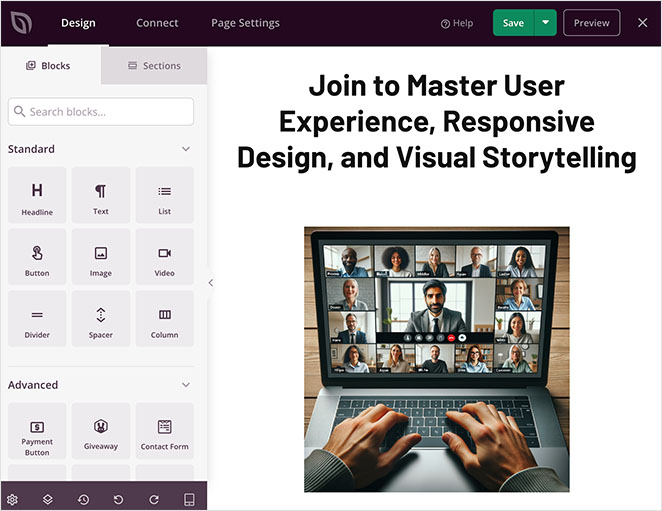
Una vez generada la imagen, puedes refinarla haciendo clic en la opción "Editar con IA".

Aquí puedes generar más variaciones, editar partes de la imagen con una herramienta de pincel o regenerarla con una nueva indicación.
Una vez que estés satisfecho con la versión final, haz clic en Insertar para añadirla a tu página.
6. Optimizar tu Página de Destino con IA
Una vez que tu página esté creada, es hora de optimizarla para SEO y conversiones. Con All in One SEO, puedes usar IA para escribir títulos SEO y meta descripciones para tu nueva página.
Así es como se hace:
- Haz clic en el botón AIOSEO en la parte superior derecha de la pantalla para abrir la configuración de SEO.
- Introduce tu palabra clave principal en el campo ‘Frase clave principal’.
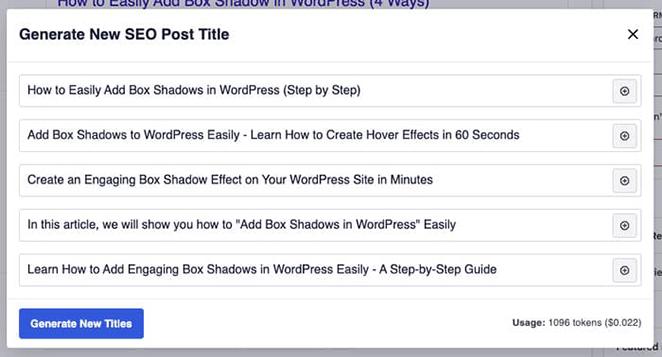
- Haz clic en el botón ‘Generar nuevo título’ para obtener sugerencias de IA para tu título SEO.
- Haz lo mismo para tu meta descripción para crear un resumen de búsqueda atractivo.
Esto escribe tu página tanto para lectores como para motores de búsqueda, lo que puede mejorar la visibilidad y las tasas de clics.
También vale la pena escribir la página para que la búsqueda de IA y las redes sociales impulsadas por IA puedan encontrarla. Usa texto claro estilo respuesta y encabezados estructurados, para que herramientas como ChatGPT y Perplexity puedan usar tu página como fuente cuando la gente pregunte sobre tu tema.
La velocidad también importa. La barra de 2026 es un LCP inferior a 2,5 segundos y un INP inferior a 200 milisegundos, y un constructor rápido facilita alcanzarla. En mis pruebas de GTmetrix, una página de SeedProd cargó en 556 ms, lo que te deja mucho margen para alcanzar esos objetivos.
Otras herramientas de IA que pueden ayudar a afinar tu página incluyen:
- WPForms: envía confirmaciones o seguimientos de formularios personalizados por IA.
- Uncanny Automator: automatiza publicaciones sociales conectando ChatGPT con WordPress.
Prueba tu página de destino de IA con pruebas A/B
Una página creada por IA es un primer borrador sólido, no la palabra final sobre lo que convierte. La forma más rápida de mejorarla es probar un elemento a la vez y quedarte con el ganador.
Comienza con los tres elementos que más mueven las conversiones:
- Encabezado: lo primero que leen los visitantes y la mayor palanca para que se queden.
- CTA: el texto y el color del botón que solicitan la acción.
- Imagen principal: la imagen que marca el tono por encima del pliegue.
Cambia un elemento a la vez para saber qué movió realmente el resultado. La IA también ayuda aquí: pídele a SeedProd AI que redacte algunos titulares o CTA alternativos, y luego pruébalos contra tu original.
Para la configuración real de la prueba, sigue nuestra guía sobre pruebas A/B para páginas de destino en WordPress.
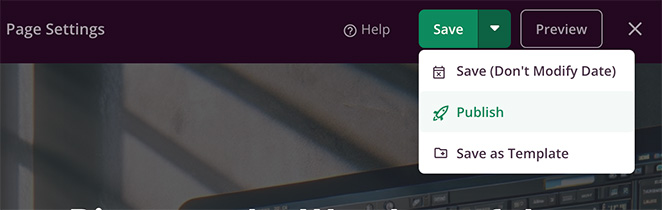
7. Publicar tu Página de Destino de IA en WordPress
Cuando hayas terminado de optimizar tu página de destino, estarás listo para publicar. Haz clic en el botón Guardar en la parte superior de tu página y selecciona Publicar.
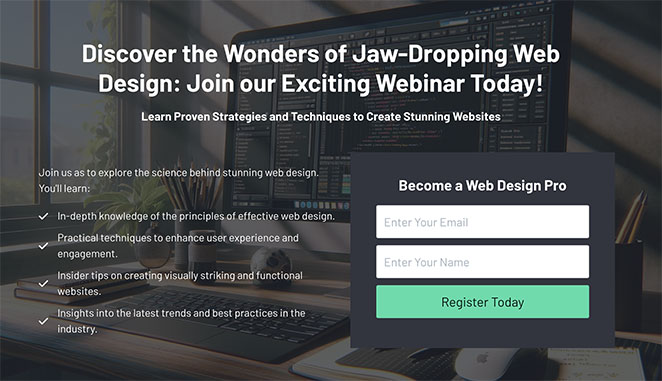
Ahora puedes visitar tu página para verla en vivo. Aquí tienes un vistazo final a la página de destino de IA que creé en mi sitio de prueba.
¿Listo para crear la tuya?
Crea tu página de destino de IA en menos de 45 minutos
SeedProd pone texto de IA, imágenes de IA y más de 300 plantillas en un editor de arrastrar y soltar, para que puedas seguir estos mismos pasos en tu propio sitio hoy mismo.
Empieza a construir ahoraCrea una página de destino mediante indicaciones con WPVibe
El flujo de trabajo anterior te mantiene en el editor de SeedProd. Si prefieres construir escribiendo instrucciones en inglés claro, ahora hay una ruta de IA más rápida que vale la pena conocer.
WPVibe es un plugin de IA que conecta tu sitio de WordPress con ChatGPT, Claude o Cursor. Describes la página que deseas en un chat, y el agente de IA edita tu sitio directamente a través de esa conexión.

Esto es lo más parecido hasta ahora a "la IA construye la página por ti", pero sigue siendo un flujo de construcción y revisión, no un botón mágico. El agente ensambla y edita la página; tú compruebas el resultado y lo publicas.
El flujo es corto:
- Conecta tu sitio: vincula WordPress a tu herramienta de IA a través de WPVibe.
- Indica la página: describe la página de destino que deseas, incluyendo secciones y objetivo.
- Revisa el resultado: comprueba el texto, el diseño y los enlaces que ha generado el agente.
- Publica: cuando tenga el aspecto correcto, publica la página.
Aún así, lo trataría como una ruta adicional en lugar de la principal. El flujo de trabajo de SeedProd te da un control más directo sobre cada sección, y siempre puedes entregar la página terminada a pruebas A/B después.
Los mejores generadores de páginas de destino con IA para WordPress comparados
Si estás sopesando qué generador de páginas de destino con IA para WordPress se adapta mejor a tu sitio, aquí tienes una comparativa de las mejores opciones que he probado.
| Herramienta | Precio inicial | Funciones de IA | Mejor para |
|---|---|---|---|
| SeedProd | 39 €/año | Redacción con IA + generación de imágenes con IA | Principiantes que desean una configuración rápida y sin código |
| Elementor AI | Desde 168 $/año a través de Elementor One | Generación de texto con IA dentro del constructor de páginas | Diseñadores que desean una personalización más profunda |
| Divi AI | 277 $/año (Divi Pro) | Redacción publicitaria con IA + generación de imágenes | Agencias que gestionan varios sitios de clientes |
Uso SeedProd en mis propios sitios porque es el más fácil de usar para principiantes y funciona completamente dentro de WordPress. Elementor AI y Divi AI pueden ser buenas opciones si ya utilizas esos constructores y deseas una mayor flexibilidad de diseño.
Preguntas frecuentes sobre la creación de una página de destino con IA
¿Necesito conocimientos de diseño o programación para crear una página de destino con IA?
No. Empiezas desde una plantilla de SeedProd y la personalizas con arrastrar y soltar, por lo que no hay que escribir CSS ni HTML. El asistente de escritura con IA redacta tu texto y la herramienta de imágenes con IA crea las imágenes, por lo que estás editando en lugar de construir desde cero.
¿Cómo funciona realmente un generador de páginas de destino con IA?
Le das una indicación que describe tu página, y la IA redacta el texto, sugiere un diseño o genera imágenes basándose en esa indicación. En SeedProd, esto ocurre directamente en el editor de páginas, por lo que la salida de la IA cae directamente en la página. Luego la editas y la publicas, ya que la IA produce un punto de partida en lugar de una página terminada.
¿Cuánto tiempo se tarda en crear una página de destino con IA?
Con SeedProd, todo el proceso de planificación con ChatGPT, construcción de la página y redacción de textos con SeedProd AI lleva entre 30 y 45 minutos. Sin IA, la misma página suele llevar de 2 a 3 horas. Ese es el ahorro de tiempo aproximado del 75 % que veo en mis propias creaciones.
¿Las páginas de destino con IA convierten bien?
Sí, cuando la página se centra en un único objetivo. La IA acelera la creación, pero la conversión sigue dependiendo de una CTA clara, mensajes que coincidan con la fuente del tráfico y una página de carga rápida. Las páginas de SeedProd son ligeras por diseño, lo que ayuda a la velocidad.
¿Cuál es la diferencia entre SeedProd AI y Elementor AI para páginas de destino?
SeedProd está enfocado a principiantes, con escritura de IA y generación de imágenes integradas desde 39 $/año y sin necesidad de plugins adicionales. Elementor AI forma parte ahora de Elementor One, desde 168 $/año, y ofrece a los diseñadores una mayor profundidad de personalización. Si eres nuevo en WordPress, SeedProd es el camino más rápido.
¿Puedo crear una página de destino gratuita con IA en WordPress?
No del todo. Las funciones de IA de SeedProd están en el plan de pago, pero puedes usar una plantilla gratuita de SeedProd y añadir contenido generado por IA manualmente con una herramienta gratuita como ChatGPT, y luego pegarlo. Ahorras tiempo en el texto incluso sin el complemento de IA de pago.
Guías de bonificación sobre páginas de destino
Si deseas obtener más información sobre la creación de páginas de destino, estas guías están repletas de consejos útiles:
- Cómo usar la IA para SEO y mejorar las clasificaciones
- Fórmulas de titulares para páginas de destino que aumentan las tasas de conversión
- Las Mejores Herramientas de Marketing de Automatización para Pequeñas Empresas
- Cómo crear un sitio web de WordPress con IA
- Ejemplos de Páginas de Destino de eCommerce para Impulsar Ventas
- Ejemplos de URLs de Páginas de Destino y Mejores Prácticas para Principiantes
Crea una Página de Destino con IA Hoy Mismo
Tu próxima página de destino puede estar lista esta tarde, con texto, imágenes y diseño gestionados por IA dentro de tu propio sitio de WordPress. Abre SeedProd, empieza con una plantilla y deja que el asistente de IA redacte tu primer titular.
Empieza hoy mismo con SeedProd
¡Gracias por leer! Nos encantaría conocer tu opinión, así que únete a la conversación en YouTube, X y Facebook para obtener más consejos y contenido útil para hacer crecer tu negocio.


