Wondering how to hide your WordPress site until it’s ready? I’ve been there, excited to launch, but not quite ready for the world to see an unfinished homepage, broken links, or placeholder text.
The first time I built a site, I didn’t realize how easy it was for someone to stumble on it too early. That moment of panic made me dig into how to make my WordPress site private until it was ready to go live, without breaking anything or messing up SEO.
In this guide, I’ll show you exactly how to hide your WordPress site during development, whether you prefer using a plugin like SeedProd or want to do it manually with WordPress settings. You’ll also see how to create a coming soon page in WordPress that keeps visitors informed while you finish your site.
Wie Sie Ihre WordPress-Website bis zur Fertigstellung ausblenden:
- Schritt 1. Einrichten Ihrer neuen WordPress-Website
- Schritt 2. Installieren Sie das SeedProd Plugin
- Schritt 3. Erstellen Sie Ihre Wartungsmodus-Seite
- Schritt 4. Anpassen Ihrer Wartungsmodus-Seite
- Schritt 5. Wählen Sie, wann Ihre Wartungsseite angezeigt werden soll
- Schritt 6. Verstecken Sie Ihre WordPress-Website, bis sie fertig ist
- How to Hide a WordPress Site Without Plugins (3 Options)
- How to Make Individual WordPress Pages Private (Bonus Tip)
Quick Summary: To hide your WordPress site until it’s ready, you can use a plugin like SeedProd to enable Maintenance Mode or Coming Soon Mode. This blocks public access while giving you full design control. You can also use built-in WordPress settings, password protection, or .htaccess rules if you prefer not to use plugins.
Why You Should Hide Your WordPress Site During Development
Wenn Sie eine WordPress-Website ausblenden, bevor sie fertig ist, verhindern Sie, dass Besucher unvollständige Inhalte oder Designfehler sehen. So haben Sie Zeit, alles in Ruhe fertigzustellen, damit die Website nach der Fertigstellung professionell aussieht.
Wie man eine WordPress-Site bis zur Fertigstellung ausblendet
Der einfachste Weg, Ihre Website privat zu machen, ist die Verwendung des "Wartungsmodus". Es gibt zwar mehrere Möglichkeiten, dies zu tun, aber ich empfehle die Verwendung des SeedProd-Plugins, weil es schnell und einfach ist.

SeedProd ist ein beliebtes WordPress-Plugin für die Erstellung von Landingpages und Themen. Sein einfacher Drag-and-Drop-Builder macht es einfach, WordPress-Seiten schnell zu erstellen, ohne Code zu schreiben.
SeedProd kann Ihnen auch helfen, Ihre Website zu verbergen, während Sie sie noch aufbauen. Sie können zwischen dem "Coming Soon"-Modus und dem Wartungsmodus wählen und sogar einstellen, dass Personen, die auf Ihrer Website eingeloggt sind, weiterhin alles sehen können.
Sehen wir uns an, wie Sie Ihre WordPress-Website mit SeedProd verstecken können.
Schritt 1. Einrichten Ihrer neuen WordPress-Website
Wenn Sie eine neue Website erstellen, ist der erste Schritt, sich ein Webhosting zu besorgen. Ich empfehle dafür Bluehost.

Bluehost bietet erschwingliche Tarife, die sowohl Webhosting als auch einen kostenlosen Domainnamen umfassen. Es wird offiziell von WordPress empfohlen und hostet über 2 Millionen Websites.
Bluehost ist ideal für neue WordPress-Nutzer, weil es die Einrichtung Ihrer Website einfach macht. Außerdem erhalten Sie eine kostenlose Geschäfts-E-Mail-Adresse mit Ihrem Domainnamen.
Siteground ist eine weitere gute Option für das Hosting Ihrer Website. Benötigen Sie weitere Hilfe bei den ersten Schritten? Lesen Sie unseren Leitfaden zur Erstellung einer WordPress-Website.
Sobald Sie Ihre Website eingerichtet haben, müssen Sie ein Wartungsmodus-Plugin installieren, mit dem Sie eine Seite in WordPress oder Ihre gesamte Website ausblenden können, bis sie fertig ist.
Schritt 2. Installieren Sie das SeedProd Plugin
Jetzt müssen Sie sich eine Kopie von SeedProd besorgen. Sobald Sie Ihr Konto erstellt haben, gehen Sie auf die Anmeldeseite, um auf Ihr Konto-Dashboard zuzugreifen.
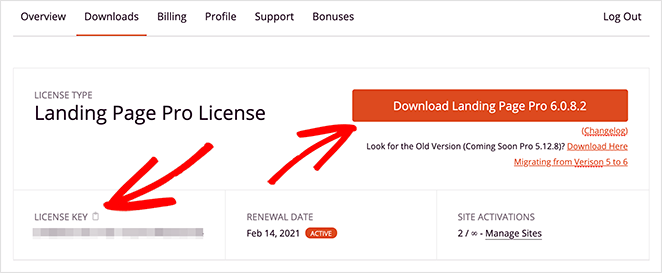
Klicken Sie auf Lizenzschlüssel anzeigen, Details und Downloads (siehe unten).

Kopieren Sie dann Ihren Lizenzschlüssel und klicken Sie auf Download Landing Page Pro, um das Wartungs-Plugin auf Ihrem Computer zu speichern.
Als nächstes installieren und aktivieren Sie das SeedProd-Plugin auf Ihrer WordPress-Website. Wenn Sie nicht wissen, wie das geht, sehen Sie sich diese Schritt-für-Schritt-Anleitung für die Installation von WordPress-Plugins an.
Nach der Aktivierung des Plugins wird eine Seite angezeigt, auf der Sie aufgefordert werden, Ihren Lizenzschlüssel einzugeben. Wenn Sie sich erinnern, haben Sie diesen beim Herunterladen des Plugins kopiert.

Geben Sie einfach Ihren Schlüssel ein und klicken Sie auf Schlüssel überprüfen.
Takeaway: Installing SeedProd is quick and beginner-friendly. It gives you full control to hide your WordPress site until it’s ready, without editing any code.
Schritt 3. Erstellen Sie Ihre Wartungsmodus-Seite
Mit SeedProd können Sie ganz einfach eine benutzerdefinierte Seite entwerfen, die die Besucher sehen, während Ihre Website versteckt ist. So können Sie das Interesse der Besucher aufrechterhalten, auch wenn Ihre Website noch nicht fertig ist.
Sie haben die vollständige Kontrolle über das Design Ihrer Seite und können den Drag-and-Drop-Builder von SeedProd verwenden, um nützliche Elemente hinzuzufügen, wie z. B.:
- E-Mail-Anmeldeformular: Bringen Sie die Leute dazu, sich für Ihre E-Mail-Liste anzumelden, damit sie wissen, wann Ihre Website an den Start geht.
- Kontakt-Formular: Geben Sie Besuchern die Möglichkeit, mit Ihnen in Kontakt zu treten und Fragen zu stellen.
- Soziale Profile: Zeigen Sie Links zu Ihren Profilen in den sozialen Medien an, damit die Leute Ihnen folgen können, um Updates zu erhalten.
- WooCommerce-Blöcke: Wenn Sie Produkte online verkaufen, können Sie Schaltflächen, Produktraster und mehr hinzufügen.
- Schaltflächen für soziale Netzwerke: Lassen Sie Ihre Besucher über Ihre neue Website berichten.
- Countdown-Timer: Schaffen Sie Spannung, indem Sie den Leuten genau zeigen, wann Ihre Website online sein wird.
- Und vieles mehr.
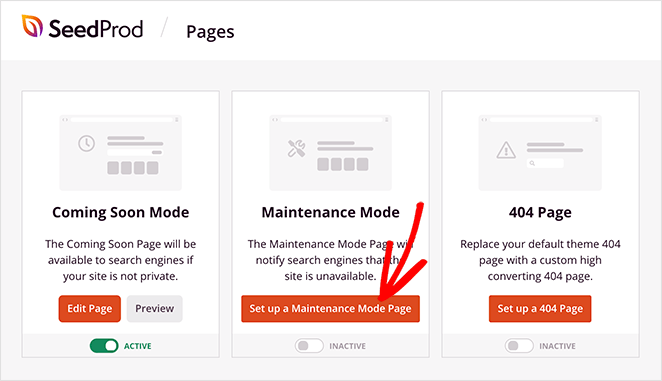
To start designing your page, click the “Set up a Maintenance Mode Page” button.
Not sure whether to use Coming Soon or Maintenance Mode? Here’s a quick breakdown of what each one does:
| Merkmal | Modus "Demnächst | Wartungsmodus |
|---|---|---|
| Am besten für | New websites not ready to launch | Live sites that need temporary updates |
| Search Engine Visibility | Optional: can allow indexing | Usually blocked from indexing |
| What Visitors See | Custom landing page promoting your launch | A splash page saying the site is under maintenance |
| Can Logged-In Users Bypass? | Ja | Ja |
| SeedProd-Unterstützung | ✅ Yes | ✅ Yes |
If you’re still building your site from scratch, I recommend starting with Coming Soon Mode. But if your site is already live and just needs updates, Maintenance Mode is the way to go.
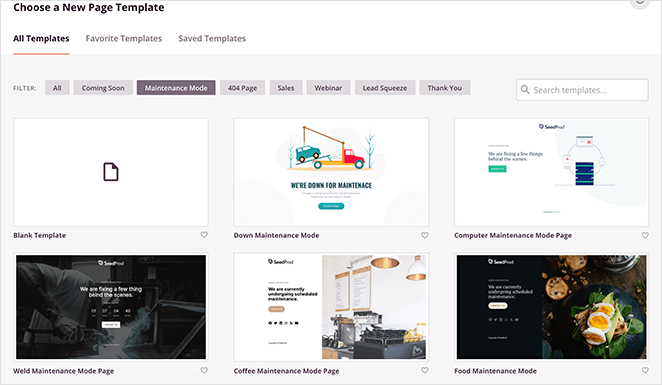
Als nächstes werden Sie von SeedProd aufgefordert, ein Thema für Ihre Seite auszuwählen.
Keine Sorge - Sie können aus einer Vielzahl von Themen und Vorlagen wählen, darunter auch Wartungsvorlagen und Vorlagen für die Seite "Demnächst". Wenn Sie die volle Kontrolle über das Design haben möchten, können Sie sogar mit einer leeren Vorlage beginnen.
Schritt 4. Anpassen Ihrer Wartungsmodus-Seite
Sobald Sie ein Thema ausgewählt haben, sehen Sie den Drag-and-Drop-Seiten-Builder von SeedProd.
Jetzt können Sie mit der Anpassung beginnen. Fügen Sie neue Elemente hinzu, ändern Sie das Design, schreiben Sie eine Nachricht für Ihre Besucher und laden Sie sogar Ihr eigenes Hintergrundbild hoch, das zu Ihrer Marke passt.
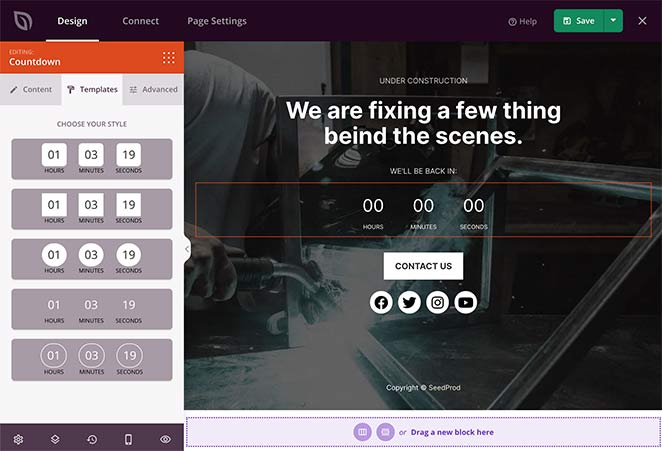
Hier finden Sie eine vollständige Schritt-für-Schritt-Anleitung, um Ihre WordPress-Website mit SeedProd in den Wartungsmodus zu versetzen.
Schritt 5. Wählen Sie, wann Ihre Wartungsseite angezeigt werden soll
Die meisten Wartungsmodus-Plugins zeigen nur eine Wartungsseite für die gesamte Website an. SeedProd ist jedoch fortschrittlicher und ermöglicht es Ihnen, auszuwählen, welche Seiten ausgeblendet werden sollen.
Vielleicht möchten Sie Ihre gesamte Website ausblenden, bis sie fertig ist, oder bestimmte Seiten oder Beiträge in der Zukunft.
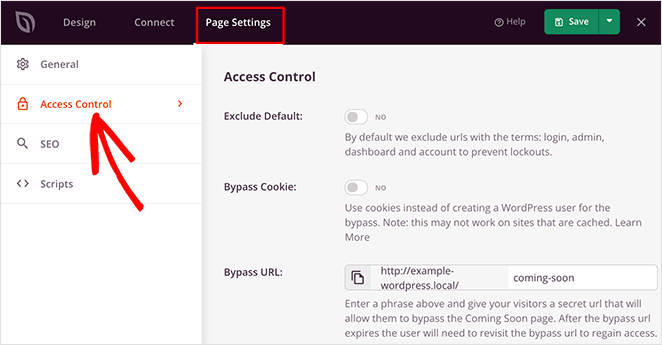
Das Verständnis dieser Funktion wird für die zukünftige Entwicklung hilfreich sein. Um zu verwalten, wo Sie Ihre Wartungsseite anzeigen, gehen Sie zu den Seiteneinstellungen im SeedProd Builder und klicken Sie auf Zugriffskontrolle.
Scrollen Sie dann nach unten zum Abschnitt URLs einschließen/ausschließen. Hier können Sie SeedProd mitteilen, wie es Ihre Website ausblenden soll.
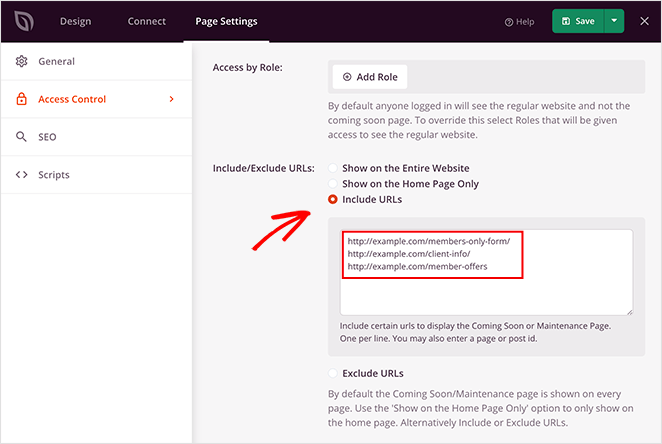
Hier erfahren Sie, was die verschiedenen Einstellungen der Zugriffskontrolle bedeuten:
- Auf der gesamten Website anzeigen: Dies ist die Standardeinstellung und die beste Wahl, um Ihre WordPress-Website zu verbergen, bis sie fertig ist. Jeder, der versucht, eine beliebige Seite auf Ihrer Website aufzurufen, sieht die Wartungsmodus-Seite im Frontend.
- Nur auf der Startseite anzeigen: Sie können diese Option verwenden, um Ihre neue Seite nur auf der Startseite Ihrer Website anzuzeigen. Alle anderen Seiten und Beiträge sind weiterhin öffentlich sichtbar.
- URLs einbeziehen: Mit dieser Einstellung können Sie bestimmte Seiten auswählen, die auf Ihrer Wartungsseite angezeigt werden sollen. Wenn Sie zum Beispiel neue Inhalte für eine Ihrer Seiten schreiben, können Sie nur diese eine Seite ausblenden und alles andere auf der Website sichtbar lassen.
- URLs ausschließen: Diese Einstellung bewirkt das Gegenteil von URLs einschließen. Sie verbirgt die gesamte Website mit Ausnahme der von Ihnen angegebenen Seiten. Wählen Sie diese Einstellung, um bestimmte Seiten zugänglich zu halten und den Rest auszublenden.
Zugriff auf eine versteckte WordPress-Site zulassen
Was ist, wenn Sie jemandem Zugang gewähren müssen, der sich nicht bei Ihrer Website anmelden kann? Dafür gibt es eine ziemlich einfache Lösung.
Im Bereich "Seiteneinstellungen" können Sie einen geheimen Zugangslink erstellen, mit dem Personen die Seite umgehen können, die Ihre WordPress-Site versteckt.
Auf der rechten Seite Ihres Bildschirms können Sie eine geheime Phrase erstellen, die einer eindeutigen Bypass-URL hinzugefügt wird.
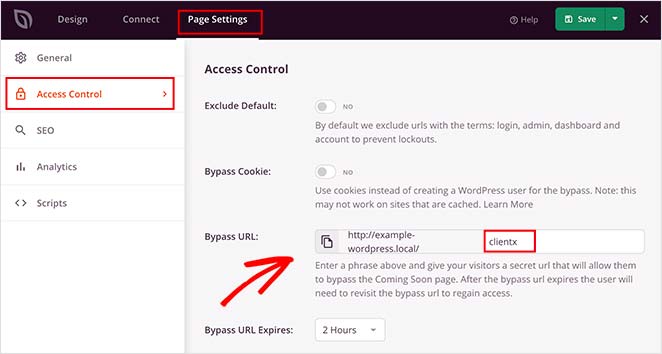
Dann können Sie diese URL an alle Personen senden, die Zugang zu Ihrer Website haben sollen, ohne dass diese die Aufbauseite sehen.
Es ist auch möglich, Ihrer Landing Page ein Passwort hinzuzufügen. Damit können Sie bestimmten Personen, z. B. Kunden, Zugang gewähren.
In diesem Leitfaden erfahren Sie alles über den Passwortschutz in WordPress.
Unterhalb des Abschnitts Bypass-URL befindet sich der Bereich Bypass nach IP. Damit können Besucher von bestimmten IP-Adressen Ihre Landing Page automatisch umgehen.
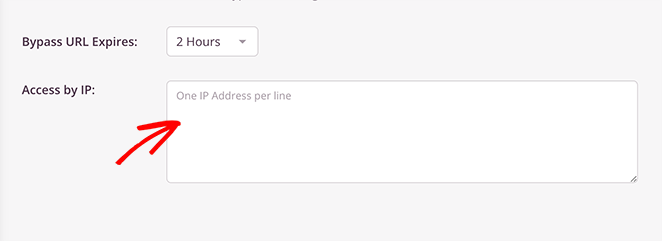
Sie müssen lediglich jede IP-Adresse in eine neue Zeile in dem dafür vorgesehenen Feld eintragen.
Schritt 6. Verstecken Sie Ihre WordPress-Website, bis sie fertig ist
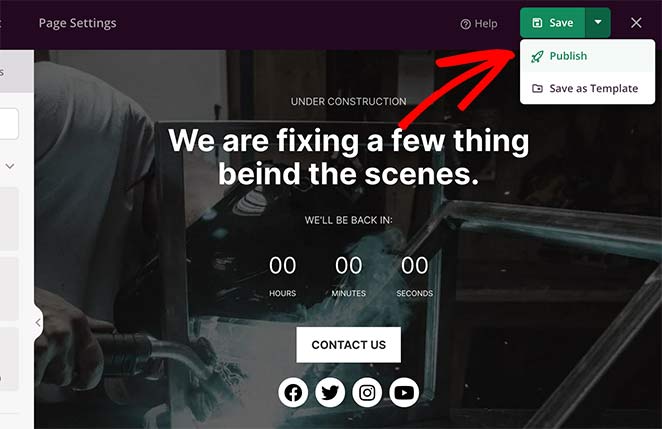
Wenn Sie zufrieden sind, können Sie Ihre Seite veröffentlichen. Wählen Sie dazu den Dropdown-Pfeil neben der Schaltfläche Änderungen speichern in der oberen rechten Ecke und klicken Sie auf Veröffentlichen.
SeedProd zeigt dann ein Popup-Fenster an, das Sie darüber informiert, dass Ihre Seite live ist.
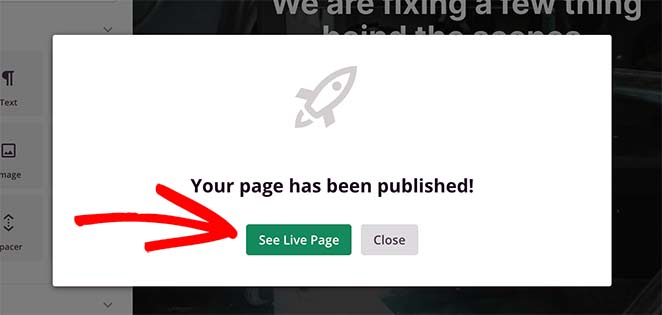
Dann können Sie auf die Schaltfläche Live-Seite anzeigen klicken, um zu sehen, wie Ihre Wartungsseite aussieht.
Hier ein Beispiel von einer Seite, die ich auf meiner Test-Website erstellt habe:

Aktivieren Sie nun Ihre Wartungsseite, indem Sie zurück zu SeedProd " Landing Pages gehen und dann den Schalter für den Wartungsmodus von Inaktiv auf Aktiv stellen.
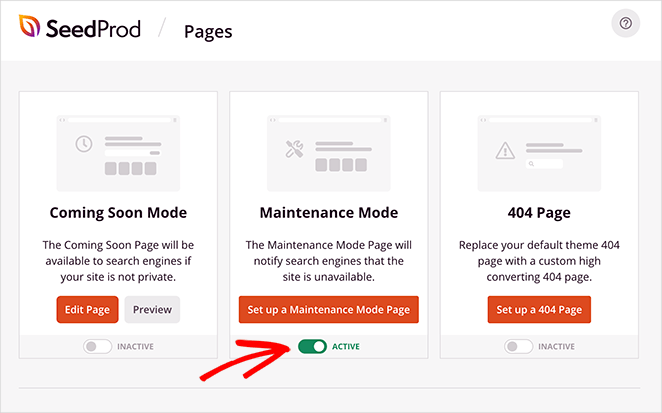
Herzlichen Glückwunsch! Sie haben Ihre WordPress-Website versteckt.
Wie schaltet man den WordPress-Wartungsmodus aus?
Wenn Sie die obigen Schritte zur Einrichtung der Wartung befolgt haben, werden Sie sie irgendwann deaktivieren wollen.
Um den WordPress-Wartungsmodus zu deaktivieren, gehen Sie auf die SeedProd-Einstellungsseite, indem Sie auf das SeedProd-Symbol in Ihrem WordPress-Dashboard klicken.
Klicken Sie dann auf den Kippschalter unter dem Abschnitt Wartungsmodus, um ihn von Aktiv auf Inaktiv zu stellen.
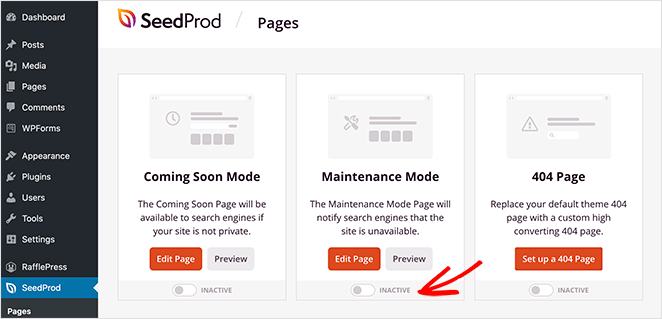
Jetzt ist Ihre Website nicht mehr vor den Besuchern versteckt.
Was ist, wenn Sie lieber kein Plugin verwenden möchten, um eine Wartungsseite einzurichten? Ich habe eine Anleitung dafür.
How to Hide a WordPress Site Without Plugins (3 Options)
If you prefer not to install a plugin, there are still a few ways to make your WordPress site private while you build it. Just keep in mind these methods have fewer design options than using a tool like SeedProd.
Option 1: Use WordPress Settings to Block Search Engines
- Go to Settings » Reading in your WordPress dashboard.
- Check the box next to “Discourage search engines from indexing this site.”
- Click Save Changes.

This doesn’t fully hide your site, but it helps keep it out of Google while you work on it. People can still access it if they have the direct link.
Option 2: Password Protect Your Site
Some hosting providers like Bluehost or SiteGround let you add password protection at the server level. You can also password protect pages inside WordPress using this guide: How to Password Protect a WordPress Site.
Option 3: Use a .htaccess Rule (Advanced)
If you’re comfortable editing code, you can add a rule to your .htaccess file to block all visitors except yourself. I only recommend this if you know how to work with FTP or your file manager.
Takeaway: You can hide your WordPress site using built-in settings or .htaccess rules, but plugin-free options come with limitations in design and flexibility.
How to Make Individual WordPress Pages Private (Bonus Tip)
Sie können auch ein WordPress-SEO-Plugin verwenden, um einzelne Seiten oder Beiträge vor Google zu verbergen, während der Rest Ihrer Website sichtbar bleibt.
Wir verwenden dafür ein beliebtes Plugin namens All In One SEO:
- Herunterladen und Installieren: Holen Sie sich das All In One SEO-Plugin aus dem WordPress-Plugin-Verzeichnis und installieren Sie es auf Ihrer Website.
- Bearbeiten Sie eine Seite oder einen Beitrag: Gehen Sie zu der Seite oder dem Beitrag, den Sie ausblenden möchten, und klicken Sie auf "Bearbeiten".
- Suchen Sie die All-in-One-SEO-Einstellungen: Scrollen Sie unterhalb des Haupteditors nach unten, bis Sie den Bereich All in One SEO-Einstellungen sehen.
- Markieren Sie "NOINDEX": Suchen Sie den Abschnitt "NOINDEX this page/post". Markieren Sie das Kästchen.
- Veröffentlichen Sie Ihre Änderungen: Speichern oder aktualisieren Sie Ihre Seite oder Ihren Beitrag.
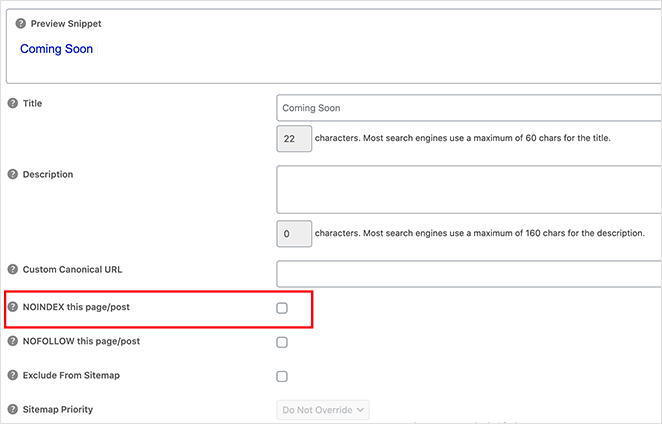
Dadurch werden Suchmaschinen angewiesen, die ausgewählte Seite oder den ausgewählten Beitrag nicht in den Suchergebnissen anzuzeigen.
Takeaway: SEO plugins like AIOSEO can help you hide specific pages from search engines, a great option if your whole site doesn’t need to stay private.
Häufig gestellte Fragen
Erste Schritte zum Verstecken Ihrer WordPress-Website
Now that you’ve seen how easy it is to hide your WordPress site, you don’t have to stress about visitors seeing an unfinished mess.
Whether you’re starting from scratch or making updates to a live site, SeedProd gives you full control — no coding, no guesswork.
Want to keep things private while you build? Get SeedProd here and start working on your site without the pressure.
Ich hoffe, Sie haben diesen Leitfaden hilfreich gefunden. Wenn Sie an weiteren hilfreichen WordPress-Tutorials interessiert sind, schauen Sie sich diese an:
- Wie man eine Verkaufsseite mit WordPress erstellt (Schritt für Schritt)
- Wie man eine "Coming Soon"-Seite in WordPress erstellt.
- 6+ Beste Fotogalerie WordPress Plugins (Expertenauswahl)
- Anpassen von WordPress-Postauszügen (ohne Code)
Vielen Dank fürs Lesen! Wir würden uns freuen, Ihre Meinung zu hören. Bitte hinterlassen Sie einen Kommentar mit Ihren Fragen und Ihrem Feedback.
Sie können uns auch auf YouTube, X (früher Twitter) und Facebook folgen, um weitere hilfreiche Inhalte für Ihr Unternehmen zu erhalten.

