

TL;DR: How to Customize Your WordPress Menu
There are 4 ways to customize your WordPress menu, depending on your theme and how much control you need.
- Appearance → Menus – add, reorder, and remove menu items on classic themes
- SeedProd – full design control over colors, fonts, and layout, plus site-wide headers
- WordPress Site Editor – built-in option for block themes
- Custom code – adds new menu locations to your theme
Your menu looks fine to you. But visitors keep landing on the wrong pages, or giving up and leaving.
Maybe the links don’t point where they should. Maybe the default style blends into the background and doesn’t match your brand. Or you’ve just published a new page and can’t figure out how to add it to the menu without breaking the layout.
I’ve spent 15+ years working with WordPress, and menus are one of those things that sound simple until you try to change one. In this guide, I’ll show you how to edit your WordPress menu (add, reorder, and remove items) and how to customize the way it looks, using 4 methods.
The fastest way to customize your WordPress menu is through Appearance → Menus in your dashboard. There you can add pages, reorder items, create dropdowns, and set a display location. For full design control over fonts, colors, and layout, use SeedProd’s drag-and-drop builder. For block themes, use the WordPress Site Editor.
Here’s how the main options compare at a glance:
| Feature | Built-in Editor | SeedProd | Site Editor |
|---|---|---|---|
| Visual drag-and-drop editing | No | Yes | Partly |
| Works with your theme | Classic themes | Any (Theme Builder replaces your theme) | Block themes only |
| Dropdown (submenu) support | Yes | Yes (via WordPress Menu option) | Yes |
| Style fonts and colors without CSS | Rarely | Yes | Yes |
| Free to use | Yes (built-in) | Paid (Pro) | Yes (built-in) |
How Do I Customize a WordPress Menu Using the Default Editor?
The easiest way to get started is with the built-in menu editor at Appearance → Menus. It works with classic themes and most non-block themes, and you don’t need any extra plugins.
I’ve used this editor for years, and it’s still the fastest way to build a basic navigation structure.
Note: If you don’t see Appearance → Menus in your dashboard, your site is running a block theme (such as Twenty Twenty-Five). Skip ahead to the Site Editor method instead.
Step 1. Create a New Menu
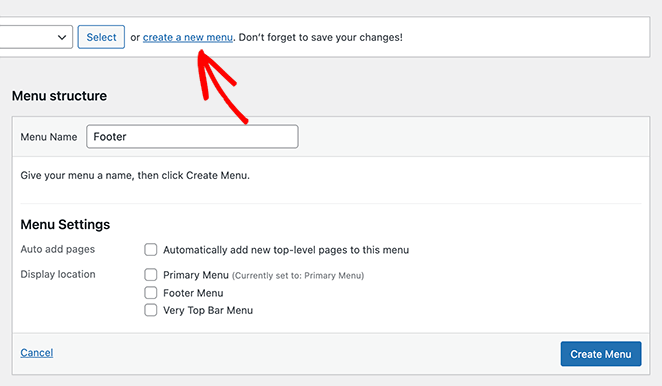
Go to Appearance → Menus from your WordPress dashboard. Enter a menu name at the top, like “Main Menu,” and click Create Menu.
If you already have a menu, select it from the drop-down at the top instead. That way you’re editing the right menu, not accidentally creating a new one.
Step 2. Add Pages, Posts, or Custom Links
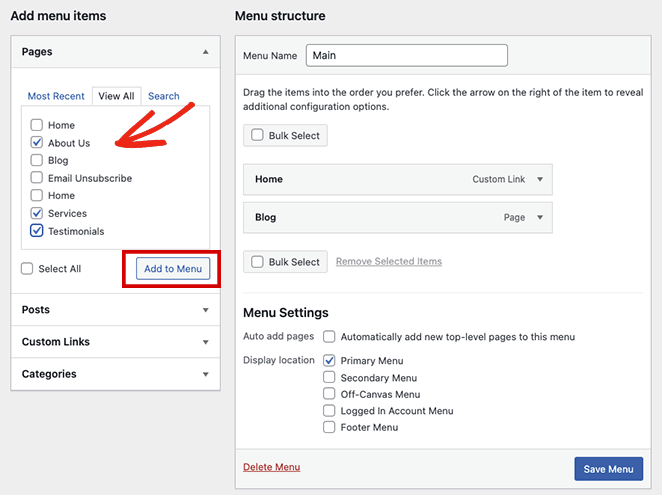
On the left, check the pages or posts you want to add and click Add to Menu. You can also include categories, tags, or any URL with custom link text by expanding the panels on the left.
Step 3. Reorder Items and Create Dropdown Menus
After adding items, drag and drop them into the order you want. Items at the top of the list appear first in your menu.
To create a dropdown, drag a menu item slightly to the right, underneath another item. It will indent, which is how WordPress recognizes it as a submenu. The parent item becomes the top-level link, and the indented item appears in the dropdown when a visitor hovers over it.
Step 4. Remove Menu Items
To remove an item, click the arrow next to it to expand its settings, then click Remove. This takes it out of the navigation menu without deleting the page from your site.
Step 5. Assign a Display Location
Scroll down to Menu Settings and check a display location.
Options vary by theme and may include:
- Primary Menu
- Secondary Menu
- Off-Canvas Menu
- User Account Menu
- Footer Menu
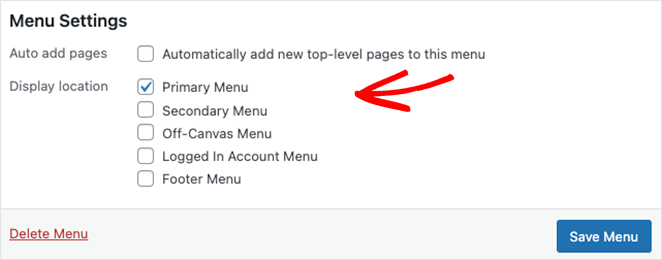
Step 6. Save the Menu
Click Save Menu and your menu appears in the location you selected.
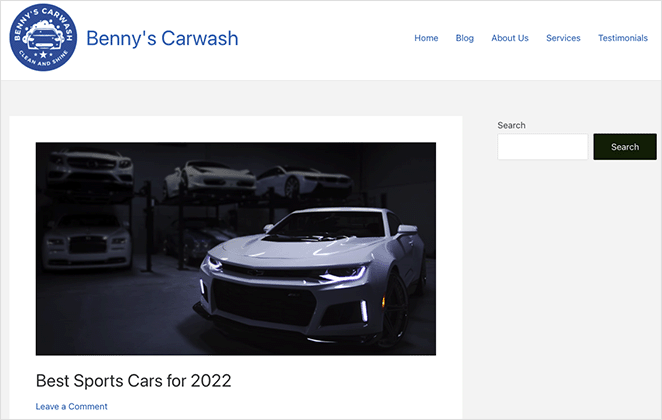
This method handles structure and ordering, but gives limited styling control. For full design control over fonts, colors, and layout, try the SeedProd method below.
How Do I Customize My WordPress Menu with a Page Builder?
For more control over your menu’s appearance, a page builder plugin is the way to go. I’ll use SeedProd in this example, but similar principles apply to any other page builder.

SeedProd is a drag-and-drop website builder for WordPress that gives you complete visual control over your navigation without touching code. You see every change live as you make it: fonts, colors, menu links, buttons, and layout all adjust in real time.
With SeedProd, you can create custom pages, menus, and entire themes in one place. You can even use it to add custom menus to your website footer, header, sidebar, and page content.
Below, I’ll use the Theme Builder to edit the site-wide navigation bar that appears on every page. If you only need a menu on a single standalone page, you can create a landing page instead and drag the same Nav Menu block into its header.
Step 1. Install SeedProd
First, download the SeedProd plugin and install and activate it on your WordPress site.
For help with this step, you can follow our guide on how to install SeedProd.
Then head to SeedProd » Settings, paste your license key, and click Verify Key to unlock the Theme Builder feature.
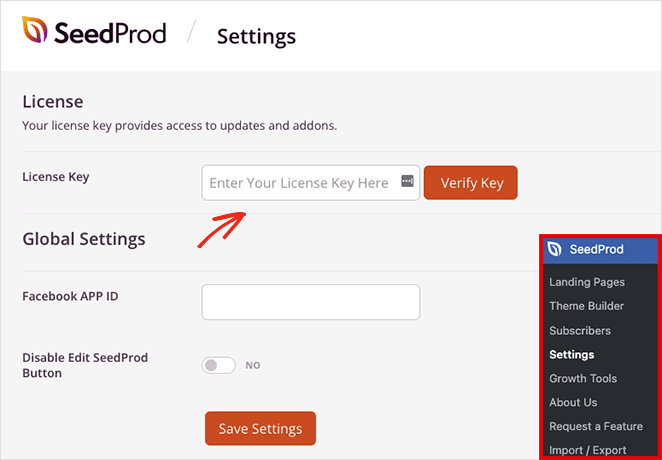
Step 2. Open the Theme Builder and Choose a Template
Go to SeedProd » Theme Builder in your WordPress dashboard to start creating your custom theme and navigation menu.
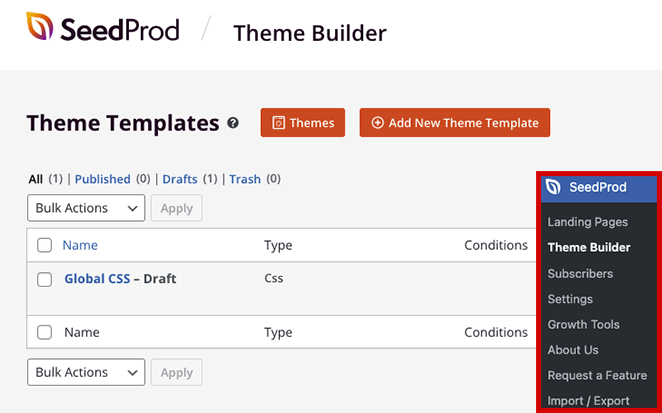
The fastest way to set up your navigation is to start with a premade WordPress theme template. Each template includes all the parts of a site (header, footer, homepage, and blog), so you only need to customize the design.
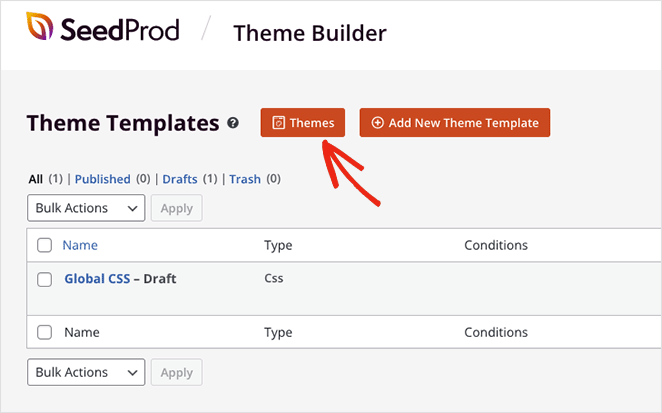
From the Theme Builder dashboard, click Themes to open the template gallery. You can preview designs in a new tab and pick one that fits your business.
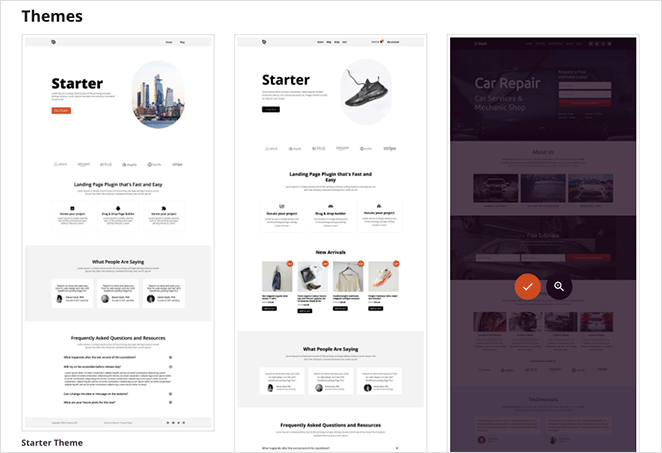
For this tutorial, I’ll use the Car Maintenance theme, but you can choose any template. Click the orange checkmark to import it into your site.
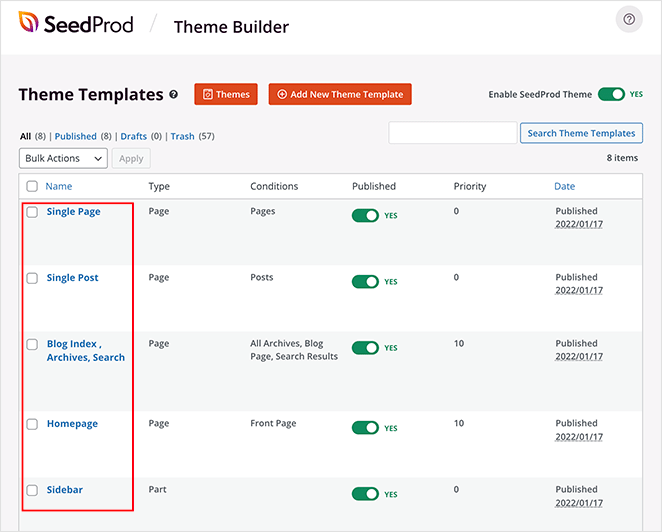
Once imported, SeedProd automatically creates your site’s structure, including the header, footer, and blog pages. You can now open any part in the drag-and-drop editor to start customizing.
Step 3. Customize the Header Template
Your navigation bar lives inside the header template. SeedProd’s premade themes usually add one automatically, so all you need to do is open the header and customize it.
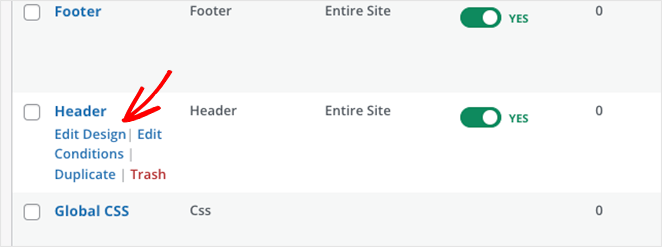
To edit your header, hover over the Header template in the Theme Builder and click Edit Design. This opens the live drag-and-drop editor.
Click any element in the preview to edit it. The settings panel appears on the left, where you can change text, styling, and functionality.
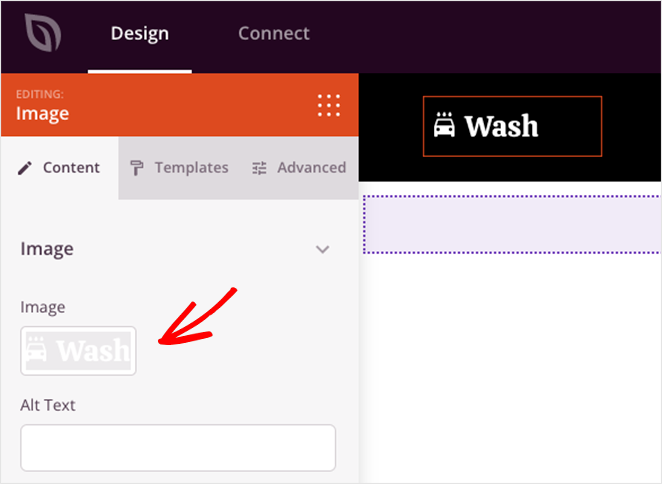
For example, click the logo block to delete the placeholder logo and upload your own from the WordPress media library.
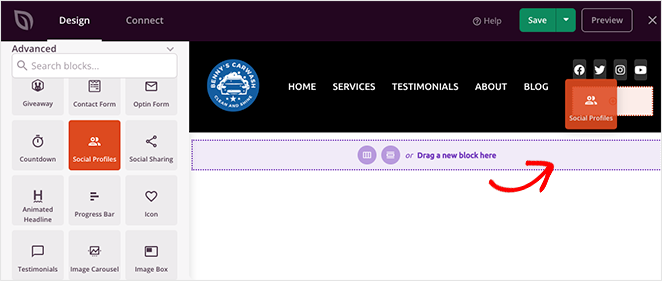
You can also drag new blocks, like social media icons, a search bar, or custom buttons, into the header to expand your navigation bar.
With the header basics covered, you’re ready to edit the navigation menu itself in the next step.
Step 4. Edit the Nav Menu Block
SeedProd uses a Nav Menu block to display your site’s navigation. This block gives you two ways to manage menus: a simple option for quick links or a WordPress Menu option for advanced control.
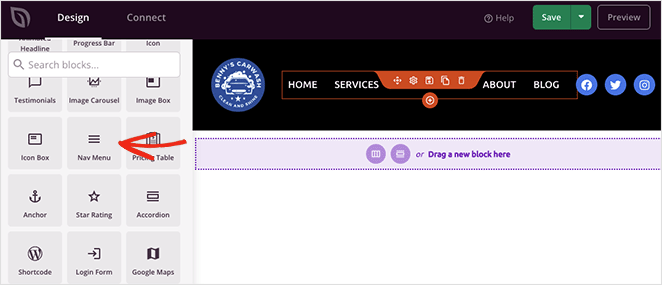
Option 1: Simple Menu
Add links directly inside the builder to any page, post, category, tag, or external URL. It’s fast to set up but doesn’t support dropdown menus or existing WordPress menus.
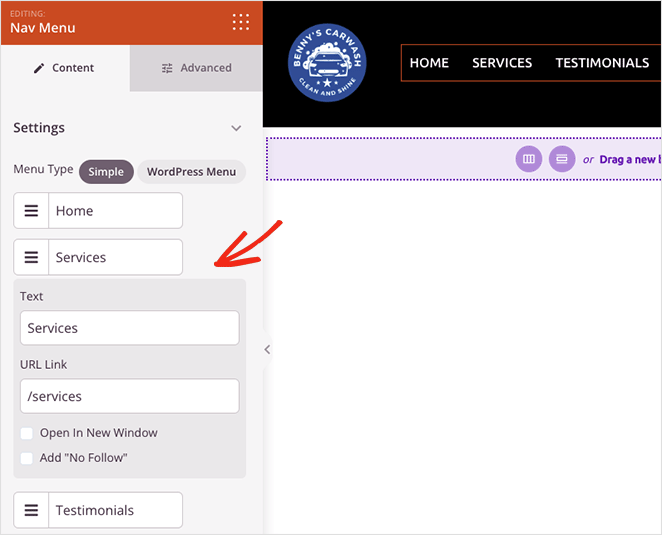
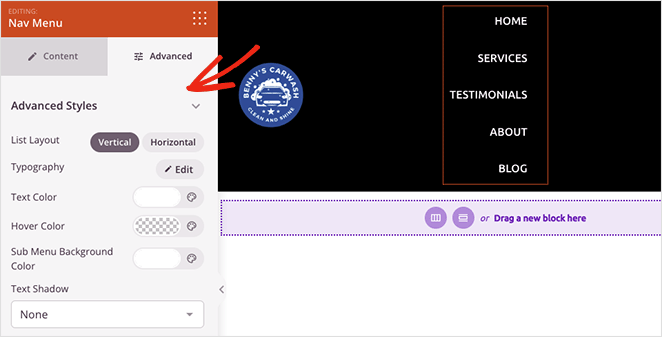
You can style the Simple menu with options for alignment, font size, spacing, and dividers. In the Advanced tab, switch between horizontal or vertical layouts and adjust typography, colors, text shadows, hover colors, and borders.
Option 2: WordPress Menu
Select a menu you’ve already created in the WordPress menu editor from the drop-down. This option supports dropdowns and mobile navigation, and inherits the flexibility of WordPress’s built-in Appearance » Menus settings.
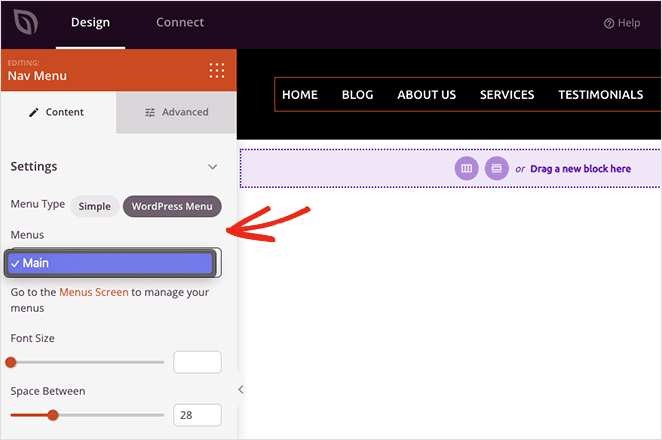
You’ll also see a quick link back to the default WordPress menu page, where you can adjust your menu structure. As with the Simple menu, the Advanced tab lets you customize fonts, colors, shadows, visibility by device, and more.
You can even display your menu in a vertical or horizontal layout. The vertical design works well for sidebar widget areas and footer menu locations.
How to Add a Menu Button in WordPress
A menu button is a great way to highlight actions like “Sign Up” or “Get Started.” In SeedProd, you can add one with the Button block.
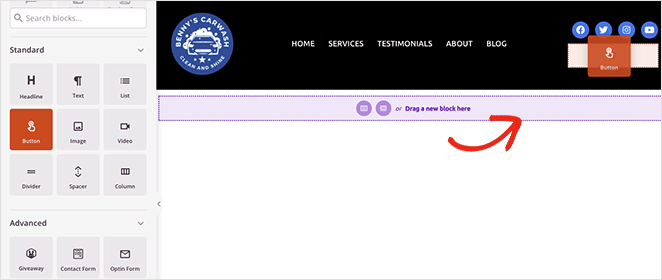
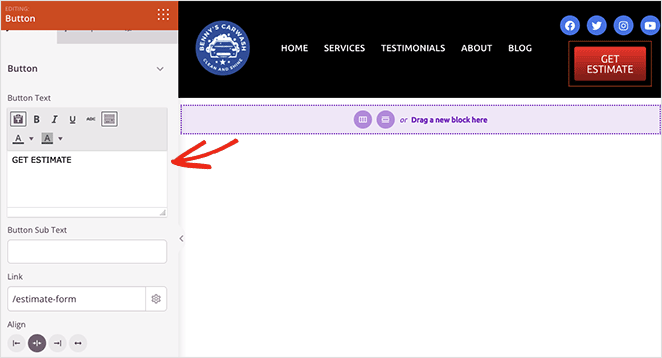
From the left-hand sidebar, drag the Button block into your header. Then customize the call to action text, link, and styling directly in the settings panel.
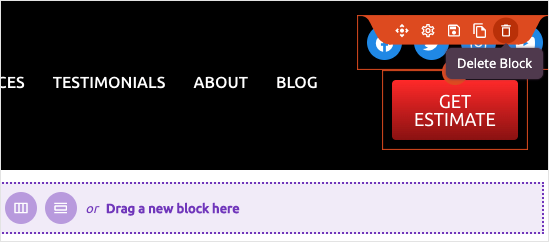
Pro Tip: Remove any elements you don’t need by hovering over them and clicking the trashcan icon.
When your menu looks the way you want, click Save in the top-right corner and close the editor to return to the Theme Builder dashboard.

Conversion tip: Your navigation bar doesn’t have to be just links. Adding a “Get a Quote” or “Book a Demo” button that links to a dedicated landing page turns your header into a conversion tool. I’ve seen sites double their lead form submissions just by making that CTA visible on every page.
Step 5. Publish Your Custom Theme
After editing your menu and header templates, you’re ready to make the changes live. Find the Enable SeedProd Theme toggle on the Theme Builder page and turn it to the “On” position.
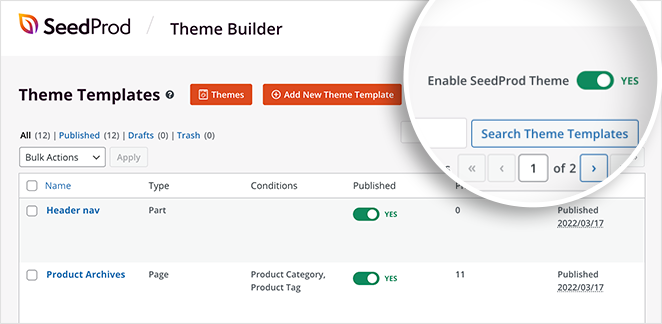
Now head to your home page to see your new custom navigation menu live on your site.

How Do I Customize a Menu Using the WordPress Site Editor?
The first two methods work for any website, regardless of which theme you use. However, if you’re using a block-based WordPress theme, like Twenty Twenty-Five, you may prefer using the WordPress site editor to customize your menu.
Please note: this method doesn’t work with every theme or let you customize every part of the menu.
To open the site editor, navigate to Appearance » Editor from your WordPress dashboard.
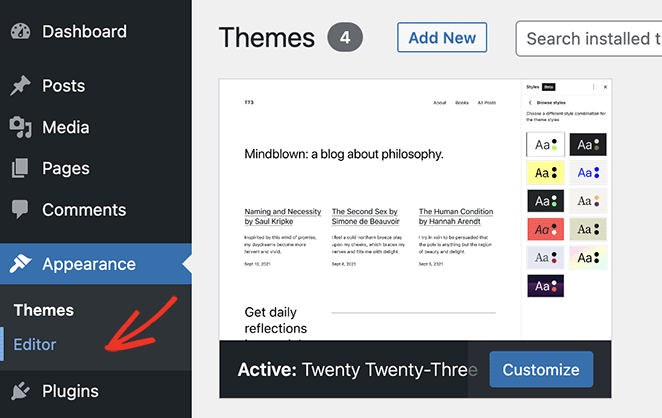
On the next screen, click the Patterns tab. In WordPress 6.5 and later, look under Patterns → Template Parts if you don’t see the Header option immediately.
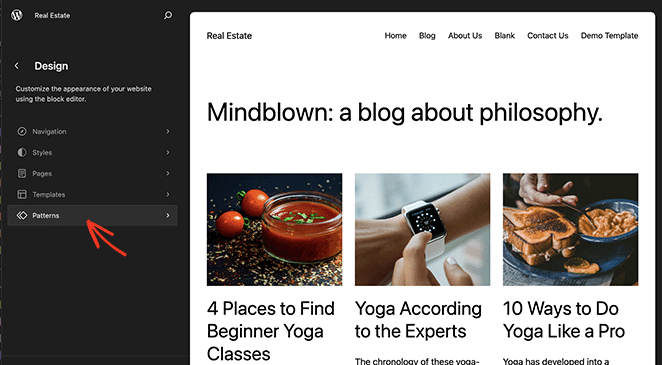
From there, click the Header option and choose your Header template.
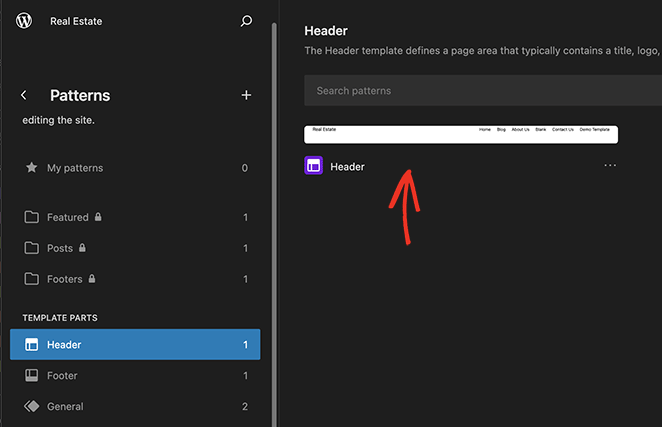
Here, you can drag and drop to rearrange the menu position or remove items from the menu.
You can also click the pencil icon to edit the menu styling.
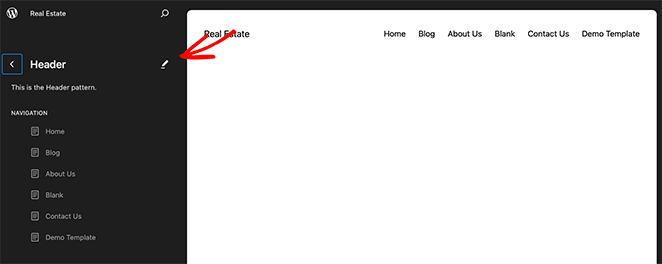
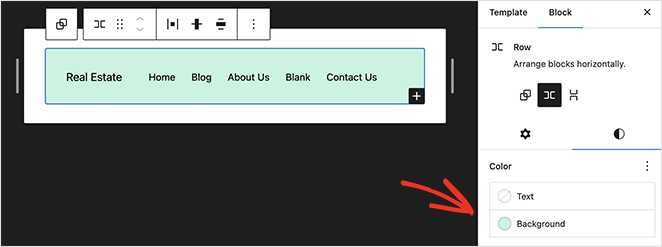
For example, you can adjust the menu background color, fonts, padding, margins, borders, and more.
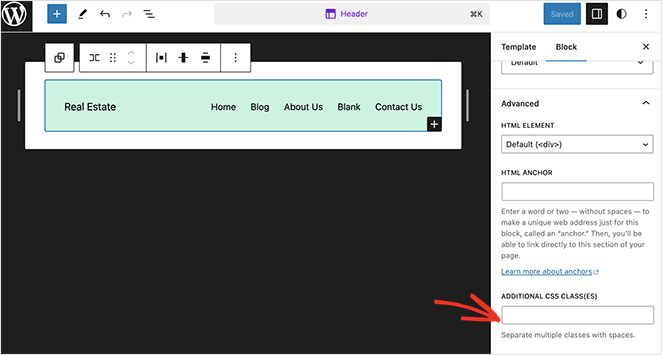
If you scroll down to the Advanced tab, you can enter custom CSS classes.
To add another menu option, like a header button, click the Add Block icon.
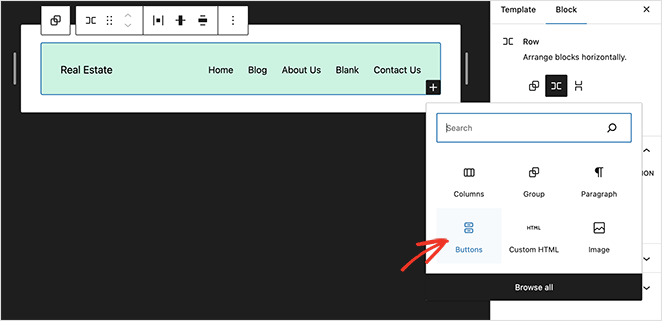
Now you can search for a block and click it to add it to your menu and customize it like any other WordPress block.
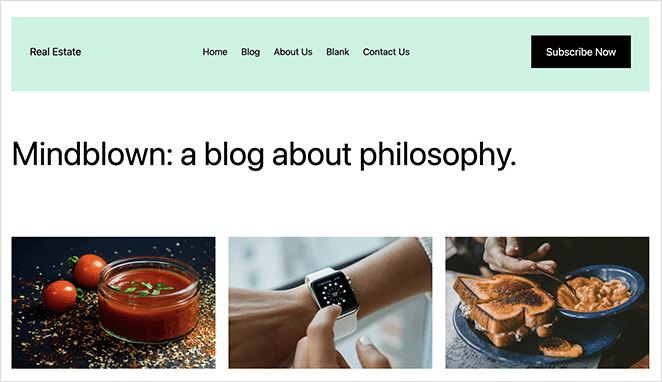
When you’re happy with the menu settings and customizations, click the Save button.
You can now visit your site to see your custom menu.
How Do I Add a Custom Menu in WordPress Without a Plugin?
If you don’t want to set up a page builder plugin and don’t have a WordPress block theme, you can always use code to add a custom navigation menu.
For this, I recommend using a WordPress code snippet plugin like WPCode. It’s the safest and easiest way to add custom code to WordPress without editing core WordPress files, like your functions.php file.
To do this, install the free WPCode plugin, then go to Code Snippets » Add Snippet from your WordPress dashboard.
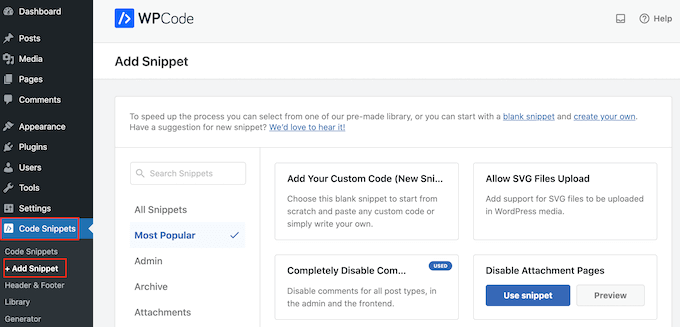
On this page, you’ll see ready-made snippets you can add to your site with a few clicks.
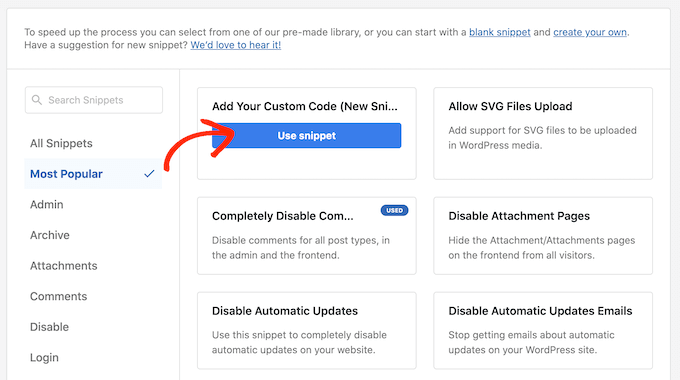
For this tutorial, I want to make my own snippet, so hover your mouse over ‘Add Your Custom Code,’ and click the Use snippet button.
Now enter a title for your snippet, open the “Code Type” dropdown, and click PHP Snippet.
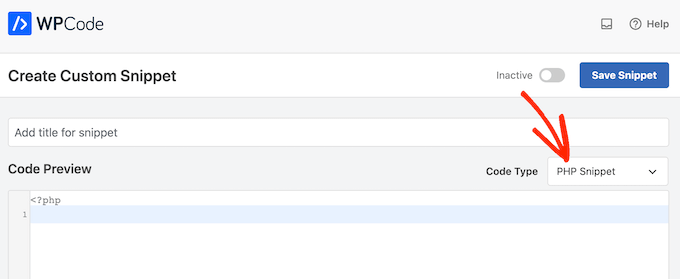
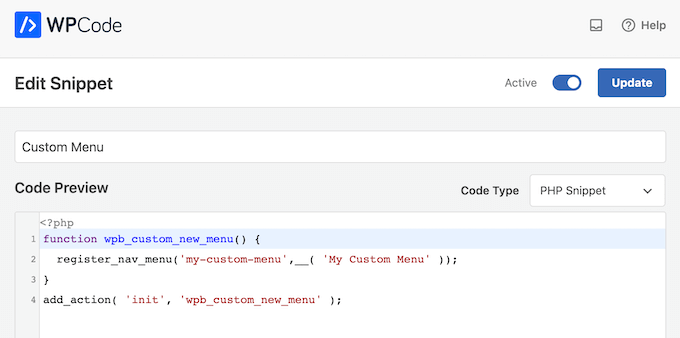
Next, paste the following snippet into the code editor:
function wpb_custom_new_menu() {
  register_nav_menu('my-custom-menu',__( 'My Custom Menu' ));
}
add_action( 'init', 'wpb_custom_new_menu' );
This snippet adds a new menu location to your theme, “My Custom Menu.”
Once you’ve done that, scroll down to the insertion options and choose the “Auto Insert” method to add the snippet across your entire site.
From there, open the “Location” dropdown menu and click Run Everywhere.
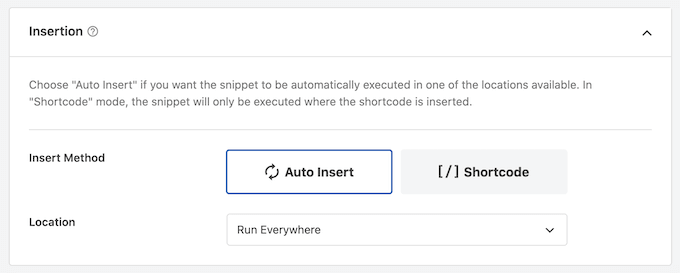
Now you can scroll to the top of the screen and click on the “Inactive” toggle to change it to “Active.”
Finally, click Save to make the snippet live.
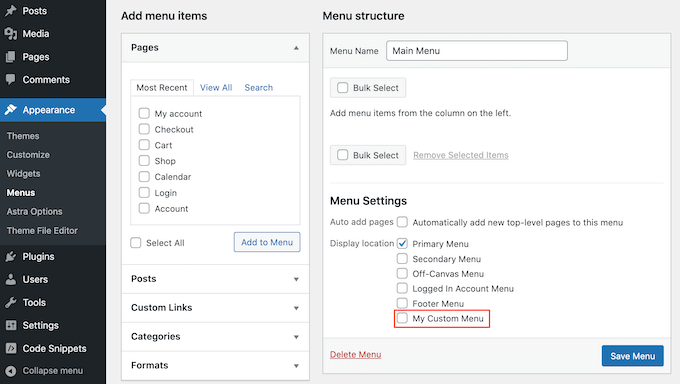
Now, head to Appearance » Menus and see the ‘Display location’ area.
You should see a new ‘My Custom Menu’ option in this area where you can add menu items.
The next step is to add your custom menu to your WordPress theme.
You can show a custom navigation menu anywhere on your site by adding code to your theme’s template file.
Simply go to Appearance » Theme File Editor.
Then, in the right-hand menu, find the template where you want to add the menu, such as your website’s header.
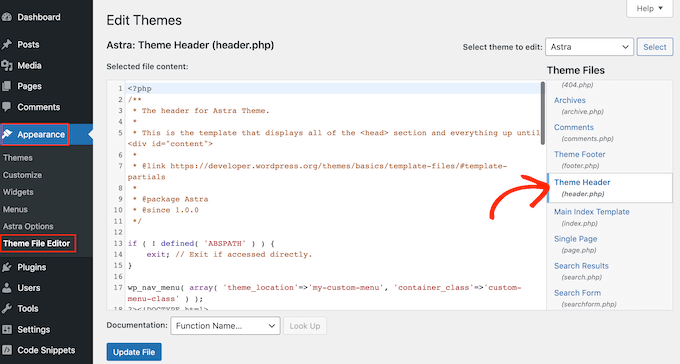
Now you’ll need to add a wp_nav_menu function and specify the name of your custom menu. For example, in the following code snippet, I’m adding My Custom Menu to the theme’s header:
wp_nav_menu( array( 'theme_location'=>'my-custom-menu', 'container_class'=>'custom-menu-class' ) );After adding the code, click the Update File button to save your changes.
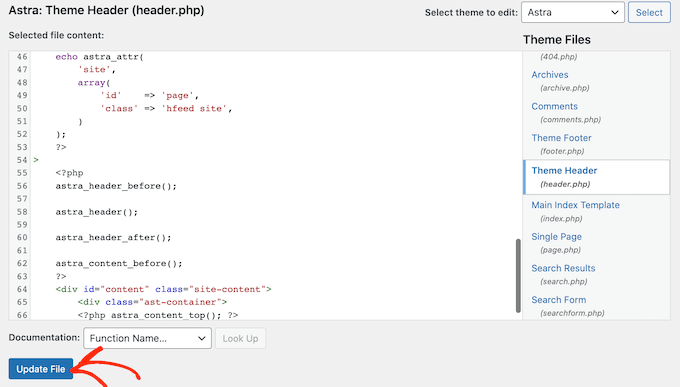
Now if you visit your site, you’ll see the custom menu in action, however, you’ll notice it appears in a simple bullet list.
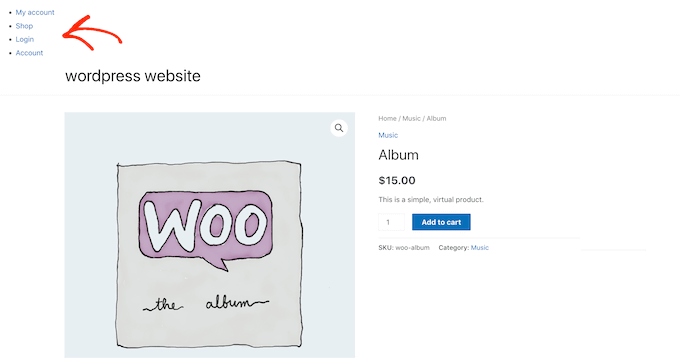
You can style the menu to better match your WordPress theme or branding by adding custom CSS code to your site.
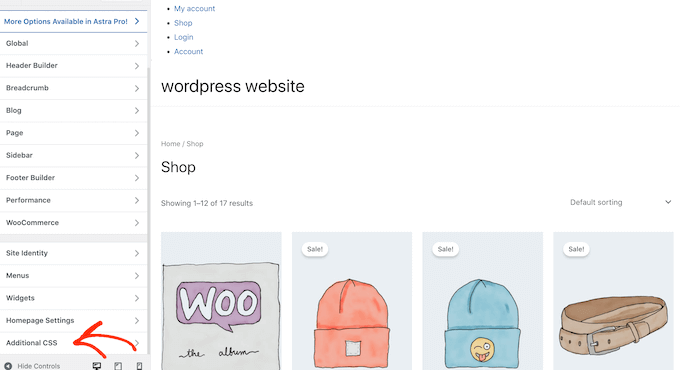
To do this, go to Appearance » Customize and click on Additional CSS in the WordPress customizer.
This opens an editor where you can type your custom CSS.
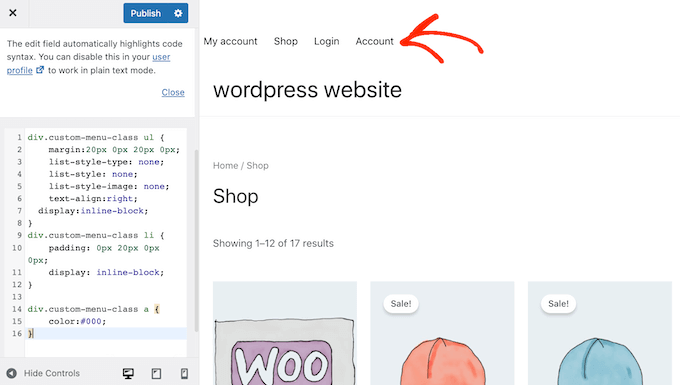
Now you can style your menu using the CSS class you added to your theme template. In my example, it’s .custom_menu_class.
In the following code, I’m adding margins and padding, setting the text color to black, and arranging the menu in a horizontal layout:
div.custom-menu-class ul {
    margin:20px 0px 20px 0px;
    list-style-type: none;
    list-style: none;
    list-style-image: none;
    text-align:right;
    display:inline-block;
}
div.custom-menu-class li {
    padding: 0px 20px 0px 0px;
    display: inline-block;
}

div.custom-menu-class a {
    color:#000;
}
The WordPress customizer updates automatically so you can see how the menu looks with the new style. If you’re happy with the changes, then Publish to make them live.
Frequently Asked Questions
How do I customize my WordPress navigation menu?
The fastest way is to go to Appearance → Menus in your WordPress dashboard. Add the pages or posts you want, assign the menu to a display location like Primary Menu, and click Save Menu. For more design control over fonts, colors, and layout, use SeedProd’s drag-and-drop builder or the WordPress Site Editor for block themes.
How do I edit the navigation menu in a WordPress website?
Go to Appearance → Menus in your WordPress dashboard and select the menu you want to edit. Add or remove items, reorder them by dragging, and click Save Menu. Editing a menu doesn’t affect your pages or posts, it only controls which links appear in your navigation. If you’re using a block theme, use the WordPress Site Editor at Appearance → Editor to edit the navigation block directly.
Why can’t I find the Menus option under Appearance in WordPress?
If you don’t see Menus under Appearance, your site is running a block theme (such as Twenty Twenty-Four or Twenty Twenty-Five). Block themes manage navigation through the Site Editor, not the classic Menus screen. Go to Appearance → Editor, then look for the Navigation section to edit your site menu. Alternatively, SeedProd works with any theme and gives you full visual control over your navigation without the Site Editor.
Can I customize a WordPress menu without a plugin?
Yes. WordPress includes a built-in menu editor at Appearance → Menus that works without any plugins. For block themes, use the WordPress Site Editor. To add a custom menu location, use a short PHP snippet with a code plugin like WPCode. The trade-off is that styling is limited to whatever your theme supports, so if you want to change fonts, colors, or layout without writing CSS, a visual builder like SeedProd is the easier path.
How do I add a dropdown menu in WordPress?
In Appearance → Menus, drag a menu item slightly to the right under a parent item. WordPress indents it and treats it as a dropdown. You can nest up to three levels deep. For control over the dropdown’s visual style, SeedProd’s Nav Menu block includes built-in hover effects, colors, and layout options.
How do I make my WordPress menu sticky (fixed on scroll)?
A sticky navigation bar stays visible as visitors scroll down the page. In SeedProd, open the Header template in the Theme Builder, click on the header row, and look for the Sticky Header option in the settings panel on the left. Toggle it on and save. For the built-in WordPress menu editor, sticky behavior depends on your theme. Many themes include a sticky header option in the Customizer (Appearance → Customize). If yours doesn’t, you’ll need a plugin or custom CSS to add it.
More WordPress Navigation Tips
If you want full design control over your WordPress navigation, SeedProd makes it easy to build custom menus, headers, and layouts without touching code. Get SeedProd Now
- How to Edit Mobile Menus in WordPress (Beginner’s Guide)
- How to Add a WooCommerce Shopping Cart Icon In Menus
- How to Make a Landing Page Without Navigation (Easy Way)
Thanks for reading! We’d love to hear your thoughts, so please feel free to join the conversation on YouTube, X and Facebook for more helpful advice and content to grow your business.