Want to learn how to edit navigation bar in WordPress?
Even though your WordPress theme controls the look of your navigation menus, you can edit them with a WordPress plugin or CSS to add customizations that better suit your needs.
In this article, we’ll show you how to edit menus in WordPress and customize them easily.
Why Edit Your WordPress Menu?
A navigation menu helps website visitors move around your website with ease.
With a good navigation structure, users can easily browse for the content that keeps them on your WordPress site longer and taking action. For example, after reading a page or blog post, visitors might decide to sign up for your email newsletter.
The default WordPress menu lists existing WordPress pages. Yet a navigation menu lets you change the default menu to one with custom links and buttons for any type of content. That allows you to streamline your website’s navigation for the best user experience.
Now that you know the benefits of editing your WordPress navigation, we’ll jump into the different methods for doing it.
How to Edit Navigation Bar in WordPress: 2 Methods
Below, we’ll share 2 different ways to change your WordPress navigation. Both methods are straightforward; however, the first example offers many more customization options.
Method 1. How to Edit Navigation Bar in WordPress with SeedProd
First, we’ll show you how to edit menus in WordPress with a powerful drag-and-drop page builder. Instead of coding your menu changes manually, page builders let you customize many areas of your site’s design without code.

The plugin we’ll use for this method is SeedProd, the best website builder for WordPress. It comes with a visual drag-and-drop editor, allowing you to customize your entire WordPress site without hiring a developer.
With SeedProd, you can create custom WordPress themes, build high-converting landing pages, and boost your lead generation efforts with customizable templates, blocks, and sections. It also has dedicated navigation menu elements you can edit by pointing and clicking.
SeedProd can also help you:
- 近日公開ページを作成する
- Eメールリストを増やす
- WordPressをメンテナンスモードにする
- Build custom 404 pages
- WordPressのログインページをカスタマイズする
- Embed social media content
- Create WooCommerce themes
- そしてもっと。
Without further ado, here are the steps to edit menus in WordPress with SeedProd.
ステップ1.SeedProdプラグインをインストールする
First, visit the SeedProd pricing page and choose your plan. SeedProd does offer a free version; however, we’ll use SeedProd Pro for the Theme Builder feature.
After that, log into your SeedProd account and click the Downloads tab. On this screen, you can download the plugin .zip file and click the clipboard icon to copy your license key.
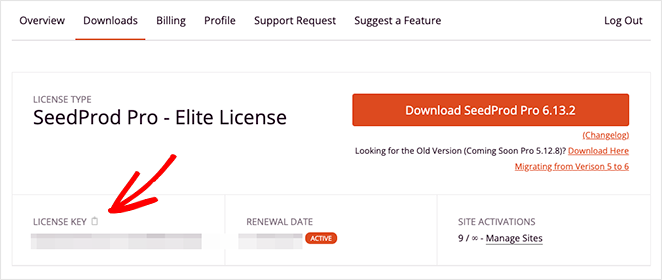
Next, head to your WordPress website and install and activate SeedProd. If you’ve never done this before, follow this guide on installing a WordPress plugin.
Once the plugin is active, navigate to SeedProd » Settings from your WordPress admin and paste your key into the License Key field. Click the Verify Key button to save your license before moving on.
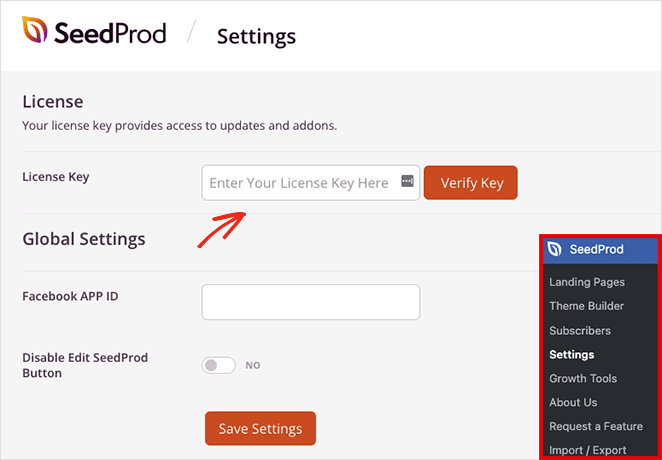
Now, go to the SeedProd » Theme Builder page, where you can start building a new WordPress theme.
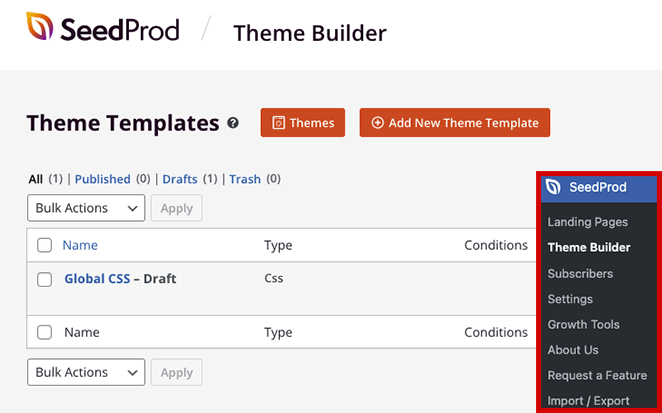
Note: For this tutorial, we’ll create a new menu using SeedProd’s Theme Builder functionality. If you’re looking to keep your existing WordPress theme, you can use the same approach in Step 4 by creating a landing page with SeedProd.
Step 2. Choose a WordPress Theme Template
SeedProd makes it easy to edit any part of your WordPress site without code, but first, you’ll need to create the basic framework for your theme.
The easiest way is to choose one of the premade WordPress theme templates. They come with all the parts that make up your theme ready-made, so all you need to do is customize them with your website content.
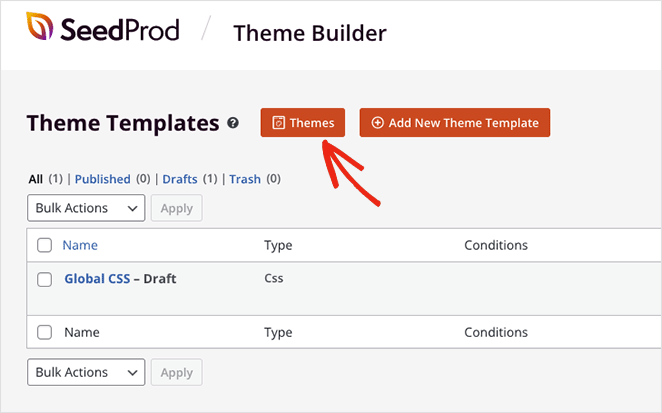
To choose a theme template, click the Themes button from the Theme Builder page. This will open a gallery of templates you can preview in a new tab.
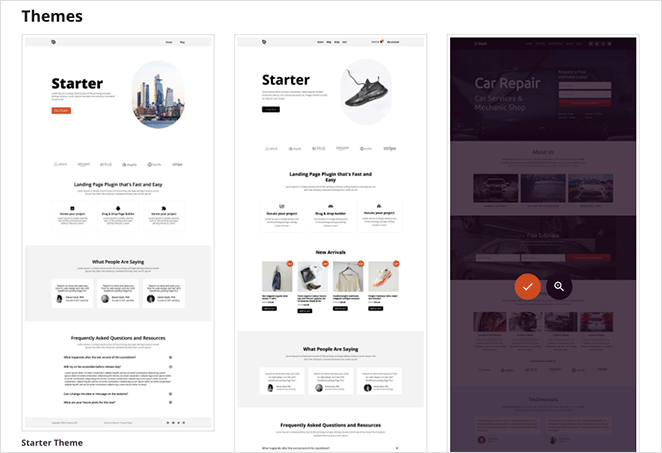
We’ll use the Car Maintenance theme for this tutorial, but you can choose any theme that fits your business best. When you’ve found a theme template you like, click the orange checkmark icon to import the template parts.
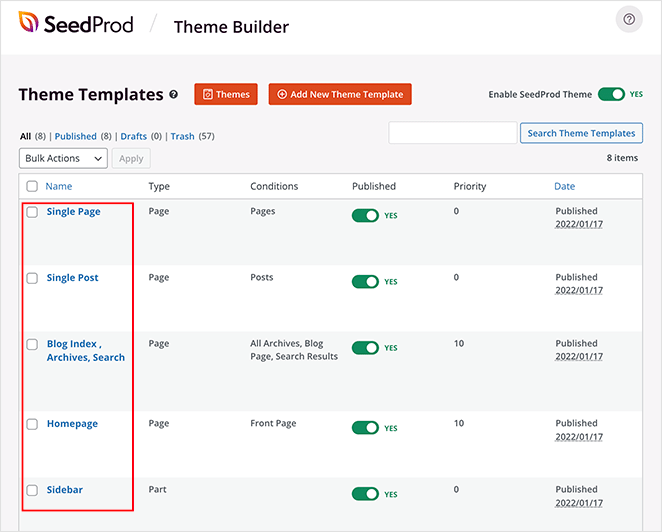
SeedProd will automatically create the parts of your theme, including your header, footer, home, and blog pages. You can now edit any template with the visual drag-and-drop builder.
Step 3. Customize the Header Template Part
Many of SeedProd’s premade templates build a navigation menu automatically. You’ll typically find it in the Header template, which we’ll show you how to customize now.
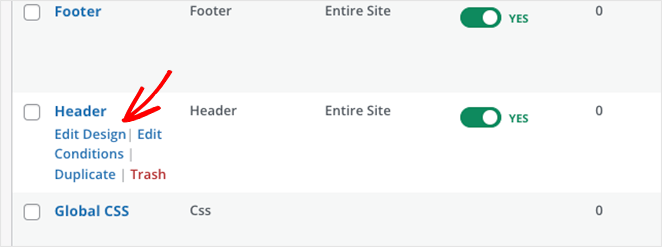
To edit your Header template, hover your mouse over it and click the Edit Design link. After, it will open in the visual page editor.
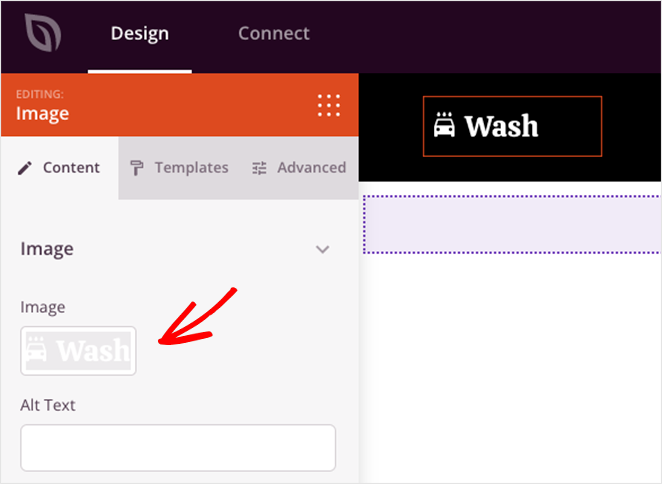
Customizing any element of your header is as easy as clicking it in the live preview. Doing so will open that element’s settings panel in the left-hand sidebar, where you can change the content, styling, and functionality.
For example, you can click the logo element, delete the default logo, and upload one from your WordPress media library or computer.
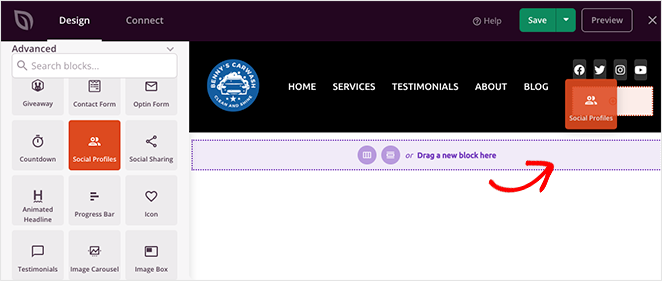
You can also add page elements by dragging a block from the left sidebar and dropping it onto your header, like social media icons, a search box, and more.
Now that you know how to use the page editor let’s look at how to edit your WordPress menu.
Step 4. Edit Your WordPress Navigation Bar
As mentioned earlier, SeedProd uses the Nav Menu block by default to display menu items.
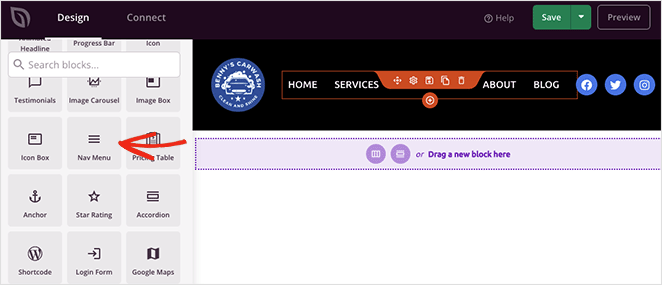
When you open the block settings, you’ll see there are 2 methods for creating and managing menus:
- Simple
- WordPress Menu
The Simple option lets you add links to your menu inside the page builder interface. You can add as many links as you like to any page, post, category, tag, or external web page.
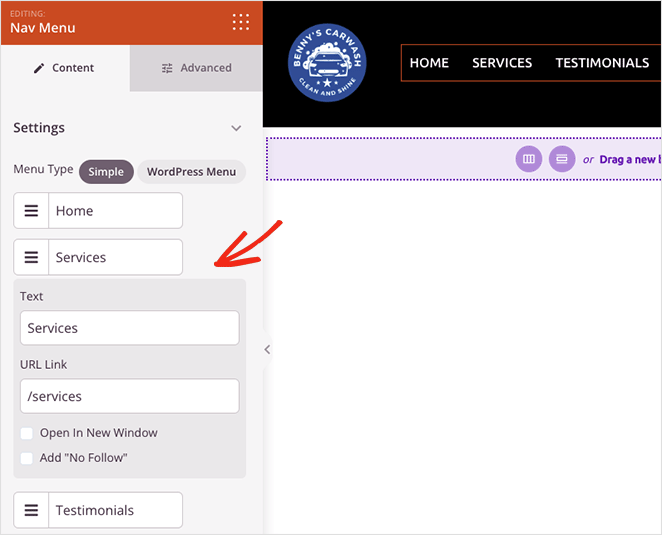
Because this is a simple approach to menu building, you can’t add drop-down menus or choose menus you’ve already made.
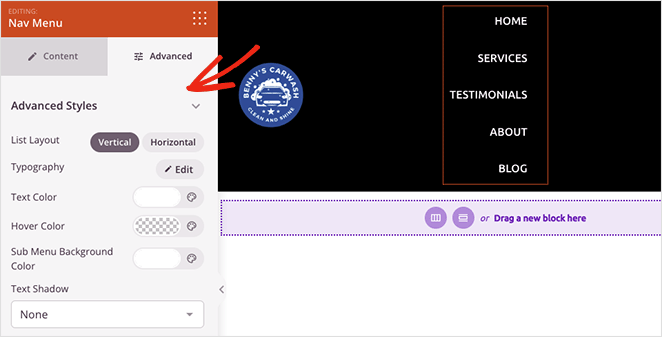
That being said, you can customize the menu alignment, font size, spacing, and divider. Plus, in the Advanced tab, you can choose between horizontal and vertical menus and customize the typography, colors, borders, and more.
The WordPress Menu option has a different approach. You can choose a pre-existing menu from the drop-down and activate mobile navigation for small screen sizes.
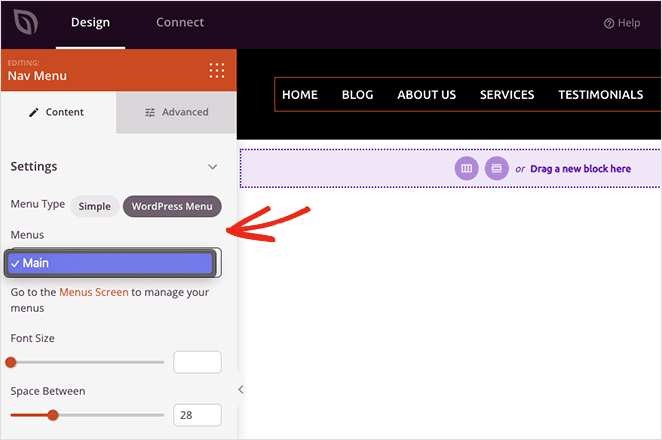
SeedProd also includes a link taking you directly to the default WordPress menu page to adjust your menu layout. Like the Simple menu, the Advanced tab has customization options for colors, fonts, shadows, device visibility, and more.
How Do I Customize the Menu Button in WordPress?
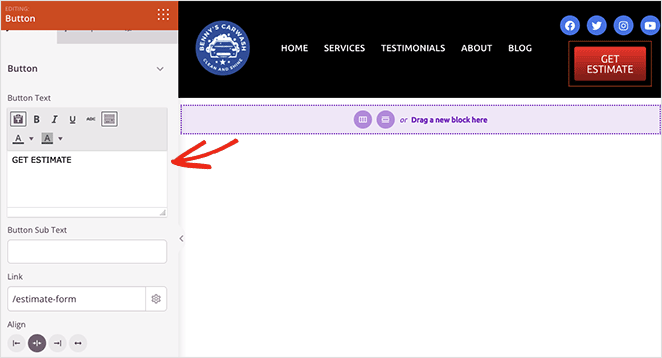
You can create a menu button for your WordPress navigation menu with SeedProd’s Button block.
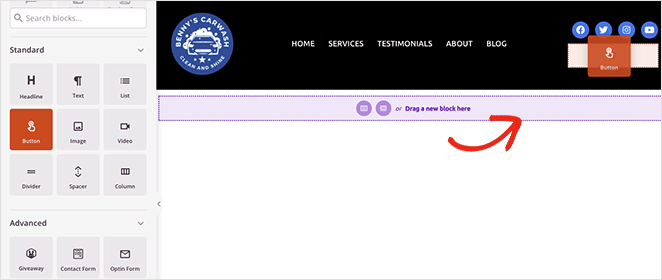
Find the Button block in the left-hand sidebar and drag it onto your header. Then you can customize the button call to action, link, styling, and more in the button settings panel.
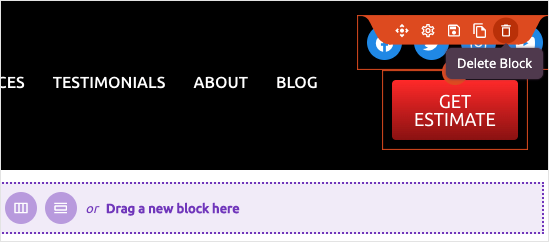
Pro Tip: You can delete any element you don’t need by hovering your cursor over it and clicking the trashcan icon.
When you’re happy with your navigation menu, click the Save button in the top-right corner and the X icon to return to the theme builder dashboard.

Now follow the same process to customize the other parts of your WordPress theme.
Step 5. Publish Your Custom WordPress Theme
After editing your WordPress menu and theme templates, you’re ready to make the changes live on your website. To do that, find the Enable SeedProd Theme toggle from the Theme Builder page, and turn it to the “On” position.

Now you can head to your home page and see your new custom navigation menu.

Method 2. Edit Menus in WordPress Without a Plugin
If you don’t want to change your existing WordPress theme, you can edit your menu using the built-in WordPress menu options.
While this method doesn’t require any WordPress plugins, there are fewer customization options. Plus, the look of your menu will vary depending on your theme.
To learn how to edit menus in WordPress without a plugin, follow these instructions.
First, go to the WordPress menu settings page by navigating to Appearance » Menus from your WordPress dashboard.
You can add items to your existing WordPress menu by selecting them in the Pages panel on the left and clicking the Add to Menu button.
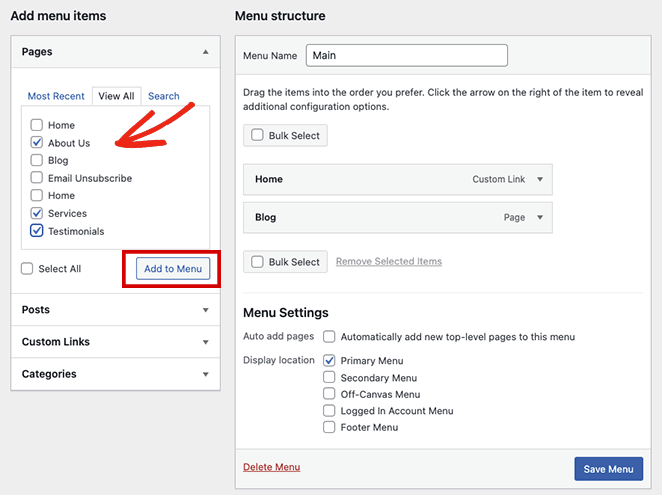
To add other content, like posts, categories, or custom links, expand the navigation label in the same panel, select the items, and click the Add to Menu button.
It’s also easy to change where your menu displays in the menu location tab; however, this depends on your active WordPress theme. For example, our WordPress theme has locations for:
- Primary Menu
- Secondary Menu
- Off-Canvas Menu
- Logged-In Account Menu
- Footer Menu
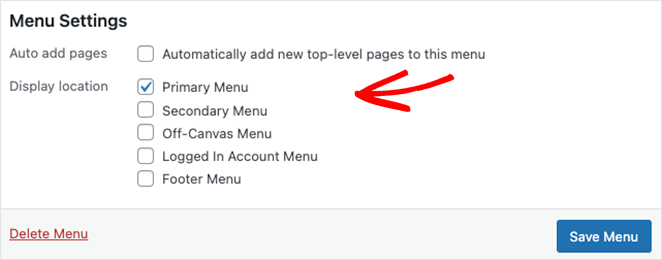
When you’re satisfied with your menu edits, click the Save Menu button.
Now you can preview your website and see your navigation menu in action.

If you need more help customizing your menu with custom CSS, follow these instructions on styling your WordPress navigation menu.
次のステップ
We hope this step-by-step tutorial helped you learn how to edit menus in WordPress easily. If you have a WooCommerce site, you might also like this guide on how to add a WooCommerce shopping cart icon in menus.
Ready to start customizing your website menus without code?
Get started with SeedProd today.
お読みいただきありがとうございました!ご質問やご意見がありましたら、お気軽にコメントをお寄せください。
また、YouTube、X(旧Twitter)、Facebookでも、ビジネスの発展に役立つコンテンツを配信しています。

