

要約:WordPressヘッダーにボタンを追加する方法
WordPressヘッダーにボタンを追加するには、完全にビジュアルな方法からCSSのみの方法まで、3つの方法があります。
- SeedProd – ビジュアルビルダーでボタンブロックをヘッダーテンプレートにドラッグします。コードは不要です。
- CSSクラスメソッド – 外観 > メニューでメニュー項目にCSSクラスを割り当て、短いCSSルールを貼り付けます。クラシックテーマで動作します。
- フルサイトエディター – WordPressの組み込みサイトエディターのナビゲーションブロック内にボタンブロックを追加します。ブロックテーマではプラグインは不要です。
最初にWordPressヘッダーにボタンを追加しようとしたとき、目立つ、誰もが最初に目にする明確な行動喚起を求めていました。
サインアップページ、無料オファー、または予約フォームへのリンクであっても、WordPressメニューのボタンは訪問者を目的の場所に正確に誘導できます。私のテストでは、SeedProdを使用してWordPressヘッダーにボタンを追加するのは5分未満で、テーマファイルを編集する必要はありません。
このチュートリアルでは、WordPressヘッダーにボタンを3つの異なる方法で追加する方法をステップバイステップで紹介します。
WordPressヘッダーメニューにボタンを追加する理由
WordPressウェブサイトのナビゲーションメニューは、通常、すべて似たようなテキストリンクです。そのため、各メニュー項目は同じ重要性、重み、緊急性を持っています。
重要な注文フォームや登録ページへのURLを追加しても、メニューの他のリンクと同じように見えます。目立たず、ユーザーが最初にクリックするほど緊急性があるようには見えません。
しかし、その重要なリンクをWordPressのボタンに変えることで、すぐに目立つようになります。WordPressヘッダーのボタンは、訪問者のユーザーエクスペリエンスとWordPressウェブサイトでのエンゲージメントを向上させます。

投稿やページ用のボタンブロックがありますが、WordPressでは現在、デフォルトでメニューボタンは提供されていません。幸いなことに、メニューにボタンを追加する方法はいくつかあり、実装は比較的簡単です。
それを念頭に置いて、WordPressヘッダーメニューにボタンを追加する3つの方法を見てみましょう。
視覚的なコントロールが必要で、ヘッダー全体のレイアウトをカスタマイズしたい場合は、SeedProdが最良の選択肢です。CSSクラスメソッドは、クラシックテーマで動作し、CSSの貼り付けに慣れていれば約3分で完了します。WordPressフルサイトエディターはブロックテーマに組み込まれており、追加のプラグインは不要です。
SeedProdでWordPressヘッダーにボタンを追加するにはどうすればよいですか?
SeedProdを使用すると、コード不要で、ボタンブロックをヘッダーテンプレートにドラッグするだけで、約5分でWordPressヘッダーにスタイル設定された行動喚起ボタンを追加できます。
これは最もカスタマイズオプションを提供し、ドラッグ&ドロップでWordPressヘッダーメニューを視覚的に構築できるため、まずこの方法をお勧めします。

SeedProdは、WordPress向けのトップクラスのランディングページおよびウェブサイトビルダーの1つです。開発者を雇ったり、サイトにショートコードを追加したりすることなく、柔軟でSEOフレンドリーなWordPressテーマ、ランディングページ、および完全なウェブサイトを作成できます。
SeedProdのドラッグ&ドロップビルダーを使用すると、カスタムヘッダー、フッター、またはサイドバーを作成し、意味のある場所にボタンを配置できます。
同じヘッダーレイアウトに、カウントダウンタイマー、オプトインフォーム、ギャラリー、およびビフォーアフタースライダーを追加することもできます。
したがって、以下の手順に従って、SeedProdでWordPressヘッダーにボタンを追加してください。
ステップ1. SeedProdのインストールと有効化
まず、SeedProdプラグインのコピーを入手し、コンピューターにダウンロードする必要があります。このチュートリアルではSeedProd Proを使用します。なぜなら、テーマビルダー機能が含まれているからです。
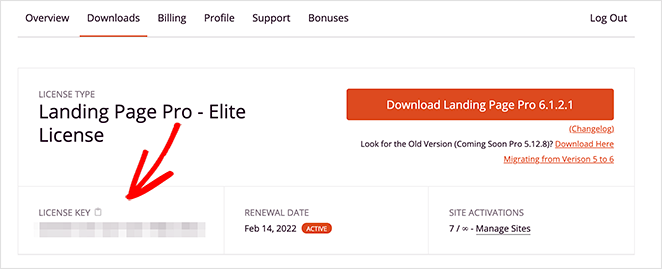
アカウントダッシュボードには、プラグインの.zipファイルを保存するための大きなダウンロードボタンが表示されます。まもなく必要になるため、この段階でライセンスキーをコピーしておくこともお勧めします。
プラグインをダウンロードしたら、WordPressダッシュボードに移動してプラグインファイルをアップロードしてください。ヘルプが必要な場合は、WordPressプラグインのインストールと有効化に関するこのガイドに従ってください。
それが完了したら、SeedProd » Settingsページに移動し、ライセンスキーを貼り付けます。
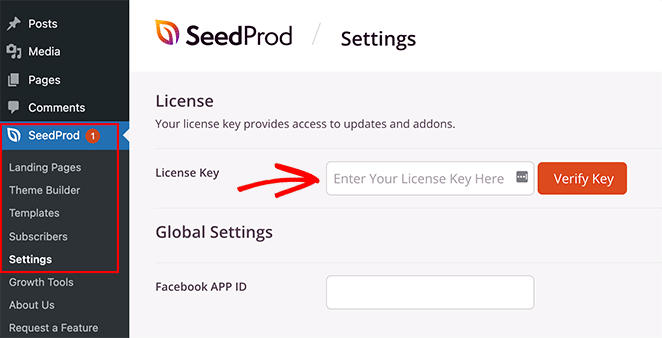
そこから、Verify Keyボタンをクリックして、Pro機能のロックを解除します。
ステップ2. 既製のテンプレートを選択する
ライセンスキーがアクティブになったら、SeedProdでどのレイアウトを作成したいかを決定できます。次の2つの異なるアプローチがあります。
- WordPressテーマ: カスタムWordPressテーマを作成して、カスタムヘッダーテンプレートで現在のウェブサイトデザインを置き換えます。(コード不要)。
- ランディングページ: 単一のページを作成し、既存のテーマを維持しながら、そのページにのみカスタムヘッダーを追加します。
このガイドでは、オプション1について説明します。なぜなら、ウェブサイト全体でナビゲーションメニューを置き換えることになるからです。ただし、オプション2を希望する場合は、このガイドに従ってWordPressでランディングページを作成してから、ステップ4からこのチュートリアルに戻ってください。
WordPressテーマオプションを選択するため、SeedProd » Theme Builderに移動し、Themesボタンをクリックする必要があります。
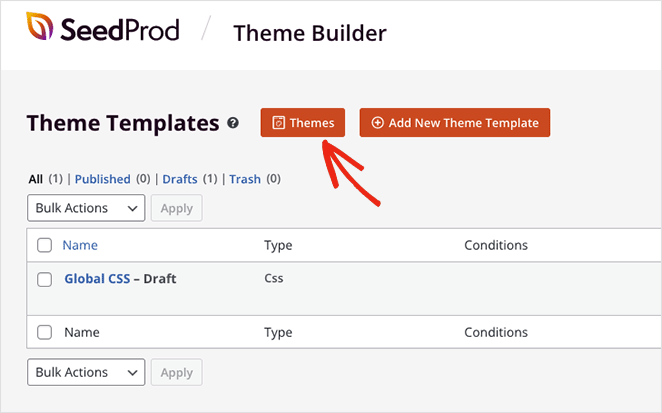
これにより、ワンクリックでインポートできる既製のウェブサイトキットのライブラリが表示されます。
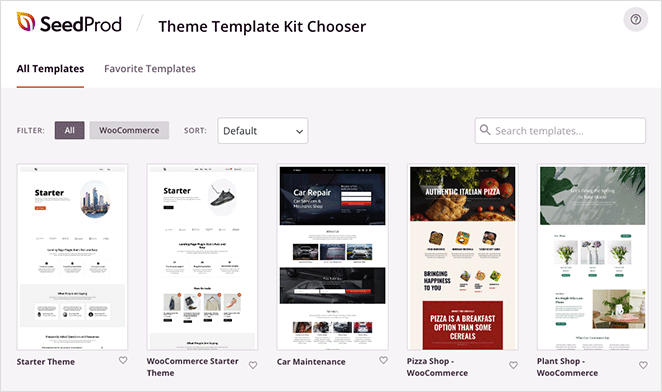
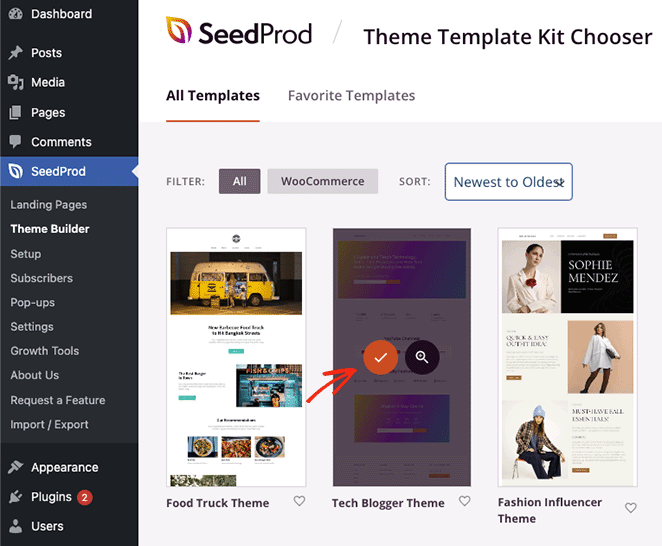
テンプレートをWooCommerce、人気順、新着順、古い順などでフィルタリングできます。気に入ったテーマを見つけたら、ティックアイコンをクリックして起動してください。
テーマのインポートが完了すると、次のようなページが自動的に表示されます。
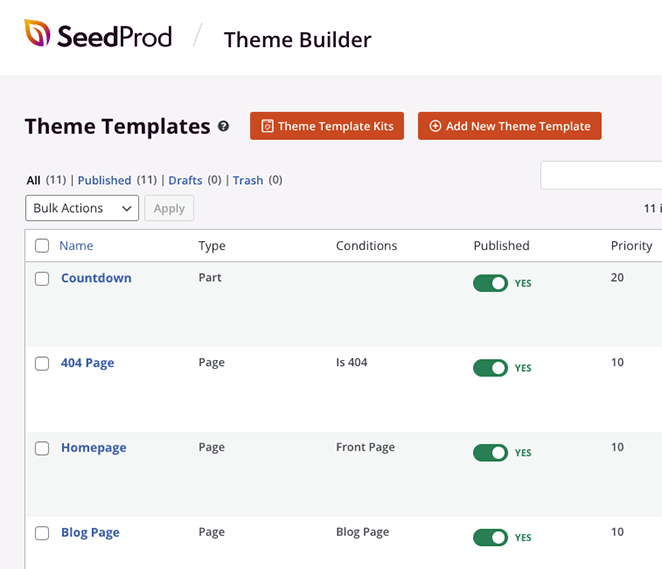
これには、WordPressテーマを構成するテンプレートのリストが含まれており、SeedProdのビジュアルドラッグ&ドロップビルダーでそれぞれを編集できます。
ステップ3.ヘッダーをカスタマイズする
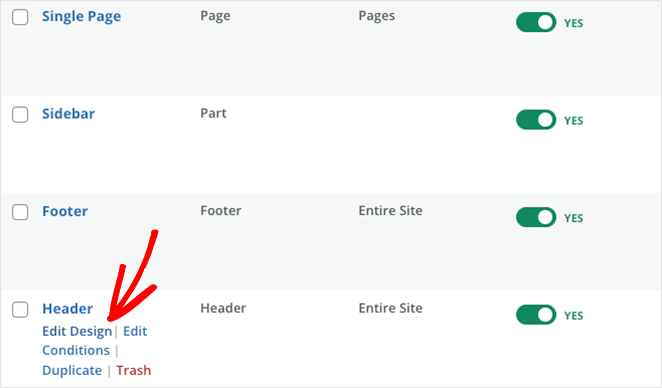
ヘッダーにボタンを追加したいので、ヘッダーテンプレートを編集しましょう。リストで表示されるまで下にスクロールし、デザインを編集リンクをクリックします。
ヘッダーテンプレートを開くと、次のような2列のレイアウトが表示されます。
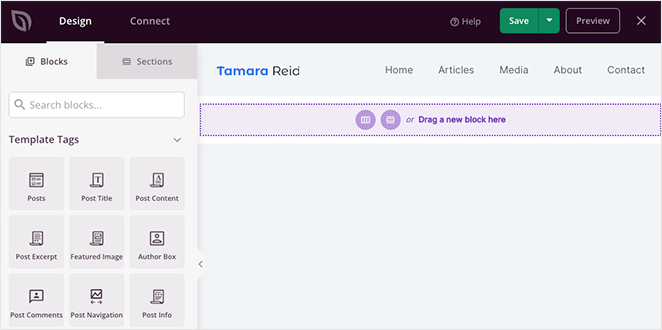
ご覧のとおり、左側にはさまざまなWordPressブロックがあり、右側にはデザインのプレビューがあります。デザインのどこかをクリックしてコンテンツを変更したり、左側のパネルからブロックをドラッグしてページに機能を追加したりできます。
現在のヘッダーレイアウトを見ると、画像ブロックのある列とWordPressメニューブロックのある列が表示されます。

ヘッダーにボタンを追加するには、3番目の列を追加する必要があります。その方法をこれから説明します。
まず、ヘッダーセクションに紫色の枠線が表示されるまでカーソルを合わせ、セクションを複製アイコンをクリックします。
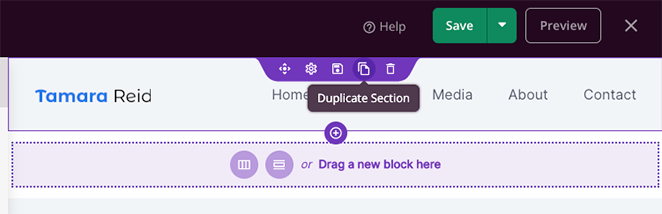
これにより、最初のヘッダーの下にコピーが追加されます。
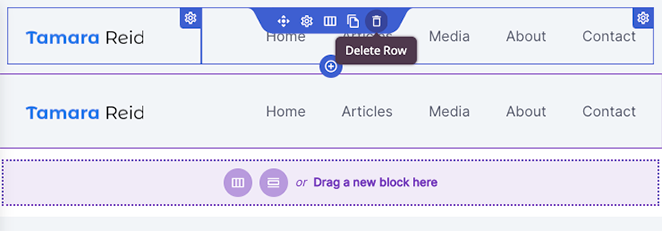
次に、最初のセクションの列に青色の枠線が表示されるまでカーソルを合わせ、ゴミ箱アイコンをクリックして削除します。
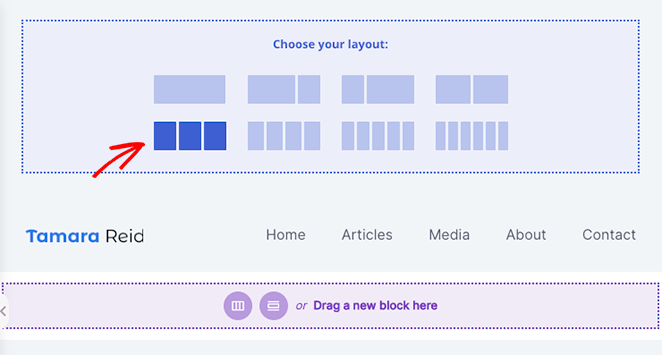
これで、新しい列レイアウトを選択できる空のセクションが表示されます。3列レイアウトをクリックしてください。
これで、複製されたセクションの移動アイコンにカーソルを合わせ、画像とナビゲーションメニュー項目のブロックを新しいセクションに移動できます。
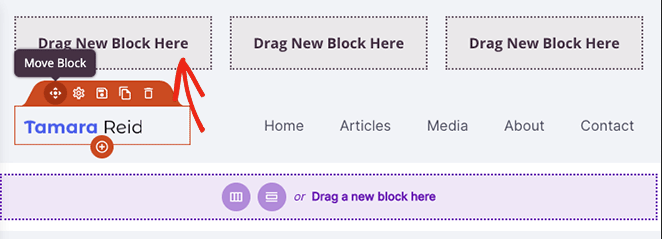
これにより、ボタンブロックを追加できる空の列が残ります。
次のステップに進む前に、ゴミ箱アイコンをクリックして古いヘッダーセクションを削除してください。

これで、WordPressヘッダーメニューにボタンを作成する準備ができました。
ステップ4.ヘッダーにボタンを追加する
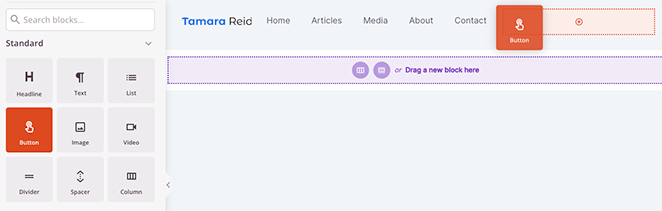
SeedProdでヘッダーにボタンを追加するのは簡単です。左側のサイドバーでボタンブロックを見つけ、ヘッダーエリアの空の列にドラッグします。
ボタンが配置されたら、それをクリックして、ボタンのリンクテキスト、ボタンのサブテキスト、リンク、モバイルおよびデスクトップでの配置、ボタンのサイズをカスタマイズできます。

ライブラリのFont Awesomeアイコンから選択することで、ボタンテキストの前後にカスタムアイコンを追加することもできます。
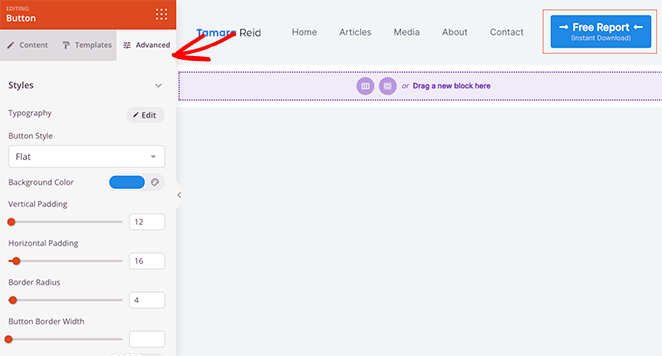
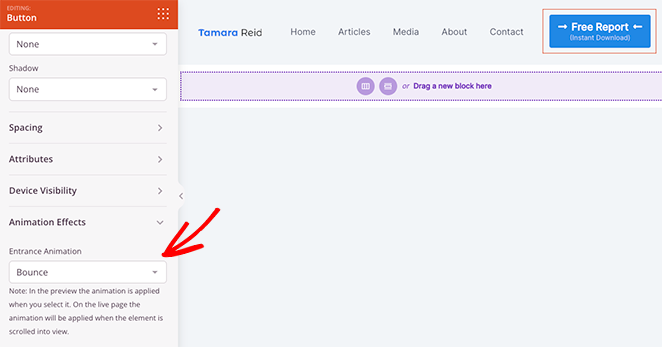
さらに多くのカスタマイズオプションについては、高度な設定タブをクリックします。ここでは、テキストの色とタイポグラフィを編集したり、背景色を変更したり、ボックスシャドウを追加したり、角丸、間隔、カスタムCSSクラスを設定したり、特定のデバイスでボタンを非表示にしたりできます。
さらに、アニメーションオプションは、ボタンをより目立たせるための優れた方法です。
高度な設定タブの「モバイルで非表示」トグルは、ボタンがモバイルナビゲーションに表示されるかどうかを制御します。デフォルトでは、すべてのデバイスに表示されます。
メニューボタンの外観に満足したら、保存ボタンをクリックしてください。

これで、WordPressテーマの残りの部分のカスタマイズを続けることができます。たとえば、ブログページ、シングルページテンプレート、サイドバーを編集したり、WordPressフッターを変更したりできます。
ステップ5.変更を公開する
ウェブサイトの残りの部分をカスタマイズした後、最後のステップはそれらの変更を公開することです。これを行うには、まずSeedProd » Theme Builderページに戻ります。
次に、右上隅にあるEnable SeedProd Themeトグルを見つけて、「はい」の位置に切り替えます。
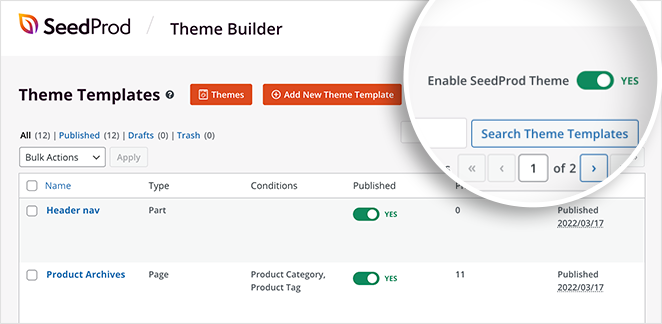
これで、WordPressテーマをプレビューし、ヘッダーボタンが機能していることを確認できます。

CSSクラスを使用してWordPressヘッダーボタンを追加する方法
CSSクラスメソッドは、任意のクラシックWordPressテーマで機能し、プラグインは必要ありません。フルビジュアルビルダーが必要ない場合は、このアプローチを使用しました。
まず、WordPressダッシュボードのAppearance » Menusに移動します。画面上部のドロップダウンから編集したいメニューを選択します。

次に、画面の右上隅にあるScreen Optionsタブをクリックします。CSS Classesの横にあるボックスをチェックします。これにより、各メニュー項目に新しいフィールドが追加されます。

次に、ボタンとしてスタイル設定したいメニュー項目を展開します。CSS Classesフィールドにクラス名を入力します。header-buttonを使用しますが、スペースがない限り、どの名前でも機能します。完了したら、Save Menuをクリックします。

次に、そのクラスをボタンに変換するCSSを追加する必要があります。最も簡単な方法はWPCodeを使用することです。これにより、テーマファイルを直接編集せずにコードスニペットを追加できます。Code Snippets » Add Snippetに移動し、スニペットタイプとしてCSSを選択し、次のように貼り付けます。
li.header-button > a {
    display: inline-block !important;
    background-color: #0073aa !important;
    color: #ffffff !important;
    padding: 12px 28px !important;
    border-radius: 4px !important;
    text-decoration: none !important;
    line-height: normal !important;
}
li.header-button > a:hover {
    background-color: #005177 !important;
    color: #ffffff !important;
}

スニペットを保存してアクティブ化します。メニュー項目は、WordPressヘッダーにスタイル設定されたボタンとして表示されるようになります。

background-colorをブランドカラーに合わせて変更します。padding値を調整してボタンサイズを制御します。WPCodeをインストールしたくない場合は、Appearance » Customize » Additional CSSで同じCSSが機能します。
このアプローチは、Appearance » Menusを使用するクラシックWordPressテーマでのみ機能することに注意してください。サイトがフルサイトエディターを備えたブロックテーマを使用している場合は、次のセクションの方法を使用してください。
プラグインなしでWordPressヘッダーボタンを追加するにはどうすればよいですか?
WordPressテーマがフルサイトエディターを使用している場合、プラグインなしでヘッダーボタンを追加できます。この方法はブロックテーマでのみ機能します。
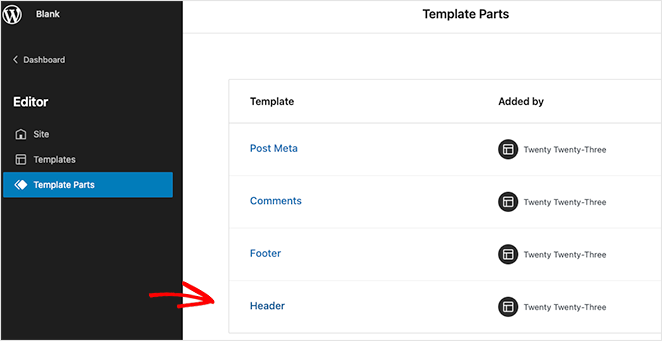
まず、WordPressダッシュボードからAppearance » Editorに移動します。これにより、WordPressフルサイトエディターが開きます。これは、ブロックを使用してウェブサイトを構築します。
次に、サイドバーを開き、Template Partsヘッダーをクリックし、右側でHeaderオプションを選択します。
それが完了したら、WordPressヘッダーのビジュアルレイアウトが表示されます。エディター内で、Navigationヘッダーをクリックします。
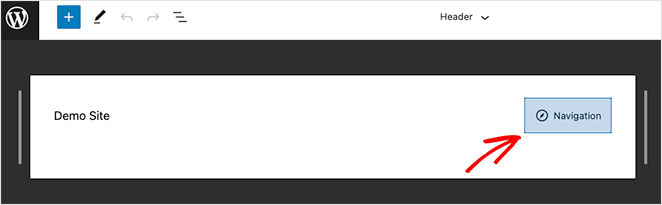
右サイドバーにナビゲーションレイアウト設定が表示されますが、まず(+)プラスアイコンをクリックしてメニュー項目の追加を開始します。
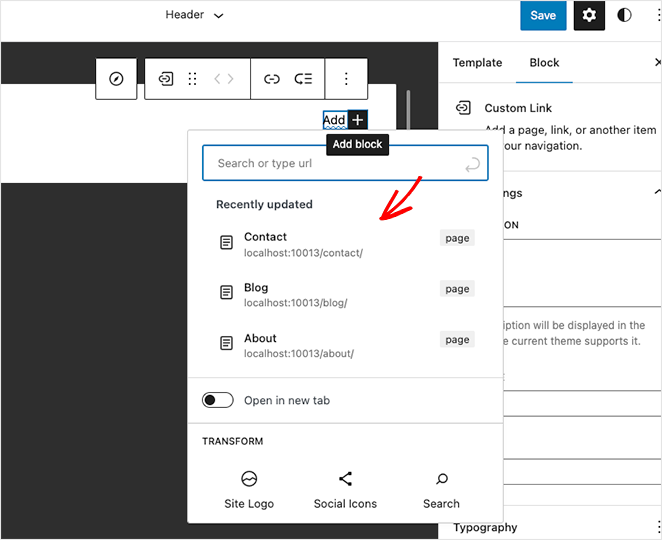
任意のページをクリックして検索し、WordPressのメニューに追加できます。
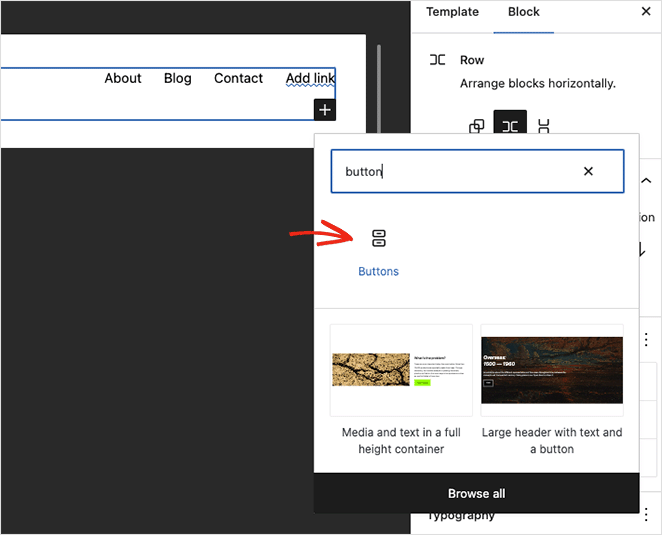
メニューリンクを配置したら、(+)プラスアイコンをもう一度クリックして新しいWordPressブロックを追加します。今回は、Buttonブロックを検索してヘッダーに追加します。
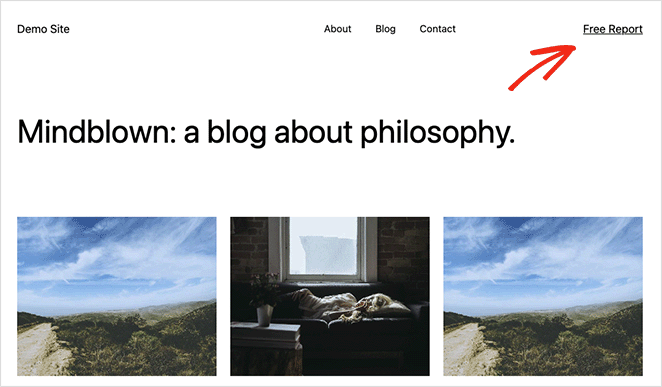
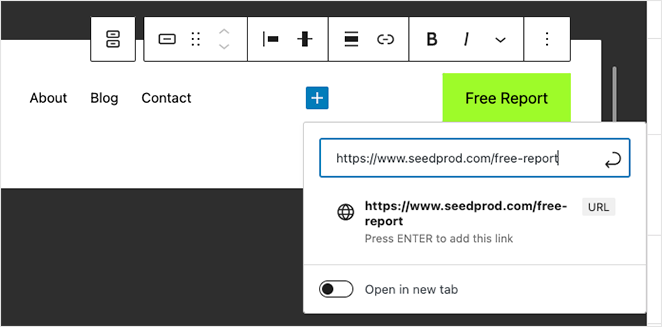
次にボタンのテキストを入力し、リンクアイコンをクリックして、訪問者にクリックしてほしいリンクを追加します。今回は、無料レポートへのリンクを追加します。
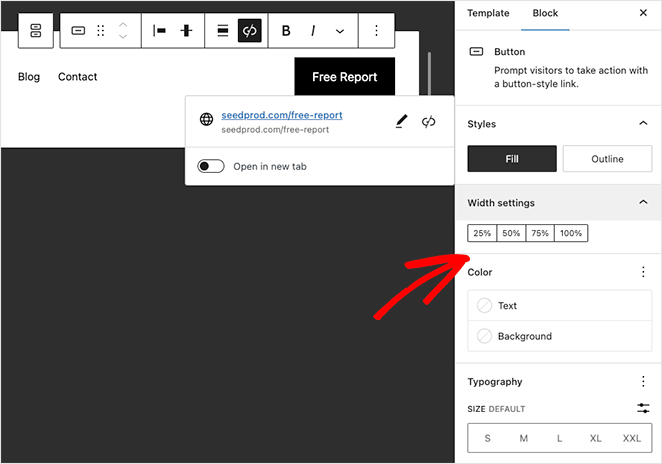
右側のブロック画面オプションで、以下の設定を変更してヘッダーメニューボタンをカスタマイズできます。
- 塗りつぶしまたはアウトラインのボタン スタイル
- 幅のパーセンテージ
- テキストと背景の色
- タイポグラフィ サイズ
- パディング
- 角丸
- 追加のCSSとクラス名
- その他多数。
ボタンはデスクトップとモバイルの両方のヘッダーに表示されます。ナビゲーションブロック内では、小さい画面でメニューが折りたたまれたときの表示方法も制御できます。
ボタンのカスタマイズが完了したら、右上隅にある 保存 メニューボタンをクリックします。
これで、ヘッダーテンプレートパーツを使用しているすべてのページに、メニューボタンとナビゲーションリンクが表示されます。
サイトエディターの機能が含まれていないテーマを使用している場合は、古いメニューカスタマイザーを使用してメニューにボタンを追加する方法に関するこのガイドに従ってください。
個人的には、SeedProd のドラッグ&ドロップビルダーが、特にコードに触れることなくより多くの制御をしたい場合に、最も簡単な方法であることがわかりました。
よくある質問
WordPress でヘッダーにボタンを追加するにはどうすればよいですか?
3つのオプションがあります。SeedProd を使用して、ボタンブロックをヘッダーテンプレートに視覚的にドラッグします。WordPress フルサイトエディターを使用して、ブロックテーマがある場合はナビゲーションブロック内にボタンブロックを追加します。または、CSSクラスをメニュー項目に割り当て、短いCSSルールでボタンとしてスタイルを設定します。コードを書かずにスタイリング制御をしたい場合は、SeedProd が最も速いオプションです。
ヘッダーボタンをモバイルで表示するにはどうすればよいですか?
SeedProd では、ボタンブロックの設定を開き、[詳細] タブに移動します。[モバイルで非表示] トグルはデフォルトでオフになっているため、ボタンはすべてのデバイスに表示されます。WordPress フルサイトエディターでは、ボタンはナビゲーションブロックのレスポンシブ動作を継承するため、個別に設定しない限り、モバイルではメニューと一緒に折りたたまれます。
WordPress ヘッダーに複数のボタンを追加できますか?
はい。SeedProd を使用すると、複数のボタンブロックをヘッダーテンプレートにドラッグして、それぞれ異なるスタイルを設定できます。フルサイトエディターでは、ナビゲーションブロック内に複数のボタンブロックを追加できます。CSSクラスメソッドの場合、異なるメニュー項目に異なるクラス名を割り当て、各クラスを個別にスタイル設定します。
ヘッダーボタンの追加は、WordPress テーマに関係なく機能しますか?
方法によります。SeedProd はテーマのヘッダーを完全に置き換えるため、現在のテーマに関係なく機能します。CSSクラスメソッドは、[外観] » [メニュー] を使用するクラシックテーマで機能します。フルサイトエディターメソッドにはブロックテーマが必要です。どちらのタイプのテーマを使用しているかわからない場合は、WordPress ダッシュボードで [外観] に移動します。[エディター] オプションが表示された場合は、ブロックテーマを使用しています。
WordPress ヘッダーにボタンを追加する方法に関するこのチュートリアルがお役に立てば幸いです。WordPress ウェブサイトのカスタマイズに役立つ次のチュートリアルも気に入るかもしれません。
お読みいただきありがとうございます!皆様のご意見をお聞かせいただければ幸いです。お気軽に会話にご参加ください YouTube, X および Facebook で、ビジネスを成長させるための役立つアドバイスやコンテンツをさらにご覧ください。


