The Push Notifications block connects your SeedProd pages directly to PushEngage, a powerful marketing tool that lets you collect web push notification subscribers and send them personalized campaigns. Adding this block to your page is the fastest way to get PushEngage installed and running on your WordPress site.
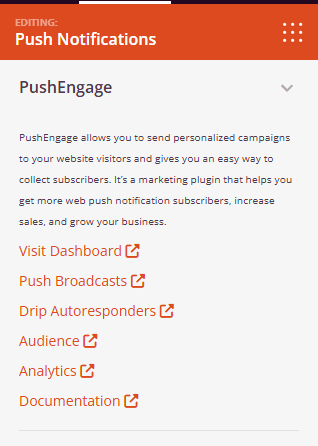
PushEngage helps you grow your business by re-engaging visitors after they leave your site — no email address required. Once a visitor subscribes, you can send them targeted push notifications directly to their browser or device, driving them back to your site with promotions, product updates, cart reminders, and more. The block’s sidebar panel gives you quick access to all key PushEngage features — campaigns, automation, audience management, analytics, and documentation — without ever leaving the SeedProd editor.
Adding the Push Notifications Block to Your Pages
Follow these steps to add a Push Notifications block to your SeedProd page:
Step 1: Add the Block
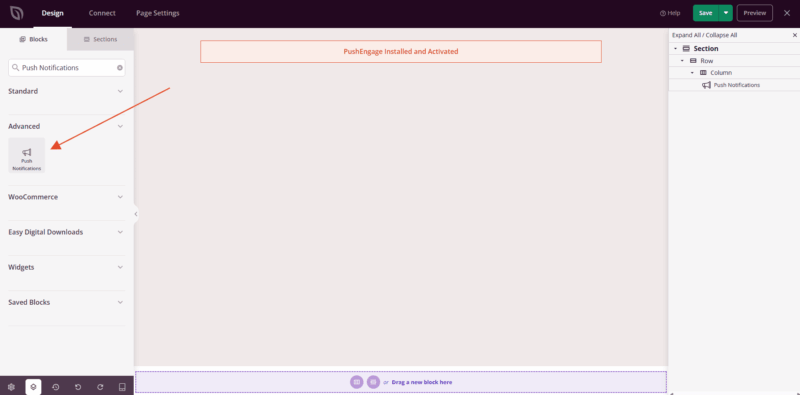
Under Design > Blocks, drag and drop the Push Notifications block into the desired section of your page.
Step 2: Install and Activate PushEngage
Once the block is placed on your page, click on it to open its settings panel. If PushEngage is not yet installed, the panel will prompt you to install and activate the free PushEngage plugin. Click the install button to add it to your site automatically — no need to leave the SeedProd editor.
Step 3: Manage Your Push Notification Campaigns
Once PushEngage is active, the block’s settings panel provides direct links to all key areas of the PushEngage dashboard, so you can manage your push notification strategy without leaving WordPress.
- Visit Dashboard: Opens the main PushEngage dashboard where you can view an overview of your subscribers, campaigns, and performance at a glance.
- Push Broadcasts: Create and send one-time push notification campaigns to your entire subscriber list or a targeted segment — ideal for promotions, announcements, and new content alerts.
- Drip Autoresponders: Set up automated sequences of push notifications triggered by user behavior, such as welcoming new subscribers or following up after a purchase.
- Audience: View and manage your full subscriber list, segment audiences by browser, device, location, or custom attributes, and control who receives which campaigns.
- Analytics: Track key performance metrics including subscriber growth, notification click-through rates, revenue attribution, and campaign engagement over time.
- Documentation: Access PushEngage’s official guides and support resources to learn best practices, set up advanced features, and troubleshoot any issues.
Step 4: Save Your Changes
Once you have finished configuring the Push Notifications block and setting up your PushEngage integration, make sure to save your work.
You’ve successfully added the Push Notifications block to your page and connected it to PushEngage! This integration makes it simple to grow your push notification subscriber list directly from your SeedProd pages, and gives you everything you need to run targeted campaigns, automate follow-up sequences, and re-engage visitors long after they’ve left your site.