The Shortcode block lets you embed any WordPress shortcode directly onto your SeedProd pages. Shortcodes are small pieces of code wrapped in square brackets — such as [contact-form-7] or [woocommerce_cart] — that trigger specific functionality when the page is rendered. This block bridges the gap between SeedProd’s visual editor and the broader WordPress plugin ecosystem.
Any plugin that outputs content via a shortcode can be dropped into a SeedProd page using this block. Common examples include contact forms, payment buttons, membership content, sliders, booking calendars, and custom PHP snippets. The optional live preview toggle lets you see the rendered output right inside the editor, so you can verify your shortcode is working before publishing.

Adding the Shortcode Block to Your Pages
Follow these steps to add a Shortcode block to your SeedProd page:
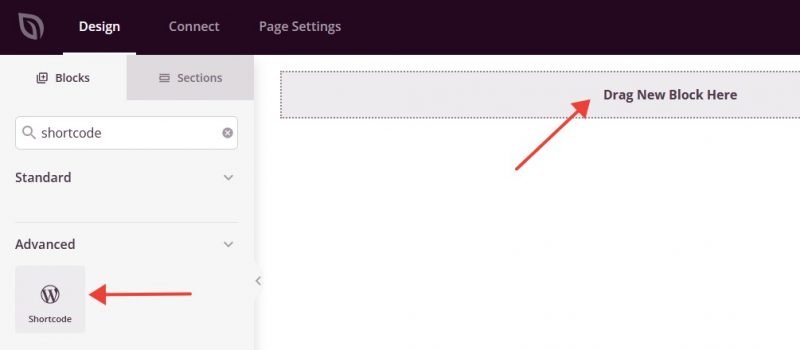
Step 1: Add the Block
Under Design > Blocks, drag and drop the Shortcode block into the desired section of your page.
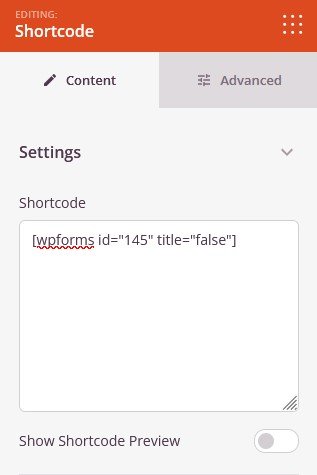
Step 2: Configure Content Settings
Once added, click on the Shortcode block to open its settings. In the Content tab, the Settings section lets you enter your shortcode and optionally preview its output in the editor.
- Shortcode: Type or paste your WordPress shortcode into the text area. Enter the full shortcode including its square brackets and any attributes — for example,
[contact-form-7 id="1" title="Contact form"]. The shortcode will be processed and rendered on the live page. - Show Shortcode Preview: Toggle this on to render a live preview of the shortcode output directly inside the SeedProd editor. This lets you verify the shortcode is working and check its appearance without leaving the builder. Toggle it off to hide the preview and keep the editor responsive while editing other elements.
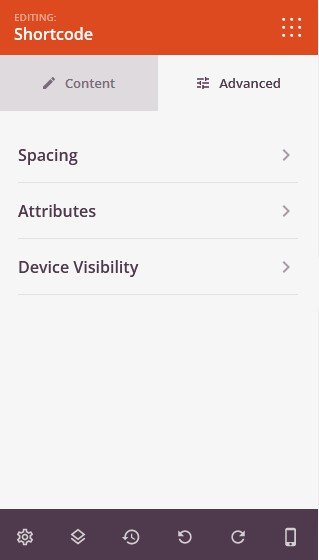
Step 3: Customize the Design
In the Advanced tab, you can control the spacing around the block and manage its visibility across different devices.
Spacing:
- Margin: Control the outer spacing around your Shortcode block (Top, Right, Bottom, Left). This determines how much space appears between the shortcode output and surrounding page elements.
- Padding: Adjust the inner spacing within your Shortcode block (Top, Right, Bottom, Left). This creates breathing room between the shortcode output and the block edges.
Attributes:
- CSS ID: Displays the auto-generated unique identifier for your Shortcode block. This ID is created automatically by SeedProd for custom styling or JavaScript targeting.
- Custom Class: Add custom CSS classes to apply specific styles from your theme or custom CSS to the block wrapper.
- Custom Attributes: Add any HTML attributes to the block wrapper element. Enter each attribute on a new line using the format: attribute-name|value (e.g., data-form|contact).
Device Visibility:
- Hide on Desktop: Hide the Shortcode block on desktop screens.
- Hide on Tablet: Hide the Shortcode block on tablet devices.
- Hide on Mobile: Hide the Shortcode block on mobile devices.
Animation Effects:
- Entrance Animation: Choose from various animation effects that play when the Shortcode block scrolls into view. Options include Bounce, Fade In, Zoom In, Rotate In, and many more.
Step 4: Save Your Changes
Once you have finished configuring the Shortcode block and customizing its appearance, make sure to save your work.
You’ve successfully added a Shortcode block to your page! This block unlocks the full power of the WordPress plugin ecosystem inside your SeedProd layouts — from contact forms and payment widgets to membership gates and custom functionality. Paste in any shortcode your plugins provide and use the live preview toggle to confirm everything looks exactly as intended before your page goes live.