I remember when I first needed a registration form for my WordPress site. The basic contact form I was using just wasn’t cutting it. I needed something that could handle payments and collect more detailed information from users.
After trying many different form plugins and helping other website owners with their forms, I’ve learned exactly what works (and what doesn’t).
The good news is, to create an event registration form, you just need the right tools and steps to follow. And that’s exactly what I’ll show you how to achieve in this step-by-step guide.
Why Create an Event Registration Form in WordPress?
With an event registration page on your website, people interested in attending can find out the information they need. And if you add an event registration form to that page, they can buy their tickets there too, keeping everything all in one place.
Letting people register online also has the following benefits:
- Securing a ticket takes less time than calling to book or visit your business in person.
- You can run promotions to encourage more people to sign up and register for your event.
- Retargeting scripts let you serve ads to people as a reminder to register.
- You can run online giveaways to drive more traffic to your event registration page.
- Your form is an excellent tool for collecting data that helps with event planning.
As you can see, creating an event registration form in WordPress can do wonders for planning, running, and increasing attendance at your event.
Steps to Create a WordPress Event Registration Form
Here’s a summary of the steps to create an event registration form in WordPress. Click any of the links below to jump to the step you need:
- Step 1: Install the WPForms Plugin
- Step 2: Choose The WordPress Event Registration Form Template
- Step 3: Customize Your Registration Form
- Step 4: Confirm Your Form Settings
- Step 5: Configure Your Form Notifications
- Step 6: Define Your Form Confirmations
- Step 7: Choose Your Form Payment Settings
- Step 8: Publish Your Event Registration Form in WordPress.
ビデオ・チュートリアル
Step 1: Install the WPForms Plugin
The first step to creating an event registration form in WordPress is to find the best tool for the job. In this tutorial, we’re using WPForms to create a registration form.
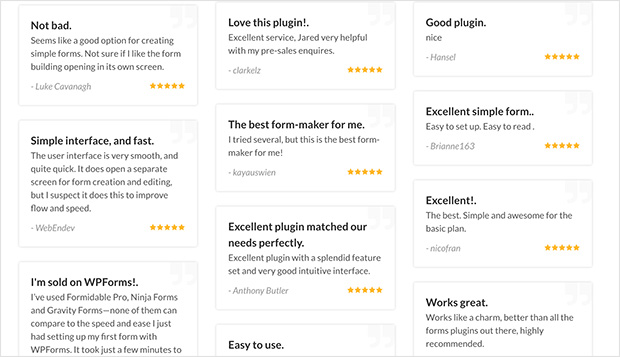
WPForms is the most user-friendly WordPress form plugin around. With over 6 million websites using WPForms to build powerful forms, it’s the best choice for creating event registration forms too.
詳しくはWPFormsのレビューをご覧ください。
To get started, get the WPForms plugin here, then install the WordPress plugin and activate it on your site.
Next, install the Form Templates Pack addon. With this feature, you can access the ready-made event registration form template, along with many other industry-specific templates for building customized WordPress forms.
When you’ve installed the addon, navigate to WPForms » Addons and scroll down until you find the Form Templates Pack addon.
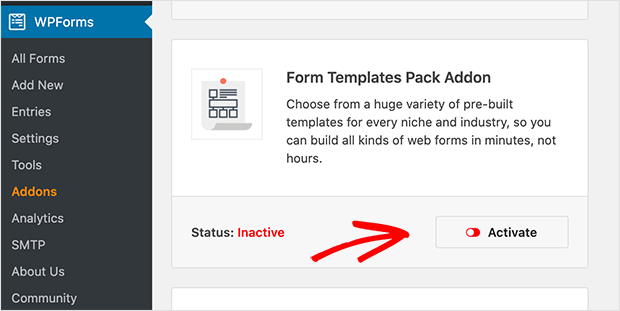
Then click Install Addon and Activate.
You’re now ready to create your event registration form!
Further Reading: How to Create a WordPress User Registration Form With Custom Fields
Step 2: Choose The WordPress Event Registration Form Template
For the next step, go to WPForms » Add New.
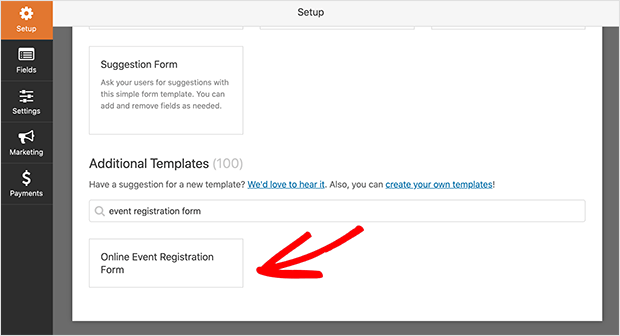
Then on the next screen, give your form a name and scroll down the page until you reach the section called Additional Templates.
In the search bar, type “event registration form” and the template will appear below. And when you click the template, a new registration form is created for you.
Now let’s move on to customizing your form.
Step 3: Customize Your Registration Form
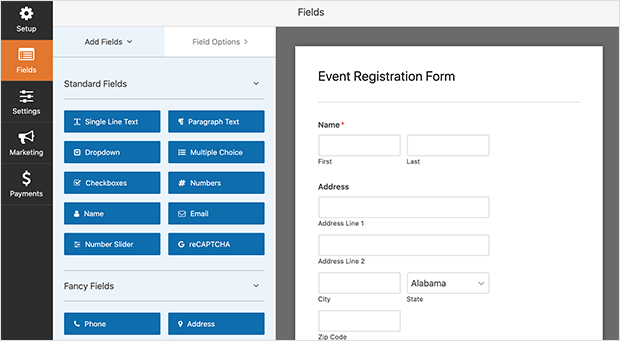
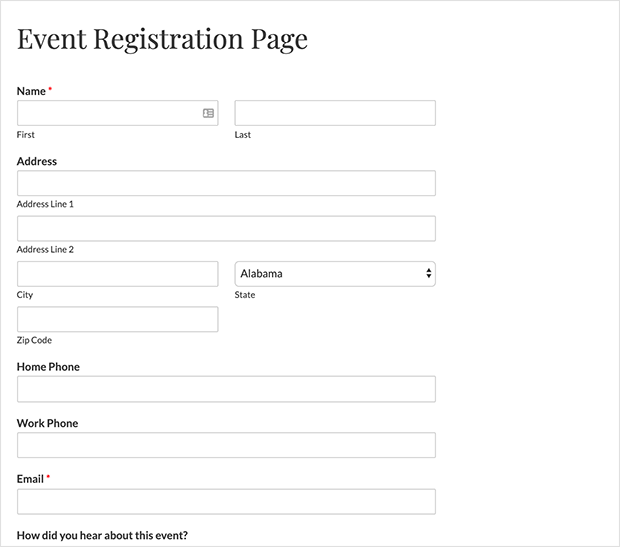
Customizing your registration form in WPForms is pretty straightforward. Within the form builder, you’ll see a range of form fields automatically added to your form, like the ones below:
- Name: for attendees to add their name.
- Address: so you know where to send their physical tickets.
- Home Phone: to make it easy for you to get in touch.
- Work Phone: incase you can’t reach them on their personal number.
- Email: to send purchase confirmations and digital tickets.
- Multiple choice: for adding extra options to your form.
- Single-Line Text: for customers to add more information.
- Drop-down: for users to choose how many tickets they want.
You can add more fields to your form by dragging elements from the left-hand column to the right. And clicking a field lets you customize the labels and contents.
For instance, if you’re collecting payments for event tickets on your form, you can add the payment field by dragging it over to your form.
Let’s look a little closer at how to add payments to your event registration form.
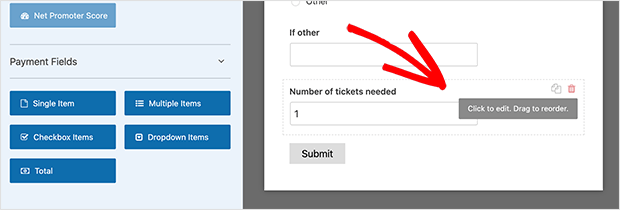
First, remove the drop-down field from your form by clicking the red trash can icon. Then navigate to the Payment Fields section and click the Multiple Items field.
Click the form field and edit the label to something suitable for your form. Then add the price of each ticket amount to the relevant items. To add more than 3 tickets to your form, click the plus (+) icon.
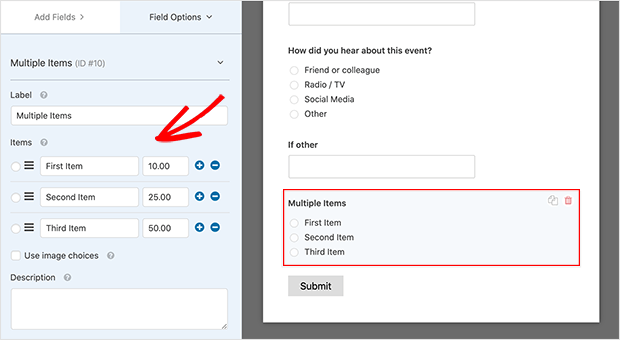
Now when people register for your event and select how many tickets they’d like, they’ll see a total price.
When you’re happy with your customizations, click Save and move on to the next step.
Step 4: Confirm Your Form Settings
Now it’s time to configure your form’s settings. You can do that by heading to Settings » General.
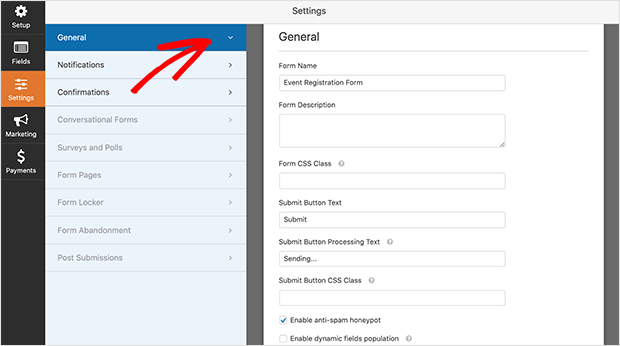
On this page, you can customize the following settings:
- フォーム名- フォームに新しい名前を付けます。
- Form Description – Add a description to help you remember what the form is for.
- Submit Button Text – Change the label of your submit button to something like “Register Now.”
- Anti-Spam – Use the anti-spam honeypot feature to prevent spam registrations and secure your website.
- Information Storing – Disable the storing of sensitive information like IP addresses to comply with GDPR.
When you’re happy with your settings, click the Save button.
Step 5: Configure Your Form Notifications
Notifications in WPForms send an email whenever someone registers for your event using the registration form. And if you don’t disable this option, which is enabled by default, you’ll get an email every single time.
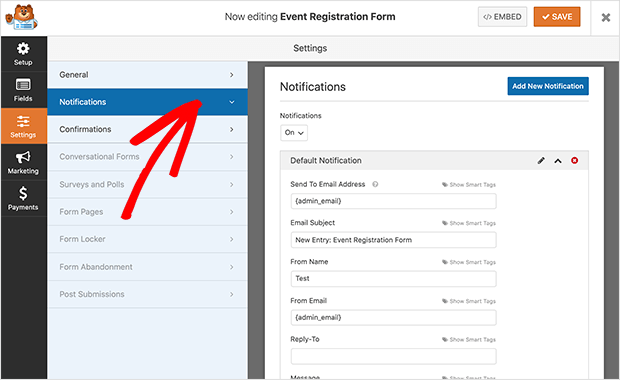
If you want to let users know you’ve received their registration and ticket purchase, you can use smart tags to send them an email. This helps reassure people that the form went through successfully and that you’ll be in touch soon with further details.
You can learn how to set up form notifications in the documentation here.
Remember to click the Save button when you’re done to save your changes. Then you can move on to setting your form confirmation messages.
Step 6: Define Your Form Confirmations
The Confirmations area in WPForms lets you display a message when users successfully submit their form. They’re an excellent way to let people know their form was processed, as well as which steps they should take next.
There are 3 Confirmation types in WPForms, including the following:
- Message – This is the default confirmation type. When users submit their event registration form, they’ll see a simple note letting them know the form went through successfully.
- Show Page – This type takes visitors to a specific page on your website. Often it’s a thank you page, thanking them for registering.
- Go to URL (Redirect) – Use this option when you want to send visitors to another website.
Setting up your confirmation message is pretty straightforward. Start by clicking the Confirmations tab from the form builder Settings page.
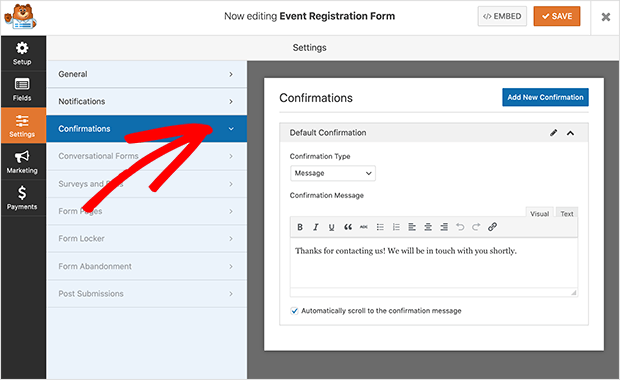
Then choose the type of confirmation you want for your registration form. In this example, we use the Message type.
Next, customize your message to suit your branding, and click Save.
Now let’s look at your form’s payment settings.
Step 7: Choose Your Form Payment Settings
If you’re selling tickets and collecting payments on your event registration form, you’ll need to define your form’s payment settings so payments are processed correctly.
WPFroms has addons for PayPal and Stripe for collecting payments through your forms. So if you’d like to use one of these options to accept payments for your event, you’ll have to install and activate the relevant addon.
The WPForms documentation has steps for installing PayPal here. And you can learn how to connect Stripe in the documentation here.
Once your chosen payment addon is installed on your WordPress site, click Payments in the form editor to configure your settings.
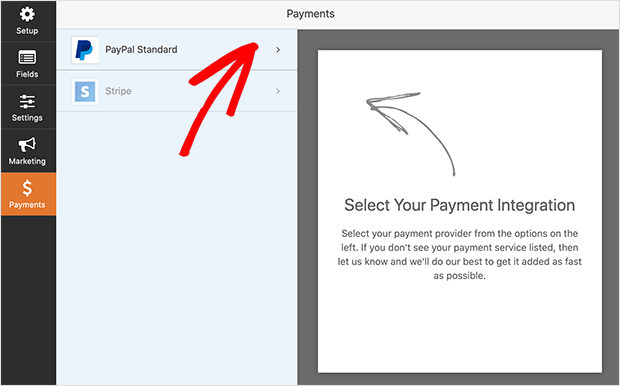
In our example, we use the PayPal addon.
On this page, start by entering your PayPal email address. Then select Production mode and choose Products and Services as the payment type.
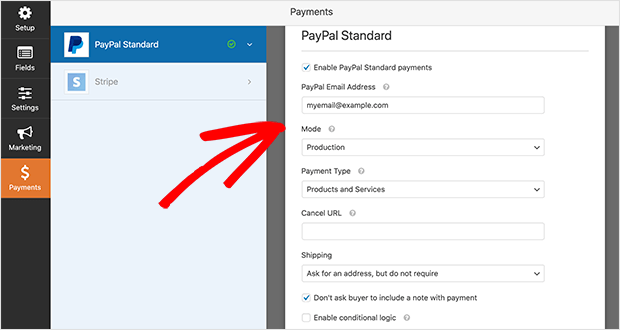
Now go ahead and adjust the other settings to suit your needs. When you’re done, click Save.
You can learn how to let users choose their own payment method in the documentation. This is super helpful if you know your visitors use other ways to pay for goods and services.
With all the settings configured, you’re ready to add your event registration form to WordPress.
Step 8: Publish Your Event Registration Form in WordPress.
Unlike many WordPress event registration plugins, WPForms lets you add forms to almost anywhere on your WordPress website. You can publish your form in posts, pages, and even WordPress sidebar widgets.
Let’s look at embedding your registration form on a new page in WordPress.
First, go to Pages » Add New from your WordPress dashboard to add a new page. Then click the plus (+) icon to add a new content block.
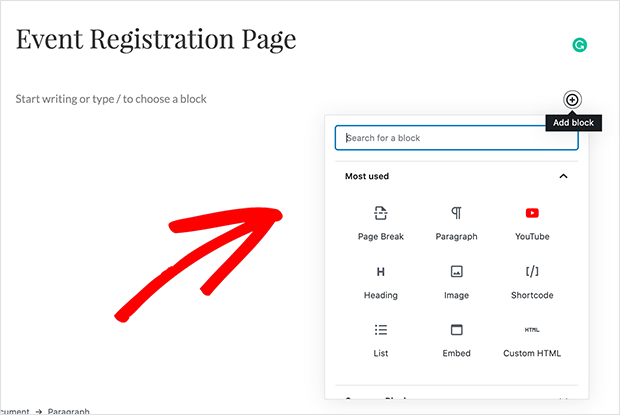
In the search box, type “WPForms” to locate the WPForms content block and click to add it to the WordPress editor.
With the WPForms widget now in your page editor, click the drop-down menu to find your event registration form. This adds your form to your page so you can preview how it looks before publishing.
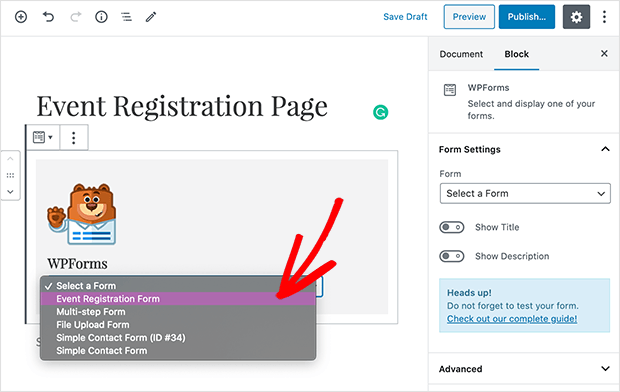
When you’re happy with your form, click Publish so site visitors can see it live on your website.
Bonus: Build a Custom Event Registration Page
While a registration form is important, why not take it a step further? You can create a dedicated event registration landing page using SeedProd, our drag-and-drop WordPress page builder.

With a full landing page, you can:
- Show more details about your event
- Add speaker bios and photos
- Include event schedules
- Display venue information and maps
- Add social proof like testimonials from past events
- Make your registration form match your brand
The best part? You don’t need any coding knowledge. SeedProd’s visual editor lets you build professional-looking pages by just dragging and dropping elements where you want them.
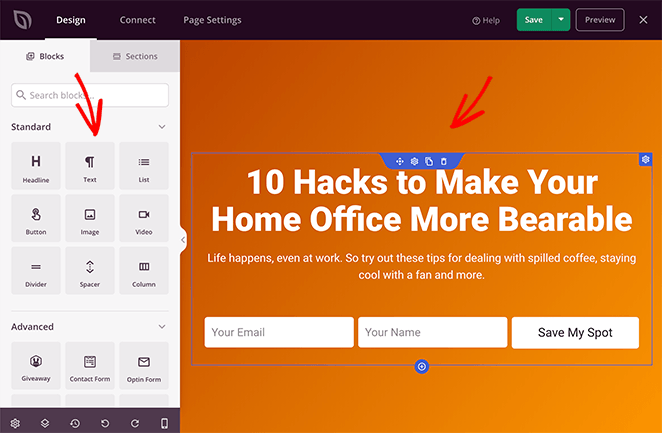
Plus, SeedProd comes with pre-made landing page templates that you can customize for your event. Just pick a template, change the colors and content, and add your registration form.
Want to learn how? Check out our step-by-step guide on how to create a landing page with a form. You’ll have a professional event registration page up and running in no time.
Get Started with Event Registrations
You now know how to create a WordPress event registration form, to increase event attendance and skyrocket your ticket sales.
If you’re interested in learning what other forms you can create in WPForms, check out our other form tutorials:
- WordPressでマルチステップフォームを作成する方法
- ファイルアップロード機能付きWordPressフォームの作り方
- How To Create a Typeform-Style Form On WordPress
- WordPressサイトにオンライン注文フォームを作成する方法
- WordPressでお問い合わせフォームを作成する方法
- How To Add A Survey To Your WordPress Website
And if you liked this article, don’t forget to follow us on Facebook and Twitter for more helpful WordPress tutorials.



Hi. Thanks for such a useful article.
May I know where to get the data of people who have registered via the form so that I can download into Excel?
Hi Iskandar. From your forms dashhboard, click the form you want to export data from. At the top of the next page, there should be an option to “Export All” Here’s a step-by-step guide to help you out: https://wpforms.com/how-to-export-wordpress-form-entries-to-csv/