


Kurz gesagt: So passen Sie passwortgeschützte Seiten in WordPress an
Der Standard-Passbildschirm von WordPress ist schlicht und ohne Branding. Hier sind die drei Methoden, die in dieser Anleitung behandelt werden.
- Passwortschutz aktivieren – Legen Sie jede Seite in den WordPress-Sichtbarkeitseinstellungen auf „Passwortgeschützt“ fest.
- Gestalten Sie Ihre Seite mit SeedProd – Verwenden Sie den Drag-and-Drop-Builder, um Ihr Logo, Ihre Farben und ein benutzerdefiniertes Passwortformular hinzuzufügen.
- Zugriffskontrollen festlegen – Geben Sie mithilfe der Inklusions-/Exklusions-URL-Einstellungen von SeedProd an, welche URLs Ihre benutzerdefinierte Passwortseite anzeigen.
- Verwenden Sie CSS Hero für schnelle Bearbeitungen – Ändern Sie Farben und Schriftarten des Standard-Passwortformulars, ohne Code schreiben zu müssen.
- Seitenweit mit SeedProd arbeiten – Schalten Sie den „Coming Soon“-Modus auf Aktiv, um Ihre benutzerdefinierte Seite auf Ihrer gesamten Website anzuwenden.
Ich habe festgestellt, dass die Anpassung dieser einfachen Seite eine der einfachsten Möglichkeiten ist, die Professionalität der Website zu verbessern. Sie versichert Kunden und Mitgliedern, dass sie sich in einer sicheren, gebrandeten Umgebung befinden.
In dieser Anleitung zeige ich Ihnen die drei effektivsten Methoden, um dieses Standardformular durch ein Design zu ersetzen, das tatsächlich zu Ihrer Marke passt.
- Warum eine passwortgeschützte WordPress-Seite anpassen?
- So schützen Sie eine WordPress-Seite mit einem Passwort
- Methode 1. Spezifische passwortgeschützte Seiten anpassen
- Methode 2: Das Standard-WordPress-Passwortformular mit CSS Hero anpassen
- Methode 2b: Anpassung mit benutzerdefiniertem PHP-Code (ohne Plugin)
- Methode 3: Erstellen Sie eine WordPress-Passwort-Wall (Seite sperren) für Ihre gesamte Website
- Bonus: Kreative Verwendungsmöglichkeiten für passwortgeschützte WordPress-Inhalte
- FAQs zum Passwortschutz in WordPress
Warum eine passwortgeschützte WordPress-Seite anpassen?
Wenn Sie exklusive Inhalte mit Kunden oder Mitgliedern teilen, hilft Ihnen die integrierte Funktion zum Schutz von WordPress-Seiten mit Passwort, diese Inhalte schnell zu sichern. Sie können einzelne Seiten oder Ihre gesamte Website mit einem einfachen Passwort sperren.
Ich verwende sie oft für private Landingpages, die sich noch in der Entwicklung befinden, aber sie eignet sich auch hervorragend für Online-Kurse, Downloads oder Premium-Artikel. Das Problem ist, dass WordPress einen schlichten grauen Passwortbildschirm anzeigt, der nicht zum Design oder Ton Ihrer Website passt.

Die Anpassung dieses Bildschirms lässt Ihre Website professioneller wirken und schafft Vertrauen. Recherchen von Lucidpress zeigen, dass konsistentes Branding auf allen Seiten das Vertrauen um bis zu 33 % steigern kann.
Hier ist, warum es wichtig ist:
- Markenkonsistenz verstärken. Ihr Logo und Ihre Farben bleiben auch bei gesperrten Inhalten sichtbar.
- Benutzererfahrung verbessern. Ein gebrandetes Design gibt Besuchern das Gefühl, am richtigen Ort zu sein.
- Benutzer klar leiten. Fügen Sie eine kurze Nachricht hinzu, die erklärt, was sich hinter der Seite verbirgt und wie man darauf zugreift.
Kurz gesagt, die Gestaltung Ihrer Passwortseite dreht sich um Vertrauen, Klarheit und eine konsistente Erfahrung für Ihre Besucher.
Wann Sie passwortgeschützte WordPress-Seiten oder -Beiträge verwenden sollten
Sie benötigen nicht immer ein vollständiges Mitgliedschafts-Plugin, um Ihre Inhalte zu schützen. In vielen Fällen reicht ein einfaches Passwort völlig aus.
Hier sind einige der nützlichsten Möglichkeiten, passwortgeschützte Seiten und Beiträge zu verwenden:
| Anwendungsfall | Beschreibung / Beispiel |
|---|---|
| Kunden-Seiten | Teilen Sie Design-Mockups, Berichte oder Verträge privat mit Kunden. |
| Seiten im Aufbau | Verstecken Sie Seiten, an denen Sie gerade arbeiten, bis sie live gehen können. |
| Interne Team-Inhalte | Halten Sie interne Zeitpläne, SOPs oder Ankündigungen privat. |
| Zeitlich begrenzte Angebote | Erstellen Sie geheime Aktionsseiten für VIPs oder E-Mail-Abonnenten. |
| Persönliche Projekte | Verstecken Sie unfertige Entwürfe oder Testseiten vor der Öffentlichkeit. |
| Geschützte Blogbeiträge | Sichern Sie sensible oder Premium-Artikel mit dem integrierten Passwortschutz von WordPress. |
Die Verwendung des Passwortschutzes auf diese Weise hält Ihren Workflow einfach und wahrt gleichzeitig Privatsphäre und Professionalität.
So schützen Sie eine WordPress-Seite mit einem Passwort
Hinweis: Sie müssen diese integrierte WordPress-Einstellung nur aktivieren, wenn Sie Methode 2 (CSS Hero) oder das Standard-Styling verwenden möchten. Wenn Sie Methode 1 oder Methode 3 (SeedProd) verwenden, können Sie diesen Abschnitt überspringen, da SeedProd den Schutz automatisch übernimmt.
Viele Benutzer möchten wissen, wie man eine Website, eine einzelne Seite oder eine Kategorie mit einem Passwort schützt. Wenn Sie die Standardmethode oder CSS Hero verwenden, können Sie den Schutz für bestimmte Seiten im Editor aktivieren:
- Öffnen Sie die Seite oder den Beitrag, den Sie schützen möchten, im WordPress-Editor.
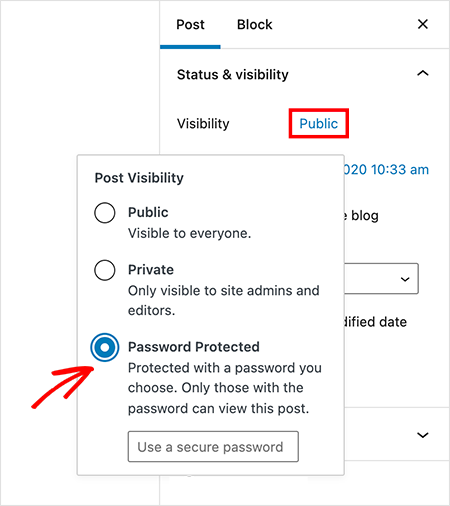
- Klicken Sie im Bereich „Zusammenfassung“ auf der rechten Seite auf den Link neben „Sichtbarkeit“.
- Wählen Sie aus den angezeigten Optionen „Passwortgeschützt“.
- Geben Sie ein sicheres Passwort in das Textfeld ein.
- Klicken Sie auf die Schaltfläche „Aktualisieren“ oder „Veröffentlichen“, um Ihre Änderungen zu speichern.
Sie haben nun die spezifische Seite mit einem Passwort geschützt. Das Ergebnis ist jedoch der unten gezeigte Standardbildschirm ohne Branding:

Nun gehen wir einige Möglichkeiten durch, wie Sie den Inhalt von passwortgeschützten WordPress-Seiten anpassen können, damit er zum Rest Ihrer Website passt.
Methode 1. Spezifische passwortgeschützte Seiten anpassen
| Preis: Ab 39,50 $/Jahr |
| Kostenloser Plan / Testversion: Ja (eingeschränkte Funktionen) |
| Herausragende Funktionen: |
| 🔹Drag-and-Drop-Builder für vollständige Designkontrolle 🔹Zugriffskontrollen zum Schutz einzelner Seiten 🔹Benutzerdefinierter Shortcode für Passwortformulare und Design-Tools |
| Bewertung: A+ |
| Am besten geeignet für: Benutzer, die vollständig gebrandete passwortgeschützte Seiten ohne Programmierung wünschen |
Der beste Weg, eine vollständig benutzerdefinierte passwortgeschützte Seite zu erstellen, ist mit SeedProd, einem Drag-and-Drop-Website-Builder für WordPress. Es ermöglicht Ihnen, eine Seite von Grund auf neu zu gestalten und den Standard-Passwortbildschirm auf jeder Seite zu ersetzen.
Im Gegensatz zu Standard-Passwortseiten können Sie mit SeedProd Marketingelemente wie Anmeldeformulare oder Countdown-Timer direkt auf den gesperrten Bildschirm einfügen.

Für diese Methode besteht unsere Strategie darin, den Drag-and-Drop-Builder von SeedProd zu verwenden, um eine neue, benutzerdefinierte Seite zu entwerfen. Wir werden sie dann so konfigurieren, dass sie anstelle des Standard-WordPress-Passwortbildschirms angezeigt wird, aber nur für die von Ihnen ausgewählten spezifischen URLs, die Sie schützen möchten.
Alternativ können Sie diese schriftlichen Anweisungen befolgen:
Schritt 1: SeedProd installieren und öffnen
Installieren und aktivieren Sie zuerst das SeedProd-Plugin. Nach der Aktivierung navigieren Sie in Ihrem WordPress-Admin-Dashboard zu SeedProd » Landing Pages.
Schritt 2: Eine „Coming Soon“- oder Wartungsseite erstellen

Klicken Sie im Bereich „Coming Soon Mode“ auf die Schaltfläche „Coming Soon“-Seite einrichten.

Sie sehen nun eine Bibliothek professioneller Vorlagen. Fahren Sie mit der Maus über die Vorlage, die Sie verwenden möchten, und klicken Sie auf das Häkchensymbol, um sie auszuwählen.

Die Vorlage wird im Drag-and-Drop-Builder von SeedProd geöffnet.
Schritt 3: Seite mit Drag-and-Drop-Blöcken anpassen

Auf der linken Seite finden Sie eine Vielzahl von Blöcken, mit denen Sie Ihre Seite erstellen können. Ziehen Sie einen beliebigen Block aus dem Bereich und legen Sie ihn auf Ihrer Seiten-Vorschau auf der rechten Seite ab. Klicken Sie auf ein beliebiges Element auf der Seite, um dessen Einstellungen zu öffnen und Inhalt und Stil anzupassen.

Sie können Standardblöcke wie Überschriften und Bilder hinzufügen oder fortgeschrittene Blöcke wie Kontaktformulare, Giveaways und Countdown-Timer.

Schritt 4: Einen benutzerdefinierten Passwortformular-Shortcode in WordPress hinzufügen
Um das Passwort-Eingabefeld hinzuzufügen, ziehen Sie den Block „Benutzerdefinierter HTML-Code“ aus dem linken Bereich auf Ihre Seite.

Klicken Sie auf den Block, um den Inhalt zu bearbeiten. Fügen Sie dann den folgenden Shortcode direkt in das HTML-Feld ein:
<div class="row"> <div class="col-md-12 seperate"> <div class="input-group"> <input type="password" id="cspio-bypass" class="form-control input-lg form-el sp-form-input" placeholder="Password"></input> <span class="input-group-btn"> <button id="cspio-bypass-btn" class="btn btn-lg btn-primary form-el noglow">Enter</button> </span> </div> </div> </div> <script> jQuery( document ).ready(function($) { $( "#cspio-bypass-btn" ).click(function(e) { e.preventDefault(); window.location = "?bypass="+$("#cspio-bypass").val()+'&return='; }); }); </script>
Dieser Shortcode generiert die eigentliche Passwort-Eingabebox und den Senden-Button auf der Live-Seite. Er wird im Editor nicht angezeigt, aber Sie können ihn in der Live-Vorschau sehen.
Schritt 5: Zugriff auf passwortgeschützte Inhalte in WordPress steuern
Konfigurieren Sie als Nächstes die Zugriffskontrollen der Seite. Klicken Sie oben auf dem Bildschirm auf die Registerkarte „Seiteneinstellungen“ und wählen Sie dann „Zugriffskontrollen“.

Suchen Sie den Bereich „Bypass-URL“. Geben Sie Ihr gewünschtes Passwort in das Feld ein. Dies funktioniert genau wie das Passwort, das Ihre Besucher eingeben werden.
Fügen Sie unter „URLs einschließen“ die URLs der Seiten ein, die Sie mit diesem benutzerdefinierten Design schützen möchten.

Schritt 6: Ihr Design veröffentlichen und die Seite aktivieren
Veröffentlichen Sie zuerst das von Ihnen erstellte Seitendesign. Klicken Sie im SeedProd-Builder auf den Dropdown-Pfeil neben der Schaltfläche „Speichern“ und wählen Sie „Veröffentlichen“. Eine Bestätigungsnachricht wird angezeigt, und Sie können auf „Live-Seite anzeigen“ klicken, um Ihre Arbeit in der Vorschau anzuzeigen.

Aktivieren Sie als Nächstes den Modus, um die Seite für die von Ihnen ausgewählten URLs live zu schalten. Navigieren Sie zurück zu Ihrem SeedProd » Landing Pages-Dashboard. Wechseln Sie im Bereich „Coming Soon Mode“ den Schalter von „Inaktiv“ auf „Aktiv“.

Keine Sorge, dies wird nicht Ihre gesamte Website offline nehmen. Die Zugriffskontrollen, die Sie im vorherigen Schritt konfiguriert haben, stellen sicher, dass diese Seite nur die von Ihnen ausgewählten spezifischen URLs schützt. Ihre benutzerdefinierte passwortgeschützte Seite ist jetzt live!

Möchten Sie Ihre eigene, markenkonforme, passwortgeschützte Seite in wenigen Minuten erstellen?
Methode 2: Das Standard-WordPress-Passwortformular mit CSS Hero anpassen
| Preise: Ab 29 $/Jahr |
| Kostenloser Plan / Testversion: Nein |
| Herausragende Funktionen: |
| 🔹Point-and-Click-CSS-Editor 🔹Schriftarten, Farben und Hintergrundbilder ändern 🔹Funktioniert mit jedem WordPress-Theme |
| Bewertung: B+ |
| Am besten geeignet für: Schnelle visuelle Anpassungen der Standard-Passwortseite |
Wenn Sie nur kleine visuelle Anpassungen an der Standard-Passwortseite vornehmen müssen, können Sie ein visuelles CSS-Editor-Plugin wie CSS Hero verwenden. Dieses Tool bietet eine Point-and-Click-Oberfläche zur Bearbeitung des Designs Ihres Themes, ohne Code schreiben zu müssen, was es zu einer schnellen Option für die Änderung von Farben, Schriftarten und Abständen macht.
Schritt 1: CSS Hero installieren und starten
Installieren Sie zuerst das CSS Hero Plugin. Nach der Aktivierung navigieren Sie zur passwortgeschützten Seite im Frontend Ihrer Website. Klicken Sie in der WordPress Admin-Leiste oben auf Mit CSS Hero anpassen.

Dies öffnet die visuelle Editor-Oberfläche von CSS Hero.

Schritt 2: Elemente Ihrer Passwortseite gestalten
Wenn der Editor aktiv ist, klicken Sie auf ein beliebiges Element auf der Seite, z. B. den Titel, den Formularcontainer oder die Schaltfläche. Das CSS Hero-Panel auf der linken Seite zeigt Styling-Optionen für dieses Element an, einschließlich Typografie, Farben, Abstände und Hintergründe.

Verwenden Sie das Panel, um Ihre gewünschten Änderungen vorzunehmen. Sie können eine neue Hintergrundfarbe auswählen, die Schriftgröße anpassen oder den Stil der Schaltfläche ändern. Alle Änderungen werden in der Live-Vorschau angezeigt.

Passen Sie das Design weiter an, bis es zu Ihrer Marke passt. Beachten Sie, dass CSS Hero nur vorhandene Elemente gestalten kann; es können keine neuen Elemente wie Kontaktformulare oder E-Mail-Anmeldefelder hinzugefügt werden.
Schritt 3: Änderungen speichern und in der Vorschau anzeigen
Sobald Sie mit Ihrem Design zufrieden sind, klicken Sie unten im CSS Hero-Panel auf die Schaltfläche Speichern und Veröffentlichen. Um den Editor zu verlassen, klicken Sie auf das 'Beenden'-Symbol in der oberen rechten Ecke.

Sie sehen nun Ihre neu gestaltete, passwortgeschützte Seite.

Methode 2b: Anpassung mit benutzerdefiniertem PHP-Code (ohne Plugin)
Wenn Sie das Passwortformular anpassen möchten, ohne ein Plugin zu installieren, gibt Ihnen der WordPress-Filter the_password_form die direkte Kontrolle über die HTML-Ausgabe. Ich habe diesen Ansatz auf Kunden-Websites verwendet, wenn ich ein gebrandetes Formular benötigte, ohne einen weiteren Plugin zur Sammlung hinzuzufügen.
Fügen Sie den folgenden Codeausschnitt zur functions.php-Datei Ihres Themes hinzu. Für eine sicherere Codeverwaltung würde ich stattdessen WPCode verwenden. Damit können Sie Codeausschnitte ein- oder ausschalten, ohne direkt mit den Theme-Dateien zu arbeiten.
add_filter( 'the_password_form', 'custom_password_protected_form', 10, 2 );
function custom_password_protected_form( $output, $post ) {
    $label = 'pwbox-' . ( empty( $post->ID ) ? rand() : $post->ID );
    return '<form action="' . esc_url( site_url( 'wp-login.php?action=postpass', 'login_post' ) ) . '" class="post-password-form" method="post">
        <p>This content is password protected. Enter your password to view it.</p>
        <label for="' . esc_attr( $label ) . '">Password:
            <input name="post_password" id="' . esc_attr( $label ) . '" type="password" />
        </label>
        <input type="submit" value="Enter" />
    </form>';
}
Sobald der Codeausschnitt aktiv ist, gestalten Sie das Formular mit CSS, das auf die Klasse .post-password-form abzielt. Fügen Sie ihn unter Design > Anpassen > Zusätzliches CSS oder in Ihrer Theme-Stylesheet-Datei hinzu.
.post-password-form {
    max-width: 400px;
    margin: 40px auto;
    padding: 30px;
    background: #f9f9f9;
    border-radius: 8px;
}
.post-password-form input[type="password"] {
    width: 100%;
    padding: 10px;
    margin: 10px 0;
    border: 1px solid #ddd;
    border-radius: 4px;
}
.post-password-form input[type="submit"] {
    background: #0073aa;
    color: white;
    padding: 10px 20px;
    border: none;
    cursor: pointer;
    border-radius: 4px;
}
Beachten Sie, dass diese Methode nur das Formular selbst anpasst. Sie erhalten kein vollständiges benutzerdefiniertes Seitenlayout wie bei SeedProd, aber es ist eine gute Option, wenn Sie sich mit WordPress-Codeausschnitten auskennen.
Methode 3: Erstellen Sie eine WordPress-Passwort-Wall (Seite sperren) für Ihre gesamte Website
| Preis: Ab 39,50 $/Jahr |
| Kostenloser Plan / Testversion: Ja (eingeschränkte Funktionen) |
| Herausragende Funktionen: |
| 🔹Ein-Klick-Passwortwand für die gesamte Website 🔹Benutzerdefinierte Designs auf Ihrer gesamten Website anwenden 🔹Admin- und wichtige Seiten vom Sperrbildschirm ausschließen |
| Bewertung: A |
| Am besten geeignet für: Vorübergehender Schutz ganzer Websites (im Aufbau oder in Wartung) |
Sie können SeedProd auch verwenden, um Ihre gesamte Website hinter einer einzigen Passwortwand zu schützen. Dies ist nützlich für Websites im Aufbau, während Wartungsarbeiten oder für private Kunden-Vorschauen. Diese Methode verwendet dieselbe benutzerdefinierte Seite, die Sie in Methode 1 entworfen haben, wendet sie aber global an.
Um den passwortgeschützten Zugriff für die gesamte Website zu aktivieren, navigieren Sie in Ihrem WordPress-Dashboard zu SeedProd » Landing Pages. Klicken Sie im Panel „Wartemodus“ auf Seite bearbeiten.

Klicken Sie im SeedProd-Editor auf den Tab Seiteneinstellungen und wählen Sie Zugriffskontrollen. Scrollen Sie nach unten zum Abschnitt „URLs einschließen/ausschließen“ und wählen Sie die Option „Auf der gesamten Website anzeigen“.

Klicken Sie abschließend auf „Speichern“, um Ihre Einstellungen zu aktualisieren. Sobald der „Wartemodus“ aktiv ist, wird Ihre benutzerdefinierte Seite auf jeder URL angezeigt. Dies schafft effektiv eine passwortgeschützte Wand für die gesamte Website in WordPress.
Bonus: Kreative Verwendungsmöglichkeiten für passwortgeschützte WordPress-Inhalte
Passwortschutz in WordPress dient nicht nur zum Verstecken unfertiger Seiten. Sie können ihn nutzen, um Exklusivität zu schaffen, private Erlebnisse zu bieten oder den Zugriff für Kunden zu verwalten.
Sie fragen sich vielleicht: „Wie kann ich die Passwortseite für diese spezifischen Bedürfnisse anpassen?“ Die Antwort liegt darin, die oben genannten Werkzeuge zu verwenden, um Ihr Design an den Anwendungsfall anzupassen. Hier sind einige kreative Ideen:
| Kreative Nutzung | Warum es effektiv ist |
|---|---|
| Gated Newsletter | Geben Sie Abonnenten mit einem gemeinsamen Passwort Zugriff auf Bonusbeiträge oder Insider-Updates. |
| Premium-Videos | Schützen Sie exklusive Tutorials oder Aufzeichnungen von Schulungen und halten Sie sie für Mitglieder privat. |
| Kunden-Dashboards | Bieten Sie Kunden einen privaten Bereich mit Fortschrittsaktualisierungen, Assets und Ressourcen. |
| Mini-Mitgliedschaftsbereiche | Erstellen Sie schlanke, nur für Mitglieder zugängliche Bereiche, ohne ein vollständiges Plugin zu benötigen. |
| Private Veranstaltungen | Verbergen Sie Veranstaltungsdetails oder Registrierungslinks hinter einer passwortgeschützten Seite für Teilnehmer. |
Jedes dieser Beispiele ermöglicht es Ihnen, einfachen Passwortschutz zu nutzen, um Vertrauen, Exklusivität und Professionalität ohne zusätzliche Werkzeuge aufzubauen.
FAQs zum Passwortschutz in WordPress
Wie entferne ich das Präfix „Geschützt:“ aus dem Seitentitel in WordPress?
WordPress fügt automatisch „Geschützt: “ vor dem Seitentitel ein, wenn der Passwortschutz aktiviert ist. Um es zu entfernen, fügen Sie diesen Codeausschnitt zu Ihrer functions.php-Datei hinzu oder verwenden Sie WPCode: add_filter('protected_title_format', function() { return '%s'; }); Dies ersetzt das Standardformat durch nur den Titel. Wenn Sie die benutzerdefinierte Passwortseite von SeedProd verwenden, erscheint das Präfix überhaupt nicht, da Sie das gesamte Seitenlayout von Grund auf neu gestalten.
Kann ich dasselbe Passwort für mehrere WordPress-Seiten verwenden?
Ja. Legen Sie im WordPress-Editor dasselbe Passwort in den Sichtbarkeitseinstellungen für jede Seite fest, die Sie schützen möchten. Wenn Sie möchten, dass ein einzelnes Passwort mehrere Seiten gleichzeitig abdeckt, können Sie mit der Funktion „Zugriffskontrollen“ von SeedProd mehrere URLs unter einer Passwortwand auflisten, sodass Besucher das Passwort nur einmal eingeben müssen, um auf alle zuzugreifen.
Wie passe ich die passwortgeschützte Seite ohne Plugin an?
Verwenden Sie den WordPress-Filter the_password_form, um das Standardformular durch Ihr eigenes HTML zu ersetzen. Fügen Sie den Filtercode zur functions.php-Datei Ihres Themes hinzu und gestalten Sie das Formular dann mit CSS, das auf .post-password-form abzielt. Diese Methode ermöglicht es Ihnen, Layout, Farben und Texte ohne Plugin zu ändern, obwohl das Ergebnis nicht mit einer vollständigen benutzerdefinierten Seitengestaltung übereinstimmt, wie es SeedProd tut.
Was ist der Unterschied zwischen einer passwortgeschützten Seite und einer privaten Seite in WordPress?
Eine passwortgeschützte Seite kann von jedem mit dem Passwort eingesehen werden, ohne dass ein Konto oder eine Anmeldung erforderlich ist. Eine private Seite ist nur für angemeldete WordPress-Benutzer mit Editor- oder Administratorrechten sichtbar und für alle anderen verborgen. Passwortschutz ist die richtige Wahl, wenn Sie Inhalte mit Kunden, Mitgliedern oder Abonnenten teilen möchten, die keine WordPress-Konten haben.
Werden passwortgeschützte Seiten von Google indiziert?
WordPress fügt passwortgeschützten Seiten ein noindex-Meta-Tag hinzu, das Google anweist, den Inhalt hinter der Passwortmauer nicht zu indizieren. Die Seiten-URL kann immer noch in den Suchergebnissen erscheinen, wenn andere Websites darauf verlinken, aber der geschützte Inhalt selbst wird nicht indiziert oder angezeigt. Wenn Sie möchten, dass die URL vollständig unsichtbar bleibt, ist der Wartungsmodus von SeedProd eine bessere Option.
Da haben Sie es!
Wahl der richtigen Passwortschutzmethode
Das Anpassen von passwortgeschützten Seiten in WordPress ist einfach, sobald Sie die richtigen Werkzeuge kennen. Sie müssen keinen Code anfassen oder Theme-Dateien bearbeiten, um Ihre Inhalte sicher per Passwort zu schützen.
- Verwenden Sie SeedProd, wenn Sie volle Designkontrolle mit einem Drag-and-Drop-Builder und benutzerdefinierten Zugriffseinstellungen wünschen.
- Verwenden Sie CSS Hero, wenn Sie nur schnelle visuelle Änderungen am Standard-Passwortformular vornehmen müssen, z. B. Farben oder Schriftarten ändern.
- Verwenden Sie die Website-weite Absicherung von SeedProd, wenn Sie Ihre gesamte Website während der Wartung oder Entwicklung hinter einer einzigen Passwortseite sperren möchten.
Jede Methode bietet eine sichere, professionelle Möglichkeit, Inhalte zu schützen und gleichzeitig Ihre Marke konsistent zu halten und Ihre Besucher von Ihrer Website zu überzeugen.
Für noch mehr Tipps zum Passwortschutz Ihrer WordPress-Website lesen Sie bitte diese Expertenanleitungen:
- So schützen Sie eine WordPress-Website mit einem Passwort: Der ultimative Leitfaden
- So schützen Sie eine WordPress-Seite mit einem Passwort (Schritt für Schritt)
- So schützen Sie eine WordPress-Website während der Entwicklung mit einem Passwort
- So schützen Sie Ihre WordPress-Website vor Hackern (17 Expertentipps)
Danke fürs Lesen! Wir würden uns freuen, Ihre Gedanken zu hören. Treten Sie also gerne der Unterhaltung auf YouTube, X und Facebook bei, um weitere hilfreiche Ratschläge und Inhalte für das Wachstum Ihres Unternehmens zu erhalten.


