RESUMEN: Cómo personalizar páginas protegidas con contraseña en WordPress
La pantalla de contraseña predeterminada de WordPress es simple y sin marca. Aquí tienes los tres métodos que se cubren en esta guía.
- Habilitar protección con contraseña: Establece cualquier página como "Protegida con contraseña" en la configuración de Visibilidad de WordPress.
- Diseña tu página con SeedProd: Usa el constructor de arrastrar y soltar para añadir tu logotipo, colores y un formulario de contraseña personalizado.
- Establece controles de acceso: Especifica qué URLs muestran tu página de contraseña personalizada usando la configuración de incluir/excluir URLs de SeedProd.
- Usa CSS Hero para ediciones rápidas: Cambia colores y fuentes en el formulario de contraseña predeterminado sin escribir código.
- Ve a todo el sitio con SeedProd: Cambia el interruptor del modo "Próximamente" a Activo para aplicar tu página personalizada en todo tu sitio.
He descubierto que personalizar esta página simple es una de las formas más fáciles de mejorar la profesionalidad del sitio. Reasegura a los clientes y miembros que se encuentran en un entorno seguro y con marca.
En esta guía, te mostraré las tres formas más efectivas de reemplazar ese formulario predeterminado con un diseño que realmente se ajuste a tu marca.
- ¿Por qué personalizar una página protegida con contraseña de WordPress?
- Cómo proteger con contraseña una página de WordPress
- Método 1. Personalizar páginas específicas protegidas con contraseña
- Método 2: Personaliza el Formulario de Contraseña Predeterminado de WordPress con CSS Hero
- Método 2b: Personalizar con código PHP personalizado (sin plugin)
- Método 3: Crear un muro de contraseñas de WordPress (bloquear página) para todo tu sitio
- Extra: Usos creativos para contenido protegido con contraseña de WordPress
- Preguntas Frecuentes sobre Protección con Contraseña en WordPress
¿Por qué personalizar una página protegida con contraseña de WordPress?
Si compartes contenido exclusivo con clientes o miembros, la función integrada de protección de páginas con contraseña de WordPress te ayuda a asegurar ese contenido rápidamente. Te permite bloquear páginas individuales o todo tu sitio con una contraseña simple.
A menudo la uso para páginas de destino privadas aún en desarrollo, pero también es genial para cursos en línea, descargas o artículos premium. El problema es que WordPress muestra una pantalla de contraseña gris simple que no coincide con el diseño o el tono de tu sitio.

Personalizar esa pantalla ayuda a que tu sitio se sienta más profesional y genera confianza. La investigación de Lucidpress indica que una marca consistente en todas las páginas puede mejorar la confianza hasta en un 33%.
Aquí te explicamos por qué es importante:
- Refuerza la coherencia de la marca. Tu logotipo y colores permanecen visibles también en el contenido bloqueado.
- Mejora la experiencia del usuario. Un diseño con marca hace que los visitantes sientan confianza de que están en el lugar correcto.
- Guía a los usuarios claramente. Añade un mensaje corto explicando qué hay detrás de la página y cómo acceder a ella.
En resumen, estilizar tu página de contraseña se trata de confianza, claridad y una experiencia consistente para tus visitantes.
Cuándo usar páginas o publicaciones protegidas con contraseña de WordPress
No siempre necesitas un plugin de membresía completo para proteger tu contenido. En muchos casos, una simple contraseña es suficiente.
Aquí tienes algunas de las formas más útiles de usar páginas y entradas protegidas con contraseña:
| Caso de uso | Descripción / Ejemplo |
|---|---|
| Páginas de clientes | Comparte maquetas de diseño, informes o contratos de forma privada con los clientes. |
| Páginas en construcción | Oculta las páginas que estás creando hasta que estén listas para publicarse. |
| Contenido del equipo interno | Mantén privados los horarios internos, los SOP o los anuncios. |
| Ofertas por tiempo limitado | Crea páginas de promoción secretas para VIP o suscriptores de correo electrónico. |
| Proyectos personales | Oculta borradores incompletos o páginas de prueba de la vista pública. |
| Entradas de blog protegidas | Asegura artículos sensibles o premium utilizando la protección de contraseña integrada de WordPress. |
Utilizar la protección con contraseña de esta manera mantiene tu flujo de trabajo simple al tiempo que preserva la privacidad y el profesionalismo.
Cómo proteger con contraseña una página de WordPress
Nota: Solo necesitas habilitar esta configuración integrada de WordPress si planeas usar el Método 2 (CSS Hero) o el estilo predeterminado. Si usas el Método 1 o el Método 3 (SeedProd), puedes omitir esta sección porque SeedProd maneja la protección automáticamente.
Muchos usuarios quieren saber cómo proteger con contraseña un sitio, una página individual o una categoría. Si estás utilizando el método predeterminado o CSS Hero, puedes habilitar la protección para páginas específicas desde el editor:
- Abre la página o entrada que deseas proteger en el editor de WordPress.
- En el panel 'Resumen' de la derecha, haz clic en el enlace junto a 'Visibilidad'.
- Elige 'Protegido con contraseña' entre las opciones que aparecen.
- Introduce una contraseña segura en el campo de texto.
- Haz clic en el botón 'Actualizar' o 'Publicar' para guardar tus cambios.
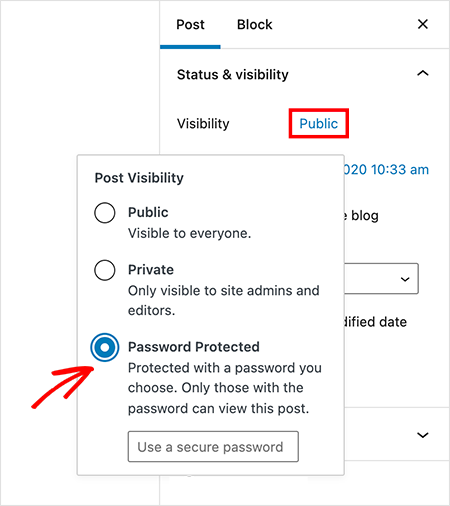
Ahora has protegido con contraseña la página específica. Sin embargo, el resultado es la pantalla predeterminada y sin marca que se muestra a continuación:

Ahora, veamos algunas formas de personalizar el contenido de las páginas protegidas con contraseña de WordPress para que coincida con el resto de tu sitio.
Método 1. Personalizar páginas específicas protegidas con contraseña
| Precios: A partir de 39,50 $/año |
| Plan/Prueba gratuita: Sí (funciones limitadas) |
| Funciones destacadas: |
| 🔹Constructor de arrastrar y soltar para un control de diseño completo 🔹Controles de acceso para proteger páginas individuales 🔹Herramientas de diseño y shortcode de formulario de contraseña personalizado |
| Calificación: A+ |
| Ideal para: Usuarios que desean páginas protegidas con contraseña totalmente personalizadas sin necesidad de codificación |
La mejor manera de crear una página protegida con contraseña totalmente personalizada es con SeedProd, un constructor de sitios web de WordPress de arrastrar y soltar. Te permite diseñar una página desde cero y reemplazar la pantalla de contraseña predeterminada en cualquier página.
A diferencia de las páginas de contraseñas estándar, SeedProd te permite a tilde;adir elementos de marketing como formularios de suscripci ilde;n o temporizadores de cuenta atr ilde;s directamente en la pantalla bloqueada.

Para este m ilde;todo, nuestra estrategia es usar el constructor de arrastrar y soltar de SeedProd para dise tilde;ar una p ilde;gina nueva y personalizada. Luego la configuraremos para que aparezca en lugar de la pantalla de contrase tilde;a predeterminada de WordPress, pero solo para las URL espec ilde;ficas que elijas proteger.
Alternativamente, puedes seguir estas instrucciones escritas:
Paso 1: Instalar y Abrir SeedProd
Primero, instala y activa el plugin SeedProd. Una vez activado, navega a SeedProd » Landing Pages desde tu panel de administraci ilde;n de WordPress.
Paso 2: Crear una P ilde;gina de Pr ilde;ximamente o Mantenimiento

En el panel 'Modo Pr ilde;ximamente', haz clic en el bot ilde;n Configurar una P ilde;gina Pr ilde;ximamente.

Ahora ver ilde;s una biblioteca de plantillas profesionales. Pasa el rat ilde;n sobre la plantilla que deseas usar y haz clic en el icono de marca de verificaci ilde;n para seleccionarla.

La plantilla se abrir ilde; en el constructor de arrastrar y soltar de SeedProd.
Paso 3: Personalizar la P ilde;gina con Bloques de Arrastrar y Soltar

A la izquierda, encontrar ilde;s una variedad de bloques que puedes usar para construir tu p ilde;gina. Arrastra cualquier bloque del panel y su ilde;ltalo en la vista previa de tu p ilde;gina a la derecha. Haz clic en cualquier elemento de la p ilde;gina para abrir su configuraci ilde;n y personalizar su contenido y estilo.

Puedes a tilde;adir bloques est ilde;ndar como titulares e im ilde;genes, o bloques avanzados como formularios de contacto, sorteos y temporizadores de cuenta atr ilde;s.

Paso 4: A tilde;adir un Shortcode Personalizado de Formulario de Contrase tilde;a en WordPress
Para a tilde;adir el campo de introducci ilde;n de contrase tilde;a, arrastra el bloque 'HTML Personalizado' desde el panel izquierdo a tu p ilde;gina.

Haz clic en el bloque para editar el contenido. Luego, pega el siguiente shortcode directamente en el campo HTML:
<div class="row"> <div class="col-md-12 seperate"> <div class="input-group"> <input type="password" id="cspio-bypass" class="form-control input-lg form-el sp-form-input" placeholder="Password"></input> <span class="input-group-btn"> <button id="cspio-bypass-btn" class="btn btn-lg btn-primary form-el noglow">Enter</button> </span> </div> </div> </div> <script> jQuery( document ).ready(function($) { $( "#cspio-bypass-btn" ).click(function(e) { e.preventDefault(); window.location = "?bypass="+$("#cspio-bypass").val()+'&return='; }); }); </script>
Este shortcode genera el cuadro de entrada de contrase tilde;a y el bot ilde;n de env ilde;o reales en la p ilde;gina en vivo. No aparecer ilde; en el editor, pero puedes verlo en la vista previa en vivo.
Paso 5: Controlar el Acceso al Contenido Protegido por Contrase tilde;a en WordPress
A continuaci ilde;n, necesitas configurar los controles de acceso de la p ilde;gina. Haz clic en la pesta tilde;a 'Configuraci ilde;n de P ilde;gina' en la parte superior de la pantalla, luego selecciona 'Controles de Acceso'.

Busca la secci ilde;n 'URL de Omisi ilde;n'. Introduce tu contrase tilde;a deseada en el campo. Esto funciona exactamente igual que la contrase tilde;a que tus visitantes introducir ilde;n.
En 'Incluir URL', pega las URL de las p ilde;ginas que deseas proteger con este dise tilde;o personalizado.

Paso 6: Publicar tu Dise tilde;o y Activar la P ilde;gina
Primero, publica el dise tilde;o de p ilde;gina que creaste. Dentro del constructor de SeedProd, haz clic en la flecha desplegable junto al bot ilde;n 'Guardar' y selecciona 'Publicar'. Aparecer ilde; un mensaje de confirmaci ilde;n y puedes hacer clic en 'Ver P ilde;gina en Vivo' para previsualizar tu trabajo.

A continuaci ilde;n, debes activar el modo para que la p ilde;gina est ilde; activa en las URL seleccionadas. Vuelve a tu panel de SeedProd » Landing Pages. En la secci ilde;n 'Modo Pr ilde;ximamente', cambia el interruptor de 'Inactivo' a 'Activo'.

No te preocupes, esto no pondrá todo tu sitio fuera de línea. Los Controles de Acceso que configuraste en el paso anterior aseguran que esta página solo proteja las URL específicas que seleccionaste. ¡Tu página personalizada protegida con contraseña ya está activa!

¿Quieres crear tu propia página protegida con contraseña y marca personalizada en minutos?
Método 2: Personaliza el Formulario de Contraseña Predeterminado de WordPress con CSS Hero
| Precios: A partir de 29 $/año |
| Plan Gratuito / Prueba: No |
| Funciones destacadas: |
| 🔹Editor CSS de apuntar y hacer clic 🔹Cambia fuentes, colores e imágenes de fondo 🔹Funciona con cualquier tema de WordPress |
| Calificación: B+ |
| Ideal para: Ajustes visuales rápidos de la página de contraseña predeterminada |
Si solo necesitas hacer pequeños ajustes visuales en la página de contraseña predeterminada, puedes usar un plugin de editor CSS visual como CSS Hero. Esta herramienta proporciona una interfaz de apuntar y hacer clic para editar el diseño de tu tema sin escribir código, lo que la convierte en una opción rápida para cambiar colores, fuentes y espaciado.
Paso 1: Instala y Lanza CSS Hero
Primero, instala el plugin CSS Hero. Una vez activado, navega a la página protegida con contraseña en el front-end de tu sitio. Desde la barra de administración de WordPress en la parte superior, haz clic en Personalizar con CSS Hero.

Esto abre la interfaz del editor visual de CSS Hero.

Paso 2: Estiliza los Elementos de tu Página de Contraseña
Con el editor activo, haz clic en cualquier elemento de la página, como el título, el contenedor del formulario o el botón. El panel de CSS Hero a la izquierda mostrará las opciones de estilo para ese elemento, incluyendo tipografía, colores, espaciado y fondos.

Usa el panel para hacer los cambios deseados. Puedes seleccionar un nuevo color de fondo, ajustar el tamaño de la fuente o cambiar el estilo del botón. Todos los cambios se reflejarán en la vista previa en vivo.

Continúa personalizando hasta que el diseño coincida con tu marca. Ten en cuenta que CSS Hero solo puede estilizar elementos existentes; no puede agregar nuevos como formularios de contacto o campos de registro de correo electrónico.
Paso 3: Guarda y Previsualiza tus Cambios
Una vez que estés satisfecho con tu diseño, haz clic en el botón Guardar y Publicar en la parte inferior del panel de CSS Hero. Para salir del editor, haz clic en el icono 'Salir' en la esquina superior derecha.

Ahora verás tu página protegida con contraseña recién estilizada.

Método 2b: Personalizar con código PHP personalizado (sin plugin)
Si deseas personalizar el formulario de contraseña sin instalar un plugin, el filtro the_password_form de WordPress te da control directo sobre la salida HTML. He utilizado este enfoque en sitios de clientes cuando necesitaba un formulario con marca sin agregar otro plugin a la pila.
Agrega el siguiente fragmento al archivo functions.php de tu tema. Para una gestión de código más segura, usaría WPCode en su lugar. Te permite activar o desactivar fragmentos sin tocar los archivos del tema directamente.
add_filter( 'the_password_form', 'custom_password_protected_form', 10, 2 );
function custom_password_protected_form( $output, $post ) {
    $label = 'pwbox-' . ( empty( $post->ID ) ? rand() : $post->ID );
    return '<form action="' . esc_url( site_url( 'wp-login.php?action=postpass', 'login_post' ) ) . '" class="post-password-form" method="post">
        <p>This content is password protected. Enter your password to view it.</p>
        <label for="' . esc_attr( $label ) . '">Password:
            <input name="post_password" id="' . esc_attr( $label ) . '" type="password" />
        </label>
        <input type="submit" value="Enter" />
    </form>';
}
Una vez que el fragmento esté activo, estiliza el formulario con CSS apuntando a la clase .post-password-form. Agrégalo en Apariencia > Personalizar > CSS adicional o en la hoja de estilos de tu tema.
.post-password-form {
    max-width: 400px;
    margin: 40px auto;
    padding: 30px;
    background: #f9f9f9;
    border-radius: 8px;
}
.post-password-form input[type="password"] {
    width: 100%;
    padding: 10px;
    margin: 10px 0;
    border: 1px solid #ddd;
    border-radius: 4px;
}
.post-password-form input[type="submit"] {
    background: #0073aa;
    color: white;
    padding: 10px 20px;
    border: none;
    cursor: pointer;
    border-radius: 4px;
}
Ten en cuenta que este método solo personaliza el formulario en sí. No te proporcionará un diseño de página completo como SeedProd, pero es una opción sólida si te sientes cómodo trabajando con fragmentos de código de WordPress.
Método 3: Crear un muro de contraseñas de WordPress (bloquear página) para todo tu sitio
| Precios: A partir de 39,50 $/año |
| Plan/Prueba gratuita: Sí (funciones limitadas) |
| Funciones destacadas: |
| 🔹Muro de contraseñas en todo el sitio con un solo clic 🔹Aplica diseños personalizados en todo tu sitio 🔹Excluye páginas de administrador y clave del bloqueo |
| Calificación: A |
| Ideal para: Proteger temporalmente sitios completos (en construcción o en mantenimiento) |
También puedes usar SeedProd para proteger todo tu sitio web detrás de un muro de contraseñas único. Esto es útil para sitios en construcción, durante el mantenimiento o para vistas previas privadas de clientes. Este método utiliza la misma página personalizada que diseñaste en el Método 1, pero la aplica globalmente.
Para habilitar la protección con contraseña en todo el sitio, navega a SeedProd » Landing Pages desde tu panel de WordPress. En el panel 'Modo Próximamente', haz clic en Editar Página.

En el editor de SeedProd, ve a la pestaña Configuración de Página y selecciona Controles de Acceso. Desplázate hacia abajo hasta la sección 'Incluir/Excluir URLs' y selecciona la opción 'Mostrar en Todo el Sitio Web'.

Finalmente, haz clic en 'Guardar' para actualizar tu configuración. Una vez que el 'Modo Próximamente' esté activo, tu página personalizada aparecerá en cada URL. Esto crea efectivamente un muro de contraseñas de WordPress en todo el sitio.
Extra: Usos creativos para contenido protegido con contraseña de WordPress
La protección con contraseña de WordPress no es solo para ocultar páginas inacabadas. Puedes usarla para añadir exclusividad, ofrecer experiencias privadas o gestionar el acceso de clientes.
Podrías preguntar: "¿Cómo puedo personalizar la página de contraseña para estas necesidades específicas?" La respuesta está en usar las herramientas anteriores para que tu diseño coincida con el caso de uso. Aquí tienes algunas ideas creativas:
| Uso Creativo | Por qué es Efectivo |
|---|---|
| Boletines Cerrados | Ofrece a los suscriptores acceso a publicaciones extra o actualizaciones exclusivas usando una contraseña compartida. |
| Vídeos Premium | Protege tutoriales exclusivos o repeticiones de formación, manteniéndolos privados para los miembros. |
| Paneles de Cliente | Ofrece a los clientes un espacio privado con actualizaciones de progreso, activos y recursos. |
| Mini Áreas de Membresía | Crea áreas ligeras solo para miembros sin necesidad de un plugin completo. |
| Eventos Privados | Oculta los detalles del evento o los enlaces de registro detrás de una página solo con contraseña para los asistentes. |
Cada uno de estos ejemplos te permite usar protección simple con contraseña para construir confianza, exclusividad y profesionalismo sin herramientas adicionales.
Preguntas Frecuentes sobre Protección con Contraseña en WordPress
¿Cómo elimino el prefijo "Protected:" del título de la página en WordPress?
WordPress añade automáticamente "Protected: " antes del título de la página cuando la protección con contraseña está habilitada. Para eliminarlo, añade este fragmento a tu archivo functions.php o usa WPCode: add_filter('protected_title_format', function() { return '%s'; }); Esto reemplaza el formato predeterminado solo con el título. Si estás usando la página de contraseña personalizada de SeedProd, el prefijo no aparece en absoluto, ya que diseñas el diseño completo de la página desde cero.
¿Puedo usar la misma contraseña para varias páginas de WordPress?
Sí. En el editor de WordPress, establece la misma contraseña en la configuración de Visibilidad para cada página que quieras proteger. Si deseas que una sola contraseña cubra varias páginas simultáneamente, la función de Controles de Acceso de SeedProd te permite listar varias URL bajo un muro de contraseñas, para que los visitantes solo necesiten introducir la contraseña una vez para acceder a todas ellas.
¿Cómo personalizo la página protegida por contraseña sin un plugin?
Utiliza el filtro the_password_form de WordPress para reemplazar el formulario predeterminado con tu propio HTML. Añade el código del filtro al archivo functions.php de tu tema, y luego estiliza el formulario con CSS apuntando a .post-password-form. Este método te permite cambiar el diseño, los colores y el texto sin ningún plugin, aunque el resultado no coincidirá con un diseño de página personalizado completo como lo hace SeedProd.
¿Cuál es la diferencia entre una página protegida por contraseña y una página privada en WordPress?
Una página protegida por contraseña puede ser vista por cualquier persona que tenga la contraseña, sin necesidad de cuenta o inicio de sesión. Una página privada solo es visible para los usuarios de WordPress conectados con roles de editor o administrador y está oculta para todos los demás. La protección con contraseña es la opción correcta cuando deseas compartir contenido con clientes, miembros o suscriptores que no tienen cuentas de WordPress.
¿Las páginas protegidas por contraseña son indexadas por Google?
WordPress añade una metaetiqueta noindex a las páginas protegidas por contraseña, lo que indica a Google que no indexe el contenido detrás del muro de contraseñas. La URL de la página aún puede aparecer en los resultados de búsqueda si otros sitios enlazan a ella, pero el contenido protegido en sí no será indexado ni mostrado. Si necesitas que la URL sea completamente invisible, el modo de mantenimiento de SeedProd es una mejor opción.
¡Ahí lo tienes!
Elegir el Método de Protección con Contraseña Adecuado
Personalizar páginas protegidas por contraseña en WordPress es sencillo una vez que conoces las herramientas adecuadas. No necesitas tocar código ni editar archivos del tema para proteger tu contenido de forma segura con contraseña.
- Usa SeedProd si deseas un control total del diseño con un constructor de arrastrar y soltar y configuraciones de acceso personalizadas.
- Usa CSS Hero si solo necesitas ediciones visuales rápidas del formulario de contraseña predeterminado, como cambiar colores o fuentes.
- Usa la protección de todo el sitio de SeedProd si deseas bloquear todo tu sitio web detrás de una única página de contraseña durante el mantenimiento o el desarrollo.
Cada método ofrece una forma segura y profesional de proteger el contenido, manteniendo la coherencia de tu marca y la confianza de tus visitantes en tu sitio.
Para obtener aún más consejos sobre cómo proteger tu sitio de WordPress con contraseña, consulta estas guías expertas:
- Cómo proteger un sitio de WordPress con contraseña: La guía definitiva
- Cómo proteger con contraseña una página de WordPress (paso a paso)
- Cómo proteger un sitio de WordPress con contraseña mientras está en desarrollo
- Cómo proteger tu sitio de WordPress contra hackers (17 consejos de expertos)
¡Gracias por leer! Nos encantaría conocer tu opinión, así que únete a la conversación en YouTube, X y Facebook para obtener más consejos y contenido útil para hacer crecer tu negocio.