


要約:WordPressのパスワード保護されたページをカスタマイズする方法
WordPressのデフォルトのパスワード画面は、シンプルでブランド化されていません。このガイドで説明する3つの方法を紹介します。
- パスワード保護を有効にする – WordPressの表示設定で、任意のページを「パスワード保護」に設定します。
- SeedProdでページをデザインする – ドラッグ&ドロップビルダーを使用して、ロゴ、色、カスタムパスワードフォームを追加します。
- アクセス制御を設定する – SeedProdのURLの含める/除外する設定を使用して、どのURLにカスタムパスワードページを表示するかを指定します。
- CSS Heroを使用して迅速に編集する – コードを書かずに、デフォルトのパスワードフォームの色とフォントを変更します。
- SeedProdでサイト全体に展開する – 「Coming Soon」モードのトグルを「Active」に切り替えて、カスタムページをサイト全体に適用します。
このシンプルなページをカスタマイズすることは、サイトのプロフェッショナリズムを向上させる最も簡単な方法の1つであることがわかりました。これにより、クライアントやメンバーは、安全でブランド化された環境にいることを確信できます。
このガイドでは、そのデフォルトのフォームを、ブランドに実際に合ったデザインに置き換えるための3つの最も効果的な方法を紹介します。
WordPressパスワード保護ページをカスタマイズする理由
クライアントやメンバーと限定コンテンツを共有する場合、WordPressの組み込みパスワード保護ページ機能を使用すると、そのコンテンツをすばやく保護できます。これにより、個々のページまたはサイト全体を簡単なパスワードでロックできます。
開発中のプライベートランディングページによく使用しますが、オンラインコース、ダウンロード、プレミアム記事にも最適です。問題は、WordPressがサイトのデザインやトーンに合わない、シンプルな灰色のパスワード画面を表示することです。

その画面をカスタマイズすると、サイトがよりプロフェッショナルに見え、信頼が構築されます。Lucidpressの調査によると、すべてのページで一貫したブランディングを行うと、信頼が最大33%向上する可能性があります。
なぜそれが重要なのかを説明します:
- ブランドの一貫性を強化する。ロックされたコンテンツでも、ロゴと色が引き続き表示されます。
- ユーザーエクスペリエンスを向上させる。ブランド化されたデザインにより、訪問者は正しい場所にいると確信できます。
- ユーザーを明確にガイドする。ページの後ろにあるものとアクセス方法を説明する短いメッセージを追加します。
要するに、パスワードページをスタイリングすることは、信頼、明確さ、そして訪問者にとっての一貫したエクスペリエンスに関するものです。
WordPressパスワード保護ページまたは投稿を使用するタイミング
コンテンツを保護するために、常に完全なメンバーシッププラグインが必要なわけではありません。多くの場合、単純なパスワードで十分です。
パスワードで保護されたページや投稿を使用する最も便利な方法をいくつかご紹介します。
| ユースケース | 説明 / 例 |
|---|---|
| クライアントページ | デザインモックアップ、レポート、契約書などをクライアントとプライベートに共有します。 |
| 工事中ページ | 公開準備ができるまで、作成中のページを非表示にします。 |
| 社内チームコンテンツ | 社内スケジュール、SOP、お知らせなどをプライベートに保ちます。 |
| 期間限定オファー | VIPまたはメール購読者向けの秘密のプロモーションページを作成します。 |
| 個人プロジェクト | 未完成の下書きやテストページを一般公開から非表示にします。 |
| 保護されたブログ記事 | WordPressの組み込みパスワード保護を使用して、機密性の高い記事やプレミアム記事を保護します。 |
このようにパスワード保護を使用すると、ワークフローをシンプルに保ちながら、プライバシーとプロフェッショナリズムを維持できます。
WordPressページをパスワードで保護する方法
注意: 組み込みのWordPress設定を有効にする必要があるのは、方法2(CSS Hero)またはデフォルトのスタイルを使用する場合のみです。方法1または方法3(SeedProd)を使用する場合は、SeedProdが保護を自動的に処理するため、このセクションはスキップできます。
多くのユーザーは、サイト全体、個々のページ、またはカテゴリにパスワード保護を適用する方法を知りたいと思っています。デフォルトの方法またはCSS Heroを使用している場合は、エディターから特定のページに保護を有効にできます。
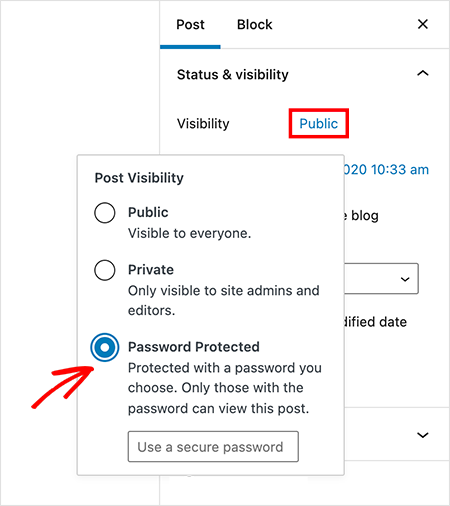
- 保護したいページまたは投稿をWordPressエディターで開きます。
- 右側の「概要」パネルで、「表示設定」の隣にあるリンクをクリックします。
- 表示されるオプションから「パスワード保護」を選択します。
- テキストフィールドに安全なパスワードを入力します。
- 「更新」または「公開」ボタンをクリックして、変更を保存します。
これで、特定のページがパスワード保護されました。ただし、結果は以下のデフォルトのブランド化されていない画面になります。

次に、WordPressのパスワード保護されたページコンテンツをカスタマイズして、サイトの他の部分と一致させる方法をいくつか見ていきましょう。
方法1. 特定のパスワード保護ページをカスタマイズする
| 価格設定: 年間39.50ドルから |
| 無料プラン/トライアル:あり(機能制限あり) |
| 注目の機能: |
| 🔹完全なデザインコントロールのためのドラッグ&ドロップビルダー 🔹個々のページを保護するためのアクセス制御 🔹カスタムパスワードフォームのショートコードとデザインツール |
| 評価: A+ |
| 最適な用途: コーディングなしで完全にブランド化されたパスワード保護ページを作成したいユーザー |
完全にカスタムなパスワード保護ページを作成する最良の方法は、ドラッグ&ドロップのWordPressウェブサイトビルダーであるSeedProdを使用することです。これにより、ゼロからページをデザインし、任意のページのデフォルトのパスワード画面を置き換えることができます。
標準のパスワードページとは異なり、SeedProdを使用すると、オプトインフォームやカウントダウンタイマーなどのマーケティング要素をロック画面に直接追加できます。

この方法では、SeedProdのドラッグ&ドロップビルダーを使用して、新しくカスタムされたページをデザインします。その後、WordPressのデフォルトのパスワード画面の代わりに表示されるように設定しますが、保護したい特定のURLに対してのみ有効になります。
または、これらの書面による指示に従うこともできます。
ステップ1:SeedProdのインストールと起動
まず、SeedProdプラグインをインストールして有効化します。有効化したら、WordPress管理ダッシュボードから SeedProd » ランディングページ に移動します。
ステップ2:近日公開またはメンテナンスページを作成する

「近日公開モード」パネルで、近日公開ページを設定ボタンをクリックします。

プロフェッショナルなテンプレートライブラリが表示されます。使用したいテンプレートにカーソルを合わせ、チェックマークアイコンをクリックして選択します。

テンプレートがSeedProdのドラッグ&ドロップビルダーで開かれます。
ステップ3:ドラッグ&ドロップブロックでページをカスタマイズする

左側には、ページを構築するために使用できるさまざまなブロックがあります。パネルから任意のブロックをドラッグし、右側のページプレビューにドロップします。ページ上の任意の要素をクリックして設定を開き、コンテンツとスタイルをカスタマイズします。

見出しや画像などの標準ブロック、またはお問い合わせフォーム、プレゼント企画、カウントダウンタイマーなどの高度なブロックを追加できます。

ステップ4:WordPressにカスタムパスワードフォームショートコードを追加する
パスワード入力フィールドを追加するには、左側のパネルから「カスタムHTML」ブロックをページにドラッグします。

ブロックをクリックしてコンテンツを編集します。次に、次のショートコードをHTMLフィールドに直接貼り付けます。
<div class="row"> <div class="col-md-12 seperate"> <div class="input-group"> <input type="password" id="cspio-bypass" class="form-control input-lg form-el sp-form-input" placeholder="Password"></input> <span class="input-group-btn"> <button id="cspio-bypass-btn" class="btn btn-lg btn-primary form-el noglow">Enter</button> </span> </div> </div> </div> <script> jQuery( document ).ready(function($) { $( "#cspio-bypass-btn" ).click(function(e) { e.preventDefault(); window.location = "?bypass="+$("#cspio-bypass").val()+'&return='; }); }); </script>
このショートコードは、実際のパスワード入力ボックスと送信ボタンをライブページに生成します。エディターには表示されませんが、ライブプレビューで確認できます。
ステップ5:WordPressでパスワード保護されたコンテンツへのアクセスを制御する
次に、ページのアクセス制御を設定する必要があります。画面上部の「ページ設定」タブをクリックし、「アクセス制御」を選択します。

「バイパスURL」セクションを見つけます。フィールドに希望のパスワードを入力します。これは、訪問者が入力するパスワードとまったく同じように機能します。
「URLを含める」の下に、このカスタムデザインで保護したいページのURLを貼り付けます。

ステップ6:デザインを公開してページを有効化する
まず、作成したページデザインを公開します。SeedProdビルダー内で、「保存」ボタンの隣にあるドロップダウン矢印をクリックし、「公開」を選択します。確認メッセージが表示され、「ライブページを表示」をクリックして作業を確認できます。

次に、選択したURLでページをライブにするためにモードを有効にする必要があります。SeedProd » ランディングページ ダッシュボードに戻ります。「近日公開モード」セクションの下で、トグルを「非アクティブ」から「アクティブ」に切り替えます。

心配しないでください。これにより、サイト全体がオフラインになることはありません。前のステップで設定したアクセス制御により、このページは選択した特定のURLのみを保護します。カスタムパスワード保護ページがライブになりました!

数分で独自のブランド化されたパスワード保護ページを作成したいですか?
方法2:CSS HeroでデフォルトのWordPressパスワードフォームをカスタマイズする
| 価格設定: 年額29ドルから |
| 無料プラン/トライアル:なし |
| 注目の機能: |
| 🔹ポイント&クリックCSSエディター 🔹フォント、色、背景画像を変更 🔹あらゆるWordPressテーマに対応 |
| 評価: B+ |
| 最適: デフォルトのパスワードページへの迅速な視覚的調整 |
デフォルトのパスワードページにわずかな視覚的調整を加えるだけでよい場合は、CSS HeroのようなビジュアルCSSエディタープラグインを使用できます。このツールは、コードを書かずにテーマのデザインを編集するためのポイント&クリックインターフェイスを提供し、色、フォント、スペーシングを変更するための迅速なオプションとなります。
ステップ1:CSS Heroのインストールと起動
まず、CSS Heroプラグインをインストールします。有効化したら、サイトのフロントエンドにあるパスワード保護されたページに移動します。上部にあるWordPress管理バーから、CSS Heroでカスタマイズをクリックします。

これにより、CSS Heroのビジュアルエディターインターフェイスが開きます。

ステップ2:パスワードページ要素のスタイル設定
エディターがアクティブになったら、ページ上のタイトル、フォームコンテナ、ボタンなどの任意の要素をクリックします。左側のCSS Heroパネルに、その要素のタイポグラフィ、色、スペーシング、背景などのスタイルオプションが表示されます。

パネルを使用して、目的の変更を加えます。新しい背景色を選択したり、フォントサイズを調整したり、ボタンのスタイルを変更したりできます。すべての変更はライブプレビューに反映されます。

デザインがブランドに一致するまでカスタマイズを続けます。CSS Heroは既存の要素にのみスタイルを設定でき、連絡フォームやメールサインアップフィールドのような新しい要素を追加することはできないことに注意してください。
ステップ3:変更の保存とプレビュー
デザインに満足したら、CSS Heroパネルの下部にある保存して公開ボタンをクリックします。エディターを終了するには、右上隅にある「終了」アイコンをクリックします。

これで、新しくスタイル設定されたパスワード保護ページが表示されます。

方法2b:カスタムPHPコードでカスタマイズする(プラグインなし)
プラグインをインストールせずにパスワードフォームをカスタマイズしたい場合は、WordPressのthe_password_formフィルターを使用すると、HTML出力の直接制御が可能になります。クライアントサイトで、スタックに別のプラグインを追加せずにブランド化されたフォームが必要な場合に、このアプローチを使用しました。
以下のスニペットをテーマのfunctions.phpファイルに追加します。より安全なコード管理のために、WPCodeを使用することをお勧めします。これにより、テーマファイルを直接編集せずにスニペットをオンまたはオフに切り替えることができます。
add_filter( 'the_password_form', 'custom_password_protected_form', 10, 2 );
function custom_password_protected_form( $output, $post ) {
    $label = 'pwbox-' . ( empty( $post->ID ) ? rand() : $post->ID );
    return '<form action="' . esc_url( site_url( 'wp-login.php?action=postpass', 'login_post' ) ) . '" class="post-password-form" method="post">
        <p>This content is password protected. Enter your password to view it.</p>
        <label for="' . esc_attr( $label ) . '">Password:
            <input name="post_password" id="' . esc_attr( $label ) . '" type="password" />
        </label>
        <input type="submit" value="Enter" />
    </form>';
}スニペットがアクティブになったら、.post-password-formクラスをターゲットにするCSSでフォームをスタイル設定します。外観 > カスタマイズ > 追加CSS、またはテーマのスタイルシートに追加します。
.post-password-form {
    max-width: 400px;
    margin: 40px auto;
    padding: 30px;
    background: #f9f9f9;
    border-radius: 8px;
}
.post-password-form input[type="password"] {
    width: 100%;
    padding: 10px;
    margin: 10px 0;
    border: 1px solid #ddd;
    border-radius: 4px;
}
.post-password-form input[type="submit"] {
    background: #0073aa;
    color: white;
    padding: 10px 20px;
    border: none;
    cursor: pointer;
    border-radius: 4px;
}
この方法はフォーム自体をカスタマイズするだけであることに注意してください。SeedProdのように完全なカスタムページレイアウトを提供するわけではありませんが、WordPressコードスニペットの操作に慣れている場合は、堅実なオプションです。
方法3:WordPressパスワードウォール(ページロック)をサイト全体に作成する
| 価格設定: 年間39.50ドルから |
| 無料プラン/トライアル:あり(機能制限あり) |
| 注目の機能: |
| 🔹ワンクリックでサイト全体にパスワードウォールを設定 🔹サイト全体にカスタムデザインを適用 🔹ロックアウトから管理者ページや重要なページを除外 |
| 評価:A |
| 最適: サイト全体を一時的に保護(構築中またはメンテナンス中) |
SeedProd を使用して、Web サイト全体を 1 つのパスワードウォールで保護することもできます。これは、構築中のサイト、メンテナンス中、またはプライベートなクライアントプレビューに役立ちます。この方法では、メソッド 1 でデザインしたカスタムページと同じものを使用しますが、グローバルに適用されます。
サイト全体のパスワード保護を有効にするには、WordPress ダッシュボードから SeedProd » ランディングページ に移動します。「近日公開モード」パネルで、ページを編集 をクリックします。

SeedProd エディターで、ページ設定 タブに移動し、アクセス制御 を選択します。「URL の含める/除外」セクションまでスクロールし、「Web サイト全体に表示」オプションを選択します。

最後に、「保存」をクリックして設定を更新します。「近日公開モード」がアクティブになると、カスタムページがすべての URL に表示されます。これにより、サイト全体の WordPress パスワードウォールが効果的に作成されます。
ボーナス:WordPressパスワード保護コンテンツのクリエイティブな使い方
WordPress のパスワード保護は、未完成のページを非表示にするだけではありません。排他性を追加したり、プライベートなエクスペリエンスを提供したり、クライアントアクセスを管理したりするために使用できます。
「これらの特定のニーズに合わせてパスワードページをカスタマイズするにはどうすればよいですか?」と疑問に思うかもしれません。答えは、上記のツールを使用して、デザインを使用事例に合わせることです。創造的なアイデアをいくつかご紹介します。
| クリエイティブな使い方 | 効果的な理由 |
|---|---|
| 限定ニュースレター | 購読者に、共有パスワードを使用してボーナス投稿やインサイダーアップデートへのアクセスを提供します。 |
| プレミアム動画 | 限定チュートリアルやトレーニングの録画を保護し、メンバー限定でプライベートに保ちます。 |
| クライアントダッシュボード | クライアントに、進捗状況の更新、アセット、リソースを備えたプライベートスペースを提供します。 |
| ミニ会員エリア | 完全なプラグインを必要とせずに、軽量な会員限定エリアを作成します。 |
| プライベートイベント | イベントの詳細や登録リンクを、参加者向けのパスワードのみのページの後ろに非表示にします。 |
これらの各例では、シンプルなパスワード保護を使用して、追加のツールなしで信頼、排他性、プロフェッショナリズムを構築できます。
WordPress パスワード保護 FAQ
WordPress でページタイトルの「保護済み:」プレフィックスを削除するにはどうすればよいですか?
WordPress では、パスワード保護が有効になっている場合、ページタイトルの前に自動的に「保護済み: 」が追加されます。これを削除するには、このスニペットを functions.php ファイルに追加するか、WPCode を使用します: add_filter('protected_title_format', function() { return '%s'; }); これにより、デフォルトの形式がタイトルのみに置き換えられます。SeedProd のカスタムパスワードページを使用している場合、最初から完全なページレイアウトをデザインするため、プレフィックスはまったく表示されません。
複数の WordPress ページに同じパスワードを使用できますか?
はい。WordPress エディターで、保護したい各ページの「表示設定」で同じパスワードを設定します。複数のページを同時にカバーする単一のパスワードが必要な場合は、SeedProd のアクセス制御機能を使用すると、1 つのパスワードウォールの下に複数の URL をリストできるため、訪問者はそれらすべてにアクセスするためにパスワードを 1 回入力するだけで済みます。
プラグインなしでパスワード保護されたページをカスタマイズするにはどうすればよいですか?
WordPress の the_password_form フィルターを使用して、デフォルトのフォームを独自の HTML に置き換えます。フィルターコードをテーマの functions.php ファイルに追加し、.post-password-form をターゲットにする CSS でフォームをスタイル設定します。この方法では、プラグインなしでレイアウト、色、コピーを変更できますが、SeedProd のように完全なカスタムページデザインには一致しません。
WordPress のパスワード保護されたページと非公開ページの違いは何ですか?
パスワード保護されたページは、パスワードを持っている人なら誰でも表示でき、アカウントやログインは不要です。非公開ページは、エディターまたは管理者ロールを持つログイン中の WordPress ユーザーにのみ表示され、他の人からは隠されます。パスワード保護は、WordPress アカウントを持っていないクライアント、メンバー、または購読者とコンテンツを共有したい場合に適した選択肢です。
パスワード保護されたページは Google によってインデックスされますか?
WordPress はパスワード保護されたページに noindex メタタグを追加します。これにより、Google はパスワードウォールの背後にあるコンテンツをインデックスしないように指示されます。他のサイトがリンクしている場合、ページの URL が検索結果に表示されることがありますが、保護されたコンテンツ自体はインデックスまたは表示されません。URL を完全に非表示にしたい場合は、SeedProd のメンテナンスモードがより良い選択肢です。
以上です!
適切なパスワード保護方法の選択
WordPress でパスワード保護されたページをカスタマイズするのは、適切なツールを知っていれば簡単です。コードに触れたり、テーマファイルを編集したりすることなく、コンテンツを安全にパスワード保護できます。
- ドラッグ&ドロップビルダーとカスタムアクセス設定で完全なデザインコントロールが必要な場合は、SeedProd を使用してください。
- 色やフォントの変更など、デフォルトのパスワードフォームの簡単な視覚的編集のみが必要な場合は、CSS Hero を使用してください。
- メンテナンス中または開発中にウェブサイト全体を 1 つのパスワードページでロックダウンしたい場合は、SeedProd のサイト全体保護を使用してください。
各方法は、ブランドの一貫性を保ち、訪問者がサイトに自信を持てるようにしながら、コンテンツを保護するための安全でプロフェッショナルな方法を提供します。
WordPress サイトのパスワード保護に関するさらに詳しいヒントについては、これらの専門家ガイドを参照してください。
- WordPressサイトにパスワード保護をかける方法:究極のガイド
- WordPressページにパスワード保護をかける方法(ステップバイステップ)
- 開発中のWordPressサイトにパスワード保護をかける方法
- WordPressサイトをハッカーから保護する方法(専門家による17のヒント)
お読みいただきありがとうございます!皆様のご意見をお聞かせいただければ幸いです。お気軽に会話にご参加ください YouTube, X および Facebook で、ビジネスを成長させるための役立つアドバイスやコンテンツをさらにご覧ください。


