


TL;DR : Comment personnaliser les pages protégées par mot de passe dans WordPress
L'écran de mot de passe par défaut de WordPress est simple et sans marque. Voici les trois méthodes abordées dans ce guide.
- Activez la protection par mot de passe – Définissez n'importe quelle page sur « Protégé par mot de passe » dans les paramètres de visibilité de WordPress.
- Concevez votre page avec SeedProd – Utilisez le constructeur par glisser-déposer pour ajouter votre logo, vos couleurs et un formulaire de mot de passe personnalisé.
- Définissez les contrôles d'accès – Spécifiez quelles URL affichent votre page de mot de passe personnalisée en utilisant les paramètres d'inclusion/exclusion d'URL de SeedProd.
- Utilisez CSS Hero pour des modifications rapides – Changez les couleurs et les polices du formulaire de mot de passe par défaut sans écrire de code.
- Passez à l'échelle du site avec SeedProd – Basculez le commutateur du mode « Bientôt disponible » sur Actif pour appliquer votre page personnalisée à l'ensemble de votre site.
J'ai constaté que la personnalisation de cette page simple est l'un des moyens les plus faciles d'améliorer le professionnalisme du site. Elle rassure les clients et les membres qu'ils se trouvent dans un environnement sécurisé et marqué.
Dans ce guide, je vais vous montrer les trois méthodes les plus efficaces pour remplacer ce formulaire par défaut par un design qui correspond réellement à votre marque.
- Pourquoi personnaliser une page protégée par mot de passe WordPress ?
- Comment protéger par mot de passe une page WordPress
- Méthode 1. Personnaliser des pages spécifiques protégées par mot de passe
- Méthode 2 : Personnaliser le formulaire de mot de passe WordPress par défaut avec CSS Hero
- Méthode 2b : Personnaliser avec du code PHP personnalisé (sans plugin)
- Méthode 3 : Créer un mur de mots de passe WordPress (verrouiller la page) pour l'ensemble de votre site
- Bonus : Utilisations créatives du contenu protégé par mot de passe WordPress
- FAQ sur la protection par mot de passe WordPress
Pourquoi personnaliser une page protégée par mot de passe WordPress ?
Si vous partagez du contenu exclusif avec des clients ou des membres, la fonctionnalité intégrée de WordPress pour protéger les pages par mot de passe vous aide à sécuriser ce contenu rapidement. Elle vous permet de verrouiller des pages individuelles ou l'ensemble de votre site avec un simple mot de passe.
Je l'utilise souvent pour des pages de destination privées encore en développement, mais il est également idéal pour les cours en ligne, les téléchargements ou les articles premium. Le problème est que WordPress affiche un écran de mot de passe gris simple qui ne correspond pas au design ou au ton de votre site.

La personnalisation de cet écran aide votre site à paraître plus professionnel et renforce la confiance. Des recherches de Lucidpress indiquent qu'une image de marque cohérente sur toutes les pages peut améliorer la confiance jusqu'à 33 %.
Voici pourquoi c'est important :
- Renforcez la cohérence de la marque. Votre logo et vos couleurs restent visibles sur le contenu verrouillé également.
- Améliorez l'expérience utilisateur. Un design marqué donne aux visiteurs la confiance qu'ils sont au bon endroit.
- Guidez clairement les utilisateurs. Ajoutez un court message expliquant ce qui se trouve derrière la page et comment y accéder.
En bref, styliser votre page de mot de passe est une question de confiance, de clarté et d'expérience cohérente pour vos visiteurs.
Quand utiliser les pages ou les articles protégés par mot de passe WordPress
Vous n'avez pas toujours besoin d'un plugin d'adhésion complet pour protéger votre contenu. Dans de nombreux cas, un simple mot de passe suffit.
Voici quelques-unes des utilisations les plus utiles des pages et articles protégés par mot de passe :
| Cas d'utilisation | Description / Exemple |
|---|---|
| Pages clients | Partagez des maquettes de design, des rapports ou des contrats en privé avec vos clients. |
| Pages en construction | Masquez les pages que vous créez jusqu'à ce qu'elles soient prêtes à être mises en ligne. |
| Contenu de l'équipe interne | Gardez privés les calendriers internes, les procédures opérationnelles normalisées ou les annonces. |
| Offres à durée limitée | Créez des pages de promotion secrètes pour les VIP ou les abonnés par e-mail. |
| Projets personnels | Masquez les brouillons inachevés ou les pages de test de la vue publique. |
| Articles de blog protégés par mot de passe | Sécurisez les articles sensibles ou premium en utilisant la protection par mot de passe intégrée de WordPress. |
Utiliser la protection par mot de passe de cette manière permet de simplifier votre flux de travail tout en maintenant la confidentialité et le professionnalisme.
Comment protéger par mot de passe une page WordPress
Remarque : Vous n'avez besoin d'activer ce paramètre intégré de WordPress que si vous prévoyez d'utiliser la Méthode 2 (CSS Hero) ou le style par défaut. Si vous utilisez la Méthode 1 ou la Méthode 3 (SeedProd), vous pouvez ignorer cette section car SeedProd gère la protection automatiquement.
De nombreux utilisateurs souhaitent savoir comment protéger par mot de passe un site, une page individuelle ou une catégorie. Si vous utilisez la méthode par défaut ou CSS Hero, vous pouvez activer la protection pour des pages spécifiques depuis l'éditeur :
- Ouvrez la page ou l'article que vous souhaitez protéger dans l'éditeur WordPress.
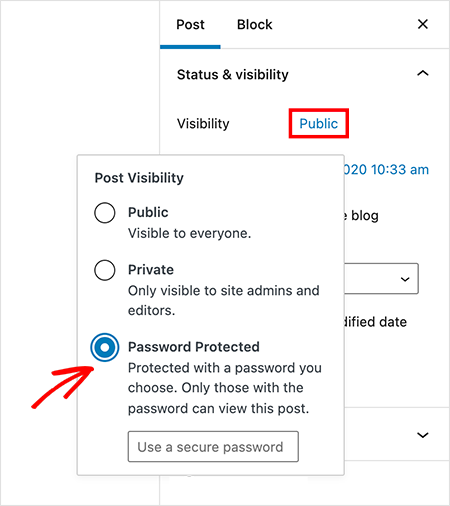
- Dans le panneau « Résumé » à droite, cliquez sur le lien à côté de « Visibilité ».
- Choisissez « Protégé par mot de passe » parmi les options qui apparaissent.
- Entrez un mot de passe sécurisé dans le champ de texte.
- Cliquez sur le bouton « Mettre à jour » ou « Publier » pour enregistrer vos modifications.
Vous avez maintenant protégé par mot de passe la page spécifique. Cependant, le résultat est l'écran par défaut, sans marque, montré ci-dessous :

Maintenant, examinons quelques façons de personnaliser le contenu des pages protégées par mot de passe WordPress afin qu'il corresponde au reste de votre site.
Méthode 1. Personnaliser des pages spécifiques protégées par mot de passe
| Tarifs : À partir de 39,50 $/an |
| Plan gratuit / Essai : Oui (fonctionnalités limitées) |
| Fonctionnalités remarquables : |
| 🔹 Constructeur par glisser-déposer pour un contrôle de conception complet 🔹 Contrôles d'accès pour protéger les pages individuelles 🔹 Shortcode de formulaire de mot de passe personnalisé et outils de conception |
| Note : A+ |
| Idéal pour : Les utilisateurs qui souhaitent des pages protégées par mot de passe entièrement personnalisées sans codage |
La meilleure façon de créer une page protégée par mot de passe entièrement personnalisée est d'utiliser SeedProd, un constructeur de sites Web WordPress par glisser-déposer. Il vous permet de concevoir une page à partir de zéro et de remplacer l'écran de mot de passe par défaut sur n'importe quelle page.
Contrairement aux pages de mot de passe standard, SeedProd vous permet d'ajouter des éléments marketing tels que des formulaires d'inscription ou des comptes à rebours directement sur l'écran verrouillé.

Pour cette méthode, notre stratégie consiste à utiliser le constructeur par glisser-déposer de SeedProd pour concevoir une nouvelle page personnalisée. Nous la configurerons ensuite pour qu'elle apparaisse à la place de l'écran de mot de passe WordPress par défaut, mais uniquement pour les URL spécifiques que vous choisissez de protéger.
Alternativement, vous pouvez suivre ces instructions écrites :
Étape 1 : Installer et ouvrir SeedProd
Tout d'abord, installez et activez le plugin SeedProd. Une fois activé, accédez à SeedProd » Pages de destination depuis votre tableau de bord d'administration WordPress.
Étape 2 : Créer une page « Bientôt disponible » ou de maintenance

Dans le panneau « Mode Bientôt disponible », cliquez sur le bouton Configurer une page « Bientôt disponible ».

Vous verrez maintenant une bibliothèque de modèles professionnels. Survolez le modèle que vous souhaitez utiliser et cliquez sur l'icône en forme de coche pour le sélectionner.

Le modèle s'ouvrira dans le constructeur par glisser-déposer de SeedProd.
Étape 3 : Personnaliser la page avec des blocs par glisser-déposer

Sur la gauche, vous trouverez une variété de blocs que vous pouvez utiliser pour construire votre page. Faites glisser n'importe quel bloc du panneau et déposez-le sur l'aperçu de votre page à droite. Cliquez sur n'importe quel élément de la page pour ouvrir ses paramètres et personnaliser son contenu et son style.

Vous pouvez ajouter des blocs standard comme des titres et des images, ou des blocs avancés comme des formulaires de contact, des cadeaux et des comptes à rebours.

Étape 4 : Ajouter un shortcode de formulaire de mot de passe personnalisé dans WordPress
Pour ajouter le champ de saisie du mot de passe, faites glisser le bloc « HTML personnalisé » du panneau de gauche sur votre page.

Cliquez sur le bloc pour modifier le contenu. Ensuite, collez le shortcode suivant directement dans le champ HTML :
<div class="row"> <div class="col-md-12 seperate"> <div class="input-group"> <input type="password" id="cspio-bypass" class="form-control input-lg form-el sp-form-input" placeholder="Password"></input> <span class="input-group-btn"> <button id="cspio-bypass-btn" class="btn btn-lg btn-primary form-el noglow">Enter</button> </span> </div> </div> </div> <script> jQuery( document ).ready(function($) { $( "#cspio-bypass-btn" ).click(function(e) { e.preventDefault(); window.location = "?bypass="+$("#cspio-bypass").val()+'&return='; }); }); </script>
Ce shortcode génère la boîte de saisie du mot de passe et le bouton de soumission réels sur la page en direct. Il n'apparaîtra pas dans l'éditeur, mais vous pouvez le voir dans l'aperçu en direct.
Étape 5 : Contrôler l'accès au contenu protégé par mot de passe dans WordPress
Ensuite, vous devez configurer les contrôles d'accès de la page. Cliquez sur l'onglet « Paramètres de la page » en haut de l'écran, puis sélectionnez « Contrôles d'accès ».

Trouvez la section « URL de contournement ». Entrez le mot de passe souhaité dans le champ. Cela fonctionne exactement comme le mot de passe que vos visiteurs devront saisir.
Sous « Inclure les URL », collez les URL des pages que vous souhaitez protéger avec ce design personnalisé.

Étape 6 : Publier votre design et activer la page
Tout d'abord, publiez le design de la page que vous avez créé. Dans le constructeur SeedProd, cliquez sur la flèche déroulante à côté du bouton « Enregistrer » et sélectionnez « Publier ». Un message de confirmation apparaîtra, et vous pourrez cliquer sur « Voir la page en direct » pour prévisualiser votre travail.

Ensuite, vous devez activer le mode pour rendre la page visible sur les URL sélectionnées. Revenez à votre tableau de bord SeedProd » Pages de destination. Sous la section « Mode Bientôt disponible », basculez le commutateur de « Inactif » à « Actif ».

Ne vous inquiétez pas, cela ne mettra pas tout votre site hors ligne. Les contrôles d'accès que vous avez configurés à l'étape précédente garantissent que cette page ne protège que les URL spécifiques que vous avez sélectionnées. Votre page personnalisée protégée par mot de passe est maintenant en ligne !

Vous voulez créer votre propre page protégée par mot de passe et personnalisée en quelques minutes ?
Méthode 2 : Personnaliser le formulaire de mot de passe WordPress par défaut avec CSS Hero
| Tarifs : À partir de 29 $/an |
| Plan gratuit / Essai : Non |
| Fonctionnalités remarquables : |
| 🔹 Éditeur CSS par pointer-cliquer 🔹 Modifier les polices, les couleurs et les images d'arrière-plan 🔹 Fonctionne avec n'importe quel thème WordPress |
| Note : B+ |
| Idéal pour : Modifications visuelles rapides de la page de mot de passe par défaut |
Si vous avez seulement besoin de faire de petits ajustements visuels à la page de mot de passe par défaut, vous pouvez utiliser un plugin d'édition CSS visuel comme CSS Hero. Cet outil fournit une interface de type « pointer et cliquer » pour modifier la conception de votre thème sans écrire de code, ce qui en fait une option rapide pour changer les couleurs, les polices et l'espacement.
Étape 1 : Installer et lancer CSS Hero
Tout d'abord, installez le plugin CSS Hero. Une fois activé, naviguez vers la page protégée par mot de passe sur le front-end de votre site. Depuis la barre d'administration WordPress en haut, cliquez sur Personnaliser avec CSS Hero.

Cela ouvre l'interface de l'éditeur visuel CSS Hero.

Étape 2 : Styliser les éléments de votre page de mot de passe
Avec l'éditeur actif, cliquez sur n'importe quel élément de la page, tel que le titre, le conteneur du formulaire ou le bouton. Le panneau CSS Hero sur la gauche affichera les options de style pour cet élément, y compris la typographie, les couleurs, l'espacement et les arrière-plans.

Utilisez le panneau pour apporter les modifications souhaitées. Vous pouvez sélectionner une nouvelle couleur d'arrière-plan, ajuster la taille de la police ou changer le style du bouton. Toutes les modifications seront reflétées dans l'aperçu en direct.

Continuez la personnalisation jusqu'à ce que le design corresponde à votre marque. Gardez à l'esprit que CSS Hero ne peut styliser que les éléments existants ; il ne peut pas en ajouter de nouveaux comme des formulaires de contact ou des champs d'inscription par e-mail.
Étape 3 : Enregistrer et prévisualiser vos modifications
Une fois que vous êtes satisfait de votre design, cliquez sur le bouton Enregistrer et publier en bas du panneau CSS Hero. Pour quitter l'éditeur, cliquez sur l'icône « Quitter » en haut à droite.

Vous verrez maintenant votre page protégée par mot de passe nouvellement stylisée.

Méthode 2b : Personnaliser avec du code PHP personnalisé (sans plugin)
Si vous souhaitez personnaliser le formulaire de mot de passe sans installer de plugin, le filtre the_password_form de WordPress vous donne un contrôle direct sur la sortie HTML. J'ai utilisé cette approche sur des sites clients lorsque j'avais besoin d'un formulaire de marque sans ajouter un autre plugin à la pile.
Ajoutez le snippet suivant au fichier functions.php de votre thème. Pour une gestion de code plus sûre, j'utiliserais plutôt WPCode. Il vous permet d'activer ou de désactiver des snippets sans toucher directement aux fichiers du thème.
add_filter( 'the_password_form', 'custom_password_protected_form', 10, 2 );
function custom_password_protected_form( $output, $post ) {
    $label = 'pwbox-' . ( empty( $post->ID ) ? rand() : $post->ID );
    return '<form action="' . esc_url( site_url( 'wp-login.php?action=postpass', 'login_post' ) ) . '" class="post-password-form" method="post">
        <p>This content is password protected. Enter your password to view it.</p>
        <label for="' . esc_attr( $label ) . '">Password:
            <input name="post_password" id="' . esc_attr( $label ) . '" type="password" />
        </label>
        <input type="submit" value="Enter" />
    </form>';
}
Une fois le snippet actif, stylisez le formulaire en ciblant la classe .post-password-form avec du CSS. Ajoutez-le dans Apparence > Personnaliser > CSS additionnel ou dans la feuille de style de votre thème.
.post-password-form {
    max-width: 400px;
    margin: 40px auto;
    padding: 30px;
    background: #f9f9f9;
    border-radius: 8px;
}
.post-password-form input[type="password"] {
    width: 100%;
    padding: 10px;
    margin: 10px 0;
    border: 1px solid #ddd;
    border-radius: 4px;
}
.post-password-form input[type="submit"] {
    background: #0073aa;
    color: white;
    padding: 10px 20px;
    border: none;
    cursor: pointer;
    border-radius: 4px;
}
Gardez à l'esprit que cette méthode personnalise uniquement le formulaire lui-même. Elle ne vous donnera pas une mise en page complète comme SeedProd, mais c'est une option solide si vous êtes à l'aise avec les snippets de code WordPress.
Méthode 3 : Créer un mur de mots de passe WordPress (verrouiller la page) pour l'ensemble de votre site
| Tarifs : À partir de 39,50 $/an |
| Plan gratuit / Essai : Oui (fonctionnalités limitées) |
| Fonctionnalités remarquables : |
| 🔹Mur de mot de passe sur tout le site en un clic 🔹Appliquez des designs personnalisés sur l'ensemble de votre site 🔹Excluez les pages d'administration et les pages clés du verrouillage |
| Note : A |
| Idéal pour : Protéger temporairement des sites entiers (en construction ou en maintenance) |
Vous pouvez également utiliser SeedProd pour protéger l'ensemble de votre site derrière un mur de mot de passe unique. Ceci est utile pour les sites en construction, pendant la maintenance, ou pour des aperçus privés pour les clients. Cette méthode utilise la même page personnalisée que vous avez conçue dans la méthode 1, mais l'applique globalement.
Pour activer la protection par mot de passe sur l’ensemble du site, accédez à SeedProd » Landing Pages depuis votre tableau de bord WordPress. Dans le panneau ‘Mode Bientôt disponible’, cliquez sur Modifier la page.

Dans l’éditeur SeedProd, allez à l’onglet Paramètres de la page et sélectionnez Contrôles d’accès. Faites défiler jusqu’à la section ‘Inclure/Exclure les URL’ et sélectionnez l’option ‘Afficher sur l’ensemble du site web’.

Enfin, cliquez sur ‘Enregistrer’ pour mettre à jour vos paramètres. Une fois le ‘Mode Bientôt disponible’ actif, votre page personnalisée apparaîtra sur chaque URL. Cela crée efficacement un mur de mots de passe WordPress sur l’ensemble du site.
Bonus : Utilisations créatives du contenu protégé par mot de passe WordPress
La protection par mot de passe WordPress ne sert pas seulement à masquer les pages inachevées. Vous pouvez l’utiliser pour ajouter de l’exclusivité, offrir des expériences privées ou gérer l’accès des clients.
Vous pourriez vous demander : « Comment puis-je personnaliser la page de mot de passe pour ces besoins spécifiques ? » La réponse réside dans l’utilisation des outils ci-dessus pour adapter votre conception à votre cas d’utilisation. Voici quelques idées créatives :
| Utilisation créative | Pourquoi c’est efficace |
|---|---|
| Bulletins d’information réservés | Donnez aux abonnés l’accès à des articles bonus ou à des mises à jour exclusives en utilisant un mot de passe partagé. |
| Vidéos Premium | Protégez des tutoriels exclusifs ou des rediffusions de formation, en les gardant privés pour les membres. |
| Tableaux de bord clients | Offrez aux clients un espace privé avec des mises à jour de progression, des actifs et des ressources. |
| Mini espaces d’adhésion | Créez des espaces légers réservés aux membres sans avoir besoin d’un plugin complet. |
| Événements privés | Masquez les détails de l’événement ou les liens d’inscription derrière une page protégée par mot de passe uniquement pour les participants. |
Chacun de ces exemples vous permet d’utiliser une protection par mot de passe simple pour renforcer la confiance, l’exclusivité et le professionnalisme sans outils supplémentaires.
FAQ sur la protection par mot de passe WordPress
Comment supprimer le préfixe « Protégé : » du titre de la page dans WordPress ?
WordPress ajoute automatiquement « Protégé : » avant le titre de la page lorsque la protection par mot de passe est activée. Pour le supprimer, ajoutez cet extrait à votre fichier functions.php ou utilisez WPCode : add_filter('protected_title_format', function() { return '%s'; }); Cela remplace le format par défaut par uniquement le titre. Si vous utilisez la page de mot de passe personnalisée de SeedProd, le préfixe n’apparaît pas du tout, car vous concevez la mise en page complète à partir de zéro.
Puis-je utiliser le même mot de passe pour plusieurs pages WordPress ?
Oui. Dans l’éditeur WordPress, définissez le même mot de passe dans les paramètres de visibilité pour chaque page que vous souhaitez protéger. Si vous souhaitez qu’un seul mot de passe couvre plusieurs pages simultanément, la fonctionnalité Contrôles d’accès de SeedProd vous permet de lister plusieurs URL sous un seul mur de mots de passe, de sorte que les visiteurs n’aient besoin d’entrer le mot de passe qu’une seule fois pour y accéder toutes.
Comment puis-je personnaliser la page protégée par mot de passe sans plugin ?
Utilisez le filtre the_password_form de WordPress pour remplacer le formulaire par défaut par votre propre HTML. Ajoutez le code du filtre au fichier functions.php de votre thème, puis stylisez le formulaire avec du CSS ciblant .post-password-form. Cette méthode vous permet de modifier la mise en page, les couleurs et le texte sans aucun plugin, bien que le résultat ne corresponde pas à une conception de page personnalisée complète comme le fait SeedProd.
Quelle est la différence entre une page protégée par mot de passe et une page privée dans WordPress ?
Une page protégée par mot de passe peut être consultée par toute personne possédant le mot de passe, sans qu'un compte ou une connexion ne soit requis. Une page privée n'est visible que par les utilisateurs WordPress connectés ayant les rôles d'éditeur ou d'administrateur et est cachée à tous les autres. La protection par mot de passe est le bon choix lorsque vous souhaitez partager du contenu avec des clients, des membres ou des abonnés qui n'ont pas de compte WordPress.
Les pages protégées par mot de passe sont-elles indexées par Google ?
WordPress ajoute une balise méta noindex aux pages protégées par mot de passe, ce qui indique à Google de ne pas indexer le contenu derrière le mur de mots de passe. L'URL de la page peut toujours apparaître dans les résultats de recherche si d'autres sites y renvoient, mais le contenu protégé lui-même ne sera pas indexé ni affiché. Si vous souhaitez que l'URL reste complètement invisible, le mode maintenance de SeedProd est une meilleure option.
Et voilà !
Choisir la bonne méthode de protection par mot de passe
La personnalisation des pages protégées par mot de passe dans WordPress est simple une fois que vous connaissez les bons outils. Vous n'avez pas besoin de toucher au code ou de modifier les fichiers de thème pour protéger votre contenu en toute sécurité par mot de passe.
- Utilisez SeedProd si vous souhaitez un contrôle total de la conception avec un constructeur par glisser-déposer et des paramètres d'accès personnalisés.
- Utilisez CSS Hero si vous avez seulement besoin d'éditions visuelles rapides du formulaire de mot de passe par défaut, comme changer les couleurs ou les polices.
- Utilisez la protection sur l'ensemble du site de SeedProd si vous souhaitez verrouiller votre site Web entier derrière une seule page de mot de passe pendant la maintenance ou le développement.
Chaque méthode offre un moyen sécurisé et professionnel de protéger le contenu tout en maintenant la cohérence de votre marque et en assurant la confiance de vos visiteurs dans votre site.
Pour encore plus de conseils sur la protection par mot de passe de votre site WordPress, veuillez consulter ces guides d'experts :
- Comment protéger par mot de passe un site WordPress : Le guide ultime
- Comment protéger par mot de passe une page WordPress (étape par étape)
- Comment protéger un site WordPress par mot de passe pendant son développement
- Comment sécuriser votre site WordPress contre les pirates (17 astuces d'experts)
Merci de votre lecture ! Nous serions ravis d'entendre vos réflexions, alors n'hésitez pas à rejoindre la conversation sur YouTube, X et Facebook pour plus de conseils et de contenu utiles pour développer votre entreprise.


