Want to learn how to export a WordPress theme and reuse it on another website?
I’ve done this plenty of times, especially when I want to keep a custom design for a new project or client site. Exporting your theme lets you duplicate the layout, style, and content setup without starting from scratch.
In this guide, I’ll show you exactly how to export a WordPress theme, including your content and design settings, and import it to another site.
Quick Summary: How to Export a WordPress Theme
- Method 1: Use SeedProd to export and import a full custom WordPress theme
- Method 2: Export theme customizer settings using a free plugin
- Method 3: Export your WordPress content and database using built-in tools
You can use any of these methods to transfer your WordPress theme or site design, depending on what you need to move.
Why Export a WordPress Theme (and When You Should)
There are many reasons for exporting a WordPress theme. Most website owners use exports to back up their theme should anything go wrong with their site.
You can also export your theme for the following reasons:
- Use the same theme for other websites
- Switch your theme to a new domain and WordPress installation
- Share your custom theme with other people as a .zip file
Bottom line: saving a copy of your WordPress theme, posts, and pages, allows you to use it again without starting from scratch.
3 Easy Ways to Export and Import a WordPress Theme
There are several ways to export your WordPress website. You can export everything with a WordPress plugin or use the built-in WordPress tool to export your database, blog posts, pages, and media library.
We’ll show you how to do each method below.
Method 1: Export a Custom WordPress Theme Using SeedProd
First, we’ll show you how to use SeedProd to export your entire WordPress theme with its content and design customizations.

SeedProd is the best website builder for WordPress, with over 1 million users. It lets you create custom WordPress themes, WooCommerce websites, and high-converting landing pages without code.
This powerful WordPress plugin also offers these excellent features:
- Visual drag-and-drop page builder
- 180+ landing page templates
- 25+ responsive WordPress themes
- Demnächst und Wartungsmodus
- Benutzerdefinierte 404- und WordPress-Anmeldeseiten
- WordPress and WooCommerce template tags
- Customizable page blocks and premade sections
- 1-click Import/Export options
- E-Mail-Marketing-Integrationen
I’ll use SeedProd’s Import/Export feature to download a custom WordPress theme and landing page for this method.
Follow the steps below to get started.
Step 1: Install SeedProd on Both Sites
To export and import your WordPress theme, you’ll need SeedProd Pro installed on both the source and destination sites.
Note: There is a free version of SeedProd, but I’ll use SeedProd Pro for the theme builder feature.
You can follow this step-by-step guide on installing a WordPress plugin if you need help.
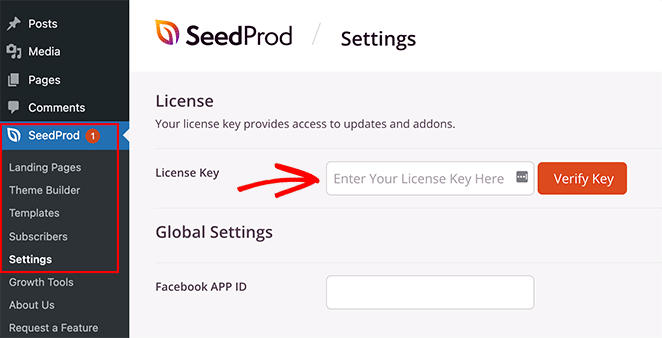
After installing SeedProd, go to SeedProd » Settings and enter your plugin license key.
You can find your license key by logging into the SeedProd website and going to the Downloads tab.
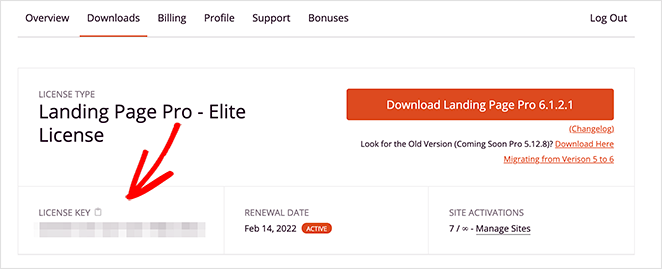
Click the Verify Key button to confirm your SeedProd license and move on to the next step.
Step 2: Build Your Custom Theme in SeedProd
You can only export themes you create using SeedProd’s Theme Builder, not third-party themes.
Creating a custom WordPress theme with SeedProd is super easy:
- Choose a premade theme design
- Edit each part of your theme with the visual drag-and-drop editor
- Enable your theme

The best thing is you won’t need to touch a single line of code or hire a developer. SeedProd handles the technical stuff automatically, leaving you with plenty of time to perfect your custom design.
Follow this step-by-step guide to create a custom WordPress theme with SeedProd.
Step 3: Export the Theme File from SeedProd
Once your theme is live, you can export it with a single click from your WordPress dashboard.
To do that, go to SeedProd » Import/Export from your WordPress dashboard. Then click the Export Theme Files button.
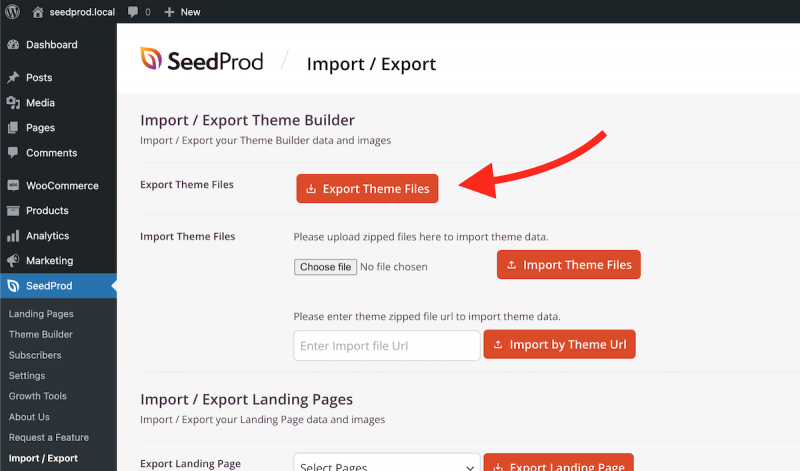
You should now see a green “Export Started” notification in the top-right corner of your screen. At the same time, SeedProd will download the theme .zip file to your computer.
Now you’re ready to import the file to another WordPress installation.
Step 4: Upload the Theme File to a New Site
On your new WordPress installation, install SeedProd again and upload the exported theme file.
Before importing your custom theme, your SeedProd Theme Builder dashboard will only have the Global CSS template.
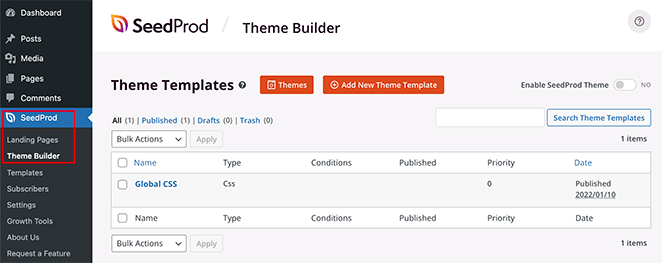
After importing your theme, you’ll see all your theme templates on this page.
To import your theme, go to SeedProd » Import/Export and click the “Choose File” button under the Import Theme Files heading. You can also drag and drop the theme file from your computer.
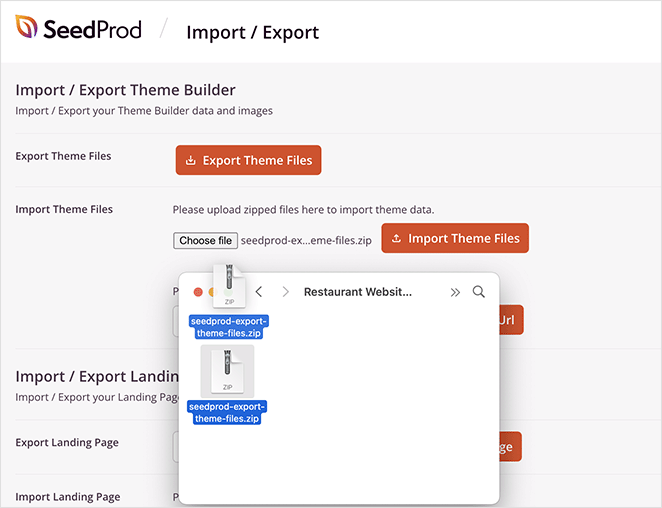
Now, you can upload your previously exported file and click the Import Theme Files button to start the import. It should take a few seconds for your import to complete.
After, head to the SeedProd » Theme Builder page, and you should see all of your imported theme files in the list.
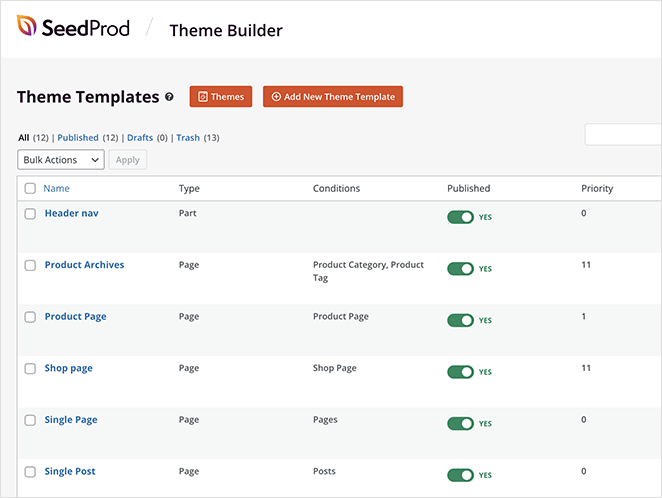
All that’s left is to enable your SeedProd theme and see it in action on your new WordPress installation.
Bonus: Export and Import Landing Pages in SeedProd
You can also move individual landing pages between sites using the same Import/Export screen.
Go to SeedProd » Import/Export, and under the “Import / Export Landing Pages” heading, choose a landing page from the drop-down menu.
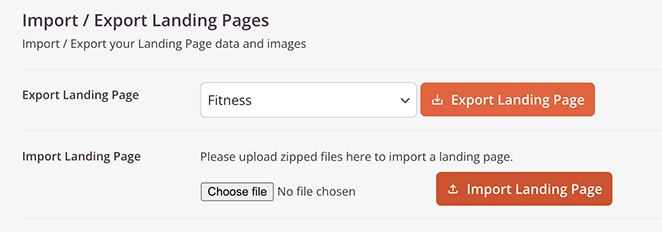
If you don’t currently have one, you can follow these steps to create a landing page with SeedProd.
After selecting your landing page from the list, click the Export Landing Page button. SeedProd will now export your landing page data and images.
To import your landing page to a different website, ensure SeedProd is active, go to SeedProd » Import/Export, and click the “Choose File” button under the Import Landing Page heading.

Next, click the landing page file you exported previously, or drag and drop it onto the page and click the Import Landing Page button.
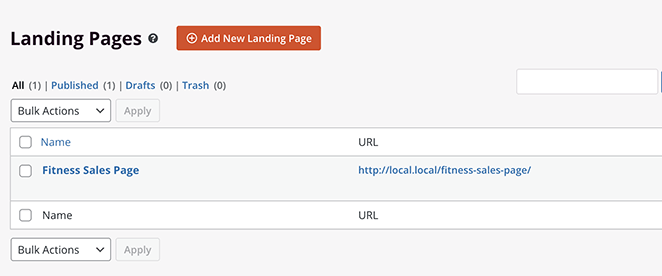
You can go to SeedProd » Landing Pages and see your imported page in the list.
Das war's!
Method 2: Export Theme Customizer Settings in WordPress
Some WordPress themes let you set up a website using the theme customizer. As a result, you can change colors, header images, background images, layout settings, and more.
If you’re working on customizing that theme on a local server or staging site, you can use a plugin to move those settings to your live website.
As a result, you can move the theme customizer settings from one website to another without moving the content or database.
Step 1: Export Customizer Settings with a Plugin
You can use a free plugin to export your WordPress theme settings as a .dat Datei.
First, install and activate the Customize Export/Import plugin on each website where you want to export/import.
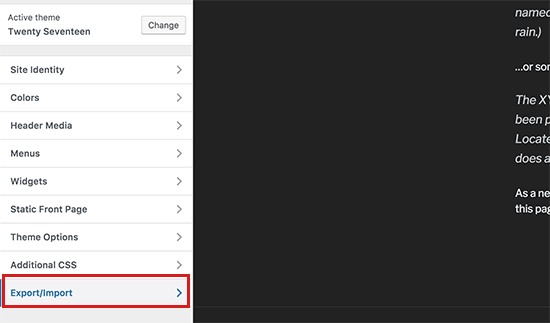
Next, go to Themes » Customize on the website where you wish to export the settings from.
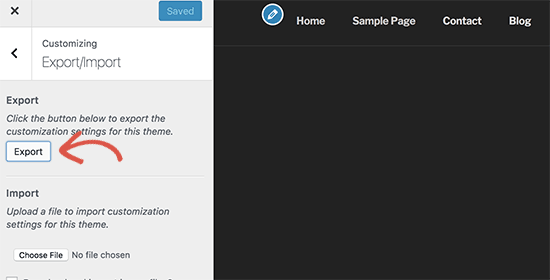
Then, click the “Export/Import” panel to view the settings and click the Export button.
The plugin will export your WordPress customizer settings and download them as a .dat file to your computer.
This method will export theme options stored in your WordPress database, such as color settings, layout directions, header media, etc. However, it can’t export your menus, site title, description, or widgets.
Step 2: Import the Settings on Your New Site
Upload the exported settings file to your new site and apply the design instantly.
On the destination site, install the same plugin.
Go to Appearance » Customize » Export/Import, upload the .dat file, and check “Download and import image files?” before clicking Import.
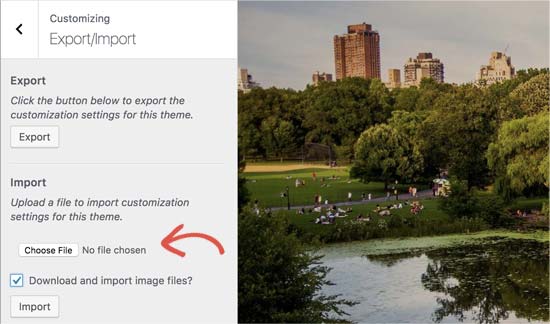
When the import is finished, you can preview your changes in the customizer and click the Save & Publish button to make the changes live.
Note: This plugin will only export theme settings saved using the theme customizer. It does not export website data like menus, widgets, images, etc. You will have to set up those changes manually.
Method 3: Export WordPress Content and Database with Built-In Tools
WordPress includes a built-in export tool to download your full site content in an XML format.
It will export your posts, pages, comments, custom fields, categories, tags, navigation menus, and posts. However, it won’t export your theme or plugin files.
Step 1: Export Your Site’s Content with WordPress Tools
Go to Tools » Export from your WordPress admin panel to use this method.
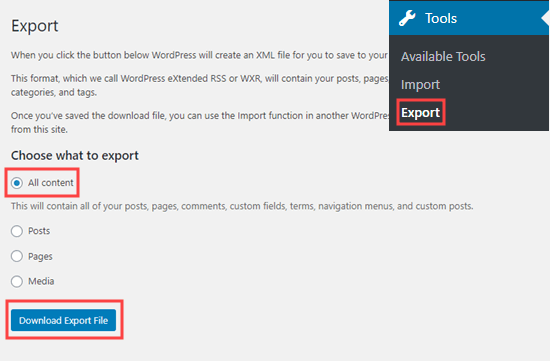
Next, select the “All Content” option and click the Download Export File button. Doing so will download an XML file of your content to your computer.
Step 2: Import the Content to a New Site
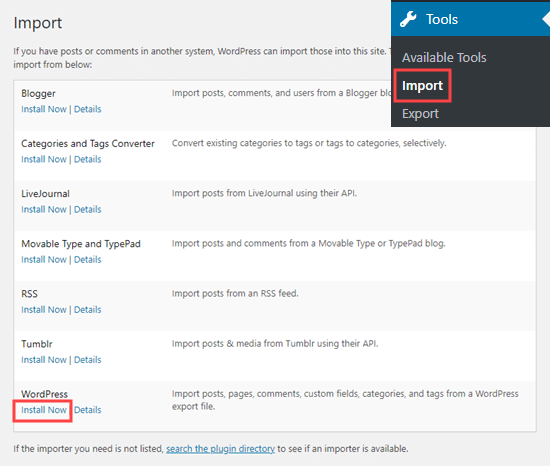
To upload the export to a new WordPress site, log in to your new website’s WordPress admin and go to Tools » Import.
Next, install and activate the WordPress importer. You can then click the ‘Run Importer’ link.
You can select your export file on the next page and click the Upload file and import button.
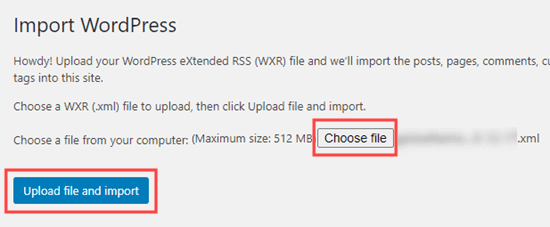
WordPress will import content like your media files and blog post images if the original website stays online.
FAQ: Exporting a WordPress Theme
We hope this article has helped you learn how to export a WordPress theme. Importing and exporting your theme is easy with SeedProd.
Bereit zum Eintauchen?
You might also like this guide on making a one-page website in WordPress.
Vielen Dank fürs Lesen! Wir würden uns freuen, Ihre Meinung zu hören. Bitte hinterlassen Sie einen Kommentar mit Ihren Fragen und Ihrem Feedback.
Sie können uns auch auf YouTube, X (früher Twitter) und Facebook folgen, um weitere hilfreiche Inhalte für Ihr Unternehmen zu erhalten.

