Do you want to build a church website for your religious community?
Having a website is vital for building your church’s online presence. A great church website can foster community, keep church members informed and engaged, and reach out to new visitors.
In this guide, we’ll show you how to build a church website for your non-profit organization. And the best part? No need for coding or hiring a developer.
Let’s get started and build a church website that is attractive, functional, and, most importantly, a true reflection of your church’s mission to God and values.
Why Build a Church Website?
Your website is more than just a digital footprint; it’s an invaluable communication tool that can help your congregation and community in numerous ways.
- Extend Your Reach: A website broadens your church’s reach globally, serving as a platform to share its mission, vision, and beliefs.
- Streamline Communication: Acting as a central hub, a website provides easy access to essential information like service times and events, podcasts, and livestreams, saving time and reducing confusion.
- Simplify Online Giving: Digital transactions are on the rise. Offering online giving options not only adds convenience but can also boost donations and tithing to support your church’s work.
- Foster Community: Interactive features like prayer request forms and discussion forums help website visitors connect and strengthen community bonds.
- Increase Visibility: A well-crafted website improves your church’s visibility and accessibility, helping potential visitors find you and access resources even if they can’t attend in person.
In essence, a website isn’t about following trends; it’s about effectively serving your congregation and expanding your outreach.
What Do I Need to Build a Church Website?
Building a church website may seem daunting, but you only really need a few key elements to get started. Let’s walk through those essentials now.
- Domain Name: Choose an easy-to-remember address that reflects your church’s name. More on domain selection later.
- Web Hosting: Select a reliable provider where your website files will be stored and accessed online.
- CMS (Content Management System): WordPress is a user-friendly CMS that powers 43% of websites. It allows easy content creation, customization, and management.
- Church WordPress Theme: Use a pre-designed theme or SeedProd to easily customize your site’s appearance. SeedProd’s drag-and-drop builder lets you create custom WordPress themes without coding.
Don’t worry if this sounds like a lot of work. We’ll guide you through the whole process in the easy-to-follow steps below.
So, let’s get to it.
Como criar um site de igreja no WordPress
As mentioned above, WordPress is one of the most popular choices for starting a new website, and using SeedProd is an easy way to tailor your site’s design to meet your needs.
We’ll use these tools below to show you how to set up a website for your church. Just follow these easy steps:
- Step 1. Set Up a Domain Name and Hosting
- Step 2. Install WordPress on Your Website
- Step 3. Install SeedProd Page Builder Plugin
- Step 4. Choose a WordPress Theme Kit
- Step 5. Build a Church Website Homepage
- Step 6. Create Your Church Website Pages
- Step 7. Add Your Church Logo
- Step 8. Launch Your Church Website
Step 1. Set Up a Domain Name and Hosting
First, you’ll need to choose your website’s domain name and hosting provider. There are many domain registrars and web hosts available, so finding one may prove challenging.
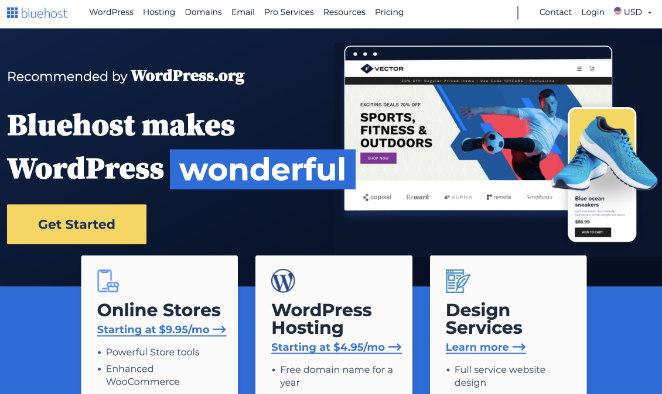
Our top pick is Bluehost, a popular WordPress hosting provider officially recommended by WordPress.org. It’s easy to use, has top-notch customer support, and all the features you need for hosting your church site, including:
- Free domain name
- Certificado SSL gratuito
- CDN gratuita
- Domain privacy
- Malware scanning
Click here to get started with Bluehost.

On the Bluehost website, click the Get Started Now button to see the different pricing options.
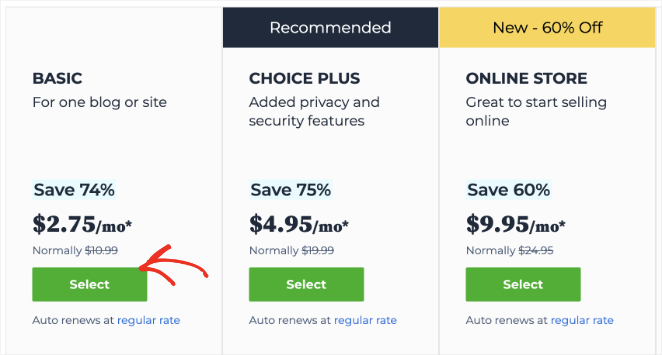
The Basic and Plus plans are popular choices for many different business owners. Click the Select button to choose a plan that suits you best.
On the following screen, you can choose a new custom domain name for your church website.
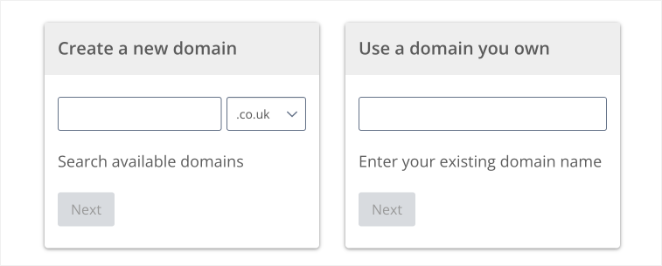
We recommended choosing a .com domain because it’s easier for users to remember. If the domain you want isn’t available, you can try adding your location next to it (for example, www.unitychurchhouston.com). It’s also best to keep your own domain short and easy to pronounce.
After choosing a domain, you can enter other account details, such as your name, address, and email address.
Underneath, you can choose extras to add to your plan. We don’t recommend selecting these right away, so uncheck these options. You can always add them later if needed.
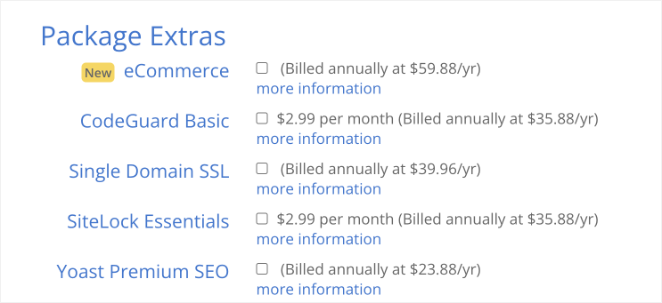
Now, go ahead and enter your payment details and complete the purchase.
Step 2. Install WordPress on Your Website
After purchasing your hosting and domain, you’ll get an email with steps on how to log in to your web hosting control panel. Bluehost automatically installs WordPress, allowing you to log in to your WordPress website from the hosting dashboard.
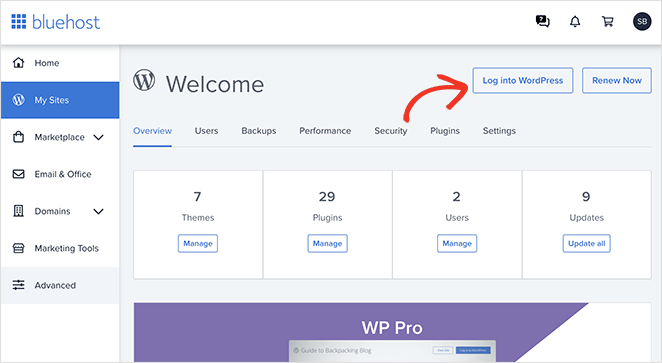
After logging in, you’ll see the WordPress admin, where you will manage your website, change settings, and add new content.
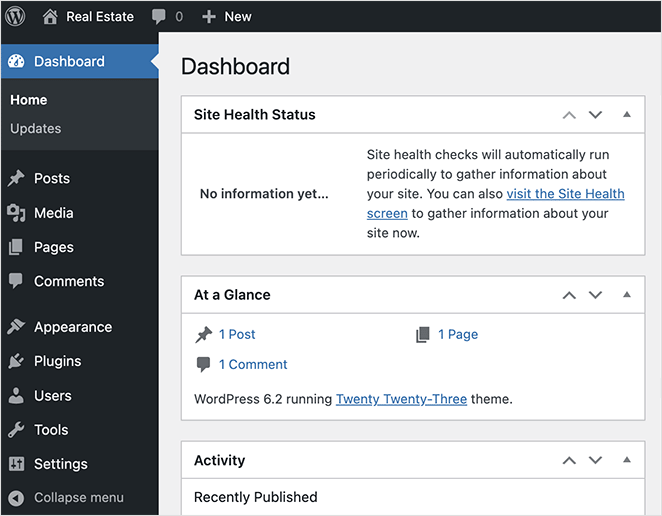
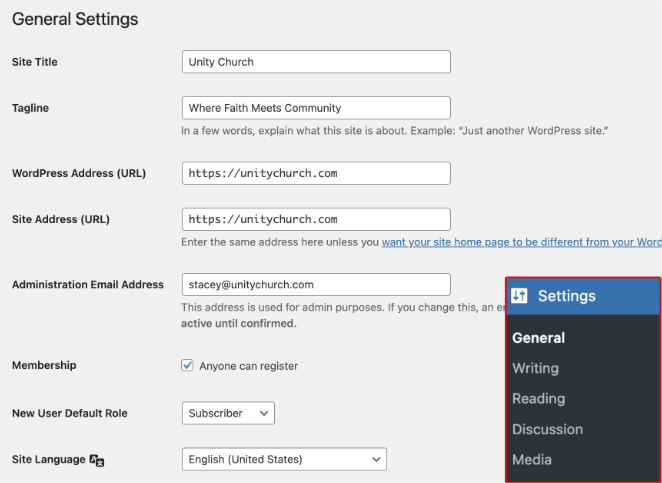
One of the first things you’ll want to do is configure your website’s basic settings. From your WordPress dashboard, navigate to Settings, then General, to enter your site’s details.
Here, you can set your church website’s title, tagline, URL, and admin email address.
Further down the page, you can choose a relevant time zone, language, and date and time format.
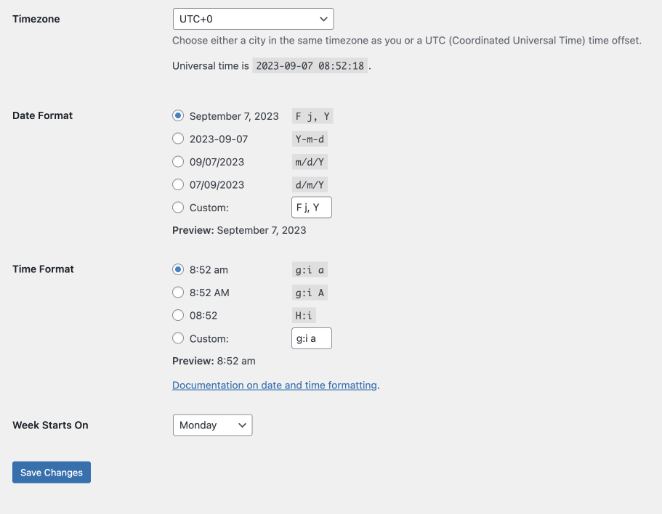
Click the Save Changes button when you’re happy with these details.
Step 3. Install SeedProd Page Builder Plugin

Now it’s time to install SeedProd to help you customize the look and feel of your website. It might be tempting to choose a church website builder or a free website builder like Wix or Weebly for this. SeedProd offers more flexibility and is easier for beginners to use.
Bluehost will have installed a WordPress theme for you automatically; however, it’s likely a free default theme and will lack the features you need for your church needs. SeedProd will allow you to override the default theme appearance, replacing it with your own custom website design.
Don’t worry – no coding or website development is required. It’s as easy as pointing and clicking.
First, you’ll need to install and activate SeedProd Pro. SeedProd offers other plans and pricing, but the Pro version unlocks access to the Theme Builder feature.
After downloading the plugin, you can follow these steps to install SeedProd Pro and activate your license.
Alternatively, launch a custom website in seconds using SeedProd’s AI website builder. Simply provide a brief description of your site, and it will generate a fully custom theme, helping you save time and get online faster.
Step 4. Choose a WordPress Theme Kit
Now head to SeedProd » Theme Builder and click the Theme Template Kits button.
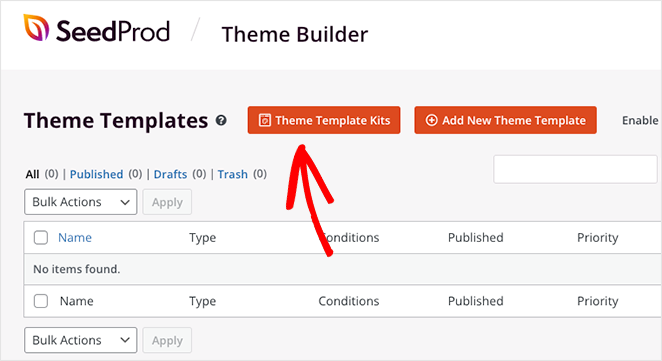
When the page opens, you’ll see a list of SeedProd’s pre-made site kits. Each kit comes with the pages you need to make a complete website, including niche pages like services, teams, portfolios, and more, depending on the template you choose.
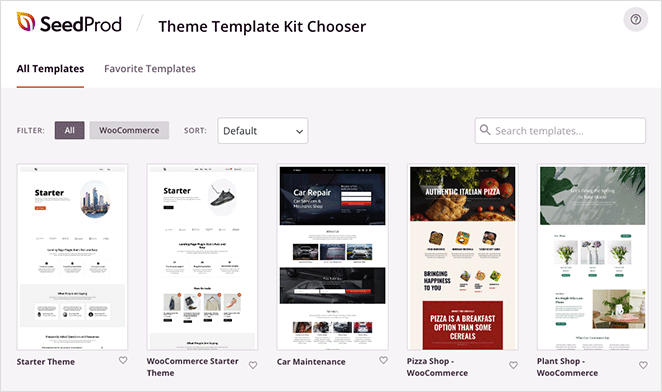
You can also use the search box to find a kit. For example, typing “Church” and hitting enter reveals a church website template.
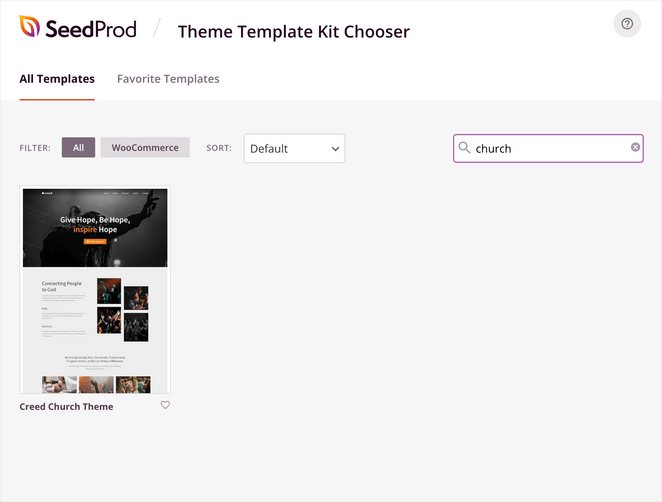
The great thing about SeedProd’s site kits is you can choose any you like and customize them to fit your church web design needs. Once you find one, simply hover over it and click the checkmark icon.
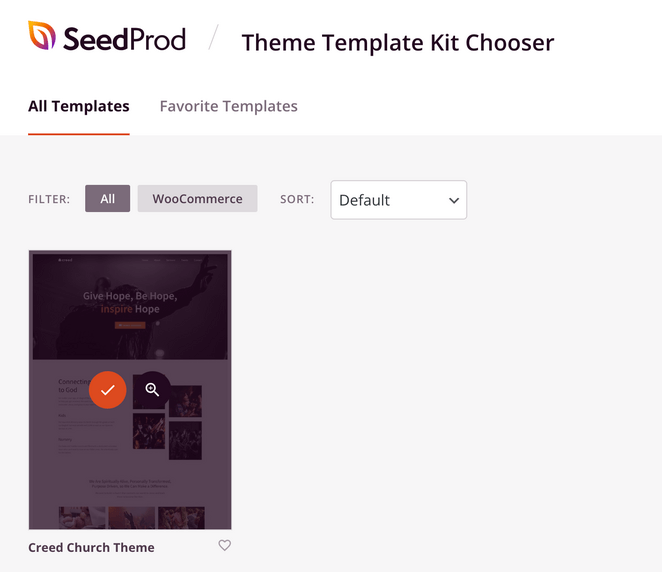
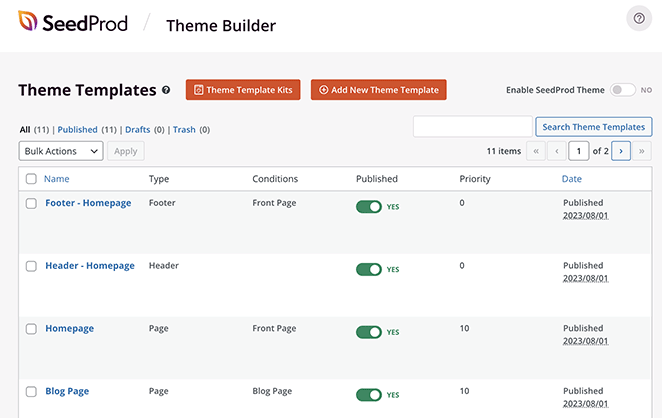
After a few seconds, you’ll see a page with all the templates that make up your theme. You can edit these and tailor their appearance in SeedProd’s drag-and-drop page builder.
Step 5. Build a Church Website Homepage
We’ll start by creating a custom homepage for your church website.
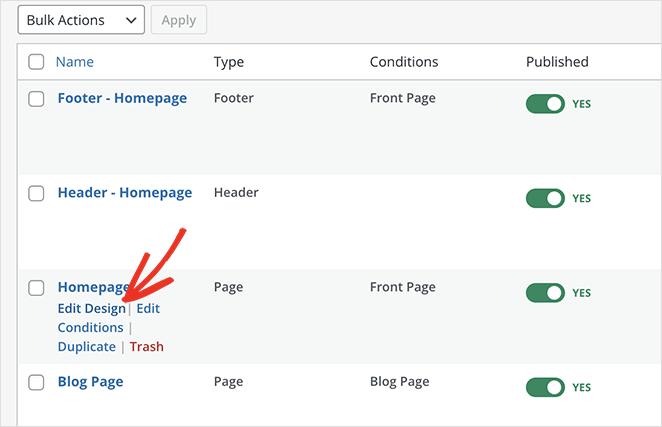
From the Theme Builder page, find your Homepage template, hover over it, and click the Edit Design link.
Your homepage template will open in SeedProd’s visual editor, where you can customize it without code. You’ll see a live preview on the right and customizable blocks and settings on the left.
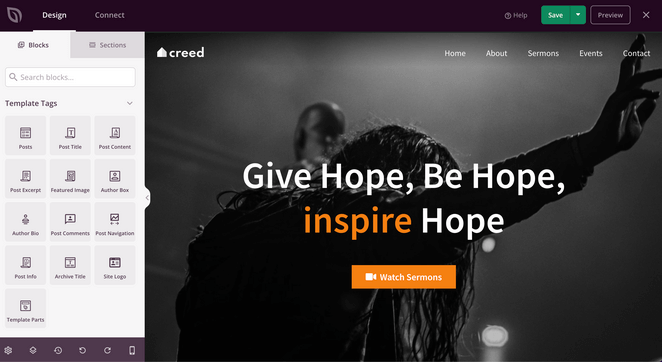
You can change everything on this web page, including the text content, images, buttons, social media icons, and more.
Let’s start by editing the main headline. To do this, click the headline on the preview, and you’ll see a content settings panel open on the left-hand side.
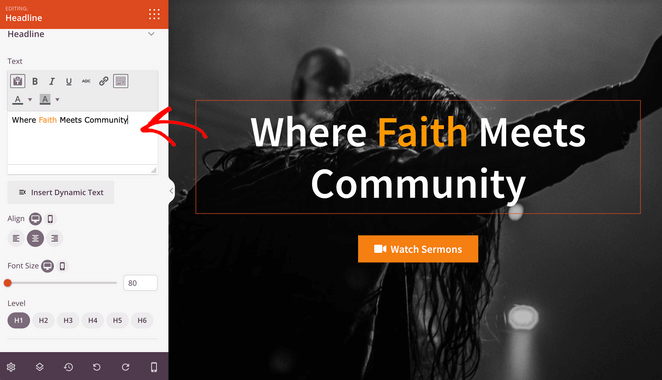
Now, highlight the demo text, delete it, and type in your own headline. You can edit the headline alignment, font size, and heading level in the same panel.
The Advanced tab has even more styling options to get your headline looking perfect. You can change fonts, colors, shadows, spacing, and even add animation effects.
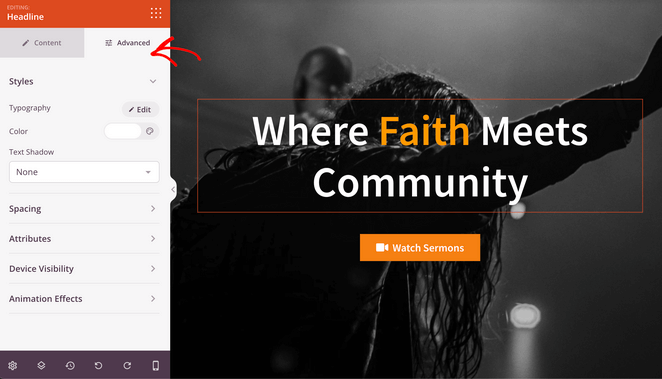
How’s that for ease of use?
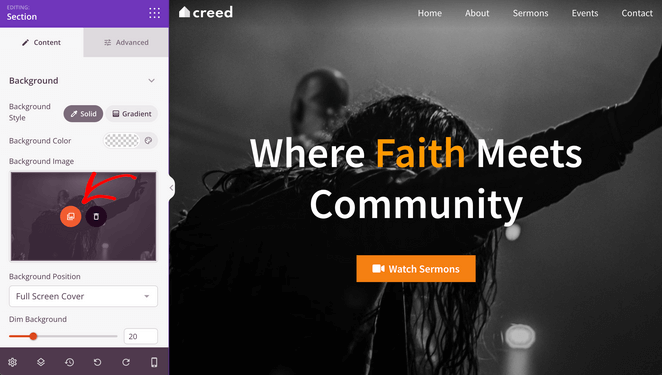
You can also change the main image at the top of your homepage. To do this, click the picture to open the section settings and click the gallery icon in the left-hand panel.
Your homepage is an excellent place to display reviews and testimonials from members of your congregation. This kind of social proof will help increase potential visitor’s trust in your church.
Plus, it’s easy to do with SeedProd’s Testimonials block. Simply find it in the blocks panel on the left and drag and drop it onto your homepage.
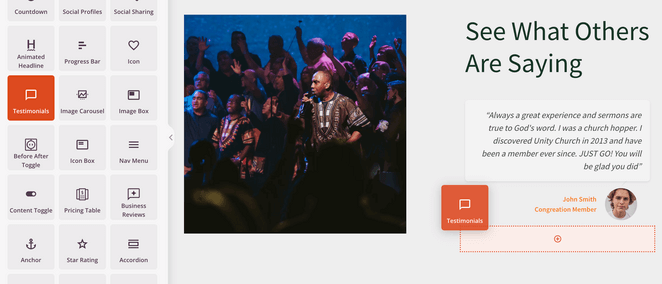
In the block settings, you can add multiple testimonials and a headshot, name, and title for each person.
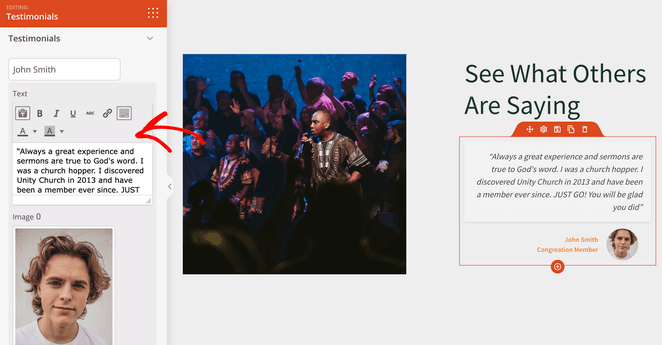
Additionally, you can enable a scrolling carousel to show many testimonials on one page without taking up too much space.
Continue customizing your homepage until it’s a welcoming front door to your website. Remember to click the Save button in the top-right corner to save your changes, then click the X icon to return to the Theme Builder dashboard.

Step 6. Create Your Church Website Pages
Besides your homepage, your website should have several key pages to help visitors find the information they need.
Here are some popular pages to include on your church website:
- About Us: On this page, you can provide more information about your church’s history, beliefs, and leadership.
- Sermons: This page should provide access to past sermons in audio or video format.
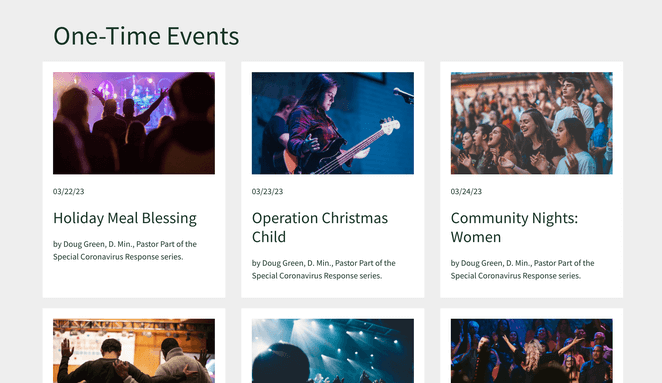
- Events Calendar: The Events page should list upcoming events at the church, such as Bible studies, potlucks, and concerts.
- Contact Us: Here, you can provide contact information for the church, such as the address, phone number, email address, and opening times.
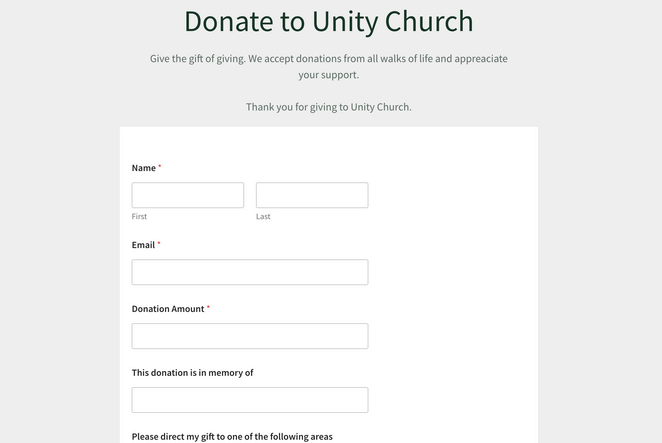
- Online Donations: The Donations page is a great place to provide information on how to give to the church, such as through online giving or mailing a check.
Building these pages is straightforward with SeedProd. For example, the Creed Church website kit has a ready-made About Us, Contact Us, Sermons, and Events page.
Sermons Page
To find these pages, navigate to Pages » All Pages from your WordPress dashboard. Then, you can hover over any page and click the “Edit with SeedProd” link to open it in the visual page builder.
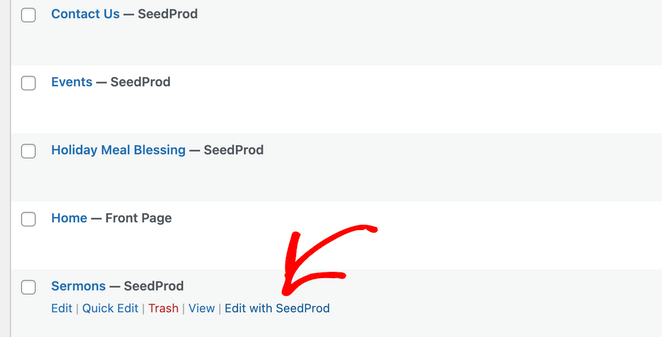
Customizing these pages follows the same process as the previous step. Simply click, drag, and drop to change the page content and put your church’s stamp on it.
For example, on the Sermons page, you can replace the images with a video block.
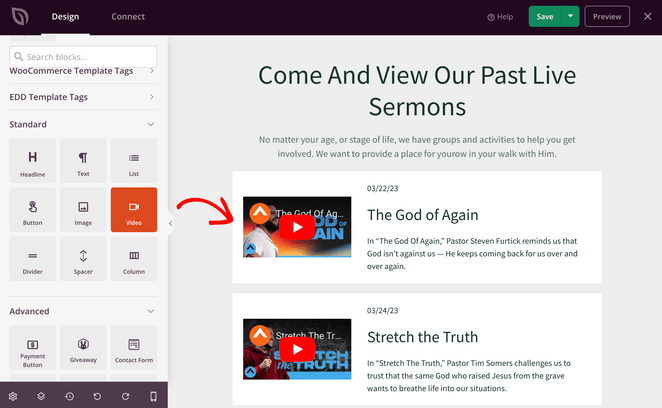
That way, you can add YouTube videos from past sermons to your website for people who may have missed the live sermon.
Events Page
Similarly, you can use Events to collect email addresses from users interested in attending. The Creed Church kit creates a single page for each event.
On each page, you can include details about the event and an opt-in form block for users to register their interest.
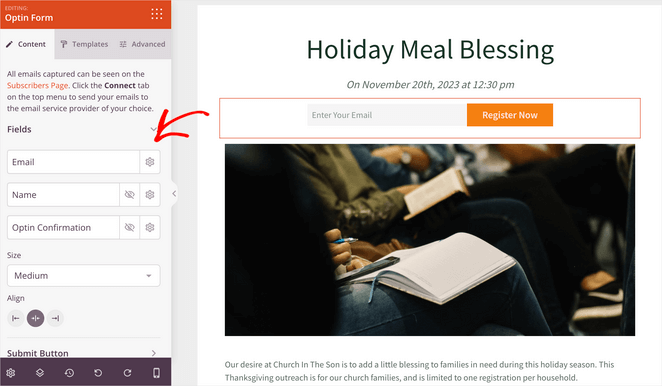
You can even link your opt-in form to your preferred email marketing service by clicking the Connect tab at the top of the page builder.
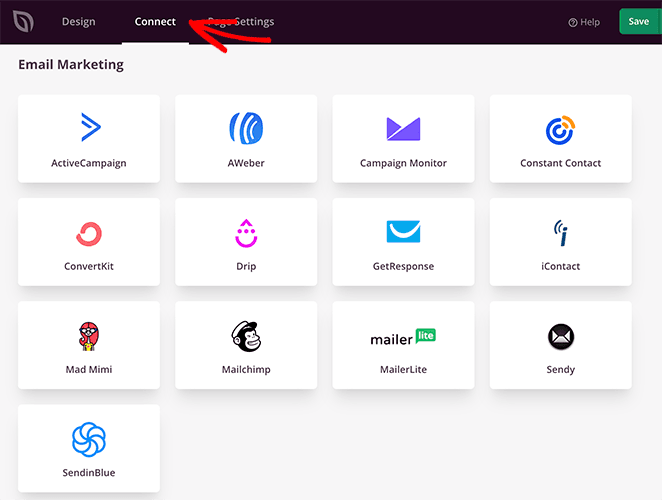
That way, you can add new contacts to your email list automatically.
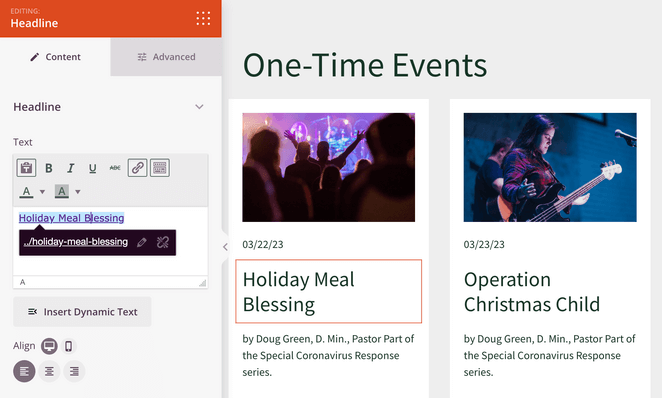
Once each event page is customized, you can link to them on your main Event Page.
Donations Page
A donations page is an excellent way to accept gifts from your congregation online. Since our template doesn’t include one, let’s look at how to create one.
First, navigate to Pages » Add New from your WordPress dashboard to open the WordPress editor. Then, give your page a name such as “Donations” or “Giving” and click Save Draft.
Now click the Edit with SeedProd button to open the page in the visual editor.
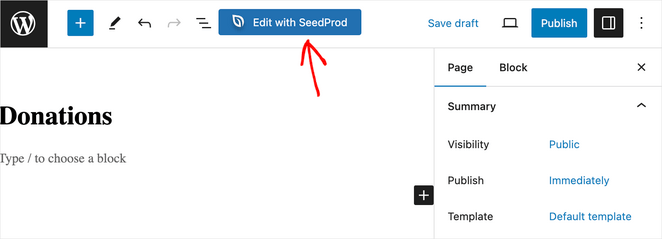
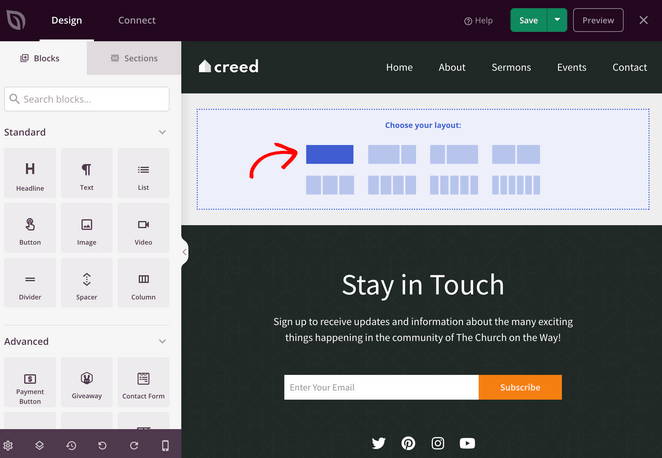
Next, choose a layout and drag blocks from the left-hand panel to add your page content.
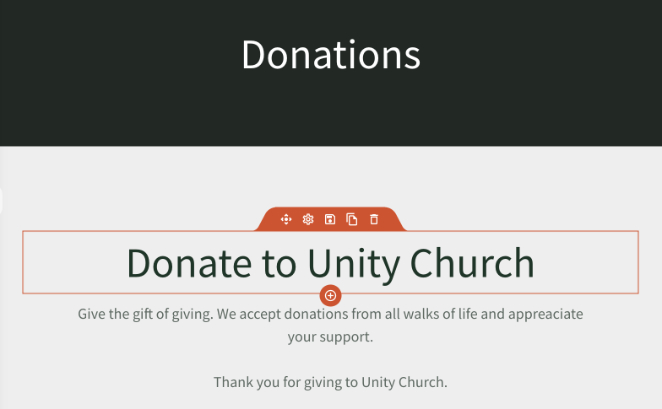
For instance, you can drag over the headline and text blocks to introduce users to giving online.
Then, you can add a method to accept donations, such as a donation form or payment button.
You can use WPForms, the best WordPress form builder plugin, to add a donation form to your church website. Its drag-and-drop form builder integrates seamlessly with SeedProd’s Contact Form block.
Follow these steps to create a church donation form, then drag the Contact Form block onto your donations page.
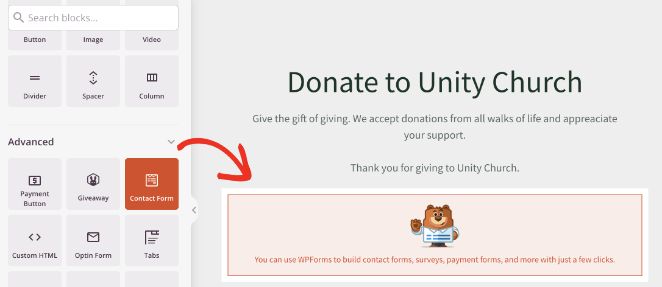
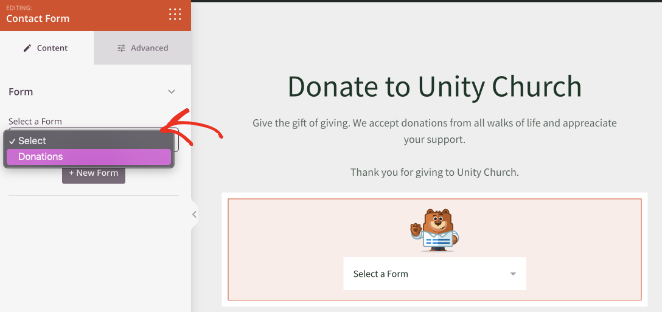
Now, in the block settings, choose your donation form from the dropdown menu.
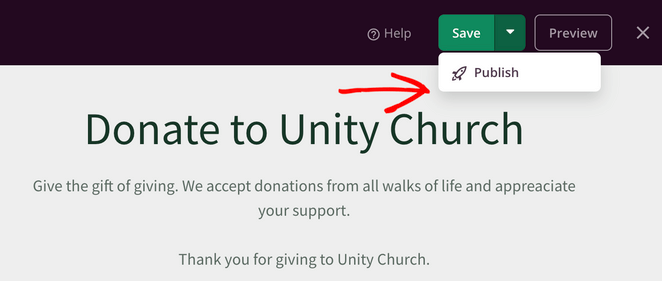
Continue customizing your donations page until you’re happy with how it looks. Then click Save and Publish to publish the changes.
Step 7. Add Your Church Logo
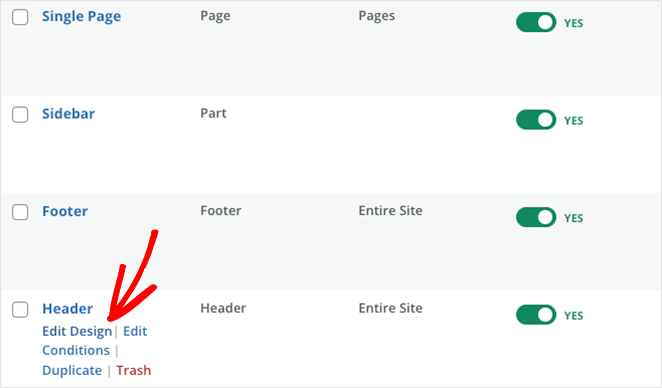
One more thing you’ll want to add to your church website is your logo. You’ll typically find this area in the header section of your theme templates, so head to the Theme Builder dashboard and click the Edit Design link on the Header template.
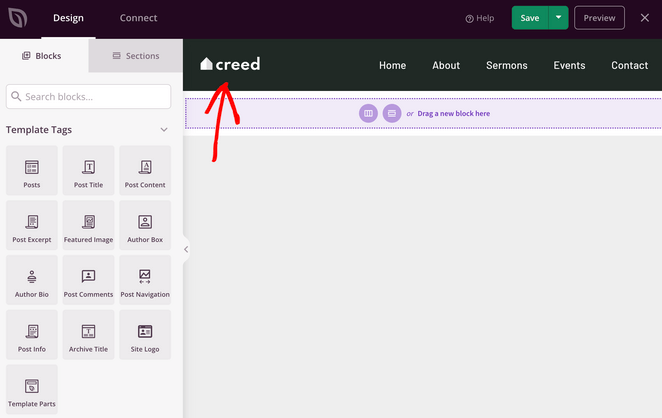
After opening the template, click the demo logo to open the image block settings.
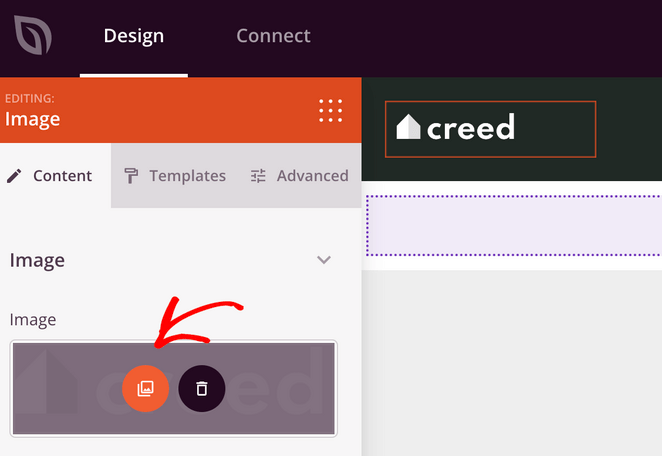
Then select the Gallery icon to open your WordPress Media Library and upload your own logo.
You can also edit your navigation menu to include your Donations page. Simply click the existing Nav Menu block, and in the block settings, click the Add New Item button.
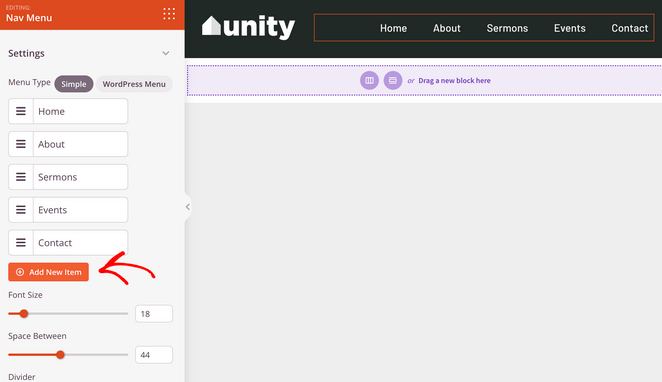
From there, you can enter the link name and URL and rearrange its order in the menu.
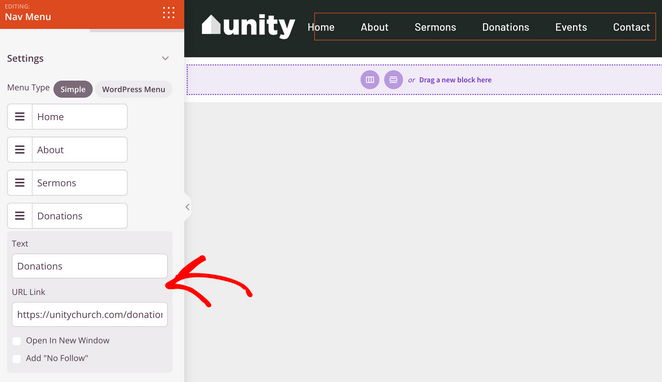
Now click Save to save your changes and exit the page builder.
Step 8. Launch Your Church Website
The final step is to launch your church website. If you’re not ready yet, you can always use SeedProd to create a coming soon page. This will hide your site until you’re ready to launch.
However, if you’re ready to publish your church website, follow these steps:
From the Theme Builder dashboard, find the heading titled “Enable SeedPod Theme.” Now click the toggle until it says “Yes.”

That’s it! Your new church website is live.
Here are some examples of the pages we’ve made in this tutorial:
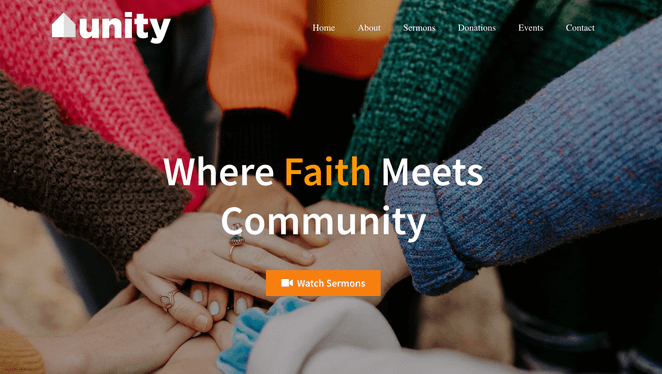
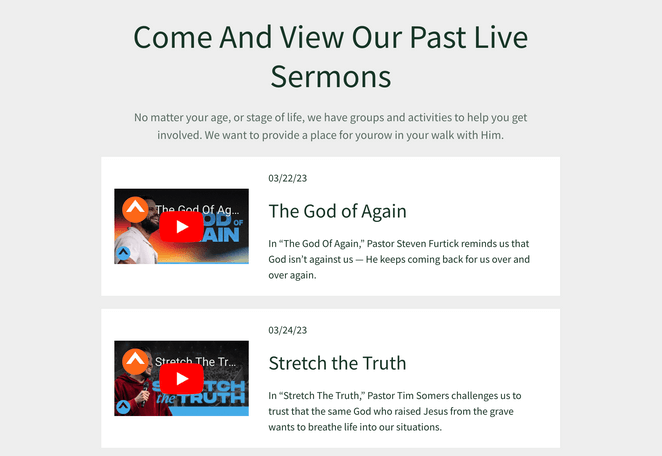
And the best thing? It didn’t require a single line of coding.
6 Essential Tips for Church Website Maintenance
Keeping your church website updated is key for member engagement and attracting new visitors. Here are some streamlined best practices you can follow:
- Keep Info Current: Always update service times, events, and contact details to avoid confusing visitors.
- Update Content Regularly: Fresh content like sermons and blogs keeps your site engaging and encourages repeat visits.
- Search Engine Optimization (SEO): Make your site easily discoverable by using relevant keywords and ensuring mobile responsiveness on mobile devices. SeedProd-built sites are mobile-friendly by default.
- Prioritize Security: Use strong passwords, update your platform, apps, and plugins, and back up your site regularly to protect against hacks.
- Audience Engagement: Utilize website tools like comment sections and contact forms, and stay active on social media to interact with your audience.
- Track Analytics: Use MonsterInsights for Google Analytics to monitor traffic, page views, and other key metrics to understand performance and identify areas for improvement.
Next Steps: Read More Website Building Tutorials
We hope this guide has helped you learn how to build a church website in WordPress.
Website building is effortless with SeedProd. You can customize any part of your church website to meet your organization’s needs. It’s fast, easy to use, and doesn’t require help from expensive developers.
Before you leave, you might also find the following best website-building tutorials helpful:
- How to Build a Personal Trainer Website in WordPress
- Como criar um site de restaurante passo a passo
- Como criar um site de fotografia no WordPress
- Como criar um site imobiliário no WordPress
- WooCommerce vs Shopify: Qual é a melhor plataforma de comércio eletrônico?
- Como criar um site de autor no WordPress sem codificação
- Como criar um site de um produto no WooCommerce
Obrigado pela leitura! Gostaríamos muito de ouvir sua opinião, portanto, fique à vontade para deixar um comentário com perguntas e feedback.
Você também pode nos seguir no YouTube, no X (antigo Twitter) e no Facebook para obter mais conteúdo útil para expandir seus negócios.

