Many readers ask us how to hide a WordPress site until it’s ready. It’s often because they want to update their site’s design but don’t want visitors to see broken or half-finished pages.
To answer their question, we generally recommend hiding WordPress websites behind a maintenance mode or coming soon page. That way, you can hide your unfinished website until it’s ready for the public to see.
In this guide, we’ll show you how to make your WordPress site private, so you can work on it without interruptions.
Table of Contents
Why Hide Your WordPress Site Until It’s Ready?
We can think of several reasons to hide your WordPress site during development, including:
- Professionalism: Showing an unfinished site can create a negative first impression. Keeping your site hidden until it’s polished ensures users see your brand at its best.
- User Experience: Unfinished features may confuse or frustrate visitors. By hiding your site, you prevent users from seeing these issues.
- Search Engine Optimization (SEO): Search engines value content quality and relevance. If your site isn’t complete or has placeholder content, it could negatively impact your SEO. Keeping your site hidden avoids ranking issues until you’re ready to launch.
- Security: A hidden site is less likely to attract unwanted attention from potential hackers. Keeping it hidden reduces the risk of security threats.
- Testing and Debugging: During development, you’ll likely encounter bugs and glitches. Having your site hidden allows you to test and debug without affecting real users.
- Content Refinement: Developing a website involves refining content, adjusting layouts, and optimizing images. Keeping the site hidden provides a controlled environment for these changes without the pressure of public scrutiny.
- Client Approval: If you’re working on a website for a client, keeping it hidden allows you to share progress with them privately. That way, they can provide feedback and approval before the site goes live.
So how do you go about hiding your WordPress site? We’ll cover that next.
Hide Your WordPress Site Until Ready with SeedProd
The simplest method to make your site private is by activating maintenance mode. We recommend using the SeedProd plugin for this.

SeedProd is the best WordPress landing page and theme builder plugin. With its easy drag-and-drop builder, you can build custom WordPress themes and high-converting landing pages in minutes.
You can also limit access to your website while it’s under construction by activating Coming Soon or Maintenance Mode. Plus, user roles allow you to disable the maintenance screen for logged-in users.
With this in mind, let’s look at how to hide your WordPress site with SeedProd.
Video Walkthrough
Step 1. Set Up Your New WordPress Website
When you create a WordPress website for the first time, you’ll need to buy web hosting. For that, we recommend taking a look at Bluehost.

Bluehost offers affordable WordPress hosting and a free domain name, all in a single plan. It’s an officially recognized WordPress hosting provider, powering over 2 million WordPress websites.
Bluehost is an excellent option if you’re a new WordPress user because it automatically sets up WordPress for you. They also let you create a free business email address for the same domain name.
Siteground is another great alternative for hosting your website. If you need more help getting started, read this guide on how to create a WordPress website.
Next, you’ll need to install a WordPress maintenance mode plugin.
Step 2. Install the SeedProd Plugin
Now, you’ll need to get a copy of SeedProd. Once you’ve created your account, head to the login page to access your account dashboard.
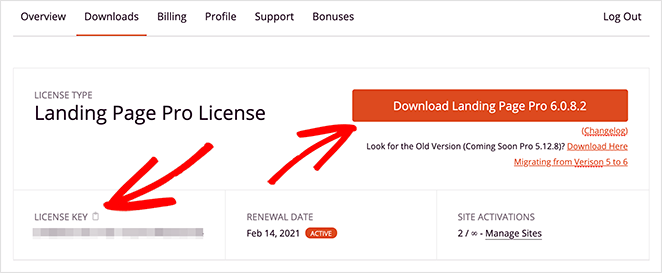
Click View License Key, Details, and Downloads as shown below.

Then, copy your license key and click Download Landing Page Pro to save the maintenance plugin to your computer.
Next, install and activate the SeedProd plugin on your WordPress site. If you’re not familiar with how to do this, you can check out this step-by-step tutorial to install WordPress plugins.
Upon activating the plugin, you’ll see a page asking you to enter your license key. If you recall, you copied this when downloading the plugin.

Simply enter your key and click Verify Key.
Step 3. Create Your Maintenance Mode Page
SeedProd makes it super-easy to design and customize maintenance pages in WordPress. This is important because it allows site visitors to still interact with your site, even if it’s hidden.
You can completely customize the entire look of your page in the visual builder and also add the following landing page elements with drag-and-drop content blocks:
- Email Signup Form – Boost subscribers to your email list and get updates for when you’re live again.
- Contact Form – Let people get in touch and ask questions through a modern WordPress contact form.
- Social Profiles – Direct visitors to your social profiles for updates and engagement while your site is hidden.
- WooCommerce Blocks – Embed add-to-cart buttons, product grids, and more to your page.
- Social Share Buttons – Encourage users to raise awareness about your new design or features on social media.
- Countdown Timer – Give people a visual idea of when they can access your main site again.
- Plus, a whole lot more.
To begin designing your landing page, click the Set up a Maintenance Mode Page button.
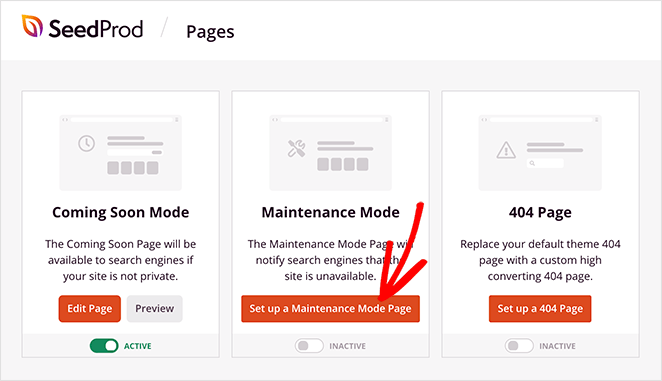
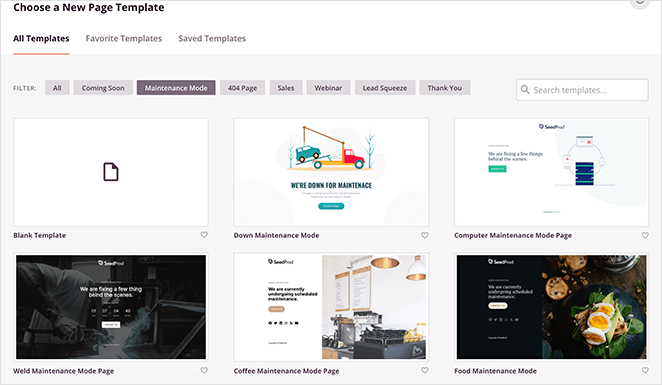
SeedProd then asks you to choose a theme for your page.
With a growing library of landing page themes and templates to choose from, there’s bound to be something that suits your needs. If there isn’t, you can always select the blank template to start from scratch.
Step 4. Customize Your Maintenance Mode Page
You’ll be taken to the drag-and-drop page builder as soon as you’ve picked a theme.
Here you can add new page elements, customize your design, and add a personal message for visitors. You can also upload a custom background image to match your branding.
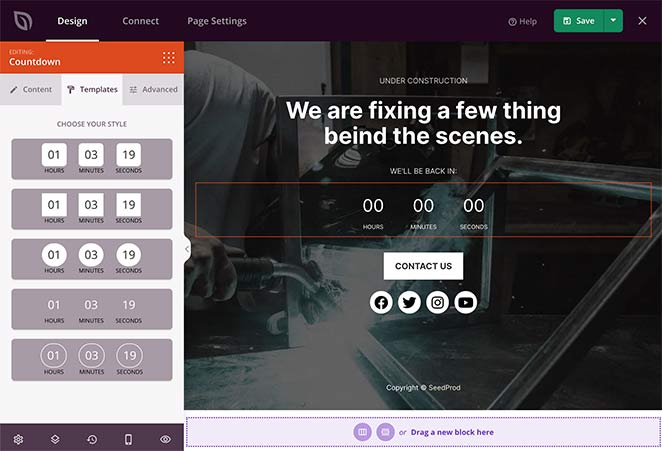
Here’s a full step-by-step guide to putting your WordPress site in Maintenance mode using SeedProd.
Step 5. Choose When to Show Your Maintenance Page
Most maintenance mode plugins display only one maintenance page for the entire website. However, SeedProd is more advanced, allowing you to choose which pages to hide.
Initially, you may want to hide your entire site until it is ready. In the future, you may want to hide specific pages or posts.
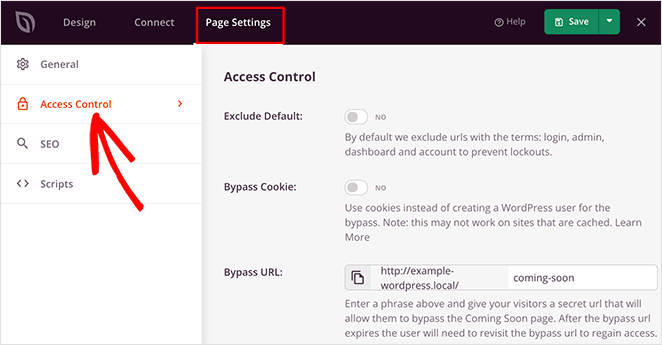
So, understanding this feature will be helpful for future development. To manage where you display your maintenance page, go to the Page Settings in the SeedProd builder and click on Access Control to access the settings.
Next, scroll down to the Include/ Exclude URLs section. This is where you can tell SeedProd how to hide your site.
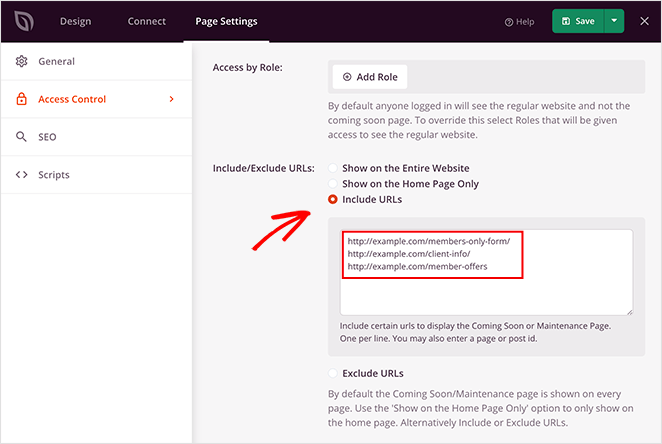
Here’s what the different access control settings mean:
- Show on the Entire Website: This is the default setting and the best choice to hide your WordPress site until it’s ready. Anyone who tries to view any page on your site will see the maintenance mode page on the front end.
- Show on the Home Page Only: You can use this to show your new page only on the homepage of your website. All other pages and posts will still be in public view.
- Include URLs: Use this setting to choose specific pages for your maintenance page to show. For example, if you’re writing new content for one of your pages, you can hide just that 1 page and leave everything else on the site visible.
- Exclude URLs: This setting does the opposite of Include URLs. It hides the entire site except for the pages you specify. Choose this to keep certain pages accessible while hiding the rest.
Allow Access to a Hidden WordPress Site
What if you need to give access to someone who can’t log in to your website? There’s a pretty simple solution.
In the Page Settings area, you can create a secret access link that lets people bypass the page hiding your WordPress site.
On the right-hand side of your screen, you can create a secret phrase added to a unique bypass URL.
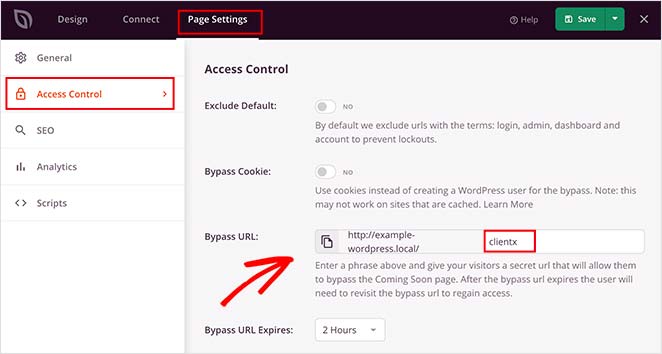
Then, you can send this URL to anyone you’d like to have access to your site without them seeing the construction page.
It’s also possible to add a password to your landing page. This will let you grant access to specific people, such as clients.
You can follow this guide to learn all about password protection in WordPress.
Below the Bypass URL section is the Bypass by IP area. This allows visitors from specific IP addresses to bypass your landing page automatically.
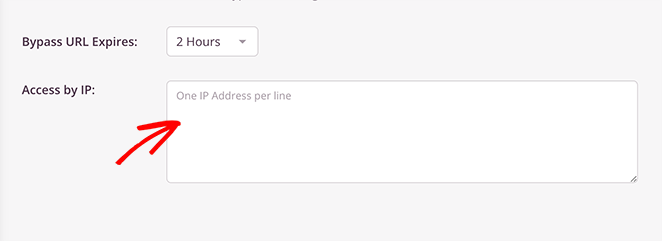
All you have to do is add each IP address on a new line in the field provided.
Step 5. Hide Your WordPress Website
When you’re happy, it’s time to publish your page. All you have to do is select the dropdown arrow next to the Save Changes button in the top-right corner and click Publish.
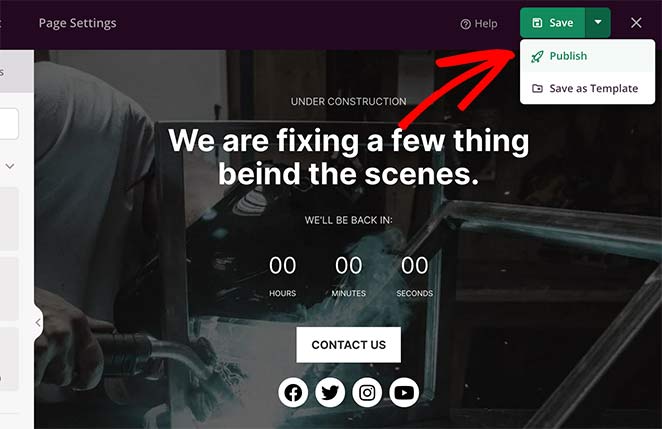
SeedProd will then show a lightbox popup notifying you that your page is live.
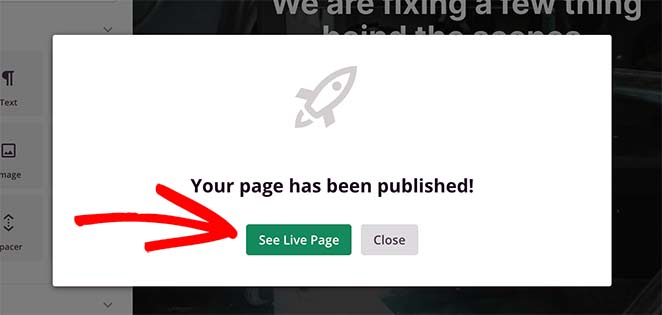
Then, you can click the See Live Page button to see what your maintenance page looks like.
Here’s an example from a page we created on our test website:

Now let’s enable your maintenance page, which you can do by heading back to SeedProd » Landing Pages, then turning the Maintenance Mode toggle from the Inactive position to Active.
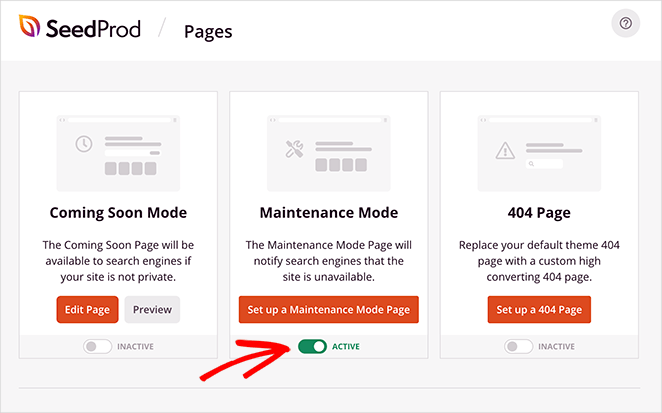
Congrats! You’ve hidden your WordPress site.
How Do You Turn Off WordPress Maintenance Mode?
If you’ve followed the steps above to set up maintenance, the time will come when you want to disable it.
To turn off WordPress maintenance mode, head to the SeedProd settings page by clicking the SeedProd icon in your WordPress admin area.
Then, click the toggle under the Maintenance Mode section to turn it from Active to Inactive.
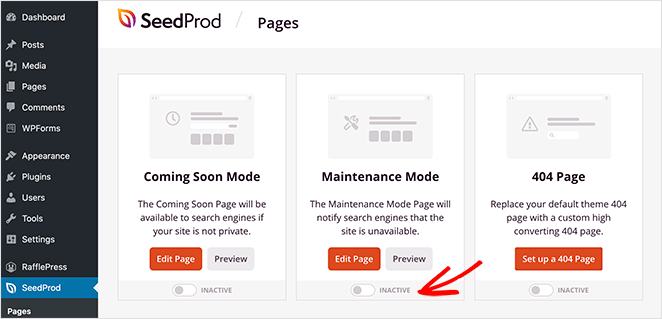
Now, your site is no longer hidden from website visitors.
What if you don’t want to use a plugin to set up a maintenance page? We have instructions for that next.
Hide Your WordPress Site Until Ready Without a Plugin
To enable maintenance mode without a plugin, you’ll need to edit your theme’s functions.php file.
We’ve put together a code snippet you can use to make things a little easier. If you’re not familiar with how to do this, it’s best to ask your site developer to do this for you.
Simply edit your theme’s functions.php file and paste in the following code:
function maintenance_mode() {

      if ( !current_user_can( 'edit_themes' ) || !is_user_logged_in() ) {wp_die('Maintenance.');}

}
add_action('get_header', 'maintenance_mode');
To disable the maintenance mode and let users see your website, comment out the last line like this:
// add_action();
How to Hide Your WordPress Site from Google
You’d typically hide your site from Google to prevent it from being indexed by search engines. This stops your web pages from appearing in search results.
You can hide your site from Google in your WordPress settings, using a plugin from WordPress.org or by editing one of your site files. Let’s take a look at each method.
Method 1: Hide Your Site in WordPress Settings
This method will prevent search engines from indexing your website and displaying it in search results to potential visitors. However, users will still be able to access your site if they visit the direct URL.
To hide your WordPress site until ready, go to Settings » Reading and select ‘Discourage search engines from indexing this site.’ This will make your site invisible to search engines and visitors.

Method 2: Hide Your Site From Google With a Plugin
To hide your site from Google with a plugin, start downloading and installing the All In One SEO plugin. Once you’ve activated it, head to any post or page and click Edit.
Then scroll to below the editor, where you’ll see the All in One SEO settings. To hide posts and pages from Google, scroll down to the section labeled “NOINDEX this page/post.”
Then click the checkbox to stop search engines from showing your post or page in search results.
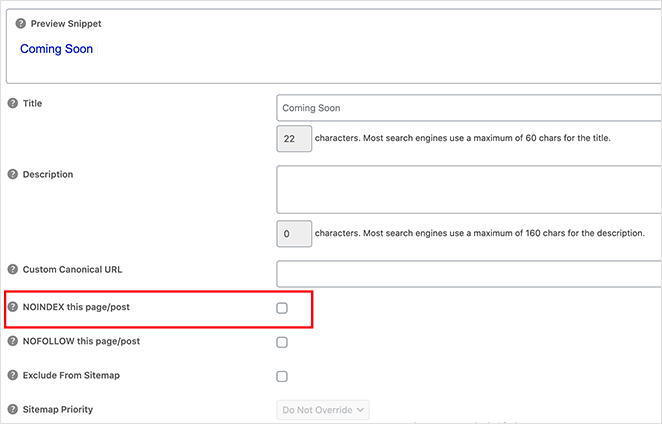
Publish your changes, and the plugin will hide your content for that specific post or page from Google.
Method 3: Hide Your Site From Search Engines Using robots.txt File
Alternatively, you can hide your website from search engines by editing your site’s robots.txt file. This might be a little tricky for beginners, so only use this method if you’re sure you know what you’re doing.
You can edit your robots.txt file by connecting to your site using an FTP client or the ‘File Manager’ in your WordPress hosting provider.
Then you’ll have to add these lines of code to your robots.txt file.
User-agent: *
Disallow: /your-page/
Make sure you replace ‘your page’ with the URL you’d like to hide and save your changes.
Testing Your Website Visibility
After hiding your WordPress site, it’s important to confirm that it is indeed hidden. Testing your site’s visibility is straightforward but essential to confirm your setup works.
The first step is to log out of your WordPress account. This is because, as an administrator, you might still have access to the website while it’s hidden from the public. Your website needs to appear as it would to an ordinary visitor or user.
After logging out, clear your browser cache. This step is important to ensure your browser doesn’t display a cached version of your site.
Next, try accessing your WordPress site by typing its URL into your browser’s address bar. Your site should show the maintenance mode or coming soon page set by your plugin instead of your website’s content. The message that appears will depend on what you set up in the plugin settings.
In case you have another device (like a smartphone or a different computer) available, try accessing the site from there as well. Different devices might have different cache settings, so it’s a good practice to check from multiple sources.
Remember to check how your site appears on various browsers like Google Chrome, Firefox, Safari, and others, if possible, as different browsers may render your site differently.
In addition to the visual check, you can also use online tools like IsItWP’s WordPress Website Visibility tool to check if your site is visible to search engines.
If your website successfully shows the maintenance mode or coming soon page across all devices and browsers, you can be confident that it’s successfully hidden. However, if your site’s content is still visible, you might need to revisit the plugin settings and ensure they’re configured correctly.
If problems persist, consider reaching out to the plugin support or referring to their help documentation.
Frequently Asked Questions
How do I password-protect my WordPress site?
To password protect your WordPress site, you can use a password protection plugin or add a password to individual pages. Check out this ultimate guide on password-protecting WordPress for more details.
How do I create a staging site in WordPress?
To create a staging site in WordPress, you can use a plugin like Duplicator. It allows you to create a duplicate of your site that you can work on without affecting the live site. After making changes to the staging site, you can push them to the live site when you’re ready.
Get Started with Hiding Your WordPress Site
You now know the simplest methods for making your WordPress site private until it’s ready for public viewing.
SeedProd’s easy drag-and-drop page builder makes it so easy to hide your website that you can do it in minutes, with no coding required. And the best thing? It’s one of the easiest ways to increase your conversion rates.
Ready to make your WordPress site private?
We hope you found this guide helpful. If you’re interested in more helpful WordPress tutorials, check these out:
- How to Make a Sales Page With WordPress (Step-by-Step)
- 6+ Best Photo Gallery WordPress Plugins (Expert Pick)
- How to Customize WordPress Post Excerpts (Without Code)
Thanks for reading! We’d love to hear your thoughts, so please feel free to leave a comment with any questions and feedback.
You can also follow us on YouTube, X (formerly Twitter), and Facebook for more helpful content to grow your business.

